SMA SUNNY ISLAND 8.0H Installation Manual
Off-grid inverter
Hide thumbs
Also See for SUNNY ISLAND 8.0H:
- Operating manual (76 pages) ,
- Quick reference manual (310 pages) ,
- Installation manual (112 pages)

Related Manuals for SMA SUNNY ISLAND 8.0H


Summary of Contents for SMA SUNNY ISLAND 8.0H
- Page 1 Off-grid Inverter SUNNY ISLAND 8.0H / 6.0H Installation Manual SI80H-60H-OffGrid-IA-en-11 | IMEN-SI80H | Version 1.1...
-
Page 3: Table Of Contents
SMA Solar Technology AG Table of Contents Table of Contents Information on this Document..... . . 9 Safety ......... 12 Intended Use. - Page 4 Table of Contents SMA Solar Technology AG Connecting the Stand-Alone Grid/Multicluster Box ..40 6.10 Connecting an External Energy Source ....43 6.11...
- Page 5 SMA Solar Technology AG Table of Contents 6.25 Connecting the Control Cable for the Battery-Room Fan ..64 6.26 Connecting the Control Cable for the Electrolyte Pump of the Battery........65 6.27...
- Page 6 Table of Contents SMA Solar Technology AG 7.11 Changing the Battery Protection Mode ....98 7.12 Setting the Resistance of the Battery Cable ....100 7.13...
- Page 7 SMA Solar Technology AG Table of Contents 7.23 Changing the Automatic Frequency Synchronisation ..114 7.24 Functional Test ........115 7.24.1...
- Page 8 Technical Data ....... . . 144 12.1 Sunny Island 8.0H ....... . . 144 12.2 Sunny Island 6.0H .
-
Page 9: Information On This Document
This document is intended for skilled persons. Only skilled persons are allowed to perform the tasks set forth in this document (see Section 2.2 "Qualification of Skilled Persons", page 13). Additional Information Additional information is available at www.SMA-Solar.com: Document title Document type Battery Management in Off-Grid Systems... - Page 10 1 Information on this Document SMA Solar Technology AG Typographies Typography Usage Example bold • Display messages • Connect PE to AC2Gen/Grid. • Parameters • Select parameter 235.01 GnAutoEna and set it to • Connections Off. • Slots • Elements to be selected •...
- Page 11 SMA Solar Technology AG 1 Information on this Document Abbreviations Abbreviation Designation Explanation Alternating Current ‒ Direct Current ‒ Flooded Lead Acid Batteries ‒ FSPC Frequency Shift Power Control ‒ Light-Emitting Diode ‒ Mean Sea Level ‒ Photovoltaics ‒ Quick Configuration Guide ‒...
-
Page 12: Safety
For safety reasons, it is not permitted to modify the product or install components that are not explicitly recommended or distributed by SMA Solar Technology AG for this product. Only use the Sunny Island in accordance with the information provided in the enclosed documentation. -
Page 13: Qualification Of Skilled Persons
2.2 Qualification of Skilled Persons Skilled persons must have the following qualifications: • Training in off-grid systems from SMA Solar Technology AG • Training in how to deal with the dangers and risks associated with installing and using electrical devices and batteries •... -
Page 14: Safety Precautions
2 Safety SMA Solar Technology AG 2.3 Safety Precautions Electric Shock High voltages are present in the off-grid system and in the off-grid inverter. The off-grid inverter can start automatically from standby. Observe the following safety rules before opening the off-grid inverter. - Page 15 SMA Solar Technology AG 2 Safety Burn Hazards Some parts of the enclosure can become hot during operation. • During operation, touch the off-grid inverter on the enclosure lid only. Short-circuit currents in the battery can cause heat build-up and electric arcs. Observe the following safety rules before working on the battery: •...
-
Page 16: Scope Of Delivery
3 Scope of Delivery SMA Solar Technology AG Scope of Delivery Check the delivery for completeness and any externally visible damage. Contact your specialist dealer if the delivery is incomplete or damaged. Figure 2: Components included in the scope of delivery... - Page 17 SMA Solar Technology AG 3 Scope of Delivery Position Quantity Description Filler-plug M25 Black RJ45 data cable CAT5e, 2 m Silicone tube 10 mm x 500 mm Cable support sleeve for 1 cable Cable support sleeve for 2 cables Installation manual, operating manual, Technical description, Parameter...
- Page 18 3 Scope of Delivery SMA Solar Technology AG "Communication for Multicluster System" Order Option The following components are added to the scope of delivery. Figure 4: Components of the "Communication for multicluster system" order option Position Quantity Description SI-SYSCAN.BGx* , installed in the master at the factory SI-COMSMA.BGx** , installed in the master at the factory...
-
Page 19: Product Description
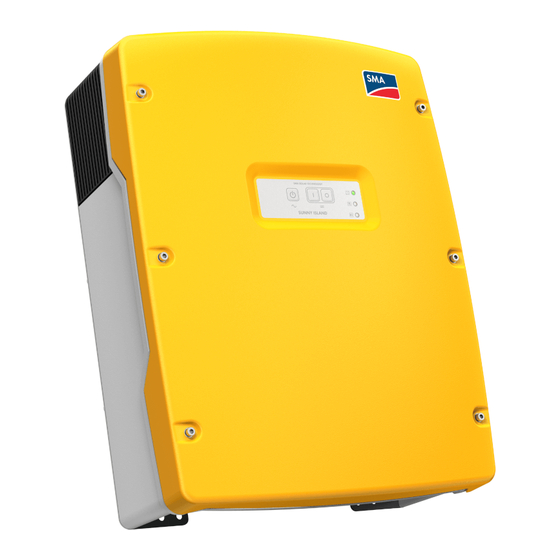
SMA Solar Technology AG 4 Product Description Product Description 4.1 Sunny Island The Sunny Island is a bidirectional off-grid inverter and forms a stand-alone grid. Figure 5: Design of the Sunny Island Position Description Ventilation grid Type label Control panel Enclosure lid The Sunny Island supplies AC loads in the stand-alone grid from a battery or charges the battery with the energy provided by sources on the AC side. -
Page 20: Type Label
The information on the type label is intended to help you in the safe use of the off-grid inverter and will be needed when you contact the SMA Service Line. The type label must remain permanently attached to the off-grid inverter. -
Page 21: Symbols On The Type Label
SMA Solar Technology AG 4 Product Description Symbols on the Type Label Symbol Description Explanation Danger to life due to high The off-grid inverter operates at high voltages voltages. All work on the off-grid inverter must be carried out by skilled persons only (see Section 2.2). -
Page 22: Off-Grid Inverter Control Panel
4 Product Description SMA Solar Technology AG 4.3 Off-Grid Inverter Control Panel Figure 7: Layout of the control panel Position Symbol Description Status Explanation Start-stop button ‒ Press the start-stop button to start or stop the off-grid system. In display messages on the Sunny Remote Control, the start-stop button is referred to as TSS. - Page 23 SMA Solar Technology AG 4 Product Description Position Symbol Description Status Explanation Grid LED No voltage is present at the connection of the external energy source. Glowing External energy source is connected. green Glowing The off-grid inverter is synchronising orange the stand-alone grid to the external energy source.
-
Page 24: Sunny Remote Control
4 Product Description SMA Solar Technology AG 4.4 Sunny Remote Control You can configure and control the off-grid system centrally with the Sunny Remote Control display. For a multicluster system, each master must be connected to a Sunny Remote Control. Error messages for the individual clusters are configured and displayed on the corresponding Sunny Remote Control. -
Page 25: Communication
SMA Solar Technology AG 4 Product Description 4.5 Communication The off-grid inverter is equipped with two interface slots for the connection of SMA communication interfaces. The SI-COMSMA.BGx communication interface is an additional RS485 interface on the off-grid inverter. You can connect the off-grid inverter to the following products using RS485: •... -
Page 26: Mounting
5 Mounting SMA Solar Technology AG Mounting 5.1 Mounting Sequence Procedure Mount/install the Multicluster Box, if present. Multicluster Box installation manual Select the mounting location for the off-grid inverter and mount Section 5.2 … 5.3 the off-grid inverter. Mount the Sunny Remote Control. -
Page 27: Selecting The Mounting Location For The Off-Grid Inverter
☐ The mounting location must be less than 3,000 m above MSL. For altitudes over 2,000 m above MSL, contact the SMA Service Line. For altitudes above 2,000 m over MSL, the power is reduced by 0.5% for every 100 m. - Page 28 5 Mounting SMA Solar Technology AG Dimensions for wall mounting: Figure 9: Dimensions of the wall mounting bracket and dimensions of the drill holes for the optional anti-theft device in the enclosure of the off-grid inverter SI80H-60H-OffGrid-IA-en-11 Installation Manual...
- Page 29 SMA Solar Technology AG 5 Mounting Observe minimum clearances: Figure 10: Minimum clearances • Observe minimum clearances to walls, other off-grid inverters or other objects. This will allow for sufficient heat dissipation. Multiple off-grid inverters installed in areas with high ambient temperatures There must be sufficient clearance between the individual off-grid inverters to ensure that inverters cannot take in the cooling air of adjacent inverters.
-
Page 30: Mounting The Off-Grid Inverter
5 Mounting SMA Solar Technology AG Observe permitted mounting position: Figure 11: Permitted and prohibited mounting positions • Mount the off-grid inverter in a permitted mounting position. The control panel should be at eye level. This will make it easier to operate the buttons and view the LED signals. - Page 31 SMA Solar Technology AG 5 Mounting Risk of injury due to the heavy weight of the off-grid inverter • Take into account the weight of the off-grid inverter (see Section 12 "Technical Data", page 144). • Hook the off-grid inverter onto the wall mounting bracket.
-
Page 32: Electrical Connection
6 Electrical Connection SMA Solar Technology AG Electrical Connection 6.1 Overview of the Connection Area Figure 12: Enclosure openings and connection areas of the off-grid inverter Position Description DC+ terminal DC– terminal Cable channel for DC+ cable Cable channel for DC– cable... -
Page 33: Organising The Electrical Connection
SMA Solar Technology AG 6 Electrical Connection Position Description Cable feed-through plate Enclosure opening for DC − Enclosure opening for DC+ Enclosure opening for PE Enclosure opening for AC2 Enclosure opening for AC1 ExtVtg connection* AC1 terminal AC2 terminal * No function 6.2 Sequence for the Electrical Connection... - Page 34 6 Electrical Connection SMA Solar Technology AG Procedure If present: Section 6.10 Connect the external energy source. Insert filler-plugs. Section 6.11 Install protective devices for the loads. Section 6.12 If AC sources are present in the stand-alone grid (e.g. PV inverters): Section 6.13...
-
Page 35: Earthing The Tn Off-Grid System
SMA Solar Technology AG 6 Electrical Connection Procedure If present: Section 6.28 Connect the auxiliary contact of the transfer switch. If present: Section 6.29 Connect the external generator request. 6.3 Earthing the TN Off-Grid System If the off-grid system is a TN system, earth the off-grid system as follows: 1. -
Page 36: Earthing The Battery
6.5 Earthing the Battery If you you wish to the battery, you can do so at the positive pole or at the negative pole using a protective conductor. SMA Solar Technology AG does not recommend earthing the battery. Conductor cross-section: You must determine the required conductor cross-section of the PE, taking into account the applicable local standards and directives. -
Page 37: Connecting The Batfuse To The Off-Grid Inverter
SMA Solar Technology AG 6 Electrical Connection • Fasten the clamping bracket using a M6x16 hexagon socket screw and a conical spring washer (torque: 4 Nm ... 5.7 Nm). The teeth of the conical spring washer must face the clamping bracket. - Page 38 6 Electrical Connection SMA Solar Technology AG Additionally required material (not included in scope of delivery): ☐ 2 x M8 terminal lug, not wider than the outer diameter of the cable Cable requirements: ☐ Conductor cross-section: 50 mm² … 95 mm²...
-
Page 39: Installing Protective Devices For Dc Sources
SMA Solar Technology AG 6 Electrical Connection Damage to the off-grid inverter due to reverse polarity • Install the DC+ cable in the cable channel for DC+ cables. Look for the + designation in the cable channel. • Fasten the DC+ cable to the DC+ terminal using an M8x20 screw and an Allen key (AF 6) (torque: 4 Nm ... -
Page 40: Connecting Pe
6 Electrical Connection SMA Solar Technology AG 6.8 Connecting PE You can connect PE to the AC1 Loads/SunnyBoys PE and AC2 Gen/Grid PE terminals. You are free to decide which terminal you connect the protective conductor to. AC connection with three-core cables To connect the stand-alone grid and the external energy source, you can use three-core cables and install PE together with the corresponding N and L (see Section 6.9 and 6.10). - Page 41 SMA Solar Technology AG 6 Electrical Connection Danger to life due to fire In case of a short circuit, the short-circuit currents from the external energy source flow through the unprotected cables between the off-grid inverter and the AC sub-distribution.
- Page 42 6 Electrical Connection SMA Solar Technology AG • For a single-phase parallel single-cluster system, the cable length and the conductor cross- section must be identical from every off-grid inverter to the AC sub-distribution. This will allow for stable and symmetric operation.
-
Page 43: Connecting An External Energy Source
SMA Solar Technology AG 6 Electrical Connection 6.10 Connecting an External Energy Source If you are installing an external energy source, connect the generator or the electricity grid to the AC2 terminal of the off-grid inverter. The AC2 terminal is single-phase. For a multicluster system, connect the external energy source directly to the Multicluster Box (see the Multicluster Box installation manual). -
Page 44: Inserting Filler-Plugs
6 Electrical Connection SMA Solar Technology AG Danger to life from electric shock due to incorrect connection of the neutral conductor If you connect the neutral conductor incorrectly, the earthing concept of the off-grid system will not work. In a TN system, the neutral conductor must be permanently connected between the AC1 and AC2 terminals. -
Page 45: Installing Protective Devices For Ac Sources In The Stand-Alone Grid
SMA Solar Technology AG 6 Electrical Connection 6.13 Installing Protective Devices for AC Sources in the Stand-Alone Grid If you install AC sources in the stand-alone grid, you must install the following protective devices in the AC sub-distribution: • Protect the connection cable of every AC source (e.g. PV inverter) with a miniature circuit- breaker. -
Page 46: Connecting The Sunny Remote Control
6 Electrical Connection SMA Solar Technology AG 6.15.2 Connecting the Sunny Remote Control A data cable is included with the Sunny Remote Control for connection purposes. If the data cable is not long enough, you can use a long CAT5e-FTP patch cable with an RJ45 plug instead. -
Page 47: Connecting The Communication To The Sunny Island Charger 50
SMA Solar Technology AG 6 Electrical Connection 6.15.4 Connecting the Communication to the Sunny Island Charger 50 Up to four Sunny Island Charger 50 devices can be connected to an off-grid inverter/master. If a Sunny Island Charger 50 is present in the off-grid system, connect the communication as follows. -
Page 48: Connecting Control And Measuring Cables For
6 Electrical Connection SMA Solar Technology AG 6.15.6 Connecting Control and Measuring Cables for Multicluster Box For a multicluster system, the Multicluster Box communicates control and measuring data with the three off-grid inverters via three red RJ45 data cables. The red RJ45 data cables are part of the scope of delivery of the Multicluster Box. -
Page 49: Connecting Rs485
The SI-COMSMA.BGx communication interface is required for communication with a communication device (e.g. Sunny WebBox) or other SMA products (e.g. PV inverter). If the off-grid inverter was ordered with the "Communication for RS485" order option, the SI-COMSMA.BG1 is installed in every master. - Page 50 6 Electrical Connection SMA Solar Technology AG Figure 16: Design of SI-COMSMA.BGx Position Description Mounting hole Type label ComSmaOut socket ComSmaIn socket Cable requirement: ☐ The data cable must correspond to the CAT5e classification. Requirement: ☐ The cable feed-through plate must be removed (see Section 6.15.1).
-
Page 51: Installing The Cable Feed-Through Plate
SMA Solar Technology AG 6 Electrical Connection 4. For a single-cluster system, lead the white RJ45 data cable through the enclosure opening of the cable feed-through plate on the master and plug the cable into the ComSmaIn socket. 5. For a multicluster system, connect the white RJ45 data cable and connect the masters to each other: •... -
Page 52: Connecting The Battery Temperature Sensor
6 Electrical Connection SMA Solar Technology AG 4. Hold the cables in position and push the cable feed-through plate towards the enclosure opening of the cable feed-through plate. 5. Hook the cable feed-through plate into the enclosure opening of the cable feed-through plate and push it into the enclosure opening. -
Page 53: Connecting The Battery Current Sensor
SMA Solar Technology AG 6 Electrical Connection 6.17 Connecting the Battery Current Sensor If you are using a battery current sensor, connect it as follows: Figure 17: Connection of the battery current sensor to the off-grid inverter Requirements: ☐ Measuring cables for intrinsically safe electric circuits must be used. In this context, "intrinsically safe"... -
Page 54: Assignment Of Multi-Function Relay
6 Electrical Connection SMA Solar Technology AG 7. Connect the BatCur– measuring wire to the battery DC‒ side on the battery current sensor. 6.18 Assignment of Multi-Function Relay Possible function/output Explanation Controlling generators In case of a generator request, the multi-function relay switches to the NO position. - Page 55 SMA Solar Technology AG 6 Electrical Connection If you are using a multi-function relay, always connect it as follows: Assignment of the multi-function relays of the slaves In case of a fault, the multi-function relays of the slaves switch less reliably than the multi-function relays of the masters.
-
Page 56: Connecting Control Cables For Autostart Generators
6 Electrical Connection SMA Solar Technology AG 5. Connect the wires to the Relay1 or Relay2 terminals using the 3-pole terminal (torque: 0.5 Nm ... 0.6 Nm): Connection Explanation In energy-saving mode closed. Change-over contact In energy-saving mode open. 6.19 Connecting Control Cables for Autostart Generators Autostart generators are started and stopped by a contact. -
Page 57: Connecting A Signal Generator For Generators Without Autostart Function
SMA Solar Technology AG 6 Electrical Connection 6.20 Connecting a Signal Generator for Generators Without Autostart Function Generators without an autostart function do not have electric starting devices. If you install a generator without autostart function, you can connect a signal generator (e.g. signal lamp) to the multi-function relay of the off-grid inverter. -
Page 58: Connecting Genman To The Off-Grid Inverter
6 Electrical Connection SMA Solar Technology AG If you connect a signal generator for generators without autostart function, connect the signal generator as follows: Requirements: ☐ The technical requirements of the multi-function relay must be met (see Section 12 "Technical Data", page 144). - Page 59 SMA Solar Technology AG 6 Electrical Connection Additionally required material (not included in scope of delivery): ☐ 4 bootlace ferrules Cable requirement: ☐ Conductor cross-section: 0.2 mm² ... 2.5 mm² 1. Break through the cable feed-through plate at a suitable position using a sharp object.
-
Page 60: Connecting The Control Cables Of The Load-Shedding Contactors
6 Electrical Connection SMA Solar Technology AG 6.22 Connecting the Control Cables of the Load-Shedding Contactors Load shedding prevents deep battery discharge and controls the power output to the loads. Load shedding provides the option of disconnecting specific loads from the stand-alone grid. In this way, you can optimise the power consumption to match the availability of stored energy and the power output of the energy sources. - Page 61 SMA Solar Technology AG 6 Electrical Connection Load-shedding contactor Off-grid inverter Figure 21: Connection of the control cable for 1-level load shedding (example) If you install load-shedding contactors on an off-grid system, always connect them as follows: Additionally required material (not included in scope of delivery): ☐...
-
Page 62: Connecting The Time Control For External Processes
6 Electrical Connection SMA Solar Technology AG 8. Enter the function of the multi-function relay used in the configuration table (see Section 7.10.1 "Use of the Multi-Function Relays", page 90). Note one of the following values here: Value Explanation AutoLodExt Setting for one-level load shedding When the off-grid inverter switches to an external energy source, load shedding is stopped and the loads are supplied by the external energy source. -
Page 63: Connecting Message Devices For Events And Warning Messages
SMA Solar Technology AG 6 Electrical Connection 6.24 Connecting Message Devices for Events and Warning Messages One of the following events and warning messages can be displayed for each multi-function relay: • The generator is running and is connected. • Voltage and frequency of the electricity grid are within the range for connection. -
Page 64: Connecting The Control Cable For The Battery-Room Fan
6 Electrical Connection SMA Solar Technology AG 6.25 Connecting the Control Cable for the Battery-Room Fan If the charging current leads to the emission of gases from the battery, the battery-room fan is switched on by the off-grid inverter for at least one hour. -
Page 65: Connecting The Control Cable For The Electrolyte Pump Of The Battery
SMA Solar Technology AG 6 Electrical Connection 6.26 Connecting the Control Cable for the Electrolyte Pump of the Battery The off-grid inverter controls the electrolyte pump for the battery. • The off-grid inverter switches on the electrolyte pump at least once a day. -
Page 66: Connecting The Auxiliary Contact Of The Transfer Switch
6 Electrical Connection SMA Solar Technology AG 6.28 Connecting the Auxiliary Contact of the Transfer Switch Figure 22: The transfer switch switches between the electricity grid and the generator. The position of the transfer switch is queried by means of the auxiliary contact. - Page 67 • Ensure that the off-grid inverter is disconnected from the electricity grid and the generator for at least five seconds between all switching operations. • Contact the SMA Service Line if you require a switching concept for a transfer switch. Requirements for operation on the electricity grid The off-grid inverter does not meet the requirements for operation on the electricity grid in many countries.
-
Page 68: Connecting The External Generator Request
6 Electrical Connection SMA Solar Technology AG 6.29 Connecting the External Generator Request An external control signal can transfer a generator request to the generator management. If you have configured generator management for external generator request, generator management starts the generator when High Level is active. All generator run times are adhered to here. -
Page 69: Commissioning
SMA Solar Technology AG 7 Commissioning Commissioning 7.1 Sequence for Commissioning Procedure Check the wiring. Section 7.2 Close the off-grid inverter. Section 7.3 If present: Inverter installation manual Ensure that the country data sets of the PV inverters and wind power inverters are set to stand-alone grid operation. -
Page 70: Checking The Wiring
7 Commissioning SMA Solar Technology AG 7.2 Checking the Wiring Ensure that you carry out all tests relevant to the off-grid system and rectify all detected problems. Requirement: ☐ The off-grid inverter must be disconnected from voltage sources (see Section 8.1). - Page 71 SMA Solar Technology AG 7 Commissioning Checklist for Additional Earthing If the battery is earthed, you must check the additional earthing on the off-grid inverter. Check item Check criterion applicable Conductor cross-section for The conductor cross-section must correspond the additional earthing to the conductor cross-section of the battery earthing.
- Page 72 7 Commissioning SMA Solar Technology AG Check item Check criterion applicable Battery current sensor, if The battery current sensor can be loaded present with the maximum DC current (see technical data of the battery current sensor). Checking for AC1 and AC2 Terminals of the Off-Grid Inverter...
- Page 73 SMA Solar Technology AG 7 Commissioning Checking for Generator Connection If a generator is present, the following steps must be carried out: Check item Check criterion applicable Connection cable The conductor cross-section is sufficient for the maximum generator current. The cables are sufficiently protected by miniature circuit-breakers.
-
Page 74: Closing The Off-Grid Inverter
7 Commissioning SMA Solar Technology AG Check item Check criterion applicable Communication with Sunny The RJ45 data cable between the Island Charger 50, if present Sunny Island Charger 50 and the off-grid inverter is correctly connected (see Sunny Island Charger 50 manual). -
Page 75: Quick Configuration Guide
SMA Solar Technology AG 7 Commissioning 2. Fasten the enclosure lid using an Allen key (AF 5) following the sequence 1 to 6 (torque: 6 Nm). ☑ The teeth of the conical spring washer are pushed into the enclosure lid. This ensures that the enclosure lid is earthed. -
Page 76: Starting The Quick Configuration Guide
7 Commissioning SMA Solar Technology AG 7.4.2 Starting the Quick Configuration Guide The Quick Configuration Guide (QCG) is used to configure the settings required for operation. Step by step, the QCG queries the required settings for the off-grid system. Parameters for a cluster are set centrally on the master. - Page 77 SMA Solar Technology AG 7 Commissioning Requirements: ☐ All off-grid inverters must be closed. ☐ All off-grid inverters must be switched off. 1. Insert the fuse links into the BatFuse, quickly connect the switch-disconnectors of the BatFuse and then close the BatFuse (see BatFuse installation manual).
-
Page 78: Configuring Single Operation And Single-Cluster Operation
7 Commissioning SMA Solar Technology AG 7.4.3 Configuring Single Operation and Single-Cluster Operation Configuration of single operation and single-cluster operation is performed using the QCG on the Sunny Remote Control. Requirements: ☐ The Sunny Remote Control must be connected. ☐ In a cluster, the Sunny Remote Control must be connected to the master. - Page 79 SMA Solar Technology AG 7 Commissioning 6. Setting the battery type: • Select the 003.06 BatTyp parameter and press the button. • If the battery type is FLA, set FLA and press the button. • If the battery type is VRLA, set VRLA and press the button.
- Page 80 7 Commissioning SMA Solar Technology AG 10. Setting a single-phase or three-phase off-grid system: • Select the 003.15 ClstType parameter and press the button. • For a single-phase off-grid system, set 1Phs and press the button. • For a three-phase off-grid system, set 3Phs and press the button.
- Page 81 SMA Solar Technology AG 7 Commissioning 13. Setting the maximum permissible current for an off-grid system with the electricity grid: • Select the 003.21 GdCurNom parameter and press the button. • Set the maximum permissible current and press the button.
- Page 82 7 Commissioning SMA Solar Technology AG 17. Turn the button to the right. ☑ The Sunny Remote Control shows the last page of Setup new device. 18. Press the button and confirm the question Done ? with Y. ☑ The settings are adopted. The QCG asks about connected slaves in the off-grid system.
-
Page 83: Configuring Multicluster Operation
SMA Solar Technology AG 7 Commissioning 7.4.4 Configuring Multicluster Operation Configure Multicluster operation with the QCG on the Sunny Remote Control. You configure the individual clusters one-by-one. Requirements: ☐ The Sunny Remote Control must be connected to the master. ☐ No Sunny Remote Control must be connected to the slave. - Page 84 7 Commissioning SMA Solar Technology AG 6. Setting the battery type: • Select the 003.06 BatTyp parameter and press the button. • If the battery type is FLA, set FLA and press the button. • If the battery type is VRLA, set VRLA and press the button.
- Page 85 SMA Solar Technology AG 7 Commissioning 10. Setting the three-phase off-grid system: • Select the 003.15 ClstType parameter and press the button. • Set 3Phs and press the button. • Confirm the three-phase off-grid system with Y. 11. Setting multicluster operation: •...
- Page 86 7 Commissioning SMA Solar Technology AG 13. Setting the cluster for an extension cluster: • Select the 003.17 ClstMod parameter and press the button. • Set ExtnClst and press the button. • Confirm the extension cluster with Y. • Select the 003.18 ClstAdr parameter and press the button.
- Page 87 SMA Solar Technology AG 7 Commissioning 16. Setting the generator interface: • Select the 003.23 GnStrMod parameter and press the button. • If the generator does not have an electric starting device, set Manual and press the button. • If the generator can be started and stopped using one contact, set Autostart and press the button.
-
Page 88: Switching To Installer Mode
7 Commissioning SMA Solar Technology AG 7.5 Switching to Installer Mode In installer mode, you have access to a reduced number of parameters for the configuration and operation of the off-grid system. The parameters for multicluster systems are only available in expert mode. -
Page 89: Setting Time-Dependent Functions
SMA Solar Technology AG 7 Commissioning 7.7 Setting Time-Dependent Functions Time-dependent functions divide the day into two intervals. You specify the intervals using two start times. The first interval starts at the first start time and ends at the second start time. The second interval begins at the second start time and ends at the first start time. -
Page 90: Configuration Of The Multi-Function Relays
7 Commissioning SMA Solar Technology AG Requirement: ☐ The Sunny Remote Control must be connected to the master of the main cluster. 1. Switch to installer mode (see Section 7.5). 2. Select the 242.01 Lod1SocTm1Str parameter and set it to the lower SOC limiting value. -
Page 91: Setting The Functions Of The Multi-Function Relays
SMA Solar Technology AG 7 Commissioning 7.10.2 Setting the Functions of the Multi-Function Relays You must configure each cluster individually in a multicluster system. Requirement: ☐ In a cluster, the Sunny Remote Control must be connected to the master. 1. Switch to installer mode (see Section 7.5). -
Page 92: Setting 2-Level Load Shedding
7 Commissioning SMA Solar Technology AG 6. If the loads are to be supplied by an external energy source during recharging of the battery, ensure the following: • Ensure that the parameter of the multi-function relay is set to AutoLodExt (see Section 7.10.1). -
Page 93: Setting Time-Dependent 1-Level Load Shedding
SMA Solar Technology AG 7 Commissioning Requirement: ☐ In a cluster, the Sunny Remote Control must be connected to the master. 1. Switch to installer mode (see Section 7.5). 2. Setting the first level of load shedding: • Select the 242.01 Lod1SocTm1Str parameter and set it to the lower SOC limiting value. - Page 94 7 Commissioning SMA Solar Technology AG Example: from 10:00 p.m. to 6:00 a.m., the load-shedding contactor is not to disconnect loads from the stand-alone grid where possible. Figure 25: Profile of the SOC limiting values for controlling the load-shedding contactor and the start times for the intervals The start time for the first interval is set to 6:00 a.m.
-
Page 95: Setting Time-Dependent 2-Level Load Shedding
SMA Solar Technology AG 7 Commissioning 7.10.6 Setting Time-Dependent 2-Level Load Shedding Time-dependent load shedding divides the day into two intervals (see Section 7.7 "Setting Time- Dependent Functions", page 89). You need toset the SOC limits that apply for each interval for 2-level load shedding. For example, you can set that as far as possible no loads are to be disconnected from the stand-alone grid during the day. -
Page 96: Setting Time Control For External Processes
7 Commissioning SMA Solar Technology AG • Select the 242.08 Lod2SocTm1Stp parameter and set it to the upper SOC limiting value for the second level of load shedding. 5. Setting the SOC limiting value for the second interval: • Select the 242.03 Lod1SocTm2Str parameter and set it to the lower SOC limiting value for the first level of load shedding. -
Page 97: Setting The Control Of The Battery-Room Fan
SMA Solar Technology AG 7 Commissioning 7.10.8 Setting the Control of the Battery-Room Fan If you wish to control a battery-room fan, set the multi-function relay as follows: 1. Switch to installer mode (see Section 7.5). 2. Select the 221.04 BatFanTmpStr parameter and set it to the battery temperature at which the fan is to be switched on. -
Page 98: Changing The Battery Protection Mode
7 Commissioning SMA Solar Technology AG Charging process Parameter Default value Boost charge 222.07 ChrgVtgBoost VRLA 2.40 V 2.55 V Full charge 222.08 ChrgVtgFul VRLA 2.40 V 2.50 V Equalisation charge 222.09 ChrgVtgEqu VRLA 2.40 V 2.50 V If you wish to control the utilisation of excess energy, set the multi-function relay as follows: 1. - Page 99 SMA Solar Technology AG 7 Commissioning • Level 2 If the battery falls below the SOC limiting value for level 2, the off-grid inverter switches to standby. The off-grid inverter tries to charge the battery during the day, when the PV inverters can supply energy.
-
Page 100: Setting The Resistance Of The Battery Cable
7 Commissioning SMA Solar Technology AG 7.12 Setting the Resistance of the Battery Cable You can optimise battery management by setting the resistance of the battery cable in expert mode. Off-grid inverter battery BatFuse cable 1 cable 2 Length l Length l Figure 27: Designation of cables... -
Page 101: Commissioning The Battery Current Sensor
SMA Solar Technology AG 7 Commissioning 7.13 Commissioning the Battery Current Sensor To operate the battery current sensor, you must set the type of the battery current sensor and start calibration and offset adjustment of the battery current sensor. The off-grid inverter distinguishes between 50 mV and 60 mV battery current sensors. These type designations indicate the amplification factor of the battery current sensor. -
Page 102: Configuring The Limiting Values For The Generator Connection
7 Commissioning SMA Solar Technology AG 11. Connect the BatCur+ measuring wire to the BatFuse L‒ side. 12. Connect the BatCur– measuring wire to the battery DC‒ side. 13. Close the BatFuse switch-disconnector and switch the off-grid system on. 7.14 Configuring the Limiting Values for the Generator Connection 7.14.1 Changing the Current Limiting Values for the Generator... -
Page 103: Changing The Voltage Limiting Values For The Generator
SMA Solar Technology AG 7 Commissioning 7.14.2 Changing the Voltage Limiting Values for the Generator Significance of the voltage limits: The voltage limiting values determine the range within which the generator voltage is allowed to fluctuate. When the off-grid inverter switches to the generator, the stand-alone grid will also fluctuate within this range. -
Page 104: Changing The Permitted Reverse Power To The Generator
7 Commissioning SMA Solar Technology AG 7.14.4 Changing the Permitted Reverse Power to the Generator If the reverse power for the set time is exceeded, all off-grid inverters disconnect the generator from the stand-alone grid and block connection of the generator to the stand-alone grid for the minimum stop time. -
Page 105: Changing The Type Of Generator Interface
SMA Solar Technology AG 7 Commissioning 7.15 Changing the Type of Generator Interface If you have installed a generator in an off-grid system, the type of generator interface determines the way the generator is controlled. 1. Switch to installer mode (see Section 7.5). -
Page 106: Changing The Minimum Run Time For The Generator
7 Commissioning SMA Solar Technology AG 7.16.2 Changing the Minimum Run Time for the Generator 1. Switch to installer mode (see Section 7.5). 2. Select the 234.08 GnOpTmMin parameter and set it to the desired value. 7.16.3 Changing the Shut-Off Delay Time for the Generator GenMan shut-off delay time GenMan has its own shut-off delay. -
Page 107: Changing The State-Of-Charge-Dependent Generator Request
SMA Solar Technology AG 7 Commissioning 7.17.2 Changing the State-Of-Charge-Dependent Generator Request Significance of the SOC limiting values: If the battery reaches the lower SOC limiting value, the generator management requests the generator. If the battery reaches the upper SOC limiting value during recharging, generator management resets this generator request. - Page 108 7 Commissioning SMA Solar Technology AG Example: from 10:00 p.m. to 6:00 a.m., the generator is not to start where possible. Figure 28: Profile of the SOC and the times for generator requests The start time for the first interval is set to 6:00 a.m. In the first interval, the lower SOC limiting value is set to 40% and the upper SOC limiting value is set to 80%.
-
Page 109: Setting Load-Dependent Generator Request
SMA Solar Technology AG 7 Commissioning 7.17.4 Setting Load-Dependent Generator Request Significance of load-dependent generator request: If you activate the load-dependent generator request, the off-grid inverter requests the generator in the event of a high load. This prevents deep discharge and cycling of the battery and extends its electrical endurance. -
Page 110: Time-Controlled Activation Of The Generator
7 Commissioning SMA Solar Technology AG 7.17.5 Time-Controlled Activation of the Generator When the generator is requested in a time-controlled manner, it is requested on certain days for a set duration (see Section 7.8 "Setting the Time-Controlled Functions", page 89). 1. Select the 235.13 GnTmOpEna parameter and set it to Enable. -
Page 111: Setting The External Generator Request
SMA Solar Technology AG 7 Commissioning 7.17.7 Setting the External Generator Request Significance of external generator request: An external control signal can transfer a generator request to the generator management. 1. Switch to expert mode (see Section 7.5). 2. To activate external generator request, select the 235.19 GnStrDigIn parameter and set it to Enable. -
Page 112: Changing The Current Limiting Values For The Electricity Grid
7 Commissioning SMA Solar Technology AG 7.19 Changing the Current Limiting Values for the Electricity Grid Significance of the current limit: Grid management limits the consumption of line current to the set maximum value. Advanced grid management: If the set line current is not sufficient for supplying the loads, grid management requests additional power from the battery. -
Page 113: Setting The Search Mode
SMA Solar Technology AG 7 Commissioning 7.21 Setting the Search Mode Search mode makes it possible to save energy. At regular intervals, the off-grid inverter checks whether loads are connected to the off-grid system. If the off-grid inverter does not detect any loads, it switches to energy-saving mode. As soon as a load is connected, the off-grid inverter exits energy-saving mode and switches to inverter operation. -
Page 114: Setting The Silent Mode
7 Commissioning SMA Solar Technology AG If a set time for float charge has elapsed, the off-grid inverter switches to silent mode and the stand- alone grid is supplied only by the electricity grid and the AC sources in the stand-alone grid. The off- grid inverter exits idle mode at configurable time intervals or else when the battery voltage per cell drops by 0.14 V. -
Page 115: Functional Test
SMA Solar Technology AG 7 Commissioning 7.24 Functional Test 7.24.1 Testing Communication Interfaces If communication interfaces are installed in the off-grid inverter, test that they have been installed correctly as follows: 1. Switch to installer mode (see Section 7.5). 2. To test the installation of the SI-SYSCAN.BGx Multicluster communication interface, select the 312.15 ComMod1 parameter and read off the value. -
Page 116: Starting The Off-Grid System
7 Commissioning SMA Solar Technology AG 7.24.2 Starting the Off-Grid System Requirement: ☐ All off-grid inverters must be switched on. 1. If no functional test has been completed yet, switch off all miniature circuit-breakers and switch- disconnectors for the AC sources in the sub-distributions. -
Page 117: Testing The Generator
SMA Solar Technology AG 7 Commissioning 7.24.4 Testing the Generator If a generator is present, you must carry out the following steps: Requirements: ☐ The miniature circuit-breakers for the AC sources must be switched off in the AC sub-distribution. ☐ The miniature circuit-breakers for DC sources must be switched off in the DC sub-distribution. -
Page 118: Testing Load Shedding
7 Commissioning SMA Solar Technology AG 7.24.5 Testing Load Shedding If load shedding is present, you must carry out the following steps: Requirements: ☐ All miniature circuit-breakers in all sub-distributions must be switched off. ☐ All loads must be switched off. -
Page 119: Testing The Frequency Shift Power Control
SMA Solar Technology AG 7 Commissioning 7.24.6 Testing the Frequency Shift Power Control Requirements: ☐ All AC loads must be switched off. ☐ The miniature circuit-breakers for the external energy source must be switched off. ☐ The off-grid inverter must be in operation (see Section 7.24.2 "Starting the Off-Grid System", page 116). -
Page 120: Completing Commissioning
7 Commissioning SMA Solar Technology AG 7.26 Completing Commissioning • When full charge is complete, switch on all miniature circuit-breakers and switch-disconnectors. Tip: The state of charge of the battery is displayed in standard mode. Load shedding in the first two operating hours... -
Page 121: Decommissioning
SMA Solar Technology AG 8 Decommissioning Decommissioning 8.1 Disconnecting the Off-Grid Inverter from Voltage Sources 1. Disconnect the off-grid system (see the operating manual of the off-grid inverter). 2. Open the switch-disconnector of the BatFuse and secure it against reconnection (see the manual of the BatFuse). - Page 122 8 Decommissioning SMA Solar Technology AG 5. If the off-grid inverter is protected against theft, loosen the safety screws. 6. Loosen the screws between the off-grid inverter and the wall mounting bracket on both sides using an Allen key (AF 5).
-
Page 123: Packing The Off-Grid Inverter
• Dispose of the off-grid inverter in accordance with the locally applicable disposal regulations for electronic waste. • Return the off-grid inverter to SMA Solar Technology AG at your own expense (see Section 13 "Contact", page 154). Label the packaging "ZUR ENTSORGUNG" ("FOR DISPOSAL"). -
Page 124: Battery Management
9 Battery Management SMA Solar Technology AG Battery Management 9.1 State of the Battery 9.1.1 Available Battery Capacity The available capacity of a new battery is equal to the rated capacity specified by the battery manufacturer. During operation of an off-grid system, the available battery capacity decreases for the following reasons: •... -
Page 125: Charge Control
SMA Solar Technology AG 9 Battery Management If the maximum permitted battery temperature is exceeded, the off-grid inverter switches off. Once the battery has cooled down to a specified temperature, the off-grid inverter starts again. 9.2 Charge Control 9.2.1 Charging Phases Figure 29: Charging phases of the off-grid inverter The off-grid inverter controls battery charging in three phases, as follows: •... -
Page 126: Float Charge
9 Battery Management SMA Solar Technology AG The first value reached limits the charge current of the battery. While the charge current remains constant, the battery voltage increases with increasing state of charge. The constant current phase ends when the cell voltage of the battery reaches the target value specified for the relevant battery type. -
Page 127: Boost Charge
SMA Solar Technology AG 9 Battery Management 9.2.2 Charging Processes For transition to the constant voltage phase, battery management chooses one of the following three charging processes: • Boost charge • Full charge • Equalisation charge Boost charge For boost charge, a high charging voltage is applied to the battery. The battery is charged to 85% to 90% of the currently available battery capacity within a short period of time. -
Page 128: Automatic Temperature Compensation
9 Battery Management SMA Solar Technology AG To protect or maintain the battery on off-grid systems that are used seasonally, you can start equalisation charge manually (see the operating manual of the off-grid inverter). External charging device An external charging device or a charge controller can also carry out equalisation charge of the battery. -
Page 129: External Energy Sources In The Off-Grid System
GenMan generator manager is required for control. GenMan is system, generators with available from SMA Solar Technology AG as an accessory. GenMan 10.2 Electricity Grid as an External Energy Source You can use the electricity grid in different ways: •... -
Page 130: Synchronisation Of The Stand-Alone Grid To The External Energy Source
10 External Energy Sources in the Off-Grid System SMA Solar Technology AG The generator and electricity grid cannot feed electricity into the off-grid system at the same time. An external automatic transfer switch is required to use a generator and the electricity grid. -
Page 131: Generator Management Of The Off-Grid Inverter
SMA Solar Technology AG 10 External Energy Sources in the Off-Grid System 10.7 Generator Management of the Off-Grid Inverter 10.7.1 Generator Management Tasks The generator management performs the following tasks: • Requesting the generator in automatic generator mode (see Section 10.7.2 "Conditions for Generator Requests", page 131):... -
Page 132: Generator Run Times
10 External Energy Sources in the Off-Grid System SMA Solar Technology AG Generator request Explanation Time-controlled generator You can set the days, times and durations for generator request request by the generator management. Charging-process-dependent The generator is requested for full charge and equalisation generator request charging. -
Page 133: Electrical Limiting Values For The Generator
SMA Solar Technology AG 10 External Energy Sources in the Off-Grid System 10.7.4 Electrical Limiting Values for the Generator The configuration of electrical limiting values allows generator management to prevent overloading of the generator and to detect and react to malfunctions. -
Page 134: Operating Procedure For Generator Control
10 External Energy Sources in the Off-Grid System SMA Solar Technology AG Automatic generator mode: In automatic generator mode, the generator management controls the generator. Automatic generator mode and generators without an autostart function The generator management can control a signal generator using a multi-function relay. - Page 135 SMA Solar Technology AG 10 External Energy Sources in the Off-Grid System Event or state Result Internal transfer relay The stand-alone grid is The off-grid inverter connects the stand-alone Closed, the synchronised. grid to the generator. stand-alone grid is connected to the...
-
Page 136: Operating Procedure For Generators Without An Autostart Function
10 External Energy Sources in the Off-Grid System SMA Solar Technology AG 10.9.2 Operating Procedure for Generators without an Autostart Function Event or state Result Internal transfer relay The generator The off-grid inverter controls a signal generator. Open, the management requests the... - Page 137 SMA Solar Technology AG 10 External Energy Sources in the Off-Grid System Event or state Result Internal transfer relay You open the switch- The off-grid inverter opens the internal transfer Open, the disconnector between the relay. stand-alone grid is generator and the off-grid...
-
Page 138: Operating Procedure For Generators With Genman
10 External Energy Sources in the Off-Grid System SMA Solar Technology AG 10.9.3 Operating Procedure for Generators with GenMan Event or state Result Internal transfer relay The generator The off-grid inverter signals to GenMan that the Open, the management requests the generator is requested. - Page 139 SMA Solar Technology AG 10 External Energy Sources in the Off-Grid System Event or state Result Internal transfer relay The generator The off-grid inverter supplies the stand-alone grid Open, the management no longer and carries out load-free disconnection of the stand-alone grid is requests the generator.
-
Page 140: Grid Management
10 External Energy Sources in the Off-Grid System SMA Solar Technology AG 10.10 Grid Management 10.10.1 Tasks of Grid Management Grid management performs the following tasks: • Grid management detects failures, disturbances and the return to the electricity grid. • Grid management controls the transition from stand-alone grid operation to grid operation. -
Page 141: Request Conditions For The Electricity Grid
SMA Solar Technology AG 10 External Energy Sources in the Off-Grid System 10.10.3 Request Conditions for the Electricity Grid To adapt grid management to the requirements of the off-grid system, you can change the request conditions of the electricity grid. Request for the electricity... -
Page 142: Operating Procedure For Grid Control
10 External Energy Sources in the Off-Grid System SMA Solar Technology AG 10.12 Operating Procedure for Grid Control Event or state Result Internal transfer relay Grid management ‒ Open, the activates the electricity grid. stand-alone grid is not connected to The line voltage is within the In order for grid management to detect a valid the electricity grid. -
Page 143: Accessories
SMA Solar Technology AG 11 Accessories 11 Accessories You will find the corresponding accessories and spare parts for your product in the following overview. If required, you can order them from SMA Solar Technology AG or from your specialist dealer. Description Brief description... -
Page 144: Technical Data
12 Technical Data SMA Solar Technology AG 12 Technical Data 12.1 Sunny Island 8.0H AC1 Connection, Stand-Alone Grid Rated power 6,000 W Maximum AC power 12,000 W AC power for 30 minutes at 25°C 8,000 W AC power for 5 minutes at 25°C 9,100 W AC power for 1 minute at 25°C... - Page 145 SMA Solar Technology AG 12 Technical Data AC2 Connection, External Energy Source Maximum AC input power 11,500 W Rated input voltage 230 V AC input voltage range 172.5 V ... 264.5 V Rated input frequency 50 Hz Permitted input frequency range 40 Hz ...
- Page 146 12 Technical Data SMA Solar Technology AG Efficiency Maximum efficiency European weighted efficiency 93.4% Efficiency Profile Figure 30: Efficiency curve Output power/rated power Efficiency 100% 92.0% 93.1% 94.2% 94.6% 94.2% 91.0% 86.2% SI80H-60H-OffGrid-IA-en-11 Installation Manual...
-
Page 147: Earthing Systems
SMA Solar Technology AG 12 Technical Data Self-Consumption Self-consumption in standby mode ˂ 4 W Self-consumption in no-load operation and in discharge mode ˂ 26 W without SRC-20 Self-consumption in no-load operation and in discharge mode ˂ 27 W with SRC-20... -
Page 148: General Data
12 Technical Data SMA Solar Technology AG High-level digital input 9 V ... 63 V Low-level digital input 0 V ... 3 V Galvanically insulated control contacts 2 multi-function relays AC load-switching limit for multi-function relays 1 and 2 1 A at 250 V... -
Page 149: Sunny Island 6.0H
SMA Solar Technology AG 12 Technical Data 12.2 Sunny Island 6.0H AC1 Connection, Stand-Alone Grid Rated power 4,600 W Maximum AC power 12,000 W AC power for 30 minutes at 25°C 6,000 W AC power for 5 minutes at 25°C 6,800 W AC power for 1 minute at 25°C... - Page 150 12 Technical Data SMA Solar Technology AG Permitted input frequency range 40 Hz ... 70 Hz Maximum AC input current 50 A Recommended conductor cross-section 10 mm² Maximum connectable conductor cross-section 16 mm² Cable diameter 9 mm ... 18 mm...
- Page 151 SMA Solar Technology AG 12 Technical Data Efficiency Profile Figure 32: Efficiency curve Output power/rated power Efficiency 100% 93.1% 93.9% 94.5% 94.2% 93.5% 90.0% 81.2% Self-Consumption Self-consumption in standby mode ˂ 4 W Self-consumption in no-load operation and in discharge mode ˂...
- Page 152 12 Technical Data SMA Solar Technology AG Noise Emission Noise emission (typical) 49 dB(A) Earthing Systems TN-C system Suitable TN-S system Suitable TN-C-S system Suitable TT earthing system, if U ˂ 30 V Suitable Protective Devices AC short circuit AC overload...
- Page 153 SMA Solar Technology AG 12 Technical Data DC Load-Limitation Curve Figure 33: DC load-limitation curve for multi-function relays 1 and 2 General Data Width x height x depth 467 mm x 612 mm x 242 mm Weight 63 kg Operating temperature range −...
-
Page 154: Contact
13 Contact SMA Solar Technology AG 13 Contact If you have technical problems concerning our products, please contact the SMA Service Line. We require the following information in order to provide you with the necessary assistance: • Off-grid inverter type •... - Page 155 Legal Provisions The information contained in this document is the property of SMA Solar Technology AG. Publishing its content, either partially or in full, requires the written permission of SMA Solar Technology AG. Any internal company copying of the document for the purposes of evaluating the product or its correct implementation is allowed and does not require permission.
Need help?
Do you have a question about the SUNNY ISLAND 8.0H and is the answer not in the manual?
Questions and answers