
Related Manuals for B&G h1000 CND


Summary of Contents for B&G h1000 CND
-
Page 1: Overview
MANUAL h1000 CND Chartplotter HB-1000C-02 English WARNING! Use of solvent based or chemical cleaners on displays will result in damage invalidate your warranty. -
Page 2: Features
introduction overview Congratulations on your purchase of the Central Navigation Display (CND) from B&G. The CND is the latest in chart plotting and navigation displays from B&G and represents B&G’s commitment to providing customers the finest marine navigation systems. The CND is a state-of-the-art computerised electro nic chart system designed as a sophisticated navigation aid. -
Page 3: Certification
introduction certification warnings & precautions WARNING: The GPS system is operated by the United States governme nt, which is solely respo nsible for its accuracy & maintena nce. The system is subject to changes that co uld affect the accuracy and performance of all GPS equipment. -
Page 4: Table Of Contents
contents contents Overview Features Features Certification Warnings & Precautions Trademarks Display overview Switching on and off Switching On Switching Off Backlight C-CARD Inserting the Card Removing the card System settings Overview of the display Navigate to a single destination Distance to bearing Steer Deleting a Destinatio n Navigating on a route... - Page 5 contents contents GPS mode GPS Mode Status Page GPS Page Road Page XTE Page XTE Options Routes Main Setup Screen Selecting a route Selecting a route to work Deleting a route Route Colour selection Reversing a route Route Report Changing Speed & Fuel values Route Report from the chart.
- Page 6 contents contents Track functions Track functions Enabling Track Storing Selecting Active Track Displaying Track Selecting Track Colo ur Selecting Time Interval Selecting Vector Delete Current Track Memory menu Memory Menu Saving a File User C-CARD menu Loading a File Deleting a File Sort the User C-CARD Directory Reading the User C-CARD Selecting slot...
-
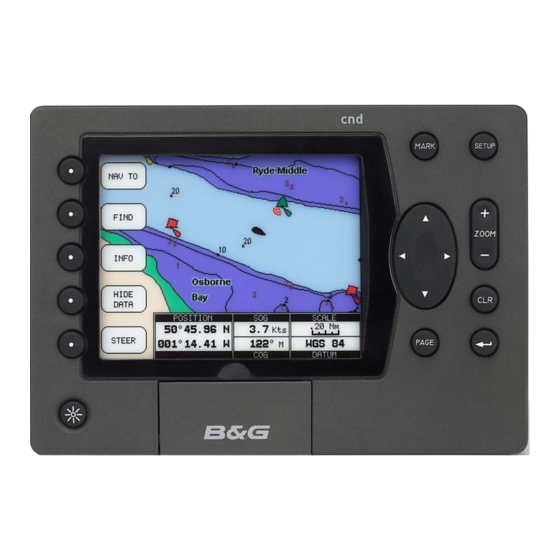
Page 7: Display Overview
getting started display overview SOFTKEYS CURSOR ENTER C-MAP Cover POWER KEY Press the PWR ke y to turn the CND On There are 5 Softkeys, which ha ve different functions when you select different modes of operation, the labels for the current functions are shown on the scree n immediately adjacent to the keys. -
Page 8: Switching On And Off
getting started switching on and off Before turning the CND on, check that the installation instructions in Appendix B ha ve been correctly follo wed. Switching On Pressing the PWR key for one second switches on the CND , you will first be presented with the B&G logo screen and so ftware... -
Page 9: C-Card
getting started c-card The CND uses two types o f C-MAPNT cartridges, The C-CARD, contains detailed charts of the area cove red. The User C-CARD can be used to permanently store your routes, Waypoints, Marks and tracks. Hold the C-CARD by the short inclined side so tha t you can see the C-MAP label. -
Page 10: Overview Of The Display
getting started overview of the display Cursor Box Cursor Softkeys Label Text Box navigate to a single destination Using the CURSOR keypad move the curso r to your desired destination then press the NAV TO softkey, this softkey will the n change to the START softkey, pressing the START softkey will then create the Direct Target. -
Page 11: Navigating On A Route
getting started navigating on a route If you prefer to navigate following a route towards its end point, you ca n define a series of locations (Waypoints) in sequence to make a route. Adding a Waypoint Using the CURSOR keypad place the cursor on the desired position, pressing the ENTER key will insert a Waypoint symbol on the chart, press the ADD TO ROUTE Softkey to make it... -
Page 12: Moving Waypoint
getting started navigating on a route Moving Waypoint Place the cursor on the Waypoint and press the MOVE Softkey, using the CURSOR keypad move the Waypoint, a dotted line connecting the Waypoint to the new position, is shown. To place the Waypoint in the new position, press the ACCEPT Softkey. -
Page 13: Editing Waypoints
getting started navigating on a route Editing Waypoints Move the cursor onto the Waypoint and press the EDIT Softkey Use the CURSOR keypad to select the field and press the ENTER key. To e nter a name use the CURSOR keypad to insert the characters, then press the ACCEPT Softkey. -
Page 14: Finding Information
getting started finding information Time To Go TTG value is displayed on the Display Page, available by pressing the PAGE key twice and the XTE Softkey. C-MAPNT Information On the display you will see a variety of Ico ns and symbols. Refer to the Handbook for their expla nation (example shown). -
Page 15: Getting Port Information
getting started finding information By pressing the INFO softkey while the chart is displayed will display a list of all objects found in the ra nge of the cursor. If there are complex objects you will also find a list of the components. Use the CURSOR keypad to scroll through the list, press the ENTER key to expand. -
Page 16: Getting Tidal Information
getting started finding information Select the service using the CURSOR keypad and then press the ENTER key. Detailed information on the services (opening and closing time of the Fuel station, telephone number of local amenities, etc) are displayed. This is available for all countries, where such information exists on the paper chart. -
Page 17: Finding Port Services
getting started finding information The scree n will display today’s Tide Height graph for the area where the Tidal symbol was located. The CND displays a moveable Vertical and Horizo ntal slider. Using the CURSOR keypad, move the horizontal slider to correspond with the draft of your boat. - Page 18 getting started finding information Whe n the find display appears press the START Softkey to displays nearest available facilities (i.e. the nearest Hospital, sail maker, bank, etc.). The icons list is sho wn of the available services. Select the facility using the CURSOR keypad and then press the ENTER key.
-
Page 19: Finding Port By Name
getting started finding information Finding Port by Name Pressing the FIND Softkey displays the find screen. Using the CURSOR keypad select “Find Port by Name” and press the START Softkey to display a list of a ll ports stored on the C-CARD. Use the CURSOR keypad to select the port and the ZOOM +/- key to select next/p revious page. -
Page 20: Searching By List
getting started finding information Insert the port name (max 15 characters) using the Up and Down CURSOR keypad to scroll throug h the letters, pressing the right arro w CURSOR keypad to move to the following space. A list of all ports containing the inserted name is displayed. -
Page 21: Finding Tide Stations
getting started finding information Finding Tide Stations To find the nearest Tide Stations on the chart press the FIND Softkey to display the find screen . Note The find will be from the cursor position if the fix position is not suitable. Using CURSOR keypad select Tide Stations and press the START Softkey to... -
Page 22: Data Pages
getting started data pages The Data Pages display the information obtained from the other instruments on your system. Using information availab le, various othe r parameters ca n be calculated and displayed. Press the PAGE key to enter the Data Pages. Speed/Depth The Speed and Depth displays are divided into three pages, accessed by repeatedly pressing... -
Page 23: Navigation
getting started data pages Navigation The Navigation displays are divided into three pages, accessed by repeatedly pressing the NAV Softkey. To scroll between pages press the NAV Softkey. Wind The Wind displays are divided into three pages, accessed by repeatedly pressing the WIND Softkey To scroll between pages press the WIND Softkey... -
Page 24: Multi Function
getting started data pages Multi Function The Multifunction displays are divided into two pages, accessed by repeatedly pressing the MULTI Softkey. Page 24... -
Page 25: Data Logs
getting started data pages Data Logs The Data Logging pages are divided into four pages, accessed by repeatedly pressing the DATA LOGS Softkey. Page 25... -
Page 26: Gps Mode
getting started gps mode GPS Mode The GPS mode displays positional information received from a n externa l GPS ante nna or unit. Initialisation Whe n the CND is first switched on, it will start acquiring sa tellites to obtain a position fix. Pressing the PAGE key twice will display the GPS page. -
Page 27: Road Page
getting started gps mode Road Page Pressing the ROAD Softkey on the Status page displays the Road Page. The Road Page shows the current course displayed on a rolling road with the current heading up the page. The target waypoi nt is also displayed. -
Page 28: Routes
advanced features routes Uploading waypoints from a PC Whe n uploading a series of pre-set waypoints from a PC via the NMEA interface (WPL), first press the ‘Setup’ butto n and select ‘Waypoints’ from the menu. Then upload your data fro m the PC, the information on your chosen wa ypoints will appear on the screen. -
Page 29: Deleting A Route
advanced features routes Deleting a Route From the main Route screen select the Route to be dele ted a nd press the DELETE Softkey. A warning appears confirming the delete . Route Colour selection From the main Route screen select the Route and press the COLOUR Softkey to display the eight colour select window, use the CURSOR keypad to select the colo ur, press the ACCEPT... -
Page 30: Route Report
advanced features routes Route Report Pressing the REPORT Softkey from the main Route screen will display information abo ut the Waypoints/Marks in that route. If more than six Waypoints are shown, use the up and down CURSOR keypad to select another page. -
Page 31: Route Report From The Chart
advanced features routes With the Speed box displayed, use the CURSOR keypad to change the value. Press the ENTER key to confirm the change. Once the estimated Speed and Fuel are entered, the CND will calculate the estimated time of arrival at each of the Waypoints/Marks in the ro ute and the fuel required. -
Page 32: Deleting A Waypoint From The List
advanced features routes Deleting a Waypoint from the list Use the CURSOR key to select the Waypoint to delete then p ress the DELETE Softkey. Whe n the de lete box appears press the ENTER key to Delete Selected Point, or using the CURSOR keypad to select Delete All Points, then press the ENTER key. -
Page 33: Finding A Waypoint/Mark On The Chart
advanced features routes Press the EXIT Softkey to return to the Route page. Finding a Waypoint/Mark on the chart Press the FIND Softkey. Select Find User Point and press ENTER. A window appears to insert the Name b y using the CURSOR keypad. -
Page 34: Marks
advanced features marks Adding a Mark Pressing the MARK key inserts a Mark on your boat’s position. In the Text Area info rmation on Mark name, symbol and Latitude/Longitude is shown. Press the CLR key to clear the message. Converting a MARK to a Waypoint Place the cursor o n the Mark a nd press the CONVERT Softkey, a window to confirm the conversion is displayed. -
Page 35: Setup Menu
settings setup menu Selecting Alarms Use the CURSOR keypad to scroll to the Alarms menu and pressing the ENTER key to select. Use the CURSOR keypad to enable the alarm, then use the CURSOR keypad to select and change the value of a setting , and press the ENTER key to set. -
Page 36: Selecting System Settings
settings setup menu Selecting System Settings Use the CURSOR keypad to scroll to the System Setti ngs menu a nd press the ENTER key to select. To set the Language Use the CURSOR keypad to select language and press ENTER to reveal the sub menu. Highlight the desired language a nd then press the ENTER key. -
Page 37: To Set The Units
settings setup menu To set the Units Use the CURSOR keypad to select the units settings menu and press the ENTER key to confirm changes. Selecting Chart Plotter settings Use the CURSOR keypad to scroll to the Chart Plotter Settings menu and press the ENTER key to select. -
Page 38: To Set The Display Options 1
settings setup menu To set the Display Options 1 Use the CURSOR keypad to select a sub menu or to change the value of a setti ng, and press the ENTER key to select. It should be noted that these Display Option settings are stored when the CND is turned off. -
Page 39: Selecting About
settings setup menu Selecting About This page displays the software and C_CARD informa tion. position correction Position Correction Position Correction applies an offset to your GPS position fix which will the n place your boat exactly on the chart where it should be. From the Plotter Setup menu, select Position Offset and press the ENTER key. -
Page 40: Track Functions
settings track functions Track functions A very useful feature of the CND is the ability to store and display exactly where the boat has been. This feature, referred to as Tracki ng, can provide invaluable information about the effect of tide and wind influence on the boat’s progress as well as giving an indication of the helmsman’s performance. -
Page 41: Selecting Time Interval
settings track functions Selecting Time Interval It is possible to change the frequency that the CND records the boat’s position in memory. It is important to match the frequency of recording to the dista nce that your boat will be travelling in order that the whole passage can be tracked. -
Page 42: Memory Menu
settings memory menu Memory Menu The CND allows you to copy information to and from User C-CARD’s, returning the information to internal memory at a later time. This a llows virtually unlimited storage. Saving a File A window is opened to insert the file name and the type of data to save. -
Page 43: User C-Card Menu
settings Loading a File Choose the file name in the list using the CURSOR keypad, then press the LOAD Softkey to return the information to interna l user c-card menu memory . Deleting a File Use the CURSOR keypad to select the item, press the DELETE Softkey to delete the file from the C-CARD. -
Page 44: Formatting User C-Card
settings user c-card menu If the User C-CARD is not present in the selected slot, a warning message appears. Formatting User C-CARD A User C-CARD must be formatted before use. This operation prepares the User C-CARD to receive and store information. Pressing the FORMAT Softkey will display a box to advise that all data wi ll be lost. -
Page 45: Technical Specifications
Appendix A technical specifications • Dimensions mm (inch): 220 x 155 x 70.6 (8.66 x 6.10 x 2.78) • Power consumption : 12 Watt max, 10 - 16 Volt dc • GPS Interface : NMEA 0183 ver 2.3 • Autopilot Interface : NMEA 0183 ver 2.3 •... -
Page 46: Installation
appendix b installation Precautions To avoid electromagnetic interference , it is recommended tha t the CND be installed no less than 0.3 me tres from a compass and 1 metre from the GPS. The CND is water resistant, but not wa terproof. Use the cover when not in use. -
Page 47: Power/Data
appendix b electrical connections Power/Data Use cable Part No. BGM-023005 With this connector This is the main Power a nd Navigation NMEA port. The CND receives data from the GPS receiver and sends data to the instrument system using this port. Sentences decoded: DBT, DPT, GGA, GLL, GSA, GSV, HDG, HDM, HDT, MWV, RMC, VHW, VTG, VWR, VWT, WPL, ZDA a nd DTM (B&G special). -
Page 48: Terms And Functions
appendix c terms and functions This section explains the terms that may be unfamiliar to the reader. Some terms are followed by a brief description on how to select the related menu option, listing the key sequence. About (page) Selects a page that gives information on software and cartography version and general software specification. - Page 49 appendix c terms and functions Bathymetrics & Soundings Range Sets the min/max value for Bathymetrics and Soundings. If the depth unit is Metres (Mt), the range is [0 - 15000], if Feet (Ft) is [0 - 49212], if Fatho m (FM) is [0 - 8202]. The default setting is [0, 33] Ft.
- Page 50 appendix c terms and functions COG = Course Over Ground Direction of the path over ground actually followed by a boat. Coordinate System Sets your preferred Coordinate System among ddd mm ss, ddd mm.mm, ddd mm.mmm XTE = Cross Track error The distance from the boat’s present position to the closest point on a line between the origin and destinations Waypoints of the navigation...
- Page 51 appendix c terms and functions Distance Units Sets the distance unit among Nm = nautical miles, Mi = miles and Km = kilometres. The default setting is Nm. DTG = Distance To Go The actual dista nce to reach the Target. File File is a collection of info rmation stored on a User C-CARD.
- Page 52 appendix c terms and functions HDOP = Horizontal Dilution Of Precision It is the index for position-fixing accuracy. The smaller the HDOP value, the more accurate ly the position can be fixed. Keypad Beep Enables/Disables the keypad beep. The default setting is On. Info Displays a screen with a list of all objects found in the range of the cursor.
- Page 53 appendix c terms and functions Speed of the boat relative to the water. Longitude The angular distance East or West of the prime meridian (Greenwich meridian) as measured by lines perpendicular parallels converging at the poles from 0° to 180°. Magnetic Deviation The angle between the Magnetic North a nd the Compass North.
- Page 54 appendix c terms and functions Deleting MOB To cancel the MOB mode, press and hold the ‘MARK’ key for two seconds. Names Turns On/Off the displaying of the local area names. The default setting is On. Nav-Aids Turns On/Off the Buoys and Beacons. The default setting is On.
- Page 55 appendix c terms and functions Port Info The Port Info function is a combination of a new Port Info database containi ng all the relevant Safety and Navigational information normally found in good pilot books and a new presentation software which displa ys special Port Facility Symbols.
- Page 56 appendix c terms and functions Route Sequence of Waypoints connected b y legs. Only the currently selected/displayed route can be navigated to or edited. Setup (menu) The Setup me nu is where all the settings and adjustments are made. SNR = Signal to Noise Ratio The ratio of the magnitude of a signal that of the noise (interference).
- Page 57 appendix c terms and functions Tide Info The Tide Info feature is the combination of a tide heights database that is included withi n new C-CARDs and features which calculate the tide graph for all primary and secondary ports world-wide, plus the times of Sunrise and Sunset.
- Page 58 appendix c terms and functions User C-CARD The CND uses the optional user C-CARD to save user data. Before a new user C-CARD can be used, it must be formatted. User Point Place on the chart identified by its coordinates and displayed on the screen with a reference symbol (see Mark, Waypoint).
-
Page 59: Troubleshooting
Appendix C troubleshooting The chartplotter does not turn On Make sure that the correct voltage (10-35V dc) is present. Check also that the polarity is correct. The chartplotter does not get a valid fix Make sure that no metal obstacles are placed around the GPS antenna and that the CND has been correctly wired. -
Page 60: Warranty
warranty warranty 1. Warranty Brookes & Gatehouse Limited (“B&G”) g uarantees this product against defects in materials or workmanship on the terms a nd conditions set out below (the “Warranty”). 2. Warranty Period The Warra nty continues for 24 months from the date of purchase by the user (excluding mechanical items, including but not limited to, autopilot drive units which are subject to 12 months warranty). - Page 61 warranty Warranty 6. Software B&G shall not be liable under this Warranty or o therwise for any defect in software incorporated within the product. 7. Further Warranties The warranty set out in this docume nt is the only warranty offered by B&G. B&G makes no further promises in relatio n to this product such as (b ut not limited to): 7.1.
Need help?
Do you have a question about the h1000 CND and is the answer not in the manual?
Questions and answers