Table of Contents
Advertisement
Advertisement
Table of Contents

Related Manuals for B&G Triton2


Summary of Contents for B&G Triton2
- Page 1 Triton2 Operator Manual ENGLISH www.bandg.com...
- Page 3 Marine Electronics Association. Copyright Copyright © 2016 Navico Holding AS. Warranty The warranty card is supplied as a separate document. In case of any queries, refer to the brand website of your display or system: www.bandg.com. Preface | Triton2 Operator manual...
-
Page 4: About This Manual
Manual version This manual is written for software version 1.0. The manual is continually updated to match new software releases. The latest available manual version can be downloaded from www.bandg.com. Preface | Triton2 Operator manual... -
Page 5: Table Of Contents
31 AIS The AIS page AIS target symbols Selecting a target AIS page display options Displaying target information AIS messages AIS SART Vessel alarms AIS settings 38 Autopilot Safe operation with the autopilot Autopilot controller Contents | Triton2 Operator manual... - Page 6 Cleaning the display unit Checking the connectors Software update 78 Menu flow chart Page menus Settings menu 82 Technical specification 83 Dimensional drawing 84 Terms and abbreviations 86 Supported data NMEA 2000 PGN (transmit) NMEA 2000 PGN (receive) Contents | Triton2 Operator manual...
-
Page 7: Introduction
(988-11233-00n) • AC12N/AC42N Installation manual (988-10276-00n) Ú Note: The last digit in the part numbers is the document's revision code. The latest version of all documents can be downloaded from the product website on www.bandg.com. Introduction | Triton2 Operator manual... -
Page 8: Front Panel And Keys
Press to activate/deactivate a menu/dialog option. MENU/Backlight key Press once to display the page menu. Double-press to display the Settings menu. Press and hold to display the Display setup dialog from where you can adjust the display backlight. Introduction | Triton2 Operator manual... -
Page 9: Basic Operation
Not all pages have a page specific menu, but all page menus give access to the Race timer and to the Settings menu. You can also access the Settings menu by double-pressing the MENU key. Settings menu Page menu Basic operation | Triton2 Operator manual... -
Page 10: Display Setup
Enter key to confirm your selection and to close the dialog Selected field Field in edit mode Ú Note: You can at any time press the Pages key to leave a dialog without saving the entries. Display setup Basic operation | Triton2 Operator manual... -
Page 11: Display Mode
• Instrument display only: Displays active data pages. The Autopilot page can be one of these data pages • Autopilot display only: Displays only the autopilot page Basic operation | Triton2 Operator manual... -
Page 12: Selecting A Data Page
If you don't confirm your selection the menu will timeout and the highlighted page will be displayed after 3 seconds. Scrolling through enabled data pages Press the Pages key to scroll through the enabled data pages. Basic operation | Triton2 Operator manual... -
Page 13: Man Over Board (Mob)
If you have an H5000 CPU on the network the CPU will perform dead reckoning calculations to provide the estimated position of the man over board. This estimated position will be displayed as a triangle symbol. Received MOB position Received and estimated MOB positions Basic operation | Triton2 Operator manual... - Page 14 The system continues to display navigational information towards the MOB waypoint until you cancel the navigation from the menu. Basic operation | Triton2 Operator manual...
-
Page 15: Pages
Automatic scrolling pages You can select to let the system automatically scroll through all enabled pages at a defined time interval. You set the time interval and start the automatic scrolling function from the Pages menu. Pages | Triton2 Operator manual... -
Page 16: Predefined Pages And Template Pages
1 + 3 Digital - side Basic Speed & Depth 1 + 4 Digital Basic Wind angle & Single analog Speed Analog + 3 Composite wind Composite Wind + 3 SailSteer + 3 Steering Single Time plot Dual Time plot Pages | Triton2 Operator manual... - Page 17 TWA (True Wind Angle) - Green if on TWA upwind or downwind. Blue if off target by 10º or more, or on a free leg. The indicator will fade from blue to green the closer you get to the exact angle Pages | Triton2 Operator manual...
- Page 18 Layline limits: Shaded areas indicating the minimum and maximum tack/gybe time period to either side of the layline. This can be set to 5, 10, 15 or 30 minute increments. Indicators Defines which indicators are displayed on the SailSteer page. Pages | Triton2 Operator manual...
- Page 19 Laylines page Ú Note: The Laylines page is only available when an H5000 CPU is connected to the system. Laylines to mark/waypoint with limits. The following options are available from the menu for configuring the page: Pages | Triton2 Operator manual...
- Page 20 This can be set to 5, 10, 15 & 30 minute increments. Wind Plot True wind direction (TWD) and true wind speed (TWS) as a plotted graph over a specified timescale. Pages | Triton2 Operator manual...
- Page 21 Weather data shown graphically along with environmental data for easy visualization. The barometer time period can be set to show from 3 hours until 48 hours history. You change the period from the menu or by using the arrow keys. Pages | Triton2 Operator manual...
- Page 22 The Depth histogram time period can be set to show 5, 10, 30 or 60 minutes history. You change the period from the menu or by using the arrow keys. Speed/Depth page Basic speed and depth. Speed field includes an acceleration bargraph. Pages | Triton2 Operator manual...
- Page 23 The wind angle indicator (1) is red for port and green for starboard tack. The true wind speed field includes a Beaufort scale indicator (2). GPS page GPS and navigation information. If not navigating the navigation fields show dashes. Pages | Triton2 Operator manual...
- Page 24 Easy visualization of wind information. Apparent wind angle indicator (1) and true wind angle indicator (2). AIS page Showing AIS targets within selected range. Refer to "AIS" on page Steering Navigational data, including an easy visualization of compass heading. Pages | Triton2 Operator manual...
-
Page 25: Configuring Data Pages
Configuring data pages Replacing a page Any enabled page can be replaced with one of the other predefined pages, or by a template page if you want to create a custom page. Pages | Triton2 Operator manual... - Page 26 If the actual recorded data is greater than the selected analog scale, the analog needle will remain at the highest point on the scale. The digital window in the center of the display will show the actual value. Pages | Triton2 Operator manual...
-
Page 27: Missing Or Faulty Data
Missing or faulty data If a data type is missing or if the data is out of scale, there will be no data reading on the display. The example shows the basic Depth/Speed page with missing speed information. Pages | Triton2 Operator manual... -
Page 28: Race Timer And Trip Log
(up or down to the nearest full minute) from any page menu, activated by pressing the MENU key. When the Race timer is stopped, the following options are available from the page menu: Race timer and Trip log | Triton2 Operator manual... -
Page 29: Trip Log
Once the time reaches zero it will begin counting up recording the elapsed time. Trip log There are three log options available: Race timer and Trip log | Triton2 Operator manual... - Page 30 Trip 2 requires a compatible GPS connected to the network. You start, stop and reset the active Trip log from the menu, activated by pressing the MENU key. Race timer and Trip log | Triton2 Operator manual...
-
Page 31: Ais
Lost AIS target. When no signals have been received within a time limit, a target is defined as lost. The target symbol represents the last valid position of the target before the reception of data was lost. | Triton2 Operator manual... -
Page 32: Selecting A Target
Your own vessel heading information is read from the active heading sensor, and COG information is received from the active GPS. For other vessels COG data is included in the message received from the AIS system. | Triton2 Operator manual... -
Page 33: Displaying Target Information
List of all AIS messages All received messages are listed in the Message listing, activated by pressing the MENU key when the AIS page is displayed. Select a message and press the MENU key to display the original message. | Triton2 Operator manual... -
Page 34: Ais Sart
Vessel alarms You can define several alarms to alert you if a target shows up within predefined range limits, or if a previously identified target is lost. The alarms are activated from the Alarm Settings dialog. | Triton2 Operator manual... - Page 35 The CPA and TCPA define when a vessel is dangerous regardless of the enabled or disabled state. Vessel message Controls whether an alarm will be activated when a message is received from an AIS target. | Triton2 Operator manual...
-
Page 36: Ais Settings
The extension line can be used to indicate speed and course for targets, either as absolute (true) motion or relative to your vessel. AIS icon orientation Sets the orientation of the AIS icon, either based on heading or COG information. | Triton2 Operator manual... - Page 37 Your vessel's MMSI number Used for entering your own MMSI (Maritime Mobile Service Identity) number into the system. You need to have this number entered to receive addressed messages from AIS and DSC vessels. | Triton2 Operator manual...
-
Page 38: Autopilot
• Verify at regular intervals the course and position of the vessel • Always switch to Standby mode and reduce speed in due time to avoid hazardous situations Autopilot | Triton2 Operator manual... -
Page 39: Autopilot Controller
For boat type set to SAIL: activates Wind mode (A) • For other boat type settings: activates NoDrift mode (B) Press and hold to activate NAV mode (C) STBY key Press to activate Standby mode. Autopilot | Triton2 Operator manual... -
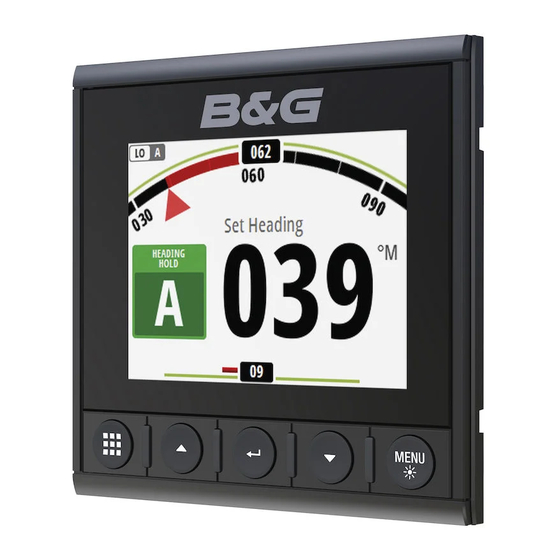
Page 40: The Autopilot Page
The autopilot has several steering modes. The number of modes and features within the mode depend on the autopilot computer, the boat type and available inputs, as explained in the description of the following steering modes. Autopilot | Triton2 Operator manual... -
Page 41: Standby Mode
Switch to AUTO mode by pressing the AUTO key. When the • mode is activated, the autopilot selects the current boat heading as the set heading. Changing set heading in AUTO mode You adjust the set heading by using the port or starboard keys. Autopilot | Triton2 Operator manual... - Page 42 Warning: In wind mode the autopilot steers to the apparent or true wind angle and not to a compass heading. Any wind shift could result in the vessel steering on an undesired course. Autopilot | Triton2 Operator manual...
- Page 43 It is not possible to select NoDrift mode if position and heading information is missing. In NoDrift mode the vessel is steered along a calculated track line, from present position and in a direction set by the user. If the vessel Autopilot | Triton2 Operator manual...
- Page 44 AUTO key activates the heading capture function. This will automatically cancel the turn, and the vessel will continue on the heading read from the compass the very moment you pressed the AUTO key. Autopilot | Triton2 Operator manual...
- Page 45 • seconds when the autopilot is in AUTO mode. • Confirm to switch to NAV mode in the dialog by pressing the AUTO key on the autopilot controller or the Enter key on the Triton Autopilot | Triton2 Operator manual...
- Page 46 If the turn is not accepted, the vessel will continue with the current set heading. Course change less than set limit Course change larger than set limit The course change limit setting depends on the autopilot computer: • H5000: Fixed value (30°) Autopilot | Triton2 Operator manual...
-
Page 47: Using The Autopilot In An Evc System
The autopilot settings can be split between settings done by the user, and settings done during installation and commissioning of the autopilot system. • User settings can be changed for various operational conditions or user preferences Autopilot | Triton2 Operator manual... - Page 48 Steering (H5000) This option allows for manually changing parameters that were set during the commissioning of the autopilot computer. For more details of the settings, refer to the separate documentation for the autopilot computer. Autopilot | Triton2 Operator manual...
- Page 49 Limits: Allows control of the True Wind Angle range where Gust and True Wind Speed response can be configured and controlled - TWA min: Minimum True Wind Angle that gust and True Wind Speed response operate in. Autopilot | Triton2 Operator manual...
- Page 50 - Gust Min: Minimum gust in knots before gust compensation is applied - Response rate: Adjust how aggressively the autopilot will react to gusts - TWA response: Controls the size of the window in which gust response will operate Autopilot | Triton2 Operator manual...
- Page 51 • Low speed / High speed - Turn rate: The rate the vessel is turning in degrees per minute - Rudder gain: Ratio between the heading error and the commanded angle Autopilot | Triton2 Operator manual...
- Page 52 Wind mode: Select what wind function the autopilot will use when in wind mode - Auto: If TWA is <70º: Wind mode will use AWA If TWA is ≥70º: Wind mode will use TWA - Apparent Autopilot | Triton2 Operator manual...
- Page 53 A low response level reduces the rudder activity and provides a more “loose” steering • A high response level increases the rudder activity and provides a more “tight” steering. A too high response level causes the boat to start lazy-s movements. Autopilot | Triton2 Operator manual...
- Page 54 • Tack angle: Controls the angle that the boat will tack to between 50º - 150º in AUTO mode • Wind mode: Select what wind function the autopilot will use when in wind mode Autopilot | Triton2 Operator manual...
- Page 55 The best way of checking the value of the Counter Rudder setting is when making turns. - Auto trim: When the vessel has a constant heading error due to external forces such as wind and current, the Auto trim Autopilot | Triton2 Operator manual...
- Page 56 SG05 Autopilot computer The SG05 Autopilot computer offers the same settings as the AC12N/AC42N Autopilot computers. Refer to "AC12N/AC42N Autopilot computer" on page 53. Autopilot | Triton2 Operator manual...
-
Page 57: Alarms
A reminder reappears at given intervals for as long as the alarm condition exists. Ú Note: An alarm received from non Navico units on the network must be acknowledged on the unit generating the alarm. Alarms | Triton2 Operator manual... -
Page 58: Enabling The Alarm System And The Alarm Siren
Press the Enter key to enable/disable the alarm Press the MENU key to show the menu from where you can • access the alarm limits Alarm history The Alarm history dialog stores alarm messages until they are manually cleared. Alarms | Triton2 Operator manual... -
Page 59: Alarm Limits On Analog Pages
This gives you a visual indication of alarm zones. True Wind Speed page showing Depth page showing high and low true wind limits shallow and deep water limits Alarms | Triton2 Operator manual... -
Page 60: Software Setup
Select the type of display you want to configure - Connected displays of the selected type are listed Highlight the display you want to configure - The HV display itself starts flashing Press the MENU key to display the options available: Software setup | Triton2 Operator manual... -
Page 61: Calibration
GPS, and compares the average of SOG against the average boat speed from the speed sensor for the duration of the calibration run. Ú Note: This calibration should be made in calm sea with no effect from wind or tidal current. Software setup | Triton2 Operator manual... - Page 62 If boat speed is not available from a paddle wheel sensor, it is possible to use speed over ground from a GPS. SOG will be displayed as boat speed and used in the true wind calculations and the speed log. Software setup | Triton2 Operator manual...
- Page 63 TWA correction table - If true wind direction is being shown as a header each time you tack then True Wind Angle is reading too narrow, add half the error to the TWA correction table Software setup | Triton2 Operator manual...
- Page 64 Motion Correction for motion correction to be applied to measured wind speed and wind angle. Depth Depth offset All transducers measure water depth from the transducer to the bottom. As a result, water depth readings do not account for the Software setup | Triton2 Operator manual...
- Page 65 All magnetic compasses must be calibrated to ensure correct heading reference. The calibration must be made on the active compass. The calibration should be done in calm sea conditions and with minimal wind and current to obtain good results. Software setup | Triton2 Operator manual...
- Page 66 Ú Note: In certain areas and at high latitudes the local magnetic interference becomes more significant, and heading errors exceeding ±3° may have to be accepted. Software setup | Triton2 Operator manual...
- Page 67 Starts the automatic calibration of the rudder feedback. This procedure sets the correct relationship between the physical rudder movement and the rudder angle readout. Follow the instructions on the display to perform the rudder feedback calibration procedure. Software setup | Triton2 Operator manual...
- Page 68 5, 10, 15 & 30 minute increments. Advanced This option is used for manually applying an offset to the displayed data for third party sensors which cannot be calibrated through the Triton Software setup | Triton2 Operator manual...
-
Page 69: Damping
Device list The Device list shows the devices that provide data. This may include a module inside the unit, or any external NMEA 2000 device. Software setup | Triton2 Operator manual... - Page 70 However, Rx and Tx errors are most likely indicating issues with the physical network, which may be resolved by correcting termination, reducing backbone or drop lengths, or reducing the number of network nodes (devices). Software setup | Triton2 Operator manual...
- Page 71 Ú Note: Rx and Tx Errors often indicate an issue with the physical network, which may be resolved by correcting termination, reducing backbone or drop lengths, or reducing the number of network nodes (devices). Software setup | Triton2 Operator manual...
-
Page 72: Decimal Places
30% • Display group: Defines which network group the unit belongs to • Night mode: Activates/deactivates the night mode color palette • Night mode color: Sets the night mode color palette Software setup | Triton2 Operator manual... - Page 73 Refer to "Sailing (H5000)" on page 50. Files File management system. Used to browse the contents of the unit's internal memory and the content of a device plugged into the unit's USB port. Software setup | Triton2 Operator manual...
-
Page 74: Restore Defaults
These limits are a visual guide on the data pages. They do not set any alarms. Global reset Resets the source selection on all displays connected to the network. About Displays copyright information, software version, and technical information for this unit. Software setup | Triton2 Operator manual... -
Page 75: Maintenance
You can update the software for the Triton unit itself and for NMEA 2000 sensors connected to the network from the Triton You can check the units software version from the About dialog. Maintenance | Triton2 Operator manual... - Page 76 Remove the USB device when the update is completed. Warning: Do not remove the USB device until the update is completed. Removing the USB device before the update is completed may damage the unit. Maintenance | Triton2 Operator manual...
- Page 77 Insert the USB device to the Triton unit Start the File explorer, and select the update file on the USB device Start the update from the file details dialog Remove the USB device when the update is completed. Maintenance | Triton2 Operator manual...
-
Page 78: Menu Flow Chart
If relevant, the page menu includes basic functions for that panel. All page menus include access to the Race timer and to the Settings dialog. Settings menu Level 1 Level 2 Race timer Race Timer Pages Pages... AutoScroll AutoScroll time Menu flow chart | Triton2 Operator manual... - Page 79 Environment... Rudder... Laylines... Advanced... Damping Heading Apparent wind True wind Boat speed Heel Angle Trim Angle Tide Trip log Trip 1... Trip 2... Log... Alarms Alarm history... Alarm settings... Alarms enabled Siren Enabled Menu flow chart | Triton2 Operator manual...
- Page 80 Commissioning manual (988-11233-00n) Autopilot, AC12N, AC42N Response and SG05 Sea state filter Sailing *** Refer to the AC12N/AC42N Installation manual Automatic steering (988-10276-00n) Installation *** Dangerous vessels... Speed and course AIS icon orientation MMSI... Menu flow chart | Triton2 Operator manual...
- Page 81 Level 1 Level 2 System Network Units Decimal places Key beeps Language Time... Display Setup Display mode... Files Simulate Restore defaults... Engine setup Global reset... About Menu flow chart | Triton2 Operator manual...
-
Page 82: Technical Specification
White for day mode. Red, green, Illumination blue or white for night mode Environmental protection Waterproof rating IPx7 Humidity 100% RH Temperature Operating -25° to +65ºC (-13°F to +149 ºF) Storage -40° to +85ºC (-40°F to +185 ºF) Technical specification | Triton2 Operator manual... -
Page 83: Dimensional Drawing
Dimensional drawing 36.5 mm (1.43") 8 mm 28.5 mm 118 mm (4.64") (0.31") (1.12") 97.5 mm (3.83") Dimensional drawing | Triton2 Operator manual... -
Page 84: Terms And Abbreviations
GLONASS Global Orbiting Navigation Satellite System GMDSS Global Maritime Distress And Safety System GNSS Global Navigation Satellite System Global Positioning System Heading Kilometer Knots LL DIST Layline distance LL TIME Layline time Meters Terms and abbreviations | Triton2 Operator manual... - Page 85 Track course to next waypoint True wind angle True wind direction True wind speed Wheel Over Line Wheel Over Point Waypoint name WPT BRG Bearing to waypoint WPT DIST Distance to waypoint Cross track error Terms and abbreviations | Triton2 Operator manual...
-
Page 86: Supported Data
127251 Rate of Turn 127257 Attitude 127258 Magnetic Variation 127488 Engine Parameters, Rapid Update 127489 Engine Parameters, Dynamic 127493 Transmission Parameters, Dynamic 127505 Fluid Level 127508 Battery Status 128259 Speed, Water referenced 128267 Water Depth Supported data | Triton2 Operator manual... - Page 87 130074 Route and WP Service - WP List - WP Name & Position 130306 Wind Data 130310 Environmental Parameters 130311 Environmental Parameters 130312 Temperature 130313 Humidity 130314 Actual Pressure 130576 Small Craft Status 130577 Direction Data Supported data | Triton2 Operator manual...
Need help?
Do you have a question about the Triton2 and is the answer not in the manual?
Questions and answers
Can I use a B&G v20s vhf with built in gps as a nmea2000 gps input to the Triton2 display?