Table of Contents
Advertisement
Advertisement
Table of Contents
Troubleshooting

Related Manuals for Classe Audio Sigma SSP


Summary of Contents for Classe Audio Sigma SSP
- Page 1 Owner’s Manual Sigma SSP Surround Sound Preamp/Processor...
- Page 2 NOTICE All of us at Classé take extreme care to ensure that your purchase will remain a prized investment. We are proud to inform you that all Classé components have been officially approved for the European Community (CE) mark. This means that your Classé product was subjected to the most rigorous manufacturing and safety tests in the world. The CE mark certifies that your purchase meets or exceeds all European Community requirements for manufacturing consistency and consumer safety.
- Page 3 Important Safety Instructions 1. Read these instructions. 2. Keep these instructions. 3. Heed all warnings. 4. Follow all instructions. 5. Do not use this apparatus near water 6. Clean only with dry cloth. 7. Do not block any ventilation openings. Install in accordance with the manufacturer’s instructions. 8. Do not install near any heat sources such as radiators, heat registers, stoves, or other apparatus (including amplifiers) that produce heat.
-
Page 4: Table Of Contents
GUI ....................7 network connectivity and streaming audio ..........7 extraordinary longevity ................7 Unpacking and Placement ................8 unpacking your SSP ...................8 Sigma SSP placement considerations ............8 Rack-Mounting the Sigma SSP ..............9 warm-up/break-in period ................ 10 operating voltage ..................10 Front Panel .....................11 Rear Panel ......................14... - Page 5 Remote Fkeys ..................43 Important note on Fkey use ..............44 Teach IR ....................44 Controls ....................45 Tone Control ................... 45 Dolby Music ................... 46 Dolby Volume and Late Night ..............46 Balance ....................47 DTS Music ....................47 Lip Sync ....................
-
Page 6: Introduction
Introduction Welcome to the Classé family! Congratulations on your purchase of the Classé Sigma series Surround Sound Preamp/Processor. It is the product of decades of design experience; capable of extracting exceptional performance from a myriad of music and theater sources. We are sure that you will enjoy it for many years to come. Classé... -
Page 7: Exceptional Design Features
The Sigma SSP features a system of filters which, in the hands of an experienced acoustician, can help optimize the performance of your system. -
Page 8: Unpacking And Placement
Unpacking and Placement We have taken all precautions, and made every effort to make the Sigma SSP simple and straightforward to install and use. Still, we recommend that you take a few minutes to review this manual. Even if you are having the preamp/ processor professionally installed, you will want to know how to efficiently operate it to its potential. -
Page 9: Rack-Mounting The Sigma Ssp
Rack-Mounting the The Sigma SSP is designed to accommodate rack-mount installation. Professional Sigma SSP installation by an authorized Classe dealer is recommended. To rack mount the SSP, remove the two side-panel screws, rotate and flip the side panel to position the rack “ear” along the front of the SSP and re-install the side- panel screws. Repeat for the side panel on the opposite side. Remove the feet from the bottom of the SSP. -
Page 10: Warm-Up/Break-In Period
In our experience, you can expect the greatest changes within the first 72 hours. After initial break-in, you’ll enjoy consistent performance levels for years to come. operating voltage The operating voltage of your Sigma SSP is 100-240 V, 50/60 Hz. Important! Attempting to operate your SSP from an incorrect AC voltage rating may cause irreparable damage which may not be covered by your warranty. -
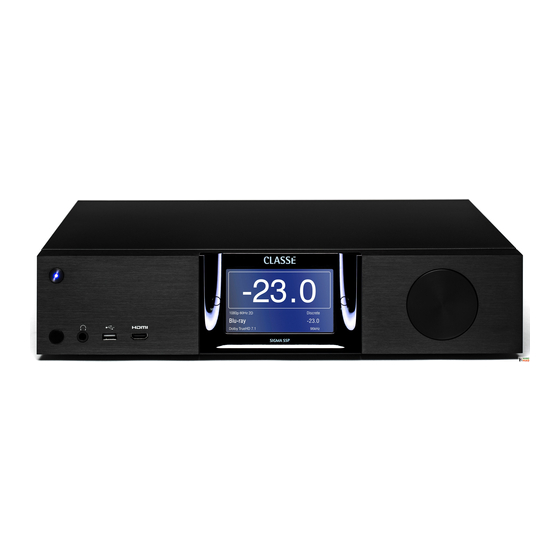
Page 11: Front Panel
MUTE SIGMA SSP Front Panel The front panel of the Sigma SSP is shown above. The numbers in the drawing refer to the descriptions that follow. Standby/On Button and Status Indicator LED Pressing the Standby button puts the SSP into standby mode – a low- power state which leaves the preamp/processor and outputs inactive. -
Page 12: Headphone Jack
The menu system gives you control over operational details including: system setup options, various display options and custom installation capabilities so that the Sigma SSP integrates smoothly into the most complex systems. For more information, see the Menu System later in this... -
Page 13: Mute Control
Touchscreen The front panel touchscreen is used for day-to-day operation of the SSP. It is also used for setup and to display useful information as required. Mute Control The Mute button reduces the SSP volume by a pre-determined amount. Pressing it a second time restores the volume to its previous level. This behavior can be easily customized for very specific user requirements. -
Page 14: Rear Panel
COAX 2 COAX OUT AUX 2 Rear Panel The rear panel of the Sigma SSP is shown above. The numbers in the drawing refer to the descriptions in this section. serial number You’ll find your SSP serial number adjacent to the AC Power Cord Input, as shown in the graphic above. Please record this number for future reference. - Page 15 HDMI signals. Consult your Classé dealer for assistance. Digital Audio Input - USB The Sigma SSP supports digital audio sources up to 24-bit/192 kHz via USB. The rear panel USB Device connector mates with a USB Host such as a PC or Mac.
- Page 16 11 RS-232 Port The primary purpose of the RS-232 port is to support the use of external commands to allow remote control of the Sigma SSP by such systems as ® ® , Control 4, Creston and Savant .
- Page 17 For more information, please contact your dealer and ask about home automation systems. RJ-45 - DB9 female adaptor If your RS-232 control system uses a cable with a male DB9 connector, you will need to buy or build an adaptor to convert the RJ-45 female to a DB9 female.
- Page 18 13 7.1-Channel Analog Outputs The Sigma SSP supports eight channels of analog audio output, with both balanced (XLR) and single-ended (RCA) connections available for the Front Left and Front Right channels. Connect the FR or R and FL or L outputs to the Right and Left amplifier channels respectively.
- Page 19 The Ethernet connection is used to enable streaming of audio using Apple’s AirPlay or DLNA. This connection also supports IP control for using the Classé App with an iOS device such as an iPad, iPhone or iPod touch, and/or home automation system to control the Sigma SSP via your home Network. 15 Main Power On/Off Switch This switch connects and disconnects the Sigma SSP from AC.
-
Page 20: The Remote Control
Function Keys (F1 to F3) The last three buttons on the remote control are the Function buttons, or Fkeys, which provide additional flexibility to the Sigma SSP remote control. Think of them as “favorite” buttons that provide direct access to specific functions or commands not covered by the other buttons. - Page 21 Using the Remote and Accessing the Battery The IR Remote ships with a battery already installed. This battery is covered by a protective film that prevents it from discharging during storage. To use the remote for the first time, open the cover by inserting a large paperclip or similar tool into the hole on the back cover at an angle to depress the button and release the catch.
-
Page 22: Initial Setup
For this reason, the Left and Right channel outputs of the Sigma SSP are available in a properly implemented balanced configuration, allowing you to maximize performance for these critical channels with both two-channel music and multichannel audio sources. To fully realize these potential benefits, high quality interconnect cables... - Page 23 Source button from the Source Selection page. See the Menu System section for details. Step 4 Connect the power amplifier(s) to the Sigma SSP rear panel. Important! Verify that the power amplifier(s) is plugged in but powered...
- Page 24 SSP. The Sigma SSP also provides two Auxiliary analog audio outputs. See the section on Configuration Setup for more details about the Auxiliary outputs. If used, connect the AUX output(s) to its corresponding amplifier(s).
-
Page 25: Understanding Surround Sound
Understanding Surround Sound Today’s sophisticated surround sound systems have spawned a bewildering array of technologies and acronyms. In this section, we’ll give you a basic overview of what all that jargon means. As a result, you’ll be better equipped to use your SSP and associated source components to their best advantage. how many channels? Although formats with even more channel options will become increasingly available, today’s home entertainment systems typically reproduce soundtracks that include anything from one to eight separate channels of information. Examples include: • Watching mono movies, such as Casablanca or The Wizard of Oz, having only a single channel of audio information in the soundtrack. - Page 26 By contrast, modern soundtracks use discrete digital channels of information. That is, each speaker has a distinct signal that is completely independent of every other channel. This approach is clearly more desirable, since it gives the movie- makers more creative control over the quality of your experience. Musicians also prefer discrete formats, since it allows them to place their instruments and voices with greater precision, to create the musical effects they desire.
- Page 27 up to 5.1 Discrete Similar to Dolby Digital in practice though it uses different technology and requires a somewhat higher bit rate. Modern SSPs and AVRs are equipped to decode both. DTS-ES Matrix Mostly Discrete A center rear channel is matrix encoded into the L&R Surround channels.
-
Page 28: Post-Processing
post-processing The first thing the Surround Sound Preamp/Processor does is recover the various channels delivered by your source with accuracy and fidelity. This might be a single-channel mono signal, a Dolby True HD soundtrack with 7.1 channels, or anything in between. The signal may have been delivered via satellite receiver, cable set-top box, Blu-ray Disc, or even downloaded from the Internet. Once the SSP has decoded the selected signal, various time delay and level offset adjustments are made to optimize the signal for playback on your system. - Page 29 Movie Plus up to 7.1 Takes 2-channel sources and creates multichannel playback for up to 7.1 channels with the relative speaker levels balanced for surround envelopment appropriate to movies. Music Plus up to 7.1 Takes 2-channel sources and creates multichannel playback for up to 7.1 channels with the relative speaker levels balanced for surround envelopment appropriate to music.
- Page 30 Neo6 up to 6.1 Creates up to 6.1 channels from a two-channel source. The sixth channel is used for Center Rear but my also play as two mono channels in systems configured with L&R Rear speakers. Neo6 Music up to 6.1 Creates up to 6.1 channels from a two-channel source.
-
Page 31: Using The Sigma Ssp
If more are enabled, they will be available on the next page by touching the button in the upper right corner of the page. See the section on source setup in the Menu System. The Sigma SSP has up to 18 selectable source buttons which are all interchangeable. - Page 32 (and you have more than nine source buttons enabled), press the button for the next page of sources. Or, press the button to return to the previous page. The Sigma SSP comes from the factory with eighteen source buttons labeled and enabled. To change the default settings and labels or to disable unused buttons, see the Menu System.
-
Page 33: The Menu System
The Menu System The comprehensive menu system provides setup and configuration controls for the Sigma SSP. These installation-specific features let you customize how the SSP works within the context of your particular system. Changes are made on-the-fly, which allows you to quickly set up and modify settings without constantly being asked if you’re sure you want to make the change and pressing enter to save. The... -
Page 34: Source Setup
• teach IR commands Source Setup Each of the 18 source buttons supported by your Sigma SSP can be customized in several ways to enhance system performance or to simplify operation. The source select page is dynamic in that it shows up to nine sources on a single page. -
Page 35: Source Name
There can be significant differences in output levels, especially among analog sources, which can lead to unexpected changes in volume when switching among them. The Sigma SSP provides an input offset adjustment range from -10 to +10 dB. Dolby Volume may be enabled to be engaged independently for each source whenever that source is selected. -
Page 36: Pass-Thru
Choosing Discrete as the Favorite Mode will output whatever number of channels the original signal contains. Note that for 7.1 channel systems with a 7.1 channel configuration selected, using Discrete mode may result in only 5.1 channels playing if only 5.1 channels are present on the original media. You might think of this as a purest mode, but most users who have 7.1 channels installed want to have sound from all of them, at least when listening to multichannel. For this reason, post processing modes like Dolby EX or Neo6 Cinema may be chosen as Favorite Modes since they will generate information... -
Page 37: Configuration Setup
Configuration Setup The Configuration Setup page allows you to define up to six different speaker configurations. Touch the button for the specific configuration you want to set up to open its configuration setup menu. The page contains buttons for naming the configuration and enabling balanced (XLR) and single-ended (RCA) outputs for Front L&R, and independently enabling Center, Subwoofer, Surround and Auxiliary outputs. -
Page 38: Auxiliary Channels
Auxiliary Channels The Sigma SSP has two auxiliary channels that can be utilized for bi-amping the L&R speakers, adding Rear channels, adding Height channels for the Dolby PLIIz mode or providing a two-channel down-mix for an analog recorder or another system. -
Page 39: Timeout
Timeout If you prefer listening to music in a dimly-lit or darkened room or the SSP is in your field of vision while watching movies, you may find even the low brightness setting of the display somewhat distracting. You can essentially turn off the touchscreen by reducing the timeout value of the backlighting so as to turn it off entirely after a period of inactivity that you may select. -
Page 40: Max Volume
Sigma SSP can provide. This setting is interactive. It is easiest to play the system at increasing levels until you reach the volume which you want to use as the maximum for the system. -
Page 41: Mute Setup
Mute Setup The Mute Setup page allows you to choose how the Mute button functions. The options for mute control are: • specific - allows you to select the exact value to which the volume is attenuated. If the current volume is already below that level when muting is engaged, the volume remains unchanged. -
Page 42: Tone Control Setup
You do not need to have all or even any filters enabled for every channel. The installer need only make the adjustments to the channels necessary to correct for the room’s interaction. We encourage you to consult with your authorized Classé dealer to properly calibrate the Parametric EQ function. NOTE: a discrete IR command or Fkey may be used to toggle the EQ on and off to easily compare before and after from the listening position. -
Page 43: Firmware Update Via Network
The Sigma SSP includes a built-in web interface that can be used to configure the system name, Network settings or update the SSP software. To access the interface, type the IP address displayed on the Network Setup page in the URL line of your browser (e.g. 192.168.1.0) and hit return. Alternately if you are using Safari on the Mac, you can “Show All Bookmarks” (See: Bookmarks menu) and click on Bonjour and double click on your Sigma SSP device listed in the Webpage’s folder. -
Page 44: Important Note On Fkey Use
CD player to Play, both from the press of a single Fkey. Teach IR The complete list of Sigma SSP discrete infrared (IR) command codes extends beyond what is practical for any one handheld remote control. However, many of these functions are critical if you plan to create a customized remote control with macros that take command of your entire system. -
Page 45: Controls
Controls The Controls page gives access to settings that are independent of those found in System Setup and more likely to be changed or used only temporarily. Tone Control Setting up the Tone Control involves choosing high- and low-frequency inflection points, and relative cut or boost for them. The factory default settings create what is called a tilt control, which tilts the tonal balance either toward more high and less low frequency for a leaner, crisper sound, or the opposite direction toward a warmer, fuller sound. -
Page 46: Dolby Music
Dolby Music Parameters for playback in the Dolby PLIIx/PLIIz Music mode may be modified to tailor your listening experience to your tastes. The Dimension control acts like a front/rear fader whereby increasing the Dimension shifts the balance toward the surround channels. The Center Width control adjusts the center versus left/ right channel balance to control how wide the center image is. -
Page 47: Balance
Dolby Late Night mode, not available when Dolby Volume is active, provides a means of compressing the signal to reduce the difference between the loudest and softest passages. As the name implies, it can be useful late at night when you want to watch a movie without worrying that the loudest passages will wake the kids (or mom and dad!). Some recordings offer the author the option of engaging the Late Night mode automatically. If this flag is detected in the bitstream and Auto Night is enabled, the feature will engage automatically. -
Page 48: Lip Sync
Lip Sync The Lip Sync function allows temporary adjustment of audio delay. This is sometimes necessary due to a problem with the media or as a result of video processing somewhere in the signal chain causing a video delay. Lip sync allows a corresponding audio delay to be added to synchronize audio with video. -
Page 49: Status
Status The Status screen provides several items of information on the currently selected source and configuration as well as access to information on the firmware used in and the internal settings and sensors of the SSP. While on this page, pressing the more button will access the CAN-Bus features for connected Classé... - Page 50 The diagrams below illustrate how to connect the CAN-Bus hardware. Any combination of models in any order. CAN-BUS CAN-BUS CAN-BUS CAN-BUS For any system with SSP-300 or SSP-600. CAN-BUS CAN-BUS CAN-BUS CAN-BUS NOTE: Daisy chain may need to be terminated with CAN-Bus Terminator.
-
Page 51: Using Can-Bus
using CAN-Bus CAN-Bus is controlled via the touchscreen of any Classé component that is so equipped. There is no master component, so Classé series systems where two or more units have a touchscreen can be controlled through any of the touchscreens. However, it is probably easiest to start using CAN-Bus through just one. CAN-Bus is accessed by pressing the menu button on the face of the unit or remote, then the status button, followed by the more or button. -
Page 52: Ac Status
AC status The AC status screen displays information from the target unit’s electrical supply sensors. Two screens are available, the second can be accessed by selecting more. status The status screen is the simplest way to access essential information about the target unit. It displays the target unit’s model number, software version, operational status and serial number. name You can set the name that this component will be listed under in the CAN-Bus devices screen. The name will appear next to the unit model and serial number, and facilitate the identification of units in large systems. -
Page 53: Amp Info
Once you have selected the input, press back, then select configuration. PlayLink is activated and disabled through the PlayLink icon on the CAN-Bus configuration screen. PlayLink is automatically active after a software update, and the PlayLink icon will only appear on the CAN-Bus configuration screen of a Delta series disc player. PlayLink can only select a single input per disc player. It is therefore not designed for users who regularly play both CDs and DVDs through different inputs from a single disc player. -
Page 54: Network Sources
The home page shows stream status including the clock status and file format. The Sigma SSP supports the Apple AirPlay protocol for streaming audio through a Network using wired (Ethernet) or wireless (WiFi) connections, or a combination of the two. AirPlay lets you stream audio from your WiFi Network-connected iPad, iPhone or iPod touch, or using iTunes, stream from a (WiFi or Ethernet) Network-connected Mac or PC. Working within the Apple... - Page 55 Using an iOS device for AirPlay works the same way. Choose the Music App icon, tap the AirPlay icon, select the Sigma SSP from the list of AirPlay speakers, choose your music and play. Volume is likewise adjusted in the SSP by using the volume control on the device.
-
Page 56: Troubleshooting
This section provides suggested solutions to potential problems. If none of these solutions work, please consult your Classé dealer for assistance. There are no user-serviceable parts inside the Sigma SSP. Important! Verify that the power amplifier(s) connected to the SSP is powered off before checking any cable connections and before power cycling the unit. -
Page 57: Network/Streaming Troubleshooting
One speaker or subwoofer seems not to be playing. P If the problem occurs with all inputs, check the interconnecting cables between the preamp and the power amp. Also check the speaker wires for secure connections. P Check the balance control setting by pressing MENU on the front panel, and then verify the balance control setting is not turning one channel off or reducing it’s output. - Page 58 Streaming audio drops out frequently. P Usually a problem associated with wireless networks, if you are using a wireless bridge, make sure the signal strength from your wireless router is good (they may need to be located closer together) and devices that cause interference such as microwave ovens are not in use.
-
Page 59: Care & Maintenace
Care & Maintenance To remove dust from the cabinet of your Sigma SSP, use a feather duster or a lint-free soft cloth. To remove dirt and fingerprints, we recommend isopropyl alcohol and a soft cloth. Dampen the cloth with alcohol first and then lightly clean the surface of the SSP with the cloth. Caution! Power down and remove the AC power cord from the SSP before performing maintenance. At no time should liquid cleaners be applied directly to the unit. -
Page 60: Specifications
Specifications All specifications are accurate at the time of printing. Classé reserves the right to make improvements without notice. n USB audio up to 24-bit/192 kHz n USB (Host) charging capability 2 Amps n AirPlay supported formats AAC (8 to 320 kbps), Protected AAC (from iTunes Store), HE-AAC, MP3 (8 to 320 kbps), MP3 VBR, Audible (formats 2, 3, 4) Audible Enhanced Audio (AAX and AAX+), Apple Lossless, AIFF, and WAV... - Page 61 Continued Made for: iPod touch (5th generation) iPod nano (7th generation) iPod touch (4th generation) iPod nano (6th generation) iPod touch (3rd generation) iPod nano (5th generation) iPod touch (2nd generation) iPod nano (4th generation) iPod touch (1st generation) iPod nano (3rd generation) Made for: iPhone 5S iPhone 3GS...
-
Page 62: Dimensions
Dimensions 17.00” (433.00) 3.45” 3.75” (88.00) (95.00) 17.00” (433.00) 13.39” (340.00) 2.10” (53.59) 9.65” (245.80) 14.57” (370.00) 14.88” (378.70) -
Page 63: Installation Worksheet
Installation Worksheet Source: ______________________________________________________________ Audio Connector:______________________________________________________ Input:_______________________________________________________________ Source: ______________________________________________________________ Audio Connector:______________________________________________________ Input:_______________________________________________________________ Source: ______________________________________________________________ Audio Connector:______________________________________________________ Input:_______________________________________________________________ Source: ______________________________________________________________ Audio Connector:______________________________________________________ Input:_______________________________________________________________ Source: ______________________________________________________________ Audio Connector:______________________________________________________ Input:_______________________________________________________________ Source: ______________________________________________________________ Audio Connector:______________________________________________________ Input:_______________________________________________________________ Source: ______________________________________________________________ Audio Connector:______________________________________________________ Input:_______________________________________________________________... - Page 64 B&W Group, Ltd. 5070 François Cusson Lachine, Quebec Canada H8T 1B3 +1 (514) 636-6384 +1 (514) 636-1428 (fax) http://www.classeaudio.com North America: (514) 636-6384 email: cservice@classeaudio.com Europe: 44 (0) 1903 221 700 email: classe@bwgroup.com Asia: (852) 2790 8903 email: classe@bwgroup.hk All Others: +1 514 636 6384 email: cservice@classeaudio.com Copyright © 2014 B&W Group Ltd.
Need help?
Do you have a question about the Sigma SSP and is the answer not in the manual?
Questions and answers