Table of Contents
Advertisement
Quick Links
Advertisement
Table of Contents

Related Manuals for Advantech PDC-190S


Summary of Contents for Advantech PDC-190S
- Page 1 User Manual PDC-190S...
-
Page 2: Declaration Of Conformity
No part of this manual may be reproduced, copied, translated or transmitted in any form or by any means without the prior written permission of Advantech Co., Ltd. Information provided in this manual is intended to be accurate and reliable. How- ever, Advantech Co., Ltd. -
Page 3: Packing List
Packing List Before setting up the system, check that the items listed below are included and in good condition. If any item is missing, please contact your dealer immediately. PDC-190S display monitor Accessories for PDC-190S – AC/DC power adapter (MPU100-105, P/N: 1757000275) –... - Page 4 Visit the Advantech websites at www.advantech.com or www.advantech.com.tw where you can find the latest information about the product. Contact your distributor, sales representative, or Advantech's customer service center for technical support if you need additional assistance. Please have the following information ready before you call: –...
-
Page 5: Safety Instructions
This equipment is not classified as Category AP or APG Disconnect device: Appliance inlet. Follow the national requirement to dispose unit. Maintenance: to properly maintain and clean the surfaces, use only the approved products or clean with a dry applicator. PDC-190S User Manual... - Page 6 The sound pressure level at the operator's position according to IEC 704-1:1982 is no more than 70dB (A). DISCLAIMER: This set of instructions is given according to IEC 704-1. Advantech disclaims all responsibility for the accuracy of any statements contained herein.
-
Page 7: Table Of Contents
Location and Function of Parts and Controls ..........8 Figure 2.1 Front Panel of PDC-190S........... 8 Table 2.1: Control Buttons of PDC-190S........8 Figure 2.2 I/O Section of PDC-190S..........9 Table 2.2: I/O Connectors of PDC-190S ........9 Preparing for First-time Use ..............10 Installation Procedures................11 2.3.1 Connect DVI Cable .............. - Page 8 Appendix C Cleaning/Disinfecting ....... 33 On Cleaning the Monitor ................. 34 Table C.1: Cleaning Agent list: Chemical Disinfectants which Have Been Tested on the PDC-190S........ 34 Appendix D Serial Remote Control ...... 35 Using Serial Communications..............36 Command Outline ................... 37 Figure D.1 Communication packet format........
-
Page 9: Chapter 1 General Information
Chapter General Information... -
Page 10: Introduction
Slim and light, they can be used in many installations - fixed to a wall or ceiling, mounted on a standard arm or installed on the optional stand. The front side of the PDC-190S is IP65 certified dust and water resistant to ensure reliability in medical environments. - Page 11 EN 61000-3-2: 2000 + A2: 2005 EN 61000-3-3: 1995 + A1: 2001 For US FCC 47 CFR Part15, Subpart B, Class B CISPR 22:1997+A1: 2000 ICES-003: 2004 Safety: For Europe EN60601-1 TUV For US UL60601-1 For China PDC-190S User Manual...
-
Page 12: Connectors
Connectors Figure 1.1 PDC-190S connection port The following connectors are situated on the rear of the PDC-190S (From left to right): 1.3.1 DC 12V Power In The connector is connected to the DC 12V Switching Power Supply. 1.3.2 Analog and Digital Port (DVI-I) The DVI-I connector integrates the analog RGB and digital DVI in one port, that can be selected via "source"... -
Page 13: Serial Remote Rs-232C Port (Db-9, Female)
The signal is output from the Loop-through terminal only when the monitor is ON. 1.3.8 Audio Port (Audio Jack) PDC-190S supports one audio line-in port, and the audio volume can be adjusted via OSD. 1.3.9 USB Type B Port and USB Type A Port There is one USB 2.0 input that can accept signals from an external standard PC via... -
Page 14: Equipotential Terminal
1.3.10 Equipotential Terminal Connects the equipotential plug in the European Market. Dimensions Figure 1.2 Dimensions of the PDC-190S PDC-190S User Manual... -
Page 15: Chapter 2 System Setup
Chapter System Setup... -
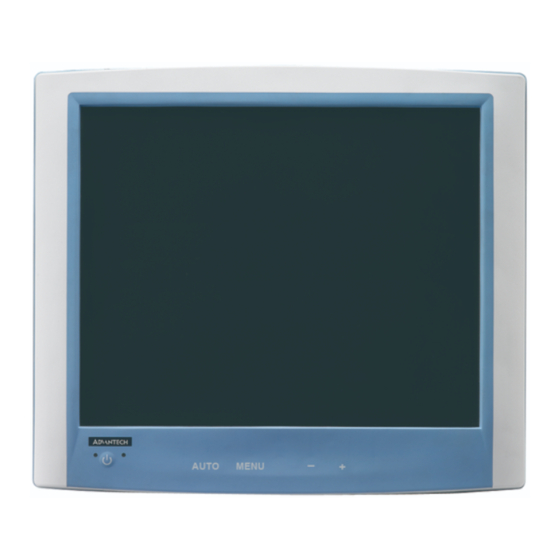
Page 16: Location And Function Of Parts And Controls
Location and Function of Parts and Controls Before you start to set up the PDC-190S, take a moment to become familiar with the locations and purposes of the controls, drives, connectors and ports, which are illus- trated in the figures below. When you place the PDC-190S upright on the desktop, its front panel appears as shown in Figure 2.1. -
Page 17: Figure 2.2 I/O Section Of Pdc-190S
When you turn the PDC-190S around and look at its rear cover, you will find the sunken I/O section is at the bottom of the PDC-190S, as shown in Fig. 2-2. (The I/O section includes various I/O ports, including the DVI-I, Component Video, S-Video, USB ports, and the line-in jack. -
Page 18: Preparing For First-Time Use
Connectors for the signal cables and power are located on the back of the panel behind the cover door. Caution! To select the signal input for each connector manually, press the source button on the monitor. PDC-190S User Manual... -
Page 19: Installation Procedures
Connect Component/RGB Signal Cable Connect the 3 x BNC (75 ohms) cables to the YPrPb IN connector of the monitor. Or connect the 4 x BNC (75 ohms) cables to the RGBS IN connector of the monitor. PDC-190S User Manual... -
Page 20: Connect Sdi Signal Cable
Caution! An AC power cord is not included in the accessories list, please contact local Advantech service if you need to purchase a local AC power cord. Plug the AC power cord into AC outlet, then switch-on the power switch on the side of AC adapter. -
Page 21: Appendix Aosd Selections
Appendix OSD Selections... -
Page 22: Introduction
Introduction When you place the PDC-190S upright on the desktop (Landscape display), you will see eight keys located on the bottom of front panel. Their function is described in the table below: Icon Control Function Power control Power Button Press the On/Off button to power the LCD moni- tor. -
Page 23: Table A.1: Description Of The Osd Directory
Auto adjust to (*active in optimum image VGA mode) Adjust the Phase(*) 0-100 synchronized tim- ings of image Adjusts image Clock(*) 0-100 position for cen- tered image 0- Auto Display Display 1- Aspect Control Image 2- 1:1 PDC-190S User Manual... - Page 24 Volume 0-20 Mute ON/OFF While detect of System Video signal D-SUB(VGA) S-Video Input Select Composite Component RGBS SDI (HD-SDI) English French German Choose the lan- Language Traditional Chinese guage of OSD Simplified Chinese you need Japanese Dutch PDC-190S User Manual...
-
Page 25: Main Menu Descriptions
0 to 100. Use the key on the front bezel to adjust the Brightness at any time the OSD is on. Note! This setting is only available on D-sub & video input, S-Video, compos- ite, component/RGBS, SDI. PDC-190S User Manual... -
Page 26: Contrast Descriptions
Use the key on the front bezel to adjust the contrast any time the OSD is on. Note! This setting is only available on video input, S-Video, composite, com- ponent/RGBS, SDI. PDC-190S User Manual... -
Page 27: Color Descriptions
Color Temp: 6500K 6500K 2.2 Gamma: 2.2 Color Temp: 6500K 6500K DICOM Gamma: DICOM Preset Color Temp: 4300K 4300K Endoscope Gamma: Endoscope Gamma Color Temp: 9300K 9300K 2.2 Gamma: 2.2 Color Temp: Customer config User 2.2 Gamma: 2.2 PDC-190S User Manual... -
Page 28: User
RGB. Auto Configuration* Selecting this control allows you to adjust to monitor the picture more clearly auto- matically. Note! This setting is only available on D-sub (VGA). PDC-190S User Manual... -
Page 29: Phase
If satisfactory results are not obtained using the Phase adjustment, use the Clock adjustment and then use Phase again. Note! This setting is only available on D-sub (VGA). A.12 Display Control Selecting this control allows you to adjust the horizontal and vertical size of the image. PDC-190S User Manual... -
Page 30: A.12.1Display Image
16:9 or 16:9 to 4:3. Select this control to display the picture in the original resolution of the input signal. This function does not work when the input video signal has higher reso- lution than the resolution of the panel PDC-190S User Manual... -
Page 31: A.12.2Aspect Ratio
Use this function when a 4:3 aspect ratio picture is zoomed out to a 16:9 16:9 format signal. A.12.3Display Position Select this control and then use four keys( ↑↓←→ ) to adjust the horizontal position and vertical position of the image. PDC-190S User Manual... -
Page 32: Pip (Enable/Disable)
The sub display shrinks to a larger size screen and overlaps the main Large display. The main display is placed on the left side of the display and the sub Side By Side display is placed on the right side of the display. PDC-190S User Manual... -
Page 33: Pip Position
PIP size is not on the side by side mode. A.17 PIP Color Selecting this control allows you to control the brightness/contrast/hue/saturation of the sub display. A.18 Blend Select this control, then use the key to adjust the blending level of sub display. PDC-190S User Manual... -
Page 34: Volume
Selecting this control allows you to mute the volume of the two inside speakers. A.21 Input Signal (Main Input Select) Select this control to set the input signal of the main display. You can select from among Component RGBS Video (Composite) Svideo (S-Video) PDC-190S User Manual... -
Page 35: Language
(Unit: second). OSD Position: Selecting this control allows you to move the OSD menu verti- cally/Horizontally on the screen. A.24 Factory Reset Selecting this control restores all of the OSD control adjustments to the factory default settings. PDC-190S User Manual... - Page 36 PDC-190S User Manual...
-
Page 37: Appendix B Timing Of Input Signal
Appendix Timing of Input Signal... -
Page 38: Compatibility Of Vesa Timing
H(kHz) V(Hz) 37.9 37.5 35.1 37.9 48.1 46.9 53.7 1024 48.4 1024 56.5 VESA 1024 60.0 1024 68.7 1152 53.8 1152 67.5 1280 47.8 1280 59.7 1280 85.8 1280 1024 64.0 1280 1024 80.0 1600 1200 75.0 PDC-190S User Manual... -
Page 39: Compatibility Of Video Timing
ITU-R Rec. BT.1358 720p/50 SMPTE 296M 720p/59 720p/60 SMPTE 296M, ITU-R Rec. BT.1543 1035i/60 SMPTE 260 1080i/50 SMPTE 274, SMPTE 295 1080i/60 SMPTE 274 1080p/24 SMPTE 274 1080p/25 SMPTE 274 1080p/30 SMPTE 274 1080p/59 1080p/60 SMPTE 274, ITU 709 PDC-190S User Manual... - Page 40 PDC-190S User Manual...
-
Page 41: Appendix C Cleaning/Disinfecting
Appendix Cleaning/Disinfecting... -
Page 42: On Cleaning The Monitor
Incidin liquid Mikrozid liquid Caution! Do not immerse or rinse the PDC-190S or its peripherals. If you accidentally spill liquid on the device, disconnect the unit from the power source. Contact your Biomedical Department regarding the continued safety of the unit before placing it back in operation. -
Page 43: Appendix D Serial Remote Control
Appendix Serial Remote Control... -
Page 44: Using Serial Communications
Steps: Prepare an RS-232C cable. Connect the male end to the RS-232C terminal port on the PDC-190S. Connect the female end to the RS-232C terminal port on the personal computer. Input terminal Cable... -
Page 45: Command Outline
A6(hex) 44(hex) action Inc Key A7(hex) 43(hex) Menu Key A8(hex) 42(hex) Note! These commands can be used while the monitor is off (standby), but please take care that the RS-232C baud rate is changed to 4800 bps. PDC-190S User Manual... - Page 46 PDC-190S User Manual...
-
Page 47: Appendix E Error Messages
Appendix Error Messages... -
Page 48: General
Table B-1 of this manual, the LCD display will appear this message: Auto Configuration* This message means the monitor is adjusting automatically according to the input signal. Note! This message only appear on D-sub (VGA) input signal. PDC-190S User Manual... - Page 49 PDC-190S User Manual...
- Page 50 No part of this publication may be reproduced in any form or by any means, electronic, photocopying, recording or otherwise, without prior written permis- sion of the publisher. All brand and product names are trademarks or registered trademarks of their respective companies. © Advantech Co., Ltd. 2009...
Need help?
Do you have a question about the PDC-190S and is the answer not in the manual?
Questions and answers