
Related Manuals for Linear DEFIANT SSD


Summary of Contents for Linear DEFIANT SSD
-
Page 1: Wireless Security
WIRELESS SECURITY SYSTEM ensor Featuring: tatus isplay Owner’s Manual Help Line: 1-800-528-4454... - Page 2 The DEFIANT SSD Console and its accessories are designed and manufactured by the oldest wireless security company in North America. You can look ahead to many years of reliable service and peace of mind with DEFIANT SSD on guard for you and your family.
-
Page 3: Table Of Contents
TABLE OF CONTENTS 1. YOUR KEEPSAFER SSD SECURITY SYSTEM ..2 17. ADVANCED PROGRAMMING ... . . 26 CONSOLE ......3 LEARN MODE . -
Page 4: Your Keepsafer Ssd Security System
1. YOUR DEFIANT SSD SECURITY SYSTEM Your DEFIANT SSD Security System package consists of: One Control Console Two Door/Window Sensors One Wireless Keypad One AC Power Adapter One Installation and Operation Video Tape One DEFIANT SSD Yard Warning Sign DEFIANT SSD... -
Page 5: Console
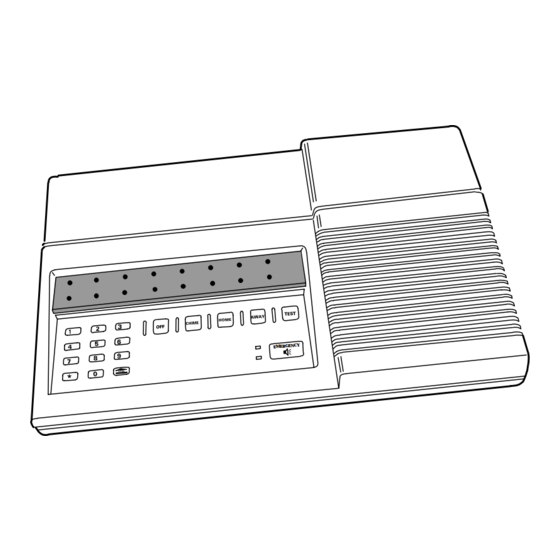
CONSOLE The DEFIANT SSD Console is the heart of the system. It monitors all of the system’s wireless sensors and controls the alarm sirens. The Console constantly monitors the condition of the system’s sensors, displaying which protected doors and windows are open or closed. If an alarm occurs, the Console displays which sensor caused it. -
Page 6: Security System Floor Plan
Indicate locations for door window sensors, interior motion detectors and external siren speakers. Decide on a centralized location for the security Console. CON - DEFIANT SSD CONSOLE S - DOOR/WINDOW SENSOR WK - WIRELESS KEYPAD ENTRY MD - MOTION DETECTOR... -
Page 7: Keepsafer Ssd Accessories
3. DEFIANT SSD ACCESSORIES (See Section 19 for detailed descriptions) Backup Battery UL NOTE: Normal estimated life should be 3 to 4 years. Remote Siren Smoke Detector Motion Detector UL NOTE: Not tested by UL. One-button Key chain Remote Control Two-button Key chain Remote Control UL NOTE: Not tested by UL. -
Page 8: Console Features
4. CONSOLE FEATURES ANTENNA Receives signals from the system’s sensors. Can be rotated towards the top of the Console case for wall mounting. STATUS INDICATORS Indicates the status of each of the system’s sensors. Lights show which doors and windows are open. Lights flash to display sensors that have caused an alarm. - Page 9 Off when AC power is off and no backup battery is installed (system disabled). MODE BUTTONS Used to control the DEFIANT SSD Console. Off Mode disarms the system. Switching to Off Mode stops the alarm siren. Multiple beeps sound and status lights flash if an alarm has occurred.
-
Page 10: System Sensors
5. SYSTEM SENSORS DOOR/WINDOW SENSOR Sensor mounts on door or window with adjacent magnet. Opening door or window moves magnet away, triggering sensor. Pressing the case causes sensor to send a test signal. Sensors should be tested when the TEST SENSORS light on the Console goes on. -
Page 11: Console Installation
6. CONSOLE INSTALLATION PLACE CONSOLE NOTE: Sensor signals must be able to reach the Console. Try to centrally locate the Console. Keep Console away from large metal appliances. Maximum sensor range is 400 feet under ideal conditions. NOTE: If you don’t use the Wireless Keypad, the Console should be easily accessible to your usual entrance. -
Page 12: Plug In Ac Adapter
PLUG IN AC ADAPTER Plug AC Adapter into the AC outlet. PLUG AC ADAPTER Secure AC Adapter with screw to prevent INTO 115 VAC OUTLET THAT IS NOT CONTROLED un-plugging. BY A LIGHT SWITCH IMPORTANT: Be sure to plug the AC adapter into a 115 VAC outlet that is not SCREW controlled by a wall switch. -
Page 13: Mount Wireless Keypad
7. MOUNT WIRELESS KEYPAD TABLE-TOP USE The wireless keypad can be used as a USE THE FOUR SCRATCH DETERRENT PADS PROVIDED portable keypad. FOR TABLE TOP USE Four anti-mar pads are provided as scratch deterrent “feet” for the keypad. NOTE: Do not use the adhesive “feet” if the keypad is going to be wall mounted. -
Page 14: Mount Sensors
8. MOUNT SENSORS SENSOR ON FRAME MAGNET ON DOOR MAGNET ON WINDOW SENSOR ON FRAME SET SENSOR SWITCH A switch on the bottom of the door/window sensor selects instant or delayed response. If the sensor is going to be used on your primary entry/exit door make sure that the switch is in the DELAYED position. -
Page 15: Attach Sensors And Magnets
ATTACH SENSORS AND MAGNETS On doors, mount sensor to door frame and magnet to door. NOTE: Magnet must line up with mark on sensor case both horizontally & vertically. MOUNT SENSOR PLATE TO FRAME Allow a maximum of 1/2" between magnet and sensor when door/window is closed. -
Page 16: Preparing The Console
9. PREPARING THE CONSOLE LABELING YOUR SENSORS The two sensors provided are pre-programmed as sensors 01 and 02. USE LABELS PROVIDED TO IDENTIFY SENSORS A label sheet with sensor location names is provided with the Console. Open one protected door/window. Choose a label that describes the sensor location, or write the location on a blank label, and stick it in the area to the right of... -
Page 17: Disarming The Console
10. DISARMING THE CONSOLE OFF MODE Use this mode to disarm the burglary portion START HERE of the system. Switching to Off Mode stops any alarms in (OPTIONAL) progress. The 24-hour emergency functions are still active in Off Mode and can be triggered by pressing the [EMERGENCY] button. -
Page 18: Using The System At Home
11. USING THE SYSTEM AT HOME HOME MODE Use this mode when sleeping or when START HERE anyone is staying inside. Home Mode causes an instant alarm when (OPTIONAL) any perimeter sensor switched to INSTANT is triggered. Home Mode causes a delayed alarm when any perimeter sensor switched to DELAYED YOUR is triggered. -
Page 19: Secure Exit
SECURE EXIT If the system is already in the Home Mode and you want to exit the premises while leaving someone inside with the system still in Home Mode, press the [HOME] key for two seconds. A “gong” and two “beeps” will sound and the HOME light will blink for 30 seconds. -
Page 20: Using The System When Leaving
12. USING THE SYSTEM WHEN LEAVING AWAY MODE Use this mode when no one will be staying START HERE home. Away Mode causes an instant alarm when (OPTIONAL) any perimeter sensor switched to INSTANT is triggered. Away Mode causes a delayed alarm when any perimeter sensor switched to DELAYED YOUR is triggered. -
Page 21: Automatic Bypassing Of Sensors
ENTRY DELAY (For Entering the Premises) The Entry Delay gives you 45 seconds to enter the premises through a delayed perimeter door without triggering an alarm. If a perimeter delayed sensor is triggered, starting the Entry Delay, the interior sensors will also become delayed (this allows motion SECONDS in the premises during the Entry Delay). -
Page 22: Using The System As Door Chime
13. USING THE SYSTEM AS DOOR CHIME CHIME MODE Chime Mode is for monitoring entries and START HERE exits without causing alarms. Use Chime Mode as an “automatic door (OPTIONAL) chime” when at home. Opening any protected door or window causes the Console to sound a “ding-dong”. -
Page 23: Bi-Weekly System Testing
14. BI-WEEKLY SYSTEM TESTING TEST MODE When the TEST SENSORS light comes on, START HERE you should test each sensor in the system. The Console must be in Off Mode before (OPTIONAL) going to Test Mode. Switch the Console into Test Mode by entering your secret code and pressing [TEST]. -
Page 24: Home Automation Output
15. HOME AUTOMATION OUTPUT HOME AUTOMATION INTERFACE The Console provides a Home Automation Output to control lights, devices and appliances. Home Automation Output can connect to most popular home automation devices and other simple electronic devices. Press [AUTO] to turn the Home Automation Output on, press [AUTO] again to turn it off. -
Page 25: Expanding Your System
16. EXPANDING YOUR SYSTEM Adding additional sensors will increase the protection provided by your system. All ground-level perimeter openings and accessible upper-story openings need protection. Motion detectors can protect interior areas and areas were valuables are kept. Wireless sensors make protecting a detached garage easy (no wires to run). -
Page 26: Removing Sensors From The System
REMOVING SENSORS FROM THE SYSTEM If a previously learned sensor isn’t going to START IN OFF be used with the system anymore, it should be removed from the Console’s memory. Start with the Console in Off Mode. YOUR Enter your secret code and press the SECRET [LEARN] button. -
Page 27: Making A Sensor Interior
MAKING A SENSOR INTERIOR Motion detectors are automatically START IN OFF programmed as interior sensors. Any other sensor can also be programmed as an interior sensor. YOUR Interior sensors can only trigger an alarm SECRET when the Console is in Away Mode. CODE The sensor must have already been learned by the Console (see “Adding sensors to the... -
Page 28: Advanced Programming
17. ADVANCED PROGRAMMING LEARN MODE To perform any of the advanced programming steps, the Console must be in START IN OFF the Learn Mode. Start with the Console in Off Mode (Learn Mode cannot be reached from any other mode). YOUR Enter Learn Mode by entering your secret SECRET... -
Page 29: Home Automation Output Time
HOME AUTOMATION OUTPUT TIME The factory setting causes the Home Automation Output to toggle between on PROGRAMMING STEP #40 and off with each activation. The Home Automation Output can be PROGRAM programmed to turn on, then automatically turn off after one to 2500 seconds (42 TIME IN SECONDS (1-2500) 0 = TOGGLE ON &... -
Page 30: Automatic Bypassing Of Open Sensors
AUTOMATIC BYPASSING OF OPEN SENSORS The factory setting causes the Console to automatically bypass any open sensors when PROGRAMMING STEP #60 the system is armed. Alternately, the Console can be programmed PROGRAM to not arm on the first attempt if there are 0 FOR AUTO BYPASS OFF any open sensors. -
Page 31: Exit Delay Beeps
EXIT DELAY BEEPS The factory setting causes the Console to beep during Exit Delays. PROGRAMMING STEP #65 Alternately, the Exit Delay beeps can be silenced. PROGRAM The Console will be silent after arming to the 0 FOR EXIT BEEPS OFF Away Mode until the Exit Delay expires, then 1 FOR EXIT BEEPS ON a single “gong”... -
Page 32: Home Automation Output During Exit/Entry Delays
HOME AUTOMATION OUTPUT DURING EXIT/ENTRY DELAYS The factory setting causes the Console’s Home Automation Output to activate when PROGRAMMING STEP #69 pressing the [AUTO] key, or when it’s triggered with a two-button remote control. PROGRAM In addition, the Console can be 0 FOR STANDARD TRIGGER programmed to activate the Home 1 FOR OUTPUT DURING DELAYS... -
Page 33: Home Automation Output Flashes During And After Alarm
HOME AUTOMATION OUTPUT FLASHES DURING AND AFTER ALARM The factory setting causes the Console’s Home Automation Output to activate when PROGRAMMING STEP #72 pressing the [AUTO] key, or when it’s triggered with a two-button remote control. PROGRAM In addition, the Console can be 0 FOR STANDARD TRIGGER programmed to flash the Home Automation 1 FOR FLASHING ON &... -
Page 34: Restricted Secret Code
RESTRICTED SECRET CODE The Console can be programmed with two PROGRAMMING STEP #98 secret codes, one that can access Learn Mode and one that cannot. PROGRAM The restricted secret code cannot access Learn Mode, the master secret code can. 1-5 DIGIT RESTRICTED CODE The restricted secret code is a good one to (3-5 DIGITS RECOMMENDED) give to children or any user that you want to... -
Page 35: Advanced Programming Table
18. ADVANCED PROGRAMMING TABLE SENSOR CODES OFF MODE CHIME MODE HOME MODE AWAY MODE 1 = HOME AUTOMATION ACTIVATES HOME AUTOMATION OUTPUT 2 = EMERGENCY EMERGENCY ALARM 3 = POLICE BURGLARY ALARM 4 = FIRE FIRE ALARM 5 = INSTANT NO ACTION CHIME INSTANT BURGLARY ALARM... -
Page 36: Additional System Accessories
19. ADDITIONAL SYSTEM ACCESSORIES NOTE: Use only DEFIANT SSD accessories with this system. Installation instructions are provided with each accessory. BACKUP BATTERY Highly recommended accessory. Powers Console if AC power fails. At least 6 hours backup time. Fits inside Console. - Page 37 SMOKE DETECTOR High quality, fast acting detector. Triggers Console’s fire siren. Built-in low battery alert and reports low battery to the Console. MOTION DETECTOR Uses passive infrared technology to detect intruders. Signals alarm when monitored area is entered (up to 40’ x 40’). Armed in Away Mode.
-
Page 38: Fcc Notice
IMPORTANT NOTICE Linear radio controls provide a reliable communications link and fill an important need in portable wireless signaling. However, there are some limitations which must be observed. For U.S. installations only: The radios are required to comply with FCC Rules and Regulations as Part 15 devices. - Page 39 Copyright © 1997 Linear Corporation...
Need help?
Do you have a question about the DEFIANT SSD and is the answer not in the manual?
Questions and answers