Advertisement
Quick Links
2GIG-PANIC1-345
PANIC BUTTON REMOTE
INSTALLATION INSTRUCTIONS
The Panic Button Remote (2GIG‐PANIC1‐345) is a compact, battery‐
powered, wireless panic button that transmits an Emergency signal
from any location within radio frequency (RF) range of the control
panel. The signal can be transmitted to the control panel, whether the
security system is armed or disarmed.
Users can mount the panic button in a convenient location in the wall
or use one of these wearable options: lanyard, wristband, belt clip,
and car‐visor clip. It is completely water‐resistant and also offers a five
(5)‐second button lockout.
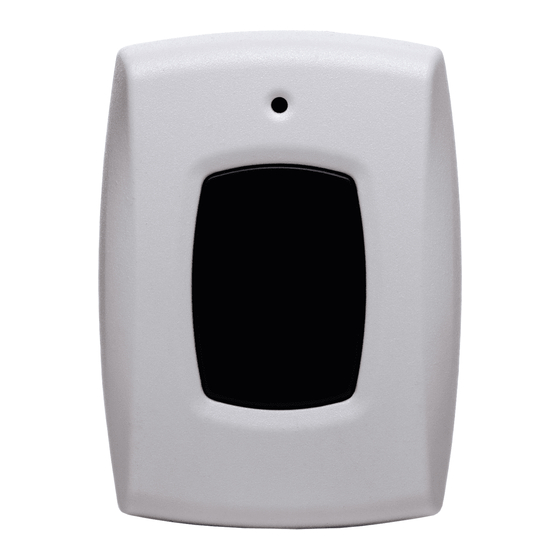
Figure 1 Panic Button Remote
A
LED Indicator
B
Panic Button
Box Contents
Verify that the package includes the following:
• 1—Panic Button Remote
• 1—Battery
• 1—Lanyard
• 1—Car‐Visor Clip
• 1—Belt Clip
• 1—Wrist Band
• 1—Sensor holder for clips (belts and visor) with option to wall
mount using two (2) screws (not included)
Figure 2 Panic Button Remote—Wearable Options
A
Lanyard
B
Sensor holder
C
Belt Clip
D Visor Clip
E
Wristband
Inserting and Replacing the Batteries
To be useful in duress situations, it is imperative that
WARNING:
you maintain the battery in the panic button. To ensure
proper functioning, it is recommended that end users and/or
qualified installation personnel check the battery for the panic
button regularly, at least one or more times per year. Under
typical conditions, the battery life is approximately two (2)
years. When the battery is low, the control panel's Home
screen will display a trouble notification. To help to ensure
that the panic button is available during a duress event,
always replace the battery when the low battery notification
first appears.
WARNING:
Always use the recommended replacement batteries
and ensure that it is new, in good condition, and fully‐charged.
See Specifications on page 2.
Insert a small, flathead screwdriver into the opening on the panic
1
button. Then remove the top cover.
Figure 3 Panic Button Remote
A
Top Cover
B
Flat Head Screwdriver
2
Gently insert the flathead screwdriver between the battery and
one of the metal clips in the battery compartment. Then remove
the old battery.
Figure 4 Panic Button Remote—Battery Compartment
A
Battery
B
Metal Clips
C
Battery Compartment
—
Removing the Top Cover
Copyright © 2014 Linear LLC
1
Advertisement

Related Manuals for Linear 2GIG-PANIC1-345


Summary of Contents for Linear 2GIG-PANIC1-345
- Page 1 • 1—Car‐Visor Clip • 1—Belt Clip Top Cover • 1—Wrist Band Flat Head Screwdriver • 1—Sensor holder for clips (belts and visor) with option to wall Gently insert the flathead screwdriver between the battery and mount using two (2) screws (not included) one of the metal clips in the battery compartment. Then remove the old battery. Figure 2 Panic Button Remote—Wearable Options Figure 4 Panic Button Remote—Battery Compartment Lanyard Battery Sensor holder Metal Clips Belt Clip Battery Compartment D Visor Clip Wristband Copyright © 2014 Linear LLC...
- Page 2 This equipment has been tested and found to comply with the limits An alarm report is transmitted to the monitoring service. To for a Class B digital device, pursuant to Part 15 of the FCC Rules. These acknowledge that the alarm report was sent, tap OK. limits are designed to provide reasonable protection against harmful interference in a residential installation. If you want to clear the alarm history on the control panel, tap Clear Alarm History. This places a checkmark in the corresponding This equipment generates, uses and can radiate radio frequency box. Then tap OK. energy and, if not installed and used in accordance with the instructions, may cause harmful interference to radio communications. However, there is no guarantee that interference will not occur in a particular installation. If this equipment does cause harmful interference to radio or television reception, which can be determined by turning the equipment off and on, the user is encouraged to try to correct the interference by one or more of the following measures: • Reorient or relocate the receiving antenna. • Increase the separation between the equipment and receiver. • Connect the equipment into an outlet on a circuit different from that to which the receiver is connected. • Consult the dealer or an experienced radio/TV technician for help. This product complies with FCC radiation exposure limits for an uncontrolled environment. Avoid operating this product at a distance less than 20 cm from the user. Any changed or modifications not expressly approved CAUTION: by the party responsible for compliance could void the user's authority to operate this equipment. Copyright © 2014 Linear LLC...
- Page 3 Linear LLC’s normal distribution channels. Linear LLC does not warrant operation of the device. this product to consumers. Consumers should inquire from their Repairs to certified equipment should be made by an authorized selling dealer as to the nature of the dealer’s warranty, if any. Canadian maintenance facility designated by the supplier. Any repairs There are no obligations or liabilities on the part of Linear LLC for or alterations made by the user to this equipment, or equipment consequential damages arising out of or in connection with use or malfunctions, may give the telecommunications company cause to performance of this product or other indirect damages with respect to request the user to disconnect the equipment. loss of property, revenue, or profit, or cost of removal, installation, or Users should ensure for their own protection that the electrical reinstallation. All implied warranties for functionality, are valid only ground connections of the power utility, telephone lines and internal until the warranty expires. This Linear LLC Warranty is in lieu of all metallic water pipe system, if present, are connected together. This other warranties expressed or implied. precaution may be particularly important in rural areas. 2GIG by Linear 1950 Camino Vida Roble, Suite 150 Carlsbad, CA 92008 USA For technical support in the USA and Canada: 855‐2GIG‐TECH (855‐244‐4832) Email: 2gigtechsupport@linearcorp.com Visit web site for technical support hours of operation For technical support outside of the USA and Canada: Contact your regional distributor Visit dealer.2gig.com for a list of distributors in your region 187‐0735 Rev. F Copyright © 2014 Linear LLC...
Need help?
Do you have a question about the 2GIG-PANIC1-345 and is the answer not in the manual?
Questions and answers