Table of Contents
Advertisement
Quick Links
Advertisement
Table of Contents

Subscribe to Our Youtube Channel
Related Manuals for Becker Cascade


Summary of Contents for Becker Cascade
- Page 1 Operation Guide Manual de usuario Manual de instruções...
-
Page 2: Table Of Contents
Fader setting Saving a destination Switching Loudness on/off and Navigation fast access Overview of controls adjusting Navigating from fast access General operation Becker Surround Protecting an entry Menu basics Subwoofer Deleting an entry Fast access function Crossover Deleting a list... - Page 3 Contents Switching navigation Filter function Naming stations announcements on/off Switching the filter function on/off Creating/Deleting voice entries Information during route guidance Filtering stations Create Filtering stations Deleting Displaying destination information Cancel filtering Reading out voice entries Displaying/Storing position Programme type Displaying traffic announcements Media mode Switching the programme...
- Page 4 Contents Creating an MP3 storage medium Emergency call Setting the search criterion MP3 CD mode Settings Editing entries MP3 memory cards/ Automatic call answering Modifying an entry Micro-drive mode Dialogue with call Deleting an entry Inserting a micro-drive/ Telephone calls Creating/Deleting voice entries memory card Status display...
- Page 5 Contents (external device) Reset function Commands for radio mode Disconnecting devices Data backup Commands for the radio status Calling up Bluetooth settings Backing up data display Activating/ deactivating Bluetooth Loading data Commands for radio fast access Searching for Bluetooth devices Direction of rotation of the rotary mode Making devices visible to others...
- Page 6 Contents Commands for navigation Commands in the menu for fast access selecting a Bluetooth device for Commands in the Fast Access/ export Edit Destinations menu Commands when an entry is open Commands for the Navigation main Commands for the Address Book menu main menu Commands for the Destination menu 170...
-
Page 7: Safety Instructions
Safety instructions Operation of the unit is permitted only if traffic conditions are suitable and you are absolutely sure that you, your passengers or other motorists are not endangered, obstructed or inconvenienced. In all cases, all applicable road traffic regulations must be obeyed. Destinations may only be entered when the vehicle is stationary. -
Page 8: Information Regarding General Road Safety
Information regarding general road safety This car radio device is intended and approved for installation and operation in passenger cars, commercial vehicles and buses (vehicle classes M, N and O) whose electric system has a rated voltage of 12V. Installation and maintenance should only be carried out by specialists. Faulty installation or maintenance can result in the malfunctioning of the motor vehicle’s electronic systems. -
Page 9: Overview Of Controls
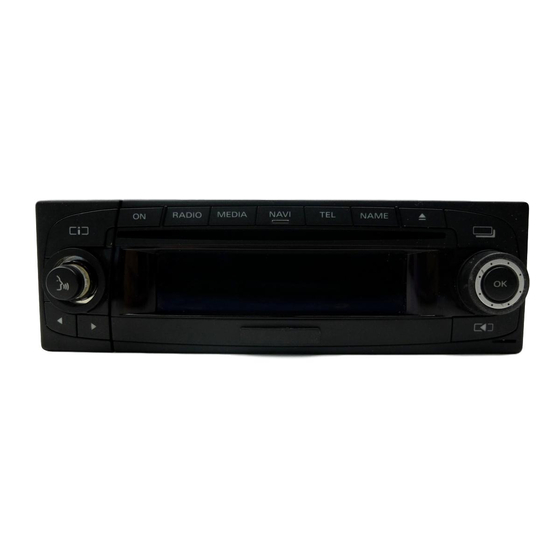
Overview of controls Overview of controls 1 Information button 10 Right-hand rotary control/push button 2 On / off switch Press = Confirm Turn = Scroll through lists and menus 3 Select radio 11 Back button 4 Select CD/CDC/memory card 12 Release slide for removable control panel 5 Select navigation 13 Display 6 Select telephone... -
Page 10: General Operation
General operation General operation Menu basics Main menu Note: The main menu for each operating mode If no selections are made for a short Note: provides access to the various functions period of time when the fast access and possible settings for that mode. If an entry in the list is abbreviated function is displayed, the display will because it is too long (three dots appear... -
Page 11: Status Display
General operation Status display The status display can always be accessed by pressing All the information you need about the 1005 If route guidance is active, you can current operating mode appears on the toggle between the combined display status screen. The Options menu for the radio function and the status display by pressing Note:... -
Page 12: Data Entry Menus
General operation If the menu entry is concealing another Data entry menus You can change the character set for the menu, a small triangle will appear after available characters by selecting various If data can be entered, special data entry the menu entry. -
Page 13: Anti-Theft Device
General operation Anti-theft device Shortly after the unit has been switched What to do if an incorrect code number on by pressing , the data entry has been entered Your Cascade features two anti-theft menu for the code number will appear. The following message appears if an devices: incorrect code number is entered. -
Page 14: Removing/Inserting The Control Panel
General operation Removing/Inserting the Note: control panel Entering an incorrect code number three 1009 Part of the control panel can be removed times will disable the unit for approx. to provide additional effective protection 1 hour. If the control panel is reinserted within against theft. -
Page 15: Insertion
General operation Insertion Inserting/Removing the cover Removing the cover Take the control panel out of its pro- Remove the control panel as described The scope of supply of the Cascade tective cover. in “Removing/Inserting the control includes a red plastic insert. This plastic Insert the left-hand side of the control panel”... -
Page 16: Switching The Unit On/Off
General operation Switching the unit on/off Switching off Notes: Press • Unless the warning message is con- If the ignition is switched on, the Cas- Switching on firmed, the Cascade will remain disa- cade is switched to standby mode. The Press bled. -
Page 17: Setting The Volume
Turn the rotary control/push button Bačance / fader You can configure the sound of your clockwise/counter clockwise. Loudness Cascade to meet your requirements in Becker surround the sound settings. The settings are also Subwoofer valid for all radio/audio sources. 1011 Crossover... -
Page 18: Setting The Equalizer
General operation Setting the equalizer Turn the rotary control/push button Confirm your selection by pressing to apply the required equalizer setting. the rotary control/push button You can switch the acoustic pattern on 5 frequency bands with the equalizer Note: setting. The equalizer presets ( Rock, Pop Jazz... -
Page 19: Setting Balance And Fader
General operation Setting balance and fader Balance setting Switching Loudness on/off and Turn the rotary control/push button You can shift the tone centre in the vehi- adjusting clockwise/counter clockwise. cle using the balance and fader setting. Loudness provides a tone-compensated increase of the low frequencies, inde- Select Bačance... -
Page 20: Becker Surround
Select Subwoofer in the sound settings. Select Crossover in the sound settings. Note: The Becker Surround function is not available for medium wave or short 1024 1025 wave. Turn the rotary control/push button You may now select Front čoudspeakers... -
Page 21: Compression
• Loudness to off This function enables you to switch the Press the rotary control/push button • Becker surround to off reduction of the dynamic range of the and hold it down for at least • Subwoofer audio signal on/off. - Page 22 General operation You can deactivate the mute function as follows: • Press the rotary control/push button again and hold it down for at least 2 seconds. • Change the volume by turning the rotary control/push button • Press • Select another station or track. •...
-
Page 23: Navigation Mode
Harman/Becker. ellites are used. We do not accept liability for errone- The supplied memory card must not be... -
Page 24: Inserting Memory Card
Navigation mode Inserting memory card Push the memory card carefully into Note: the slot. The slot for memory cards containing For Norway, Sweden, Finland, Den- navigation data is located underneath the mark, Spain and Italy, non-verified data This pushes the eject button located removable control panel on the Cascade has been used to achieve a high depth of above and to the left of the slot out-... -
Page 25: Removing Memory Card
Navigation mode Removing memory card Selecting navigation Note: Remove the control panel as described Press The memory card containing the navi- in “Removing/Inserting the control gation data must be loaded when start- panel” on page 14. ing navigation mode for the first time. Remove the cover as described in “In- If calibration of the navigation system 2001... -
Page 26: Calling Up The Navigation Main Menu
Navigation mode Calling up the Navigation • Enter address Note: Accesses the data entry menu for the main menu If route guidance is already active, you destination. See “Entering a destina- can start to enter another destination by Press twice. tion”... -
Page 27: Entering A Destination
Navigation mode Entering a destination The corresponding menu appears or the Selecting a country required action is initiated. If your destination is located in a different In the Navigation main menu, select country ( GREAT BRITAIN in the example Enter address entry. -
Page 28: Entering A Destination Town
Navigation mode Entering a destination town If the complete town name has already Note: been entered or completed automatically, In the Enter Destination menu, select Select the symbol to delete the last the unit will either switch automatically the town ( GLASGOW in the example). -
Page 29: Selecting Destination Via Postcode
Navigation mode The town distinguishing list appears if Turn the rotary control/push button the selection is ambiguous. and then press the rotary control/ push button to select the required post- 2010 code. 2008 The data entry menu for the postcode The display then shows either the desti- appears. -
Page 30: Entering The Destination Road
Navigation mode Entering the destination road The last letter entered is highlighted. To Turn the rotary control/push button help, the name of the road closest to the and then press the rotary control/push In the Enter Destination menu, select previous entry is displayed. The Cas- button to select the required road. -
Page 31: Entering The Destination Town Centre
Navigation mode Entering the destination town centre 2020 2019 Instead of navigating directly to a road, you can also navigate to a town centre. Turn the rotary control/push button The last letter entered is highlighted. To and then press the rotary control/push help, the name of the centre closest to In the Enter Destination menu, select button to select the required centre. -
Page 32: Selecting Junction For Destination Road
Navigation mode Entering destination via geo-coordinates 2023 2022 You can also enter a destination as geo- coordinates. Confirm your selection by pressing A list containing ranges of house num- the rotary control/push button bers appears. In the Enter Destination menu, select Turn the rotary control/push button Geo co-ordinates and then press the rotary control/push... -
Page 33: Setting The Route Options
Navigation mode Setting the route options Notes: You can use the route options to specify • By selecting you can specify 2099 how the Cascade calculates the route to the direction of the geographical lati- the destination. tude ( =north and Select the symbol from the in- In the Enter Destination menu,... -
Page 34: Saving/Deleting Route Options
Navigation mode Turn the rotary control/push button Notes: Notes: to select one of the following options: • Dynamic route guidance is not possi- • Routes without motorways can only Dynamic route ble in all countries at present. be calculated for short distances (up Quick route to 200 km depending on digitalisation •... -
Page 35: Saving A Destination
Navigation mode Saving a destination Navigation fast access Press Once you have entered a destination, In navigation fast access mode, the last you can save it in the address book. This 50 destinations to which the vehicle has may be useful if you wish to travel to 2002 travelled are displayed. -
Page 36: Protecting An Entry
Navigation mode Protecting an entry Deleting an entry Deleting a list Call up the navigation fast access Call up the navigation fast access Call up the navigation fast access function. function. function. Select the entry to be protected. Select the entry to be deleted. Press the rotary control/push button Press the rotary control/push button Press the rotary control/push button... -
Page 37: Saving An Entry In The Address Book
Navigation mode Saving an entry in the • Create new entry In the data entry menu, select the Select this option to create a new entry symbol. address book in the address book. Call up the navigation fast access Press the rotary control/push button function. -
Page 38: Adding Data To Entries
Navigation mode Turn the rotary control/push button The navigation address previously Selecting a destination from the and then press the rotary control/push selected is added to the selected address address book button to select the Save entry. book entry. You can find a destination in the address A confirmation that the entry has been book and start navigation to it. -
Page 39: Point Of Interest
Navigation mode Turn the rotary control/push button Point of interest Select the SpeciačDest entry. and then press the rotary control/push You can select a POI as a main destina- button to select the required entry. tion or a stopover. 2039 POIs include petrol stations, airports or Route guidance to this destination will hospitals, for example. -
Page 40: Local
Navigation mode • In vicinity of čocation Local Turn the rotary control/push button You can select a POI in the vicinity of and then press the rotary control/push In vicinity of In the POI menu, select the the vehicle. When you make your button to select each letter one after the čocation entry. -
Page 41: In Country
Navigation mode In country Turn the rotary control/push button and then press the rotary control/push In country In the POI menu, select the button to select the required POI. entry. 2053 Route guidance to the selected point of The data entry menu for POIs appears interest is initiated. -
Page 42: In Place
Navigation mode In place Accept entry: In the data entry menu, select the In pčace In the POI menu, select the 2052 symbol. entry. Turn the rotary control/push button Press the rotary control/push button and then press the rotary control/push and hold it down for at least 2 seconds. -
Page 43: Information About Points Of Interest
Navigation mode Information about points of Turn the rotary control/push button External points of interest to scroll through the information. interest You can select an external POI as a main You can call up additional information Note: destination or as a stopover. about many POIs, e.g. - Page 44 Navigation mode Note: In vicinity of destination entry can only 2038 2105 be selected if route guidance is active. The Options menu appears. The categories that can be selected are Confirm your selection by pressing then displayed. the rotary control/ push button Select the Stop-over entry.
-
Page 45: During Route Guidance
Navigation mode Select the desired category. During route guidance Navigation status screen Confirm your selection by pressing All information relevant to information During route guidance, navigation infor- the rotary control/ push button is displayed on the navigation status mation is displayed on the status screen screen. -
Page 46: Example Navigation Displays
Navigation mode Turn the rotary control/push button Example navigation displays • “Please turn left after 100 metres.” to select the various displays in the Warning status display. Accident hazard 2061 Road traffic regulations always take pri- ority when a vehicle is being driven in The name of the road the vehicle is 2057 traffic. -
Page 47: Traffic Lane Recommendations
Navigation mode • “Please follow the direction arrows.” • Recalculating route: Traffic lane recommendations On some roads Cascade will also provide you with animated traffic lane recom- 2063 2066 mendations, in addition to the navigation announcements. This may be helpful for This display tells you that you are cur- confusing motorway exits, for example. -
Page 48: Options Menu
Navigation mode Options menu • Canceč You can abort the current route guid- During route guidance, you can call up ance. See “Cancelling route guidance” 2108 the Options menu in the navigation status on page 49. screen. Turn right and then turn right at the sec- Press the rotary control/push button Messages •... -
Page 49: Cancelling Route Guidance
Navigation mode • Route opt. Cancelling route guidance Traffic announcements You can modify the route options dur- You can use this function to cancel route You can display/listen to a list of traffic ing navigation. See “Modifying route guidance before reaching the actual des- announcements relevant to the route. -
Page 50: Route List
Navigation mode Route list Press to exit the route list. • Enter address You can display the route planned by the You can enter a complete address as a Cascade. stopover as described in “Entering a Stopover You can enter another destination as a destination”... -
Page 51: Blocking A Route
Navigation mode Blocking a route Note: Note: You can use this function to block a sec- Once the stopover has been reached, the If no operator inputs are made, the tion of the route still to be travelled when following display appears. menu will automatically disappear after the next junction is reached. -
Page 52: Modifying Route Options
Navigation mode Unblocking a route Modifying route options Switching navigation announcements Once a block has been entered, it can be You can modify the route options during on/off removed again. navigation. You can switch navigation announce- ments off and then back on again. In the Options menu, select the Bčock In the Options menu, select the... -
Page 53: Information During Route Guidance
Navigation mode Information during route Displaying/Storing position Notes: Press guidance • If a stopover is active, information Turn the rotary control/push button about it is displayed. appears on clockwise until Position appears on the Displaying destination the display above the car. top right of the display. -
Page 54: Displaying Traffic Announcements
Navigation mode Press the rotary control/push button Press the rotary control/push button Displaying/Changing route settings to store the current position. Press Turn the rotary control/push button clockwise until Route appears on the top 2078 2069 right of the display. The current position was saved in fast All TMC messages are displayed. -
Page 55: Information During Non-Active Route Guidance
Navigation mode Dynamic route guidance Note: Note: with TMC Dynamic Only one of the three settings ( As the traffic announcements are trans- route, Quick route Short route ) may be mitted by radio stations, we cannot Note: active ( ) at the same time. assume responsibility for the complete- Dynamic route guidance is not possible For more information about route... -
Page 56: Dynamic Route Guidance
Navigation mode Dynamic route guidance Displaying traffic information Note: You can activate dynamic route guid- Current traffic announcements can be If no TMC stations are received for ance by selecting Dynamic route in the displayed in text form. There are several 10 minutes, No TMC reception at present. -
Page 57: Settings
Navigation mode Settings You can make various settings for navi- 2069 2084 gation in the settings. All TMC messages are displayed. The announcement appears in full. In the Navigation main menu, select To listen to the announcement, select Note: Setting entry. -
Page 58: Traffic Announcements
Navigation mode Confirm your selection by pressing • Unit of measure • Announce messages the rotary control/push button You can convert the calculation of the If this function is active, all traffic distances from metric (display in metres announcements are made automati- and kilometres) to imperial (display in cally on receipt. -
Page 59: Announcing The Time Of Arrival
Navigation mode Announcing the time of arrival Displaying speed limits You can specify whether the calculated If the function is on, the system will in- 2100 time of arrival should be announced form you of the maximum permissible automatically once the route has been speed limit for the route along which Press the rotary control/push button calculated/ recalculated or after pressing... -
Page 60: Eta Setting
Navigation mode ETA setting • Note: This is the default setting. It offers You can configure the calculation of the On routes with variable speed limits sufficiently accurate calculation of the ETA. ETA stands for Estimated Time (dependent on weather conditions, time ETA for most drivers. -
Page 61: Measuring Unit
Navigation mode Set freečy is selected, you still need to Measuring unit select the required setting. The available You can convert the calculation of the range is between 50% and 200%. distances from metric (display in metres A value of 100% indicates the set- and kilometres) to imperial (display in ting. -
Page 62: Radio Mode
Radio mode Radio mode Switching on radio mode The Radio main menu appears. • Programme type The example shows the Radio main Accesses the selection menu for the Press menu for VHF. programme type. See “Programme Radio mode is activated. The last wave- Turn the rotary control/push button type”... -
Page 63: Selecting A Waveband
Radio mode • Reception optimisation • FM - ačphabeticaččy • Station memory Accesses the selection menu for If an FM station was selected previ- The last station set is retained. reception optimisation. See “Recep- ously, it will remain selected or, if an The station memory, which can store tion optimisation”... -
Page 64: Possible Settings For Fm Stations
Radio mode FM mode Station list Press or turn the rotary control/ All stations which can be received/iden- push button to the left to select the FM mode combines the two wavebands tified appear in the station list. FM - ačphabeticaččy FM - by quačity previous station on the station list. -
Page 65: Scan Function
Radio mode Scan function Aborting the scan function Notes: All stations in the station list are scanned In the status display, press • If the selected entry is a station chain, briefly to enable you to select the one this is indicated by a small triangle on you require. -
Page 66: Manual Station Tuning
Radio mode Manual station tuning Filter function Switching the filter function on/off You can set the required frequency In the Filter menu, select the Fičter You can use this function to filter manually. entry. stations or entire station chains out of the Turn the rotary control/push button station list. -
Page 67: Filtering Stations
Radio mode Filtering stations Filtering stations Cancel filtering In the Filter menu, select the station In the Filter menu, select the station to Cancel all filters chain to be filtered out and press the be filtered. In the Filter menu, select the Reset rotary control/push button Turn the rotary control/push button... -
Page 68: Programme Type
Radio mode Programme type Switching the programme type Select Reset in the programme type function on/off menu to reset all programme types to Programme type (PTY) is a service In the Programme Type menu, select off. offered by many stations within the Programme type entry. -
Page 69: Regionalisation
Radio mode Regionalisation Radio text Press the rotary control/push button to activate the function ( ). During the transmission time, certain FM stations supply additional informa- RDS programmes are divided into tion, e.g. news or information about the regional programmes with different current programme, via the RDS data programme content. -
Page 70: Voice Entries
Radio mode Voice entries • Dečete ačč entries Reception optimisation Dečete ačč entries is selected, a prompt You can delete or listen to voice entries You can select one of three settings to will appear asking you to confirm assigned to the station. You can also suppress reception-related interference. -
Page 71: Bandwidth Control
Radio mode • Automatic Bandwidth control Traffic programme Setting for normal operation, i.e. Bandwidth control can be used to im- If an RDS station broadcasts traffic depending on reception, the unit prove station reception in difficult recep- announcements, it is possible to inter- switches back and forth from stereo to tion areas (station A has a neighbouring rupt audio mode (CD, MP3, etc.), AM... -
Page 72: Switching A Traffic Programme On/Off
Radio mode Switching a traffic programme Selecting a TP station Manual TP station selection In the TP menu, select the station on on/off You can specify whether or not you wish which you wish to listen to traffic to listen to the traffic news on a specific In the TP menu, select the Traffic info news. -
Page 73: Tp Volume
Radio mode TP volume Cancelling traffic AM mode You can use this function to control the announcements AM mode combines the two wavebands increase in volume for traffic announce- You can cancel the reception of traffic Short wave ments. announcements. Possible settings for In the TP menu, select the Vočume... -
Page 74: Scan Search
Radio mode Scan search Scan function Aborting the scan function In the status display, press All stations which can be received are In the status display, press scanned briefly to enable you to select the one you require. Turn the rotary control/ push button Turn the rotary control/ push button In the status display, press and hold down... -
Page 75: Station Memory
Radio mode Station memory Storing stations Different waveband set In the Fast Access menu (not for AM You can store the current station if you Up to 20 FM, medium wave and short waveband), select the station to be are already in the station memory or if a wave stations can be stored in the station stored. -
Page 76: Station Already In Memory
Radio mode Turn the rotary control/push button Station already in memory Moving stations to select the required memory position. The station to be stored is already set and You can move the position of a station Confirm the memory position by press- you are in station memory fast access stored in the station memory. -
Page 77: Deleting Stations
Radio mode Deleting stations Status display Select the Name station entry. In the status display, press the rotary You can delete a station stored in the control/push button station memory. The Options menu appears. 3023 Select the Dečete entry. Fast access mode Turn the rotary control/push button Select the letters in the required name The station is deleted from the station... -
Page 78: Creating/Deleting Voice Entries
Radio mode Creating/Deleting voice entries Select the Create voice entry entry. Reading out voice entries The procedure for saving a voice entry is You can create a voice entry/delete an You can listen to the voice entry for a launched. existing voice entry for a station stored station stored in the station memory. -
Page 79: Media Mode
Media mode Media mode Media mode includes all sources on the In all three cases, the media fast access Notes: Cascade which can be used to play back functions will appear on the display • In fast access mode, the individual audio or MP3 media. -
Page 80: Media Status Display
Media mode Media status display Note: Notes: The media status display is the “standard Once the last track on a CD/in a direc- Press and hold to display the full display” for audio mode. All relevant tory has been played, if possible, the names (if available) of the track entries data for audio mode appears in the status next track played by the Cascade will be... -
Page 81: Track Jump/Track Skip
Media mode Track jump/Track skip Fast forward/rewind Play mode You can start audible fast forward/rewind. Play mode includes functions such as Press to select the next track or track mix (random play function), the Notes: to select the previous track. scan function and the repeat function. -
Page 82: Track Mix (Random Play Function)
Media mode Notes: Notes: • Only one of the functions can be Press to play the next 4005 switched on ( ). random track. If the current track has been playing for longer than 8 seconds • Select normač order to delete any other The Play Mode menu appears. -
Page 83: Repeat Track
Media mode Repeat track CD mix Repeat CD Activate the function to repeat the cur- Notes: Notes: rent track continuously. The function is only available if the CD The function is only available if the CD Turn the rotary control/push button changer is the active source. -
Page 84: Repeating A Directory
Media mode Press the rotary control/push button Calling up the Media Switching detailed track display on/off to switch the function on ( ) or If detailed track display is activated, a main menu off ( ). previously abbreviated track name/ID3 You can make settings for media mode tag is displayed in full, if possible. -
Page 85: Notes On Compact Discs (Cd)
Media mode CD mode • Before playing the CD, it should be Inserting/Ejecting CDs cleaned with a special, commercially Insertion available cleaning cloth, wiping from Insert the disc into the CD slot with Notes on compact discs (CD) the centre outwards. Solvents such as the printed side up. -
Page 86: Notes On Cd-R And Cd-Rws
Media mode Notes on CD-R and CD-RWs Temperature protection circuit MP3 mode You can play CD-Rs (writeable CDs) A temperature protection circuit in the and CD-RWs (rewriteable CDs) on this Cascade protects the laser diode from General notes on MP3 unit. -
Page 87: Creating An Mp3 Storage Medium
Media mode Creating an MP3 storage • The display of artist’s name and track For further information about creating title is restricted to a total maximum MP3 files and ID3 tags, please consult medium length of 63 characters. your dealer or check on the Internet. •... -
Page 88: Mp3 Memory Cards Micro-Drive Mode
Media mode MP3 CD mode MP3 memory cards/ Inserting a micro-drive/memory card The slot for micro-drive/memory cards is The following points, described in “CD Micro-drive mode located underneath the removable control mode” on page 85 apply to MP3 CD Note: panel on the Cascade or underneath the mode: •... -
Page 89: Removing A Micro-Drive Memory Card
Media mode Reinsert the cover as described in Removing a micro-drive/memory card Playback sequence for MP3 “Inserting/Removing the cover” on Remove the control panel as described storage media page 15. in “Removing/Inserting the control Reinsert the control panel as described panel”... -
Page 90: Playlists
Media mode Here is an example of a folder structure Playlists Creating playlists on an MP3 storage medium. We used the WINAMP freeware in our Due to the number of MP3 files that can The filled grey rectangles represent fold- trials for creating playlists. -
Page 91: Cd Changer Mode
Media mode CD changer mode Loading/Ejecting the External units/AUX mode CD magazine The following points, described in “CD You can call up units connected exter- To eject the CD magazine, open the slid- mode” on page 85 apply to CD changer nally to the Cascade as described in ing cover on the changer and press the mode:... -
Page 92: Telephone Mode
“Importing an address book entry” on Bluetooth® wireless technology. page 115. The Internet page www.becker.de contain additional informations. • It is only possible to display the name of a caller if the caller is listed in the •... -
Page 93: Calling Up The Telephone
Telephone mode Calling up the telephone Bluetooth not yet switched on Bluetooth mobile phone not yet If Bluetooth has not been switched on connected when you try to call up telephone mode, If the mobile phone has not been Note: you will be shown the following connected when you try to call up To call up telephone mode directly, it is... -
Page 94: Calling Up The Telephone Main Menu
Telephone mode Select the device to be connected from Calling up the Telephone main the list. menu Press the rotary control/push button 5004 In the Telephone main menu, you can enter/ select telephone numbers, call up The Telephone main menu appears. the call lists, connect a telephone, call Then proceed... -
Page 95: Dialling Numbers
Telephone mode • Cačč from address book Dialling numbers Establishing a connection: You can select a telephone number In the input menu, select the Diač entry. Use this function to enter a telephone from the address book. See “Selecting number and to call this number. a number from the address book”... -
Page 96: Selecting A Number From The Address Book
Telephone mode If the person called answers the Selecting a number from the If several telephone numbers have been telephone the Cascade switches to the saved in the address book entry the address book status display for active telephone calls. following appears on the display. -
Page 97: Call Lists
Telephone mode The Cascade indicates that a connection Call lists In the Telephone main menu, select is being established by displaying the Cačč čists You can obtain a display of the call lists following message. for missed calls, answered calls and numbers dialled. -
Page 98: Calling A Number From The List
Select (delete) or (do not Harman/ Becker cannot generally be delete). Calling a number from the list held liable for the emergency call Select the list entry you wish to call. If you select , the call list will be function. -
Page 99: Automatic Call Answering
Telephone mode Following initiation of the emergency Settings Automatic call answering call, the following information is When the function ( ) is active, In the settings section you can activate/ displayed in the status bar. incoming calls will automatically be deactivate “Automatic call... -
Page 100: Telephone Calls
Telephone mode Telephone calls • The name of the telephone currently Accepting/ rejecting a call connected will be displayed at the You can accept or reject incoming calls. Below, you can find information on the bottom left. operating options available to you Accepting a call •... -
Page 101: Rejecting A Call
Telephone mode Ending a call Options menu Note: Active calls can be terminated. For this The Options menu can be displayed Mute Selecting deactivates the signal purpose, status display must be first be during an active call. You can end the tone and the previously active source, accessed. -
Page 102: End Call
Telephone mode End call The entries must not be confirmed. The Private Select Hang up in the Options menu to individual DTMF tones will be sent You can divert calls received via end the active call. See “Ending a call” immediately after selection. -
Page 103: Fast Access Telephone Functions
Telephone mode Fast access telephone functions You may: Direct calling Call up the telephone fast access • Call numbers and names listed in fast In fast access mode the last 20 numbers function. access mode directly. or names which have been dialled, Turn the rotary control/push button •... -
Page 104: Deleting An Entry
Telephone mode Protecting an entry Deleting an entry Deleting a list Call up the telephone fast access Call up the telephone fast access Call up the telephone fast access function. function. function. Select the entry to be protected. Select the entry to be deleted. Press the rotary control/push button Press the rotary control/push button Press the rotary control/push button... -
Page 105: Saving A Number In The Address Book
Telephone mode Saving a number in the address • Create new entry Select this option to create a new entry book 2030 in the address book. Call up the telephone fast access function. • Amend entry Turn the rotary control/push button Select the entry to be saved. -
Page 106: Adding Data To Entries
Telephone mode Turn the rotary control/push button Adding data to entries and then press the rotary control/ Select the Amend entry entry. push button to select each letter in the 5027 first name one after the other. Select the symbol from the 5026 Turn the rotary control/push button input menu. -
Page 107: Calling Up The Address Book
Address book Address book You can store complete addresses with Calling up the Address Book Creating an entry telephone numbers and other informa- main menu In the Address Book main menu, tion in the address book. You can set up select the New entry - text ončy entry. - Page 108 Address book Accept entry: Note: In the data entry menu, select the If for example a telephone number has 6005 symbol. been entered for Mobiče teč. , this will appear in the menu instead of Mobiče teč. You can now enter additional data: Press the rotary control/push button To enable you to identify numbers sub- Turn the rotary control/push button...
-
Page 109: Creating An Entry Which Supports Navigation
Address book If, under “Automatic dialogue” on Creating an entry which Once you have entered the address, you page 131, you specified that a prompt to must confirm your entry. supports navigation record a name should appear when an In the Address Book main menu, address entry is created, you will be You can enter additional data: select the... -
Page 110: Find Entry
Address book Once you have entered all the informa- Find entry tion, you must save the entry. When searching for an address book 6008 Select the Save entry. entry, you can search based on names or towns. Please also refer to the descrip- Once you have recorded a name, the tion in “Setting the search criterion”... -
Page 111: Setting The Search Criterion
Address book If the complete name/location has already Setting the search criterion Note: been entered and/or added automatically, In the Address Book main menu, Select the symbol to delete the last the address book entry appears. select the Search criterion entry. -
Page 112: Editing Entries
Address book Editing entries Confirm your selection by pressing Modifying an entry the rotary control/push button In the Edit Entries menu, select the Find the address book entry to be Change data entry. modified. • Change data You can modify the data entered for an entry. -
Page 113: Create
Address book Deleting an entry Creating/Deleting voice entries Note: Find the address book entry to be You can record a voice entry or delete an If you wish to change part of the deleted. existing voice entry for the selected address, the Cascade will prompt you to Select the Edit... -
Page 114: Delete
Address book Delete Exporting an address book The Cascade tries to establish a Find the address book entry for which connection to the required device. Use this function to transfer the entire you wish to delete a voice entry. If authentication is required, you will address book in vCard format to another Select the Edit... -
Page 115: Exporting An Address Book Entry
Address book Exporting an address book The Cascade tries to establish a Importing an address book connection to the required device. entry entry If authentication is required, you will Use this function to transfer a single Addresses in vCard format can be have to connect/ authenticate the device address book entry in vCard format to imported from other devices. - Page 116 Address book Then, depending on the settings in • Ačways The following information will be “Always allow connection” Connection to the external device is displayed if the transfer was successful. page 121, the following query is sent or, allowed. The function described in if the function is active, this step will be “Always allow...
-
Page 117: Navigating To An Address Book Entry
Address book Navigating to an address book Voice entries • Dečete ačč entries You can delete all stored voice entries. entry In the Address Book main menu, select the Voice entries entry. You can start route guidance to an When the next prompt appears, address for an address book entry from select to delete the entry or... -
Page 118: Calling An Address Book Entry
Address book Calling an address book entry Fast access functions Protecting an entry Call up the address book fast access From the address book you can start a The last 20 address book entries used in function. call to a telephone number stored in the the address book appear here. -
Page 119: Deleting A List
Address book Deleting an entry Deleting a list Call up the address book fast access Call up the address book fast access function. function. In the Fast Access menu which appears, Press the rotary control/push button select the entry to be deleted. until a menu appears. -
Page 120: Calling Up General Settings
Settings Settings Calling up general settings Bluetooth Opening the device list Press You can configure your Cascade to meet Bluetooth® wireless technology is a Turn the rotary control/push button your requirements in the general set- system which allows radio contact anti-clockwise until Bčuetooth tings. -
Page 121: Always Allow Connection
Settings • Bluetooth is switched on and a • The symbol is shown on the Always allow connection telephone is connected to the Cascade. display if an error occurred in When this function is activated the establishing a connection. It is then corresponding external device can only possible to disconnect the device. -
Page 122: Name Device
Settings Name device Deleting a device from the list Deleting all devices from the list You can change the name of a device You can delete devices from the You can delete all devices from displayed in the Bluetooth device list. Bluetooth device list which are not used the Bluetooth device list. -
Page 123: Connecting And Disconnecting Devices
Settings Connecting and disconnecting Connecting devices (Cascade) Select the device to be connected from devices the device list. 7037 Before a Bluetoothdevice is able to communicate with the Cascade, it must Notes: Select to connect or not to be connected to the system. •... - Page 124 Settings Connecting a device (external device) The external device has previously Connecting the Cascade to an external been connected to the Cascade device can also be initiated by the 7038 Note: external device. If the function described in “Always Enter the password by rotating/ Note: allow connection”...
- Page 125 Settings • Ačways The external device has not been If the connection to the external device Connection to the external device is connected to the Cascadebefore is established successfully, another allowed. The function described in When the external device attempts to signal tone can be heard and the “Always allow...
-
Page 126: Disconnecting Devices
Settings • Ačways Disconnecting devices Calling up Bluetooth settings Connection to the external device is Select the device to be disconnected Press allowed. The function described in from the device list. Turn the rotary control/push button “Always allow connection” anti-clockwise until Bčuetooth Note: Seite 121 will also be activated. -
Page 127: Activating/ Deactivating Bluetooth
Settings Activating/ deactivating Bluetooth Searching for Bluetooth devices activate deactivate Use this function to start a Cascade Bluetooth. search for Bluetooth devices within the 7044 transmission/ reception range. Call up the Bluetooth settings. All the devices (including those already Turn the rotary control/push button connected etc.) are displayed as a result to select between of the search. -
Page 128: Making Devices Visible To Others
Settings Press the rotary control/push button Making devices visible to others Device name to cancel the search. Here you can specify whether other You can give your Cascade a name. This Bluetooth devices are to be able to name will be displayed by other If you do not cancel the search it will recognise the Cascade or not. -
Page 129: Voice Mode
Settings Voice mode Press the rotary control/push button Setting the system language You can select the language for You can make settings for voice mode as announcements and displays here. well as for traffic announcements and other announcements here. Notes: 7003 •... -
Page 130: Displaying Voice Settings
Settings Turn the rotary control/push button Displaying voice settings Volume for voice output and then press the rotary control/push This function can be used to display the You can set the volume for announce- button to select the required language. currently valid voice settings. -
Page 131: Automatic Dialogue
Settings For the Rečative to audio setting, select Automatic dialogue Voice entries Vočume You can specify which events should You can use this function to read out and trigger automatic voice dialogue. Auto- delete all voice entries already stored for matic dialogues are automatic queries the radio and address book functions. -
Page 132: Voice Output
Settings Deleting: • Signač prior to voice input Extended PTT Select Dečete radio Dečete address Once the function has been activated, If the function is active, voice mode can book in addition to being highlighted on the be activated automatically by pressing When the next prompt appears, select Cascade, a beep tone sounds to to delete the entry or... -
Page 133: Repeating A Voice Announcement
Settings Repeating a voice announcement System settings Dispčay If the function has been switched on and • Setting display brightness with Dispčay You can configure various basic settings route guidance is active, the last naviga- brightness on your Cascade to meet your require- tion announcement can be repeated or an Cočours •... -
Page 134: Calling Up The System Settings
Settings • You can use Cčock to configure the Calling up the system settings Audio GMT time sent by the satellite in Press The Audio section includes system terms of its format and the current Turn the rotary control/push button settings for audio mode. -
Page 135: Settings For Left-Hand/ Right-Hand Drive Vehicles
Settings Displaying the volume Note: Note: You can activate/deactivate the display of A setting of “0” indicates no increase in Only one of the two settings can be a change in volume in graphics format. volume. active ( ) at one time. A setting of “20”... -
Page 136: Digital Level
Settings Digital level Supporting the parking aid Display You can adapt the volume level of digital You can select whether the audio vol- The Display section includes system set- audio sources (CD and all MP3 sources) ume is to be lowered when the reverse tings for the display. -
Page 137: Display Colour
Settings Display colour Press the rotary control/push button Day/ night design You can use this function to set the dis- to apply the preferred colour You can configure settings for the play colour using predefined colour pal- scheme. This quits the menu. changeover between day and night de- ettes. -
Page 138: External Device
Settings External device Reset function • Dečete personač data Personal data is deleted. Settings are You can specify whether an AUX source You can reset the Cascade to the factory not reset. or an external hands-free unit is settings. connected to the Cascade instead of a In the following prompt, select CD changer. -
Page 139: Data Backup
Settings Data backup Backing up data This starts the data backup. The following display appears when the You can use this function to backup the Notes: backup has been successful: Data address book data and the fast access • Only the address book data and the been backed up. -
Page 140: Direction Of Rotation Of The Rotary Control/Push Button
Settings Turn the rotary control/push button Direction of rotation of the Clock to select the memory card containing rotary control/push button You can configure the GMT time sent the data backup that is to be loaded. by the satellite in terms of its format and You can specify the direction in which Confirm your selection by pressing the current time zone. -
Page 141: Software Update
Settings The Clock Settings menu appears. The Software update current time setting appears on the right- A software update for your Cascade can hand side of the display. 7027 be carried out by inserting a CD. New You may now select between Change functions for your Cascade can be pro- format:... -
Page 142: What Is Voice Mode
Voice mode Voice mode What is voice mode? The following symbols are used in the • Symbol example dialogues: In an example dialogue between the In several instances, voice mode allows voice control system and user, this • ...* you to control your Cascade simply by symbol indicates a user voice com- You can use your voice control system pressing a button and using your voice. -
Page 143: General Information About The Voice Control System
Voice mode General information about the • Avoid ambient noise in the vehicle Activating the voice control when entering voice commands (e.g. system voice control system conversations between other passen- The voice control system becomes avail- The primary principle of voice mode is gers going on at the same time). -
Page 144: Ending Voice Dialogue Prematurely
Voice mode Ending voice dialogue prematurely Voice entries Notes: A voice dialogue can be ended at any Depending on the setting in “Voice You can activate or deactivate the time. entries” on page 144 for radio mode and sounding of the signal tone as described in “Voice entries”... -
Page 145: Examples For A Voice Dialogue
Voice mode Settings • Detailed voice output Examples for a voice dialogue In some places, voice mode responds You can change the settings for voice A number of examples of voice dialogues with a slightly longer voice output. mode in “Voice mode” on page 129. The appear below. -
Page 146: Example Operation In Radio Mode
Voice mode Example operation in VHF is switched on based on quality and the Fast Access menu appears. radio mode " 9002 FM quality The following description assumes that You will hear a signal tone #. you are in the status display for radio The radio menu appears. -
Page 147: Example For Entering A Navigation Destination
Voice mode " Example for entering a Spell out London L - O - N - D. Navigation You will hear a signal tone #. navigation destination The following description assumes that Say the command Enter destina- 9008 you are in the status display for radio tion. - Page 148 Voice mode Say the command Scroll forwards. 9011 9013 9009 " The data entry menu for the road Would you like to enter a junction or a appears. house number? The unit scrolls through the selection " Please spell the first letters of the road. Say the command No.
-
Page 149: Example For Entering A Telephone Number
Voice mode Example for entering a General commands telephone number General commands are commands that 9015 The following description assumes that are common to different operating you are in the status display for radio modes. The input menu for a telephone number mode. -
Page 150: Help Function (Online Help)
Voice mode Help function (online help) Aborting voice dialogue Select a list entry Say the command Accept [line] The online help provides information You can abort a voice dialogue at any number ... (1 - 4) or [Select] [line] about voice commands currently sup- time. -
Page 151: Commands For Status Displays, Fast Access Functions And Main Menus
Voice mode Commands for status displays, • You can call up media mode. • You can call up the sound menu (Only Say the command Media. for media and radio). fast access functions and Alternative commands: Say the command Tone menu. main menus Alternative commands: Media [player] [on], CD [player]... -
Page 152: Commands For Radio Mode
Voice mode Commands for radio mode • Switch off the mute function. • Switch scan function on/off (page 65). Say the command Mute off. Switch on: If radio mode has been set as the active Alternative commands: Say the command Scan [on] or source, the following commands will Unmute radio, Unmute media or Play sample [station]. - Page 153 Voice mode • Switch radio text on/off (page 69). Switch off: • Deleting a voice entry (page 78). Switch on: Say the command Traffic pro- Speak the command Delete voice Say the command Radio text on or gramme off. entry. Alternative commands: [Activate] radio text.
-
Page 154: Commands For Radio Fast Access Mode
Voice mode Commands for radio fast access • Call up Radio main menu (page 62). • Call up TP menu (page 71). Say the command Radio menu. Say the command Traffic pro- mode Alternative commands: gramme. [Open] radio menu or [Open] menu. Alternative commands: Traffic info, Open traffic info [menu] •... -
Page 155: Commands In The Edit Station Menu
Voice mode Commands in the Edit Station menu The following commands are available • Move station in memory (page 76). The following commands are available in the Edit Station menu for the wave- Say the command Move station. in the Edit Station menu for the VHF band station memory: •... -
Page 156: Commands For The Radio Main Menu
Voice mode Commands for the Radio • Call up TP menu (page 71). • Call up Reception Optimisation menu Say the command Traffic pro- (page 70). main menu gramme. Say the command Reception opti- Alternative commands: misation [menu] or [Open] reception Traffic info, Open traffic info [menu] optimisation [menu]. -
Page 157: Commands In The Waveband Menu
Voice mode Commands in the Waveband menu • Set VHF waveband alphabetically. • Select medium wave waveband. Say the command FM alphabeti- Say the command AM. cally. Alternative commands: Alternative commands: [Activate] medium wave, [Select] 3002 medium wave, [Activate] AM or [Activate] [FM] alphabetically, [Acti- vate] [very high frequency] alphabet- [Select] AM. -
Page 158: Commands In The Programme Type Menu
Voice mode Commands in the Programme Type Commands in the Filter menu Switch off: menu Say the command Station number ... (1 - X) filter off or Deactivate filter station [number] ... (1 - X). 3006 3007 • Switch filtering off for all stations. In the Filter menu, the following com- Say the command Reset. -
Page 159: Commands In The Tp Menu
Voice mode Commands in the TP menu • Set TP station selection to automatic. Commands in the Voice Entries menu Say the command Station auto- matic. Alternative commands: 3013 3024 [Search for] [traffic info] automati- cally or [Search for] [traffic info sta- In the TP menu, the following com- In the Voice Entries menu, the following tion] automatically. -
Page 160: Commands In The Reception Optimisation Menu
Voice mode • Delete all assigned voice entries. Commands in the Reception Commands for media mode Say the command Delete entries. Optimisation menu If media mode has been set as the active Alternative commands: source, the following commands will Delete [all] entries or Delete [all] always be available: voice entries. -
Page 161: Commands For The Media Status Display
Voice mode • Select previous CD (CD changer only) • Select CD using CD number. Commands for the media status (page 79). Say the command CD number ... display Say the command Previous CD. (1 - X). Alternative commands: Alternative commands: Play last CD or Play previous CD. - Page 162 Voice mode • Calling Media main menu • Switching on normal playback se- • Selecting next folder (only for MP3 (page 84). quence. media). Speak the command Media menu. Speak the command Normal or- Speak the command Next directo- Alternative commands: der.
-
Page 163: Commands For Media Fast Access
Voice mode Only if CD changer is an active media • Switching on repeat folder. Commands for media fast access source: Speak the command Repeat direc- tory. • Switching on CD mix (page 83). Speak the command CD mix. 4001 Alternative commands: In media fast access mode, the following CD mix [on] or Activate CD mix. -
Page 164: Commands For The Media Main Menu
Voice mode • Switching to an inserted CD with MP3 • Selecting playlist via the playlist Commands for the Media tracks. number (only if playlists are avail- main menu Speak the command MP3 CD. able). Speak the command [Playlist] • Switching to an inserted CD with au- number ... -
Page 165: Commands For The Media Play Mode Menu
Voice mode Commands for the media • Switch on repeat track (page 83). • Switch on repeat CD (page 83). Say the command Repeat track. Say the command Repeat CD or Play Mode menu Activate repeat CD. • Switch on normal playback sequence. Say the command Normal order or Only if MP3 is an active media source: [Play] tracks in normal order. -
Page 166: Navigation Commands
Voice mode Navigation commands Switch off: Commands for the navigation Say the command Instructions status display If navigation is active, the following off. commands are always available: Alternative commands: Deactivate instructions or Deactivate 2057 • Cancel route guidance (page 49). voice. -
Page 167: Fast Access
Voice mode • Call up the Route Options menu • Call up the Block menu (page 51). Commands for navigation (page 33). Say the command Block. fast access Say the command Route options Alternative commands: or Open route options. Edit block, Edit blocking, Open block or Open blocking. - Page 168 Voice mode • Call up the Enter Destination menu • Select a destination from the address • Start navigation to a fast access desti- (page 27). book (page 38). nation. Say the command Enter address Say the command From address Say the command [Navigate] [des- or Address.
-
Page 169: Commands In The Fast Access Edit Destinations Menu
Voice mode Commands in the Fast Access/Edit • Delete entire list (page 36). • Start destination input (page 27). Destinations menu Say the command Delete list or Say the command Enter destina- Delete entire list. tion. • Save destination in address book Alternative commands: (page 37). -
Page 170: Commands For The Destination Menu
Voice mode Commands for the Destination • Enter destination road (page 30). • Start route guidance to destination. Say the command Street or Enter Say the command Start route menu street. guidance or Start navigation. • Enter junction (page 32). •... -
Page 171: Commands For The Poi Menu
Voice mode Commands for the POI menu • Selecting a POI in a specific town Commands for the (page 42). Route Options menu Speak the command Enter town or [Special destination] [in [a]] town. 2040 • Selecting a POI in the destination area 2026 In the POI menu, the following com- (page 41). -
Page 172: Commands For The Stopover Menu
Voice mode • Switch avoid motorway on/off. • Switch avoid toll on/off. Commands for the Stopover Switch on: Switch on: menu Say the command Avoid motor- Say the command Avoid toll or way. Avoid toll on. Alternative commands: Switch off: 2039 Avoid motorway on or Activate avoid Say the command Avoid toll off or... -
Page 173: Prompt: Is The New Destination A Main Destination Or A Stopover
Voice mode • Select a stopover as destination. Prompt: Is the new destination a main Commands for telephone mode Say the command Enter special destination or a stopover? destination or Special destination. Commands for telephone fast • Select a stopover from the fast access access mode 2096 list. - Page 174 Voice mode • Starting a redial to the number dialled • Calling up a work telephone number • Calling a fast access telephone last. from a voice entry equipped address number. Speak the command Redial or [Di- book entry. Speak the command Call tele- Speak the command Call [entry] al] [the] last [dialled] number.
-
Page 175: Commands In The Fast Access Edit Telephone Numbers Menu
Voice mode Commands in the Fast Access/ Edit • Saving a fast access telephone number Commands for the Telephone Telephone Numbers menu in the address book. main menu Speak the command Save to the • Switch entry protection on/ off address book. -
Page 176: Alternative Commands: [Call] [Entry] [Number]
Voice mode • Calling Settings menu Commands in the input menu for Commands in the Call Lists menu (page 99). telephone numbers Speak the command Settings. Note: Alternative commands: 5011 Please refer to the description under Open settings or Open telephone set- “Example for entering a telephone tings. -
Page 177: Commands In The Call Lists
Voice mode Commands in the call lists • Calling up a work telephone number • Calling a fast access telephone from a voice entry equipped address number. book entry. Speak the command Call tele- Speak the command Call [entry] phone number ... (1 - X). 5012 Alternative commands: ...* business. -
Page 178: Commands In The Settings Menu
Voice mode Commands in the Settings menu • Switching automatic voice dialogue Commands for the on/ off in the event of a call (page 99). address book Switch on: Speak the command Dialogue for 5016 Commands for address book calls [on] or Activate dialogue for fast access calls. - Page 179 Voice mode • Create a new address book entry which • Calling up a work telephone number • Start route guidance to an address to cannot be used by the navigation from a voice entry equipped address which a voice entry has been assigned system (page 107).
-
Page 180: Say The Command Edit [Entry]
Voice mode • Starting a call to a work telephone • Edit an entry to which a voice entry • Edit an entry/Call up the Edit menu number from a fast access entry. has been assigned (page 112). (page 112). Speak the command Call [entry] ... -
Page 181: Alternative Commands
Voice mode • Call up the Search Criterion menu Commands in the Fast Access/Edit Commands in the Edit menu (page 111). Entries menu Say the command Search crite- rion or Set search criterion. 6016 6026 • Call Voice Entries menu (page 117). -
Page 182: Commands In The Edit Data Menu
Voice mode Commands in the Edit Data menu Commands when an entry is open Commands for the Address Book main menu • Save data entered. Say the command Save. 6015 Commands in the menu for selecting a 6002 Bluetooth device for export •... -
Page 183: Find An Entry
Voice mode • Create a new address book entry which • Set search criterion town Commands in the Voice Entries menu cannot be used by the navigation (page 111). system (page 107). Say the command Search by town Say the command New entry text or [Set] search by town. -
Page 184: Commands In The Search Criterion Menu
Voice mode • Delete all assigned voice entries (page 113). Say the command Delete entries. Alternative commands: Delete [all] entries or Delete [all] voice entries. Commands in the Search Criterion menu 6014 In the Search Criterion menu, the follow- ing commands are available (page 111): •... -
Page 185: Technical Terminology
Technical terminology Technical terminology CF card Folder (Auxiliary) (Compact Flash) Directory Option to connect external audio signals. Type of memory card, rewriteable Folder on a CD/memory card/micro-drive removable memory card developed in containing MP3 tracks. 1994 by SanDisc. Balance Volume setting between left and right There are two different types of CF card, loudspeakers. - Page 186 Technical terminology ID3 tag Off-road PTY ID “Table of contents” for an MP3 track. Warning from the navigation system (Programme Type ID) Contains information such as title, artist, if you are in an area not covered by the Identification of the programme trans- album, year and genre.
- Page 187 Technical terminology • Nationač Music abbreviated to Nationač M Radio text • News Additional information transmitted by • Očdies Music abbreviated to Očdies most VHF stations via RDS. • Other Music abbreviated to Other M. • Phone In • Pop Music abbreviated to Pop M.
- Page 188 Always stereo ....71 Becker Surround ....20 Call up system settings ..134 AM mode .
- Page 189 Index Cancel route guidance ... .49 Colour display ....137 Destination town ... . 28 Cancelling traffic announcements .
- Page 190 Index Emergency call ....98 Factory settings ....138 Height above sea level ...53 Enter Fader .
- Page 191 Index Metrisch ..... .61 Navigation fast access Micro-drive ....88 Delete entry .
- Page 192 Index PTY ......68 Repeating a directory ... .84 Switch off .
- Page 193 Index Select telephone mode ...99 Station memory ....75 Delete entry ....77 Safety instructions .
- Page 194 Index Switch on Threshold frequency ... . .20 Announcements ... . .52 Time ......140 Unit Bluetooth telephone mode .
- Page 195 Index Voice dialogue End ..... .144 Waveband .....63 Examples .
-
Page 196: Technical Data
• Supply voltage: • Output: 12 V 4 x 18 W RMS • CD connection: • Line cross section: The Becker Silverstone 7860 CD For power supply min. 0.75 mm² changer can be connected. • Loudspeaker impedance: • Playable CDs: min. 4 Only CDs which comply with DIN EN 60908 can be used. -
Page 197: Notice
NOTICE Dear Listener, In conformance with current EC guidelines, any person may operate this radio receiver. This unit conforms to the current valid European or harmonised national standards. This designation is your guarantee that the unit conforms to the applicable specifications regarding electromagnetic compatibility. - Page 198 Correct disposal of this product (waste for electrical and electronic equipment) (Applicable in European Union countries and other European countries with a separate collection scheme) The label on the product or on the accompanying literature indicates that at the end of its life it cannot be disposed of together with normal household waste.
Need help?
Do you have a question about the Cascade and is the answer not in the manual?
Questions and answers