Table of Contents
Advertisement
Quick Links
Advertisement
Table of Contents

Related Manuals for Labconco ReVo


Summary of Contents for Labconco ReVo
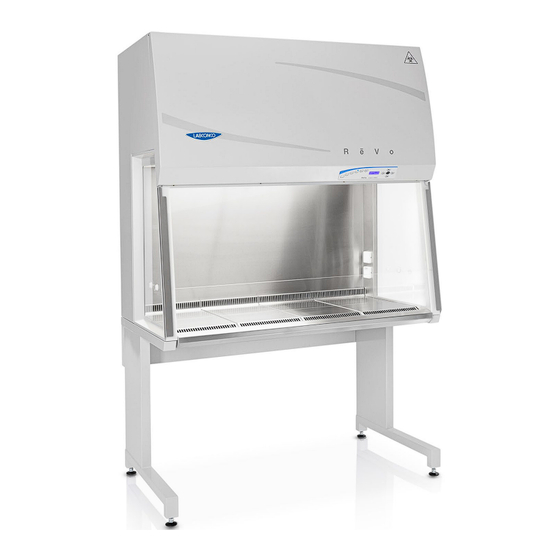
- Page 1 Please read user’s manual before operating equipment Original Instructions LABCONCO CORPORATION 8811 Prospect Avenue Kansas City, MO 64132 (800) 821-5525 I +1 (816) 333-8811 labconco.com User Manual ReVo & ReVo Pro™ Class II, Type A2 Microbiological Safety Cabinets Register this product...
- Page 2 ReVo™ Type A2 Microbiological Safety Cabinets 2023—Present 3R231xxx1 3R241xxx1 3R251xxx1 3R261xxx1 3T231xxx1 3T241xxx1 3T251xxx1 3T261xxx1...
-
Page 3: Warranty
Warranty Labconco Corporation provides a warranty to the original buyer for the repair or replacement of parts and reasonable labor as a result of normal and proper use of the equipment with compatible chemicals. Broken glassware and maintenance items, such as filters, gaskets, light bulbs, finishes and lubrication are not warranted. - Page 4 Symbols used in this manual Note Used to direct attention to a special item. Warning Used in case of danger of a serious accident or lethal injury. Caution Used in case of danger of medium or minor injuries or physical damage. This document is the original instruction manual in accordance with the current Machinery Directive.
-
Page 5: Table Of Contents
Installation of the ReVo and ReVo Pro cabinets ............16 General considerations ...................... 16 Specific considerations ...................... 16 Transport ........................... 17 Exhaust connection for the ReVo and ReVo Pro cabinets ..........17 Cabinet exhaust system accessories ................. 18 4.5.1 Double exhaust HEPA filter (Not GS) ................. 18 4.5.2... - Page 6 10.3 What is required by EN 12469 and DIN 12980 to be tested ..........50 10.4 The factory quality test of the ReVo and ReVo Pro cabinets ..........50 10.5 The factory check list and factory test report ..............51 10.6...
-
Page 7: Introduction To This Instruction Manual
0,25 m/s – 0,50 m/s. The Labconco default downflow setting is 0,28 m/s with a maximum variation of ± 10% on single measuring points, which is in accordance with annex G in EN 12469. -
Page 8: Standard Revo Cabinet
Please also refer to sections “Testing” and “Maintenance”. The following precautions must be taken for operation of the ReVo/ReVo Pro-series. Caution The safety cabinet must not be used for Group 4 pathogens. - Page 9 If this cover is removed, the cabinet will give no protection of the operator or of the environment and the fan will run with openly rotating blades. Caution The ReVo/ReVo Pro Class II cabinets will not provide any protection for operator or environment against harmful gases or vapours. Caution Always keep hands and arms away from the work chamber when activating the sliding window.
-
Page 10: Description
Description Safety systems The ReVo/ReVo Pro class II cabinets have the following build-in safety systems: Negative pressure air system A negative pressure air system combines with HEPA filters in the downflow and exhaust airflow for personnel and product protection. Personnel protection... - Page 11 The sloped front and ample legroom on the ReVo and the ReVo Pro enables the operator to change working positions while being able to see the operating status of the cabinet at all times.
-
Page 12: Hepa Filters - Revo
ReVo 1500 exhaust filter R3838502 ReVo 1800 exhaust filter R3838502 HEPA filters – ReVo Pro The filter system consists of three HEPA H14 filters for pre- filtering, downflow and exhaust air. Exhaust filter Air is drawn from the surrounding room into the work chamber... -
Page 13: Control Panel: Standard Set Up
Control Panel: Standard set up All functions are controlled by an electronic card with microprocessor via the control panel with display shown below. Control Display buttons Navigation buttons ENTER 3.4.1 Control panel Button 1 with green LED light to select the fan ON/OFF at normal velocity. The green light indicates that the fan is running at normal velocity, and that conditions are safe. -
Page 14: Display
Window fully closed, opening 0 mm For easy loading and unloading of the cabinet, the window can be raised to create a 700 mm opening on front of the cabinet. On the ReVo/ReVo Pro cabinets the default work opening is 200 mm... -
Page 15: Lighting In Working Chamber
UV disinfection of the ReVo is possible with an accessory, sold separately of the cabinet. The standard Labconco cabinet system is prepared for full control of safety and timing for the use of UV light – see section “UV light option” for operation and build in safety measures. -
Page 16: Installation Of The Revo And Revo Pro Cabinets
Installation of the ReVo and ReVo Pro cabinets General considerations A class II safety cabinet is a ventilated cabinet, which provides product, operator and environmental protection. It has an open front with inward airflow for operator and environment protection, downward HEPA filtered laminar airflow over the entire working area for product protection and HEPA filtered exhaust air environmental protection. -
Page 17: Transport
The cabinet can be moved through a standard 2000 mm x 800 mm door. Transport of the ReVo / ReVo Pro can be carried out by lifting the cabinet using a forklift either sideways under the support stand or directly under the trough. Furthermore, the cabinet can be moved manually by using hooks in the dedicated holes in the support stand. -
Page 18: Cabinet Exhaust System Accessories
If the room exhaust is balanced to include air exhausted through the ducted safety cabinet, this cabinet must not be turned off. The ReVo and ReVo Pro cabinets can exhaust in three common ways: Directly to the room in which they are installed. -
Page 19: Direct Duct Kit For Thimble Extraction (Not Gs)
200 mm duct spigot on a housing and will fit over the exhaust filter. Care must be taken when fitting to avoid damaging the airflow sensor. Product name Catalogue No. Direct duct 900/1200 Contact Labconco Direct duct 1500/1800 Contact Labconco 4.5.4 Direct duct kit with horizontal venting anti- blowback (Not GS) This kit is designed for use when the cabinet is to be hard ducted with all air vented externally. -
Page 20: Direct Duct Kit With Vertical Venting - Anti-Blowback (Not Gs)
If moving is warranted both the ReVo and ReVo Pro can be lifted and moved using a low lifter (on 1500 and 1800 models use one from each side). Be aware that the cabinets are top heavy. Stabilize cabinet during the moving process. -
Page 21: Connecting Utilities To The Revo And Revo Pro Cabinets
Connecting utilities to the ReVo and ReVo Pro cabinets If optional valves for utilities are delivered, make sure that local rules and regulations are complied with during installation and use. It is generally recommended, to use an authorized technician for this kind of work. -
Page 22: Connections
This switch must be lockable both in the ON and OFF positions. Assemble the stand for the ReVo cabinets As default the ReVo is delivered without the stand mounted. ReVo Pro is always delivered with the stand mounted. Stand... -
Page 23: Levelling Of The Revo And Revo Pro Cabinets
Installation test on the ReVo and ReVo Pro cabinets The ReVo and ReVo Pro must go through a series of test after installation has been finalized before being released for normal operation. As a minimum the following tests must be performed with satisfactory results: Leak test of downflow and exhaust filters and HEPA prefilters on ReVo Pro cabinets •... -
Page 24: Operating The Revo And Revo Pro Cabinets
Caution Labconco will not warrant the operational safety if the cabinet is operated without the required installation tests, or if these tests and are not performed by adequately trained personnel. - Page 25 Button 5 with yellow light is if UV-light is required for decontamination or activation of the table • top. The time for the light is set in the user menu (See User menu). The UV-light can only be turned on when the front window is closed completely. When the UV-light is turned on, the normal lighting in the cabinet is turned off.
-
Page 26: Overview Of The User Menu
Overview of the user menu Programming Password protected access for trained personnel only! Service mode: This menu is only operated by authorised service people from Labconco, distributors and trained technical people for safety reasons – who have got the Service access code. -
Page 27: Supervision - Alarm
In Service mode the following can be adjusted: Airflow speeds downflow and exhaust through 2 air flow sensors. • The setting and calibration of the Alarms: Analogue air flow sensors or pressostats. • The configuration of the cabinet options: UV–light, light mode setting, electrical outlets, gas •... -
Page 28: Setting Of Light
When there has been no activity in the cabinet for more than 5 minutes (no PIR signal), the following sequence will be executed: Alarm in 10 secs (LED flash + buzzer) + the text in the display is changed to “Window closing in xx sec”... -
Page 29: Start-Up Of The Revo And Revo Pro Cabinets
Alarm will cancel automatically when the window is in the correct position. The cabinet is ready for use with protection of product, operator and environment. Operating modes of the ReVo and ReVo Pro cabinets The following are the operating modes for ReVo and ReVo Pro cabinets: • OFF mode Window open mode •... -
Page 30: Working Mode (Operating Mode)
The user can enter a time for the UV light to be switched on and the duration of the UV disinfection period. The ReVo and ReVo Pro Class II Safety Cabinets are designed, build and tested in accordance with the current European standard EN 12469:2000 - Biotechnology - Performance criteria for microbiological safety cabinets, which is the standard dealing with class II safety cabinets. -
Page 31: Loading The Working Chamber
Please remember that UV light does not penetrate areas blocked from the direct light – for example under the table tops - and that it does not represent a substitute for good old fashion mechanical cleaning of the inner surfaces of the safety cabinet. If UV is desired as a disinfectant, it must be used in careful combination with other cleaning and chemical disinfectant methods. -
Page 32: 6.10.1 After Work
Devices making rapid movements, e.g. agitators, centrifuges. • Caution Do not damage the laminator, the prefilters (ReVo Pro) or the main filter in the ceiling of the work chamber by mechanical objects or heat sources, otherwise the microbiological safety is no longer ensured. -
Page 33: Interrupting An Ongoing Procedure
Turn the cabinet either to standby mode or off mode. 6.12 Shut down of the ReVo and ReVo Pro cabinets If the cabinet is not to be used or is to be stored for an extended period of time, it must be completely decontaminated. -
Page 34: Cleaning/Decontamination Of Cabinets
Item Fault message Fault reaction Action Flow 2 = inflow For blockage of inflow • and/or exhaust air from the cabinet • If ducted, that the external ventilation system is working properly Call service technician • Visible “High flow X” and audible High flow alarms Call service technician alarm on control panel... -
Page 35: Caring For And Cleaning Of Coated Surfaces
To properly care for stainless steel, use cleaners and disinfectants free of caustic agents such as chlorine, iodine and ammonia. Always follow the application of any cleaner or disinfectant with a minimum of two clean distilled water rinses, then a thorough drying with a clean soft cloth. By rinsing with distilled water and drying, any remaining residue is removed from contact with the stainless steel. -
Page 36: Uv Disinfection After Cleaning The Working Chamber
UV Disinfection after cleaning the working chamber UV disinfection can be performed by using the optional factory installed UV light. To start the UV disinfection procedure: Close the front window. Press the yellow button (5). The pre-programmed UV settings will be performed. To interrupt or cancel the UV disinfection procedure, just press the yellow button (5) again. -
Page 37: Service And Maintenance Of Revo And Revo Pro Cabinets
• General evaluation of the state of the cabinet. Check and if necessary replacement of light tubes (normal and UV if mounted). • Leak test of all HEPA filters (downflow and exhaust – and prefilters on ReVo Pro only). •... -
Page 38: Working Chamber Lights, Replacement
Remove the laminator located in top of the work chamber (handle with care). Release the two lamps from the fixtures by rotating them 90º. Install the new lamps performing the inverse operation. Product name Catalogue No. Light tube ReVo and ReVo Pro 900 R1297503 Light tube ReVo and ReVo Pro 1200 R1297504... -
Page 39: Optional Uv Lights
Product name Catalogue No. UV light tube, all models Contact Labconco Replacement of fuses All fuses are located on PCB’s accessed through the top plate located on the front top of the cabinet. Make sure that power is cut before removing the protective top plate. -
Page 40: Replacement Of Laminator
Install the replacement laminator and mount the fixing screws again. Product name Catalogue No. Laminator ReVo and ReVo Pro 900 R3832500 Laminator ReVo and ReVo Pro 1200 R3832501 Laminator ReVo and ReVo Pro 1500... -
Page 41: Specifications
Measurements performed in accordance with accuracy grade 1 (precision) paragraph 5.2.1.2 “Outdoors”. For further details please refer to the standard. Part no: 3x2310xx1 ReVo 900 Unit General Specifications Certificates None Compliance with... - Page 42 ReVo 1200 Unit Part no: 3x2410xx1 General Specifications Certificates None Compliance with EN 12469, EN 61010-1, EN 61000-6, EN 11201 Sound Pressure Level at factory settings and standard configuration dB(A) Sound Pressure Level in NightSmart mode dB(A) Down flow, Air velocity 0,28 ±0,01...
- Page 43 ReVo 1500 Unit Part no: 3x2510xx1 General Specifications Certificates None Compliance with EN 12469, EN 61010-1, EN 61000-6, EN 11201 Sound Pressure Level at factory settings and standard configuration dB(A) Sound Pressure Level in NightSmart mode dB(A) Down flow, Air velocity 0,28 ±0,01...
- Page 44 ReVo 1800 Unit Part no: 3x2610xx1 General Specifications Certificates None Compliance with EN 12469, EN 61010-1, EN 61000-6, EN 11201 Sound Pressure Level at factory settings and standard configuration dB(A) Sound Pressure Level in NightSmart mode dB(A) Down flow, Air velocity 0,28 ±0,01...
- Page 45 ReVo Pro 900 Unit Part no: 3x2315xx1 General Specifications Certificates None EN 12469, DIN 12980, EN 61010-1, EN 61000-6, Compliance with EN 11201 Sound Pressure Level at factory settings and standard configuration dB(A) Sound Pressure Level in NightSmart mode dB(A) Down flow, Air velocity 0,28 ±0,01...
- Page 46 Part no: 3x2415xx1 ReVo Pro 1200 Unit General Specifications Certificates None EN 12469, DIN 12980, EN 61010-1, EN 61000- Compliance with 6, EN 11201 Sound Pressure Level at factory settings and standard configuration dB(A) Sound Pressure Level in NightSmart mode...
- Page 47 ReVo Pro 1500 Unit Part no: 3x2515xx1 General Specifications Certificates None EN 12469, DIN 12980, EN 61010-1, EN 61000- Compliance with 6, EN 11201 Sound Pressure Level at factory settings and standard configuration dB(A) Sound Pressure Level in NightSmart mode...
- Page 48 ReVo Pro 1800 Unit Part no: 3x2615xx1 General Specifications Certificates None EN 12469, DIN 12980, EN 61010-1, EN 61000-6, Compliance with EN 11201 Sound Pressure Level at factory settings and standard configuration dB(A) Sound Pressure Level in NightSmart mode dB(A) Down flow, Air velocity 0,28 ±...
-
Page 49: Spare Parts
Quality testing of the ReVo and ReVo Pro cabinets All ReVo and ReVo Pro cabinets are adjusted and tested before leaving the factory. A factory check list and a factory test report is issued for each cabinet and is, together with the HEPA filter test... -
Page 50: Classification Of The Revo And Revo Pro Cabinets
10.1 Classification of the ReVo and ReVo Pro cabinets The ReVo and Labconco Mar Pro cabinets are rated as Class II type A2 in accordance with the standards EN 12469 and DIN 12980 (ReVo Pro only). 10.2 Test terms and definitions Nominal value Default value as specified by Labconco. -
Page 51: The Factory Check List And Factory Test Report
10.5 The factory check list and factory test report The factory check list and factory test report is designed for the ReVo and ReVo Pro cabinets specifically. They document all quality related activities performed during the production through testing and cleaning when the cabinet is ready for packing and shipment. -
Page 52: Pir Sensor
11.2 Table tops The ReVo and ReVo Pro cabinets are, as default, delivered with V-shaped divided table tops in AISI 304 stainless steel. A number of alternatives can be delivered to suit different types of working processes. Contact Labconco for more information. -
Page 53: 12 Tüv/Gs Marking
TÜV/GS marking A selection of ReVo and ReVo Pro cabinets have been certified and granted the GS mark. Below the models and the equipment certified are listed: ReVo 900 ReVo 1200 ReVo 1500 ReVo 1800 ReVo Pro 900 ReVo Pro 1200... -
Page 54: Annex 1 - Factory Check List And Factory Test Report
Annex 1 - Factory check list and factory test report... -
Page 64: Dop Challenge And Measuring Valves
13.1.2 ReVo Pro cabinets The ReVo Pro cabinets has up to 7 DOP valves, 4 placed under the top plate, that needs to be removed to gain access to these DOP valves, and up to 3 under the working table on the front of the prefilter box. - Page 65 Challenge of main downflow and exhaust filters is done through 1, 2 or 3 DOP valves placed under the working table on the front of the prefilter box. Warning Must be closed and tightened before normal operation. Refer to manual for details.
-
Page 66: Annex 3 - Service Log Book
Annex 3 - Service log book Type: Product name: Serial no.: Supplier: Service interval Location... -
Page 67: Annex 4 - Decontamination Statement
Annex 4 - Decontamination statement Statement regarding personal safety for repair/inspection Labconco is legally obliged to protect its employees from all dangers. We therefore kindly ask you to copy and complete this statement before work is commenced. Subject: Service report no. -
Page 68: Annex 5 - Declaration Of Comformity - Revo
Annex 5 – Declaration of comformity – ReVo Annex 6 – Declaration of conformity – ReVo Pro... -
Page 69: Annex 7 - Shortform Manual Revo
Annex 7 – Shortform manual ReVo... -
Page 70: Annex 8 - Shortform Manual Revo Pro
Labconco has chosen to recommend one method for decontamination of the ReVo and ReVo Pro cabinets, and have this method validated to ensure, that it is efficient and will create the safe... - Page 71 The same procedure is used on ReVo (two-filter model) and ReVo Pro (three-filter model), which means that it is designed and designed to cope with the “worst case” cabinet, the ReVo Pro 1800. The validation of the decontamination process has been performed using chemical and biological indicators from BIOQUELL.
- Page 72 The Clarus S is set to 155 ml giving a gassing period of 80 minutes and an aeration period of 4 hours 10 minutes. Experience show that the aeration on the ReVo Pro cabinets will take longer, as the hydrogen peroxide in the prefilters is hard to remove. Check the concentration using a gas detection probe.
- Page 73 Step by step procedure – decontamination of ReVo and ReVo Pro cabinets Prepare the cabinet Empty the cabinet. Remove all equipment that are not necessary for the decontamination process. It is recommended to remove the table tops on the ReVo Pro cabinets and place the decontamination equipment directly in the trough.
- Page 74 Check the concentration inside the working chamber. If it is 1 ppm or less, the cabinet is safe and can be opened completely. On ReVo Pro cabinets the concentration must be measured inside the prefilters, where some hydrogen peroxide will probably be found even with the working chamber clean.
- Page 75 Pictures for step by step decontamination procedure Prepare the cabinet 1” inlet in side window 3” outlet on top plate Place the BIOQUELL Top: Internal catalyst equipment in the cabinet Middle: Generator Bottom: Container for H Holder for container Connect the hoses to the Clarus S equipment and the 3”...
- Page 76 Transition from gassing to During aeration the lid for the 3” outlet is aeration removed to increase the airflow – the negative pressure in the cabinet will increase significantly. During aeration Cabinet is running at reduced velocity during the entire decontamination process...
Need help?
Do you have a question about the ReVo and is the answer not in the manual?
Questions and answers