Table of Contents
Advertisement
Quick Links
Advertisement
Table of Contents

Related Manuals for Labconco RapidStill I


Summary of Contents for Labconco RapidStill I
- Page 1 RapidStill™ I Models 6500000...
- Page 2 The warranty for the RapidStill I will expire one year from date of installation or two years from date of shipment from Labconco, whichever is sooner. Warranty is non-transferable and only applies to the owner (organization) of record.
-
Page 3: Table Of Contents
CHAPTER 1: INTRODUCTION General Description Performance Component Identification CHAPTER 2: INSTALLATION Installation Set-up Assembly Initial Test CHAPTER 3: NORMAL OPERATION Samples Digested Utilizing Micro Digestor Start-Up and Operation Shutdown Calculations CHAPTER 4: ROUTINE MAINTENANCE Glass Still (Replacement) Stopcock CHAPTER 5: REPLACEMENT PARTS CHAPTER 6: WIRING DIAGRAM... -
Page 4: Chapter 1: Introduction
Thank you for displaying confidence in us by selecting a Labconco RapidStill I. Our design engineers, assemblers and inspectors have utilized their skills and years of experience to ensure that the Labconco RapidStill I meets our high standards of quality and performance. -
Page 5: General Description
4 ml (maximum) equivalent of concentrated acid, and is capable of giving reproducible results in ranges as low as 10 micrograms (gamma) #1% nitrogen. The RapidStill I may also be utilized for other steam distillations that DO NOT exceed the volume limitations of the units mixing chamber (approximately 50 to 55 ml). -
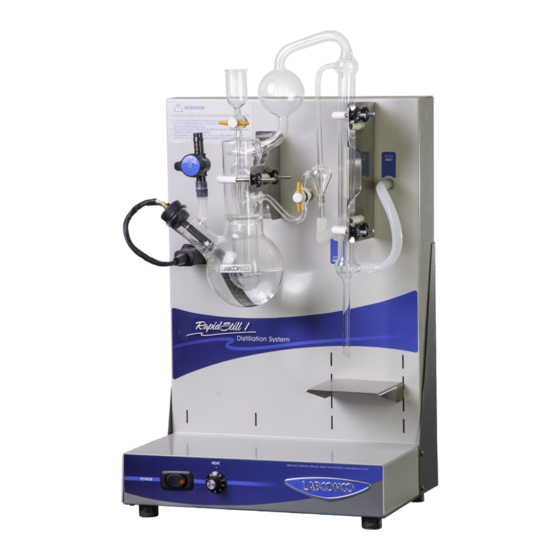
Page 6: Component Identification
Chapter 1: Introduction Component Identification Power Switch Switches power to the Heater. When ideal Heat Control setting is achieved, use this switch to turn Heater ON and OFF. Heat Control The electric immersion heater provides fast, efficient heat. Steam generation starts very rapidly from a cold start. Control input to the heater and steam output by adjusting this knob. - Page 7 Chapter 1: Introduction Product Service 1-800-522-7658...
-
Page 8: Chapter 2: Installation
Your RapidStill I has been shipped to you in one carton. When unpacking, remove the packing material carefully, checking all material for two separately packed parts. The carton will contain: Base Housing Glass Still Heater Stainless Steel Flask Shelf “U” Clamp (large) (1) “U”... - Page 9 Carefully attach the condensing water tubing to the glass barb fittings. Do not add clamps or any lubricant (other than water) to these connections. Turn Base Housing upright. Locate the RapidStill I where there is convenient 115 volt outlet and accessibility to cold tap water and drain. Product Service 1-800-522-7658...
- Page 10 Chapter 2: Installation Obtain several lengths of flexible plastic or silicone tubing (3/8" ID x 1/16" wall). Tubing IS NOT furnished with the unit and may be obtained from laboratory supply dealers. Connect tubing from the rear of the housing to a drain or sink for effluent.
-
Page 11: Initial Test
Chapter 2: Installation NOTE: Make certain the Power Switch is in the OFF position. Connect the Power Cord to the back of the Base Housing. Power Cord may be plugged into outlet at this time. Initial Test The start-up process should begin as follows: Make sure the Power Switch is in the OFF position. - Page 12 Chapter 2: Installation Aspirator Sample Stopcock Addition Stopcock Water Level Check Sample Addition Stopcock; it must be closed. Close Aspirator Stopcock. Turn on tap water source and fill the Condenser. The rate of water through the Condenser will be adjusted later based on the temperature of the distillate.
- Page 13 “siphon” rate. When Mixing Chamber is cleared of the test liquid, close the Aspirator Stopcock. (11) The RapidStill I is now ready for samples. Refer to the following appropriate method for the determination of nitrogen content from predigested samples. Product Service 1-800-522-7658...
-
Page 14: Chapter 3: Normal Operation
Samples Digested Utilizing Micro Digestor Start-up and Operation The Labconco RapidStill I is designed to conform with standard Micro Kjeldahl distillation techniques. The preparation of digested samples, chemical treatment of the sample prior to distillation and titration techniques following the distillation are described in the A.O.A.C. - Page 15 Stopcock and aspirating the rinse solution to the drain. NOTE: Close the Aspirator Stopcock before addition of each rinse. The RapidStill I is ready to process the next sample. NOTE: If long delays are encountered between sample runs, rinse the Mixing Chamber with distilled or deionized water prior to new sample distillation.
-
Page 16: Shutdown
= weight of sample in grams x sample aliquot Factor = wheat 5.70 milk 6.38 rice 5.95 all other 6.25 NOTE: Labconco recommends the use of this method with the Labconco RapidStill I. However, alternative methods may be readily adapted to the apparatus. Product Service 1-800-522-7658... -
Page 17: Chapter 4: Routine Maintenance
Glass Still (Replacement) Disconnect the Power Cord from the outlet before performing any service work. Remove Heater assembly by unplugging it and remove stopper from flask. Disconnect ALL tubing connections on glass still. Lay the Base Housing down on its back. Remove U-clamp nuts and bolts (3). -
Page 18: Stopcock
Chapter 4: Routine Maintenance Stopcock The Labconco RapidStill I is equipped with two PTFE stopcocks. The PTFE stopcocks do not require lubricants. The plug and glass barrel may be cleaned with acetone to wash away any solid particles that might accumulate during long service. -
Page 19: Chapter 5: Replacement Parts
PART ITEM NUMBER DESCRICPTION 6500100 Glass Still Assembly with PTFE stopcocks 1352500 PTFE plug replacements for PTFE stopcock 6507700 Heat Controller 1876500 Knob, for Heat Controller 1327000 Power Switch 1331300 Power Cord, 115V 1327200 Circuit Breaker, 3 amp 6506900 Shelf for Receiving Flask 6504201 Heater assembly, complete with stopper and male plug;... -
Page 20: Chapter 6: Wiring Diagram
Product Service 1-800-522-7658...
Need help?
Do you have a question about the RapidStill I and is the answer not in the manual?
Questions and answers