Advertisement
Quick Links
SSV WORKS, 2610 Calle Quetzal, Camarillo, CA 93012
www.SSVworks.com | Phone: 818-991-1778 | Fax: 866-293-6751
7
pg
Panel
Disassembly
9
pg
RGB LED Controller Command Center
Installation
9
pg
Dash Speaker Panel
Installation
12
pg
Amp
Installation
15
pg
JVC MR1
Installation
18
pg
Subwoofer
Installation
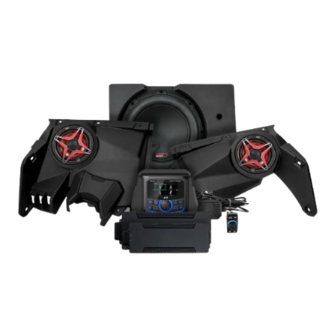
2017-2023 Can Am Maverick X3
Maverick X3
X32-PHZ3V
Phase 3, V-Spec, 3-Speaker
1650 Watt Audio Kit
1
Advertisement

Subscribe to Our Youtube Channel
Related Manuals for SSV Works X32-PHZ3V


Summary of Contents for SSV Works X32-PHZ3V
- Page 1 X32-PHZ3V 2017-2023 Can Am Maverick X3 Phase 3, V-Spec, 3-Speaker 1650 Watt Audio Kit SSV WORKS, 2610 Calle Quetzal, Camarillo, CA 93012 www.SSVworks.com | Phone: 818-991-1778 | Fax: 866-293-6751 Maverick X3 Panel Disassembly RGB LED Controller Command Center Installation Dash Speaker Panel...
-
Page 2: Parts List
All SSV Works enclosures are covered by a limited lifetime warranty against defects in instructions completely before material or workmanship. All SSV Works Electronics are covered by a limited 1 year warranty installation to avoid possible injury, or against defects in material or workmanship. All SSV Works Speakers are covered by a damage to the accessory or vehicle. - Page 3 All SSV Works enclosures are covered by a limited lifetime warranty against defects in instructions completely before material or workmanship. All SSV Works Electronics are covered by a limited 1 year warranty installation to avoid possible injury, or against defects in material or workmanship. Labor for replacement of defective components damage to the accessory or vehicle.
- Page 4 All SSV Works enclosures are covered by a limited lifetime warranty against defects instructions completely before in material or workmanship. All SSV Works Electronics are covered by a limited 1 year installation to avoid possible injury, or warranty against defects in material or workmanship. Labor for replacement of defective damage to the accessory or vehicle.
- Page 5 All SSV Works enclosures are covered by a limited lifetime warranty against defects instructions completely before in material or workmanship. All SSV Works Electronics are covered by a limited 1 year installation to avoid possible injury, or warranty against defects in material or workmanship. Labor for replacement of defective damage to the accessory or vehicle.
- Page 6 WARRANTY INFORMATION: Please read and understand these All SSV Works enclosures are covered by a limited lifetime warranty against defects in material instructions completely before or workmanship. All SSV Works Electronics are covered by a limited 1 year warranty against defects in material or workmanship.
- Page 7 PANELS AND DASH DISASSEMBLY A. To remove the seat, use a 13mm socket and wrench to remove front (2) bolt and nut, and use a 18mm socket to remove (2) rear nuts and seat belt nut ( repeat on other seat) B.
- Page 8 E. Remove gas cover on the passenger side to expose a 10mm nut. Unscrew with a wrench and T30 torx driver. E2. Using panel removal tool unsnap (2) push clips on the driver and passenger side dash covers. Unscrew the (4) T30 screws on the passenger side, and (7) T30 screws on the driver side.
- Page 9 DASH SPEAKER PANEL INSTALLATION TOOLS NEEDED FOR INSTALLATION - T20 & T30 Torx Driver - 8, 10 & 13mm Socket Wrench Refer to the X3-DP6K installation manual included in the kit for a detailed installation process of the dash speaker panels. RGB LED CONTROLLER COMMAND CENTER INSTALLATION TOOLS NEEDED FOR INSTALLATION - Wire Cutter...
- Page 10 RUNNING WIRE HARNESSES AMP POWER CABLES Connect the A-H1Q (x2) power/ground wire from the amplifiers to the battery. Use the provided fuse holder for circuit protection. JVC MR1 POWER HARNESS Connect the JVC MR1 to SSV adapter harness (B-H2368) to the factory bus bar located in the center console beside the passenger seat.
- Page 11 SUBWOOFER AUDIO CABLES Run the B-H2702 Subwoofer extension cable from 600.1 amplifier to the subwoofer. The subwooder enclosure can be mounted under the driver or passenger seat. DASH SPEAKER PANEL AUDIO CABLES Run the B-H1385 front speaker harness from 400.4 amplifier to the dash speaker panels. The shorter end of the harness goes to the driver side dash speaker panel.
- Page 12 AMP WIRING Power/Ground Amp Turn On Remote Bass 400.4 Front Inputs Rear Inputs Front Outputs Rear Outputs Power/Ground Sub Output Remote Bass 600.1 Sub Inputs Amp Turn On AMP PLATE INSTALLATION Mounts to ROPS Cage bolt Mounts to Firewall For optional ALPHA12 Switcher bracket Mounts to...
- Page 13 The amp tray mounts on the driver side firewall above the tube chassis. A. Make a pilot hole with a pick tool through the top right screw hole in the amp plate and push all the way through the vehicle panel. C.
- Page 14 F. Route the front speaker harness (B-H1385) and RGB harness (B-H2935) towards the driver and passenger side of the vehicle and plug in the 4 pin audio connector to the 400.4 amplifier front outputs. Leave the 4 pin RGB connector at the center of the dash or LIT-CC RGB Controller mounting location.
- Page 15 DASH KIT ASSEMBLY A. Set the base plate on the dash. Press the (4) drill guides onto the base plate B. Using a 1/8” drill bit, drill the center of the drill guides to provide C. Set aside the base plate and open the pilot holes up with a 1/4” pilot holes.
- Page 16 F. Place (4) M6 T30 screws and washers into each drilled hole. Fasten G. Using a #2 phillips screwdriver, secure the front of the base plate from the bottom a washer and M6 nut. Secure each screw with with the provided (2) #6 x ½” screws. 10mm wrench and T30 torx driver.
- Page 17 L. Secure the backside of the DMR1 with (2) push pins. M. Center the trim ring on the MR1 and firmly press down until the side and corners click into place. JVC MR1 WIRING CONNECTION A. Connect the blue “AMP TURN-ON” from the B.
- Page 18 UNDER SEAT SUBWOOFER ENCLOSURE (DRIVER SIDE) THIS STEP IS OPTIONAL Some x3 models have a thinner skid plate than others and may rattle more. We have provided a drill template to help minimize skid plate rattle. H. To help minimize skid plate rattle, we have supplied a drill template that adds 4 holes to help relieve air pressure that is being generated by the high output of the sub enclosure.
- Page 19 B. Using the supplied T-30 torx M6 screws and washers, screw the C. Using the supplied T-30 torx M6 screws and washers, screw the C bracket to the bottom left side of the enclosure. Large bracket to the right side of the enclosure shown above. Do not screw in all the way, leave the screws somewhat loose so that you can fit the enclosure snug and then tighten the screws after.
- Page 20 F. Remove the seat mounting spacer from the seat mounting stud G. Replace the factory seat bolt spacer with the supplied SSV towards the center of the car. Works spacer on top of bracket C. Feed the enclosure down under the seat bar and simultaneously guide “Bracket C”...
- Page 21 J. Route the B-H2702 sub extension harness along the center console away from any moving parts and sharp metal towards the rear of the vehicle then connect to the B-H3081 “Y” splitter. Plug one end of the “Y” splitter to the B-H3074 2-pin extension (3 ft) to the X32-DUS10 (driver side).
- Page 22 C. Zip tie all wiring to the factory cables away from any moving parts. THIS CONCLUDES THE INSTALLATION PROCESS. REPLACE THE FACTORY PANELS AND SEATS. QUESTIONS? PLEASE CONTACT SSV WORKS AT 818-991-1778 OR EMAIL SUPPORT@SSVWORKS.COM © 2024 SSV Works, Camarillo, CA 93012...
Need help?
Do you have a question about the X32-PHZ3V and is the answer not in the manual?
Questions and answers