
Related Manuals for ROBOTIQ POWERPICK20


Summary of Contents for ROBOTIQ POWERPICK20
- Page 1 ROBOTIQ POWERPICK20 VACUUM GRIPPER Original Notice © 2023 Robotiq Inc. Robotiq PowerPick20 Vacuum Gripper robot iq.com | leanrobot ics.org Instruction Manual...
-
Page 2: Table Of Contents
1. General Presentation 1.1. Disclaimer 1.2. Nomenclature 2. Safety 2.1. Disclaimer 2.2. Risk Assessment 2.3. Use of the PowerPick20 Vacuum Gripper 3. Installation 3.1. Scope of Delivery 3.2. Environmental and Operating Conditions 3.3. Air Supply 3.4. Reception of the Product 3.5. - Page 3 8. Troubleshooting 9. Warranty 9.1. Conditions 9.2. Warranty 9.3. Warranty Void and Exclusions 10. Harmonized Standards 11. Appendix 12. Contact PowerPick - Instruction Manual...
-
Page 5: Revisions
Revisions Robotiq may modify this product without notice, when necessary, due to product improvements, modifications or changes in specifications. If such modification is made, the manual will also be revised, see revision information. See the latest version of this manual online at: support.robotiq.com. - Page 6 Information provided by Robotiq in this document is believed to be accurate and reliable. However, no responsibility is assumed by Robotiq for its use. There may be some differences between the manual and the product if the product has been modified after the edition date.
-
Page 7: General Presentation
1 .General Presentation 1 .1 .Disclaimer The terms Gripper, PowerPick20 Gripper, PowerPick20 Vacuum Gripper and PowerPick20 used in the following manual all refer to the Robotiq PowerPick20 Vacuum Gripper. The Robotiq PowerPick20 Vacuum Gripper is a robotic device designed for industrial applications. -
Page 8: Nomenclature
(40 lb). To simplify this manual, the word “ box” will be used to represent the item to be handled with the Gripper. The PowerPick20 Gripper is directly installed on the wrist of the robot, without a coupling interface. -
Page 9: Safety
The installer is responsible for the safe installation and commissioning of the PowerPick20 vacuum gripper. Robotiq accepts no liability for damage, injury or any legal responsibility incurred directly or indirectly from the use of this product. The user (installer and operator) shall observe safe and lawful practices including but not limited to those set forth in this document. -
Page 10: Risk Assessment
2.2.Risk Assessment 2.2.1 .General Risk Assessment The robot, the Gripper and any other equipment used in the final application must go through a comprehensive risk assessment process before they can be used. The following non-exhaustive list presents risks that must be assessed during the integration process: Risk of contact between body parts and the gripper and/ or suction cups;... - Page 11 Warning Collisions between a person and the PowerPick20 Gripper may result in material damage, bodily injury and even death. Anyone in the vicinity of the work cell should take the necessary precautions. Make sure no individual or asset are in the vicinity of the robot and/or Gripper prior to initializing the robot.
-
Page 12: Use Of The Powerpick20 Vacuum Gripper
2.3.Use of the PowerPick20 Vacuum Gripper The PowerPick20 Vacuum Gripper is designed to pick, place and handle cardboard boxes. If the Gripper is used for other applications, make sure to consider the type of item to be handled in the risk assessment (please refer to the General Risk Assessment section) and take the appropriate safety measures. -
Page 13: Installation
This manual uses the metric system. Unless specified, all dimensions are in millimeters. Warning When installing: Do not operate the PowerPick20 Vacuum Gripper or even turn on the power supply before confirming the device is firmly attached and the work area is clear. Make sure that the air supply source is secured. - Page 14 1 x Large suction cup bracket assembly 1 x 12 mm double air tube (3.63 m) 4 x 8 mm air tubes (275 mm) 1 x Hardware kit: 1 x M8 shoulder screw 4 x M8 x 40 mm hex socket head cap screws with captive spring washer 10 x 190 mm cable ties 1 x Tubing curler 1 x Pneumatic adapter 1/2 BSPP to 12 mm tube...
-
Page 15: Environmental And Operating Conditions
The optimal pressure for compressed air consumption is 6 bar (87 psi). The maximum pressure allowed is 8 bar (115 psi). Robotiq recommends using a local pressure regulator with a filter and air dryer. The filter should prevent any dust particle larger than 5 µm from getting inside the system. -
Page 16: Reception Of The Product
Inspect the package for damage or defects before and after opening it. Make sure to have all components in hand before discarding the box and packaging material. If damage or defects are discovered, or if components are missing, contact the Robotiq support team at support@ robotiq.com. 3.5.Mechanical Installation Warning Failure to properly secure and install the equipment can result in material damage and bodily injury. - Page 17 Installation Fig. 3-1: PowerPick20 Vacuum Generation Unit 1. Identify the area where the PowerPick20 Vacuum Generation Unit will be installed. Choose a location so that the electrical cable and air tubes will not encumber the working environment. 2. Install the Powerpick20 Vacuum Generation Unit using two (2) M8 bolts (tools and hardware not provided).
- Page 18 For more detail about the possible Gripper configurations, see section Configuration Steps and Tips. Info Please use the Robotiq Configurator to simulate the configuration that corresponds best to the application at hand. Should the application require more than one configuration, consider using a gripper arrangement that adapts to every situation.
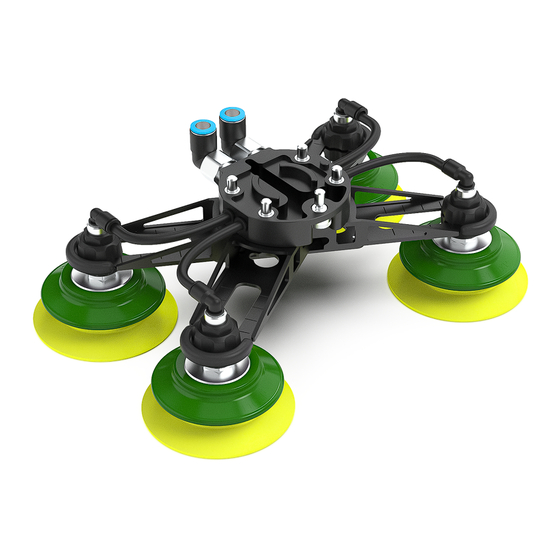
- Page 19 Fig. 3-2: PowerPick20 Gripper, Default Configuration Caution Any unused manifold port should be covered with a port plug to avoid air leakage. Installation of Manifold Assembly Install the Manifold directly on the robot wrist (no coupling required). Align with the dowel pin on the robot wrist.
- Page 20 Fig. 3-3: Installation of the Manifold Assembly on the Robot Wrist Installation of Gripper Offset Equipment on the Manifold For more detail about the different Gripper configurations, please refer to the Configurations Steps and Tips section. Skip this step if no offset is necessary. Wrist Extension Align the holes of the wrist extension with the corresponding pins on the manifold.
- Page 21 Hollow Offset Link on Manifold Align the holes of the hollow offset link with the corresponding pins on the manifold. Install the hollow offset link onto the robot wrist with four (4) M8 x 40 mm hex socket head cap screws with captive spring washer using the provided 6 mm hex key.
- Page 22 Fig. 3-6: Installation of the Hollow Offset Link on the Wrist Extension Installation of Suction Cup Brackets Suction Cup Brackets on Manifold Align the holes of the suction cup brackets with the corresponding pins on the manifold. Install the suction cup brackets onto the Manifold with four (4) M8 x 40 mm hex socket head cap screws with captive spring washer using the provided 6 mm hex key.
- Page 23 If necessary, when using the small brackets, cut the tubes to the required length. Fig. 3-7: Installation of Suction Cup Brackets Suction Cup Brackets on Gripper Offset Equipment Align the holes of the suction cup brackets with the corresponding pins on the gripper offset equipment. Please refer to the figure below for alignment.
- Page 24 Changing Suction Cup Pattern 1. Remove the M8 socket head screw under the PowerPick20 Gripper, near the center, using the provided 6 mm hex key. 2. Loosen (do not remove) the four (4) M8 socket head cap screws with captive spring washer holding the suction cup brackets to the robot wrist or gripper offset equipment using the provided 6 mm hex key.
- Page 25 3. Rotate the suction cup brackets until the holes for the desired pattern are aligned. 4. Tighten the M8 socket head screw under the PowerPick20 Gripper, near the center, to secure the pattern, using the provided 6 mm hex key. Required torque is 8 Nm (5.9 lb-ft).
- Page 26 4. Remove the four (4) M8 socket head cap screws with captive spring washer under the PowerPick20 Gripper, holding the suc- tion cup brackets to the robot wrist or gripper offset equipment using the provided 6 mm hex key.
- Page 27 Fig. 3-10: Changing Powerpick20 Suction Cup Brackets Info In the figure above, two (2) air nodes have been removed for ease of viewing. PowerPick - Instruction Manual...
- Page 28 Cut the air tubes to the right length if necessary. Air Supply to PowerPick20 Vacuum Generation Unit If the supplied 12 mm air tube is long enough, connect the end of the 12 mm air tube to the air filter or air supply (please refer to the Air Supply section for more information).
- Page 29 Make sure the air tube is neither too tight nor too loose so that the robot can move freely, without the air tube getting stuck when moving. A tubing curler and 190 mm zip ties are supplied to help in that matter. Fig. 3-11: PowerPick20 Vacuum Generator- air tubes routing PowerPick - Instruction Manual...
-
Page 30: Electrical Installation
3.6.1 .PowerPick20 Vacuum Generator 1. Connect the M12 connector of the I/O cable to the PowerPick20 Controller, using the port identified as “ device control.” 2. Connect the open end of the I/O cable to the robot control box according to the table and figure below. - Page 31 Fig. 3-12: PowerPick20 Controller Connections to Robot Control Box If you're using the PowerPick20 Vacuum Gripper with the PE20 Robotiq Palletizing Solution, follow the electrical installation instructions in the PE20 User manual. PowerPick - Instruction Manual...
-
Page 32: Supply Pressure Adjustment
If so, further tests must be performed to ensure the payload is always maintained in operating conditions. Follow these instructions to adjust the supply pressure of the PowerpIck20 Vacuum Gripper Unit. Caution Make sure all pneumatic tubes connected to the Vacuum Generation Unit and the Vacuum Gripper are pushed all the way in. -
Page 33: Configurationsstepsand Tips
3.8.ConfigurationsStepsand Tips Info Please use the Robotiq Configurator to simulate the configuration that corresponds best to the application at hand. Should the application require more than one configuration, consider using a gripper arrangement that adapts to every situation. 3.8.1 .TCPand Center of Mass Refer to the Tool Center Point and Center of Mass section to identify the values of your configuration. - Page 34 3.8.2.Suction Cup Brackets Fig. 3-13: A-B-C box dimensions Box dimensions by configuration Component combination Configuration Metric Imperial Small suction cup brackets A: 250 mm + A: 9-7/8 in + 110 mm suction cups Square B: 250 mm + B: 9-7/8 in + A: 325 mm + A: 12-3/4 in + Rectangle...
- Page 35 3.8.3.Wrist Extension Install the wrist extension if additional vertical reach is required. Component Additional vertical reach Wrist Extension (optional) 1 00 mm (3-1 5/ 1 6 in) Table 3-4: Wrist extension Fig. 3-14: Wrist Extension with Small Suction Cup Brackets 3.8.4.Choice of Horizontal Offset Component Choose your offset component according to: the necessary horizontal reach.
- Page 36 Fig. 3-15: 200 mm Hollow Offset Link with Large Suction Cup Brackets PowerPick - Instruction Manual...
-
Page 37: Software
Please refer to the Electrical Installation section for additional information on wiring. 1. In the I/O menu, identify the analog input for each of the two (2) pressure sensors of the Powerpick20 vacuum generator; each analog input will display the voltage value of the corresponding vacuum sensor. - Page 38 5. Go to the program tree and tap where you want to activate the PowerPick20 Gripper. a. Insert a Set node (Program > Basic). b. In the Command window, set the Digital Output linked to the first pressure sensor to High; this will activate the vacuum for half of the suction cups.
-
Page 39: Specifications
5.Specifications Info This manual uses the metric system. Unless specified, all dimensions are in millimeters. 5.1 .Technical dimensions 5.1 .1 .PowerPick20 Vacuum Generator Fig. 5-1: Technical Dimensions of the PowerPick20 Vacuum Generation Unit PowerPick - Instruction Manual... - Page 40 5.1 .2.200 mm Hollow Offset Link Fig. 5-2: Technical Dimensions of the 200 mm Hollow Offset Link PowerPick - Instruction Manual...
- Page 41 5.1 .3.Small Suction Cup Brackets Fig. 5-3: Technical Dimensions of Small Suction Cup Brackets 5.1 .4.Large Suction Cup Brackets Fig. 5-4: Technical Dimensions of Large Suction Cup Brackets PowerPick - Instruction Manual...
- Page 42 5.1 .5.Air Nodes Fig. 5-5: Technical Dimensions of Air Nodes PowerPick - Instruction Manual...
- Page 43 5.1 .6.Wrist Extension Fig. 5-6: Technical Dimensions of Wrist Extension 5.1 .7.PowerPick20 Gripper (Default Configuration) Fig. 5-7: Technical Dimensions of the PowerPick20 Gripper (Default Configuration) PowerPick - Instruction Manual...
-
Page 44: Mechanical Specifications
5.2.Mechanical Specifications 5.2.1 .PowerPick20 Vacuum Gripper Value Specification Metric Imperial Compressed air and electricity Energy source Gripper mass See the Tool Center Point and Center of Masssection. Vacuum Generation Unit mass 6.7 kg 1 4.6 lb Air tube to Vacuum Generator... - Page 45 1Includes gravitational acceleration. 2This value is only valid for the PowerPick20 Gripper used in conjunction with a UR20 robot. The payload may be limited by the robot used. Please refer to the user manual of the robot for additional information.
-
Page 46: Tool Center Point And Center Of Mass
5.3.Tool Center Point and Center of Mass Center of mass (mm) TCP (mm) Hollow Off- Suction Cup Wrist exten- Mass Configuration set Link Bracket sion 0 mm Small 117 1805 0 mm Large 117 1963 200 mm Small 168 2429 200 mm Large 168 2587... - Page 47 200 mm Large 268 3053 PowerPick - Instruction Manual...
-
Page 48: Electrical Specifications
0.7 W Peak current 200 mA Hot swappable ESD safe Electrical connection 1 2-pole female M1 2 connector Table 5-2: Electrical Specifications of the PowerPick20 Vacuum Generator 5.5.Control specifications Specification Value Communication protocol options Digital I/O Feedback Vacuum level (1 -5V analog) -
Page 49: Maintenance
Caution Unless specified, any repair work performed on the PowerPick20 Vacuum Gripper must be done by Robotiq. The warranty will be void if the PowerPick20 Vacuum Generator is opened by anyone other than a Robotiq employee. 6.1 .Safety Measures 6.1 .1 .General Guidelines... -
Page 50: Maintenance
Caution For maintenance on pneumatic components, install a lockout valve before connecting to the product. Always lockout prior to performing maintenance on pneumatic components. Always inform the operator before performing maintenance operations and tag out the system. Secure the maintenance area with temporary barriers if needed. Clean the affected parts, especially the connections and fittings. - Page 51 M8 x 1.25 shoulder screw Robot wrist 1 6 Nm 1 1 .8 lb-ft M8 x 1.25 Socket head Suction cup brackets 8 Nm 5.9 lb-ft hex cap screw Table 6-3: PowerPick20 Gripper Fastener Torque Settings PowerPick - Instruction Manual...
-
Page 52: Spare Parts, Kitsand Accessories
7.Spare Parts, Kitsand Accessories Item Description Ordering number PowerPick20 Vacuum Gripper Kit: - 1 x PowerPick20 Vacuum Generation Unit 1 x Vacuum Generator 1 x Mounting bracket & Filter-regulator assembly 1 x M12-12 pin I/O cable 1 x Grommet and pneumatic fitting for... - Page 53 1 This SKU does not contain the PowerPick20 Gripper Unit or the PowerPick20 Vacuum Generation Unit. 2 This SKU does not contain the PowerPick20 Gripper Unit or the mounting bracket & filter-regulator assembly. 3 This SKU does not contain the PowerPick20 Vacuum Generation Unit.
-
Page 54: Troubleshooting
8.Troubleshooting Symptom / Issue Cause Solution Validate that the PowerPick20 vacuum generator input pressure is at the right level.If needed, increase it to 7 bar (1 00 psi). Verify that the suction cups are in good condition.If needed, clean them (please refer to the Maintenance section).If wear is visible, replace them... -
Page 55: Warranty
9.1 .Conditions Robotiq covers the PowerPick20 and all its components against defects in material and workmanship for a period of one (1) year from the date of reception, when utilized as intended. Robotiq also guarantees that the equipment will meet applicable specifications under normal use. - Page 56 Robotiq shall not be liable for damages resulting from the use of the PowerPick, nor from special, incidental, or consequential damages. Robotiq shall also not be responsible for any failure in the performance of other items to which the PowerPick and any of its component is connected or the operation of any system of which it may be a part.
-
Page 57: Harmonized Standards
1 0.Harmonized Standards The standards listed in the table below were followed, as far as applicable, for the design and production of the Robotiq PowerPick Vacuum Gripper. Standard Year Description ISO 12100 2010 Safety of machinery — General principles for design — Risk assessment and risk reduction... -
Page 58: Appendix
1 1 .Appendix Fig. 11-1: Pneumatic Scheme of PowerPick20 with the Filter-Regulator PowerPick - Instruction Manual... -
Page 59: Contact
1 2.Contact www.robotiq.com Contact Us Phone 1-888-ROBOTIQ (762-6847) (01) 418-380-2788 Outside US and Canada Technical support and engineering option 3 Sales option 2 Head office Robotiq: 966, chemin Olivier Suite 500 St-Nicolas, Québec G7A 2N1 Canada PowerPick - Instruction Manual...
Need help?
Do you have a question about the POWERPICK20 and is the answer not in the manual?
Questions and answers