ROBOTIQ PE Series Instruction Manual
Palletizing solution
Hide thumbs
Also See for PE Series:
- Original notice (97 pages) ,
- Quick start manual (10 pages) ,
- Quick start manual (10 pages)

Related Manuals for ROBOTIQ PE Series


Summary of Contents for ROBOTIQ PE Series
- Page 1 ROBOTIQ PALLETIZING SOLUTION PE Series Original Notice © 2023 Robotiq Inc. Robotiq Palletizing Solution - PESeries for Universal Robots robot iq.com | leanrobot ics.org Instruction Manual...
-
Page 2: Table Of Contents
4.1. Starting Up 4.2. Light States 5. Software 5.1. Installation 5.2. Multipick Feature 5.3. Program 5.4. Wiring the Multipick Feature 5.5. Palletizing Script Functions 6. Specifications 6.1. Technical Dimensions 6.2. Mechanical Specifications Palletizing Solution - PE Series - Instruction Manual... - Page 3 6.3. Electrical Specifications 7. Maintenance 7.1. Fasteners 7.2. PowerPick Vacuum Gripper 7.3. Cleaning 7.4. Solution Storage 8. Spare Parts, Kits and Accessories 9. Troubleshooting 9.1. Palletizing Solution (except the PowerPick Gripper) 9.2. PowerPick Vacuum Gripper 10. Warranty 11. Harmonized Standards 11.1.
- Page 4 Palletizing Solution - PE Series - Instruction Manual...
-
Page 5: Revisions
Revisions Robotiq may modify this product without notice, when necessary, due to product improvements, modifications or changes in specifications. If such modification is made, the manual will also be revised, see revision information. See the latest version of this manual online at: support.robotiq.com. - Page 6 2022/02/03 Updated Physical Clearance and Reachable Area of the Robot section Added new option in Copilot Configuration tab Added new option in Palletizer node Removed Force and Speed Robot Limits section Updated Harmonized Standards section 2022/01/04 Initial Release...
- Page 7 Information provided by Robotiq in this document is believed to be accurate and reliable. However, no responsibility is assumed by Robotiq for its use. There may be some differences between the manual and the product if the product has been modified after the edition date.
-
Page 8: General Presentation
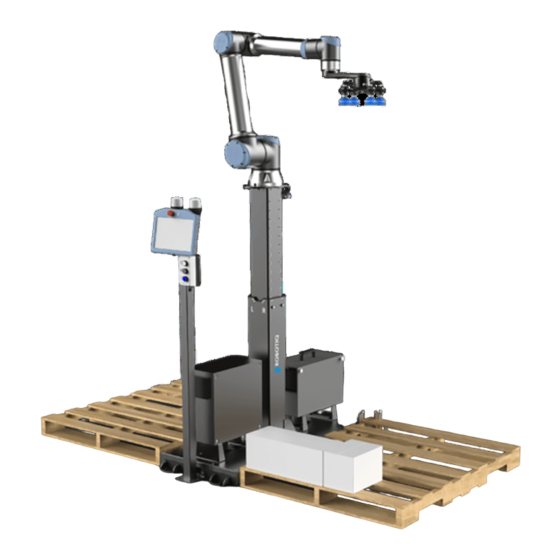
Series Robotiq Palletizing Solution. The PE Robotiq Palletizing Solution is a hardware and software solution already connected and ready to install. It is composed of a base fully integrated with a Robotiq Controller, pallet sensors, a pedestal, and a post with a teach pendant rack and status lights. - Page 9 1 .1 .2.Robotiq Controller All the components of the Solution are integrated and controlled via the Robotiq Controller. It allows for the motion of the robot during a palletizing action, and the control of the pallet sensors and status lights.
-
Page 10: Palletizing Operation Diagrams
The following diagrams explain the logical operation of the Palletizing Solution based on the operator's actions, as well as responses such as signals, pallet and box sensor behaviors, etc. Please refer to the Status Lights section for further information about light states. Palletizing Solution - PE Series - Instruction Manual... -
Page 12: Safety
2.1 .Disclaimer The intent of this section is to provide general guidelines for safe use of the Robotiq Palletizing Solution, always follow local regulations. The installer is responsible for the safe installation and commissioning of the Palletizing Solution. Robotiq accepts no liability for damage, injury or any legal responsibility incurred directly or indirectly from the use of this product. -
Page 13: Intended Use
Caution The unit should be used exclusively within the range of its technical data. Any other use of the solution is deemed improper and unintended. Robotiq will not be liable for any damages resulting from any improper or unintended uses. -
Page 14: Warnings, Risk Assessment And Final Application
Risk of load dropping resulting from loss of vacuum; Risk of pinching any moving component of the Robotiq Palletizing Solution or the robot; Risk of damage or breaking if using a custom suction cup bracket that does not meet the technical requirements;... - Page 15 The vacuum level will continue and the object will not be lost. (Any 24V pin) The PowerPick Vacuum Gripper that comes with the Robotiq Palletizing Solution is connected via the robot controller. Warning Loss of vacuum can occur due to power failure or air supply interruption.
- Page 16 Special attention must be given to the pedestal, the cable management system, and the gripper components. Please contact Robotiq Support if any sign of damage is detected. Palletizing Solution - PE Series - Instruction Manual...
-
Page 17: Installation
Caution Make sure to follow all the safety rules and regulations of your workplace while using the Robotiq Palletizing Solution. Always wear all recommended personal protective equipment in accordance with your workplace's safety standards, including: Safety glasses;... -
Page 18: Scope Of Delivery
3.1 .Scope of Delivery 1 x PE Series Palletizing Solution base including: 1 x Pedestal 1 x Robotiq Controller 4 x Pallet sensors 1 x Cable management system 1 x PE Series Palletizing Solution post including: 2 x Status lights... -
Page 19: Required Toolsand Equipment
Torque wrench with 10 mm (3/8 in) drive or adapter, minimum torque range of 15 - 50 Nm (11.0 - 36.9 ft-lb) Isopropyl alcohol Additionally, if you decide to install the anchors provided by Robotiq, you will need the following: Hammer drill... -
Page 20: Environmental And Operating Conditions
Table 3-1: Environmental and operating conditions of the Robotiq Palletizing Solution Caution Use of the Robotiq Palletizing Solution is not recommended in presence of chemicals in the environment. 3.3.1 .Air Supply Compressed air must be supplied to the vacuum gripper according to the technical specifications. For maintenance and other purposes, it is recommended to install a lockout valve before connecting to the product. -
Page 21: Mounting And Installation
The Robotiq Palletizing Solution is shipped on a pallet. A wood crate is protecting the hardware from external elements. Since the crate weighs 212 kg (465 lb), Robotiq recommends using a pallet truck or forklift truck to move it. The operation of such machinery should be done by qualified and authorized personnel. - Page 22 Caution Make sure to have all components in hand before discarding the crate and packaging. 3.4.3.Moving and Positioning the Solution Warning Failure to properly secure and install the equipment can result in material damage and bodily injury. In addition, note that the warranty will not cover material damage resulting from an installation that did not comply with the instructions found in this manual.
- Page 23 Palletizing Solution - PE Series - Instruction Manual...
- Page 24 Robot Installation Info A UR10 or UR10e cobot is required for the installation. The cobot is not included in the Robotiq Palletizing solution. For e-Series Universal Robots 1. Run the cable through the inner pedestal section and pull the cable out at the bottom of the pedestal.
- Page 25 2. Place the robot on the robot base plate so that the back of the robot (the side on which is the notch to let the power cable through the robot base) is oriented towards the front of the Solution (towards the Robotiq Controller). Align properly with the two dowel pins (already installed on the robot base), and secure the robot using four (4) M8 x 25 mm screws and Belleville washers.
- Page 26 3. Reposition the robot base plate and secure it with its four (4) screws. 4. Place the robot on the plate so that the back of the robot is oriented towards the Robotiq Controller. Align properly with the two dowel pins (already installed on the robot base), and secure the robot using four (4) M8 x 22 mm screws and Belleville washers.
- Page 27 5. Screw the pedestal back in place, starting with the side that has four (4) screws with a 15 Nm torque. Then tighten the two (2) other screws with a 15 Nm torque. Palletizing Solution - PE Series - Instruction Manual...
- Page 28 However, it can be positioned elsewhere, although the final position is dependent on cable length. Ten-meter cable extensions are available as an option for the push button enclosure and status lights. Please contact support@ robotiq.com should you need to add them to your configuration.
- Page 29 In preparation to do so, pull out the cable that is already routed from under the base, through one of the holes of the back base plate. 6. Use the power cable provided with the UR robot to power the Robotiq Controller. Pull the cable through the hole at the very back of the base.
- Page 30 1. Install the UR controller and secure it using the four (4) M12 screws. 2. Connect the power output cable of the Robotiq controller to the UR controller. 3. Connect the robot arm’s power output cable to the socket on the UR controller.
- Page 31 Do not unscrew completely. Unscrew only half a turn to be able to change the orientation of the column. Completely untightening the screws can cause the column to fall and cause bodily injuries and material damages. 5. Rotate the column counterclockwise as much as possible. Palletizing Solution - PE Series - Instruction Manual...
- Page 32 6. Position the robot so that the wrist is on the outside left side of the base like shown in the figure below. 7. Move the robot so the robot tool flange is parallel to the ground: change the feature reference to Base and modify the tool position like the following: RX=0°, RY= 180°, RZ=0°.
- Page 33 -180° 2. Using four (4) M6 screws and tooth lock washers, secure the gripper on the robot tool flange. Align with the dowel pin. Required torque is 9.5 Nm (7.0 lb ft). Palletizing Solution - PE Series - Instruction Manual...
- Page 34 With Isopropyl alcohol, clean the area where the PowerPick controller will be placed. Remove the protective layers from the double-sided tape. Place the PowerPick Controller on the Robotiq Controller, with pneumatic fittings pointing to the pedestal column. Leave enough space (recommendation of 250 mm (10 in)) between the PowerPick Controller and the pedestal to ensure that the tubing and electrical cable have enough space to connect.
- Page 35 Place the air tube along the sleeve and position it on the second double-sided tape portion (see figure below). g. Close the sleeve. h. Using a cable tie, attach the air tube to the bracket just under the robot base plate so the white label #3 is under the bracket. Palletizing Solution - PE Series - Instruction Manual...
- Page 36 6. Remove the safety clip from the PowerPick Controller (P+ port) and connect one extremity of the 8 mm air tube. Replace the safety clip. 7. Run the air tube through the base via a hole under the Robotiq Controller and make it run through the hole at the back of the base.
- Page 37 2. Connect the M12 connector of the I/O cable to the PowerPick Controller. 3. Run the cable to the robot controller via the base using holes under the Robotiq Controller and the robot controller. Follow the good practices of the cable management. You can use the plate under the controller and a grommet (not included).
- Page 38 Run the cable to the robot controller. b. Refer to the diagram in the Robotiq Controller section to connect the wires. Depending on the application and the safety devices used, there are alternate ways to wire the buttons to the controller. Adjust accordingly.
- Page 39 4:1 safety factor: 5600 N [1280 lbf] Caution Make sure to follow all the safety rules and regulations of your workplace while using the Robotiq Palletizing Solution. Always wear all recommended personal protective equipment in accordance with your workplace's safety standards, including: Dust mask;...
- Page 40 2. Install the pedestal cover using the provided screws (4). 3. Connect the power cable to the power outlet. 4. Power on the Robotiq Controller and the robot. Caution Make sure to do a risk assessment before starting to use the Solution. For more details, please refer to the Safety...
- Page 41 Add virtual planes around pallet(s) option available in the Settings tab of the Palletizer node of the Robotiq URCap to contain the overrun within a certain distance of the pallet. Please refer to Software section to learn more about this option.
-
Page 42: Other Grippers
If your gripper does not fit the following models, it can still work, but Robotiq does not guarantee that there will be no collision. - Page 43 Bracket representation Height Width Length Direction 31.5 mm 75 mm Same length as TCP offset (X, Y) Same direction as TCP offset (X, Y) Palletizing Solution - PE Series - Instruction Manual...
-
Page 44: Installation For Universal Robots
3.6.Installation for Universal Robots The table below shows which Robotiq software to use with your Universal Robots’ controller. Please refer to the URCap Package section for the installation of the UR software packages for the Palletizing Solution. Info For CB-Series robots, the controller must have been produced after september 2019 (serial number > 2019301732) to be able to be installed on the Solution. - Page 45 Tap the URCaps button. Tap the plus (+) button to look for the .urcap file in the available drives. Select the Copilot URCap (UCS-X.X.X.) to install the URCap. Palletizing Solution - PE Series - Instruction Manual...
- Page 46 Once the files are selected, tap the Open but- ton. Tap the Restart button to complete the URCap installation. By doing so, you accept the license agreement detailed in the URCap information textbox.
- Page 47 Palletizing URCap package. Go to www.support.robotiq.com, select Browse by product. Click on your Robotiq product page and then Universal Robots Click on Software → Robotiq URCap → download the Copilot URCap and extract it on the root of a blank USB stick.
- Page 48 Restart PolyScope to complete the URCap installation.By doing so, you accept the License Agreement that is detailed in the URCap Information text box (see below for the License Agreement). When PolyScope reopens, the ActiveDrive toolbar will appear on the screen.
- Page 49 Select System in the navigation pane on the left. Select URCaps. In the Active URCaps box, select the URCap to uninstall. Tap the minus (-) button to uninstall the URCap. Restart Polyscope to complete the unin- stallation process. Palletizing Solution - PE Series - Instruction Manual...
- Page 50 On CB-SeriesUniversal Robots Go to Setup Robot. Tap URCaps Setup. In the Active URCaps box, tap the URCap to unin- stall. Tap the minus (-) button to uninstall the URCap. Restart PolyScope to complete the uninstallation process.
-
Page 51: Robot Configurations
2. Then, unlock the section with the proper password and change the values. The minimum and maximum values for the Elbow will be -167° and 3°. The minimum and maximum values for the Wrist 3 will be -273° and 273°. Palletizing Solution - PE Series - Instruction Manual... - Page 52 For CB-Series: 1. Tap Installation→ Safety → Joint Limits → Position range 2. Then, unlock the section with the proper password and change the values. The minimum and maximum values for the Elbow will be -167° and 3°. The minimum and maximum values for the Wrist 3 will be -273° and 273°. 3.8.3.Configurable Inputs Two of the buttons found on the push button enclosure can be configured to trigger “...
- Page 53 Please refer to Physical Clearance and Reachable Area of the Robot section for more information. The values can vary depending on your configuration. Palletizing Solution - PE Series - Instruction Manual...
-
Page 54: License Agreement
Licensor if, at such time, the End-User is not in default in respect of any of its obligation contained herein. Such modifications and upgrades of the Software shall be installed by the End-User itself by consulting the Licensor’s Web- site http://robotiq.com/ where a link to proceed to such installation will be made available thereof. A new version of the... - Page 55 End-User shall comply with the Licensor’s request for information regarding bugs, defects or fail- ures and furnish him with information, screenshots and try to reproduce such bugs, defects or failures upon Licensor’s demand. Palletizing Solution - PE Series - Instruction Manual...
- Page 56 12. Expiration and Termination. The Licensor may terminate this Agreement for default by the End-User. This Agreement will also be automatically terminated upon the election of such by the Licensor or the official launch of the Software, whichever event comes first. Upon termination of this Agreement for any reason, the End-User shall promptly uninstall the Software on any UR’s Productsand Licensor’s Products, computer, or server on which it has been installed, deliver to the Licensor all CDs, DVDs, magnetic tapes, cards, and other tangible items and materials embodying the Software, and return to the Licensor all copies thereof or destroy such copies and warrant in writing that all copies thereof have been destroyed.
-
Page 57: Operation
4. Test the Vacuum Gripper: Make sure the compressed air is supplied, then tap the I/O tab and manually activate the DO corresponding to the vacuum of the gripper. Repeat for the DO corresponding to the blow off. Palletizing Solution - PE Series - Instruction Manual... -
Page 58: Light States
Controller and robot controller is properly connected (to the USB adapter) . Try powering off the system (both the robot and the Robotiq Controller). Wait 1 minute. Power up the system again. Follow the procedures required by the system to recover A Protective or Emergency stop has occurred. -
Page 59: Software
The possible heights range from 950 to 1550 mm with 50 mm increments. b. Robotiq recommends to keep the Copilot activated at all time. However, when another URCap or a Polyscope option (for example, ProfiNET or Ethernet/IP) needs to control the speed slider, you can deactivate the Use Copilot to manage a soft speed transition when resuming from a Safeguard stop option. - Page 60 d. If required, select the Add 25 mm minimum distance between robot arm and base option. When ticked, this feature ensures a 25 mm clearance between the moving parts and the base of the Solution during trajectory execution. Caution When adding moves other than those generated automatically by the Palletizer node, it is the responsibility of the user to observe this distance at all times.
-
Page 61: Multipick Feature
The boxes must have the same payload. 5.3.Program 5.3.1 .ParametersConfiguration 1. Before you start programing, make sure that your Robotiq Palletizing Solution is set this way: Fig. 5-3: Configuration of Palletizing environment 2. On the Teach Pendant, tap Program > URCaps. - Page 62 Fig. 5-4: Four parameters to set SETTINGS- First Part Tap SETTINGS. Info Here the term Tool refers to the Gripper. Fig. 5-5: SETTINGS parameter - top screen a. Set Tool speed and Tool acceleration, With box and Without box. b. Palletizer mode: tick Depalletizing if you want to depalletize (Palletizing is ticked by default). c.
- Page 63 Rename each box type. Fig. 5-7: Box Types Caution Do not leave any space in the names of the Box Types, as it would not work properly when called in the program tree. Palletizing Solution - PE Series - Instruction Manual...
- Page 64 3. Set the Box attributes: dimensions A, B and C and Payload. With the multipick feature, you must do the following steps: Tap Edit below each box type to configure it. Remember that each multiple box type is a multiple of one single box, therefore: One dimension will double for a double box type, will triple for a triple box type, etc.
- Page 65 6. The Pedestal height is displayed in the interface, beside the Move Here (Robot) button: make sure the value corresponds to the actual height of the pedestal. Fig. 5-11: Pedestal height The BOX parameter is now completed. Go back to the Palletizer node by tapping the house icon at the bottom right. Palletizing Solution - PE Series - Instruction Manual...
- Page 66 SETTINGS- Second Part Fig. 5-12: Select SETTINGS again Fig. 5-13: SETTINGS parameter - middle screen Fig. 5-14: SETTINGS parameter - middle screen (with multipick feature) e. For box type (with multipick feature only): select a box type. Follow steps f to i for each box type. f.
- Page 67 If the conveyor configuration is Parallel, select the Direction (From left or From right). iv. Enter the values (see the associated images). Fig. 5-15: Perpendicular conveyor Fig. 5-16: Parallel conveyor - From left Fig. 5-17: Parallel conveyor - From right Palletizing Solution - PE Series - Instruction Manual...
- Page 68 Fig. 5-18: Custom conveyor i. Allow gripper to pick the box at different angles: This allows the Gripper to rotate 90° or 180° around the Z-axis for trajectory optimization and more flexibility. It can be unticked if it is impossible for the Gripper to pick the box at 90° or 180° from the originally taught grip position.
- Page 69 To ensure a proper operation of the Solution, a minimum distance of 50 mm is recommended. The SETTINGS are now completed. Go back to the Palletizer node by tapping the house icon at the bottom right. Palletizing Solution - PE Series - Instruction Manual...
- Page 70 PALLETParameter 1. Tap PALLET. Fig. 5-22: Select the PALLET parameter 2. Pallet dimensions: set the Front, Side and Height dimensions. 3. Pallet selection: Select Pallet LEFT or Pallet RIGHT. To use both pallets, tick both. Fig. 5-23: PALLET parameter The PALLET parameter is now completed. Go back to the Palletizer node by tapping the house icon at the bottom right.
- Page 71 5. Use the arrows to move and position the boxes on the pallet. You can modify the Movement Step to move the boxes faster or with more precision. 6. If you have ticked Set label orientation in the BOX parameters, the side where is the label will be identified by an arrow. Palletizing Solution - PE Series - Instruction Manual...
- Page 72 Fig. 5-26: Pattern editing Fig. 5-27: Pattern editing with multipick feature 7. The Pattern configuration also allows to customize the layer sequence. Enter the Number of layers. Fig. 5-28: Layers editing 8. If you created multiple patterns, tap Edit Layer Sequence to modify the Layer Sequence.
- Page 73 Fig. 5-29: Layer Sequence All your Palletizer parameters are now configured. 5.3.2.Program Tree with Multipick Feature Fig. 5-30: Final program tree Palletizing Solution - PE Series - Instruction Manual...
- Page 74 Multipick Request When picking for example two boxes at a time using the multipick feature, it is required to validate that two boxes are available and well positioned. This can be done using two box sensors for which the signals are combined in one signal. Then this signal is sent to the robot which can pick two boxes.
- Page 75 7. In the Script node, tap the f(x) box. 8. In the dialog box, write sync() and tap Submit. This command resynchronizes with the main program. Fig. 5-34: Complete Thread node in program tree Palletizing Solution - PE Series - Instruction Manual...
- Page 76 Gripper(s) Activation The following steps explain how to activate the right Gripper(s) for each box type. Info Grippers are linked to digital outputs. In the example presented in this section, there are two grippers: one linked to digital_out[1] and the second to digital_out[2]. The association between the box types and the grippers to activate can vary depending of your configuration.
- Page 77 If node. Then select High in the next scrolling menu. This example: digital_out[1] set to High. This activates one gripper when a single box (small_box) is to be picked. Fig. 5-37: Set node in the If node Palletizing Solution - PE Series - Instruction Manual...
- Page 78 6. Go back to the If node and tap Add Else at the bottom. Fig. 5-38: Add Else in the If node 7. In the program tree, tap <empty> in the Else node. Then go to Program > Basic and select Set. Select it twice. 8.
-
Page 79: Wiring The Multipick Feature
Each box type has its own input signal that can be interpreted as a " product ready to be palletized" signal. When multiple boxes are palletized together, combining box sensor signals is required. Robotiq provides only one box sensor with the standard product. Additional sensors can be bought using the part number PAL-BOX-SENS-KIT 1. -
Page 80: Palletizing Script Functions
5.5.Palletizing Script Functions Palletizing functions are made available in the Script drop-down menu. Fig. 5-42: Script node Tap the Script Code textbox (f(x)), then on the drop-down Function menu gives access to the script functions list. Fig. 5-43: Function menu in Script node... - Page 81 1 = Ready: Pallet is ready to begin the palletizing or depalletizing process. 2 = In progress: Palletizing/depalletizing is in progress on the pallet. 3 = Completed: Pallet is full (palletizing) or empty (depalletizing). Palletizing Solution - PE Series - Instruction Manual...
- Page 82 5.5.4.Set Palletizer State Description This function configures the state of a Palletizer node. It must be used outside the palletizer node in order to work properly. Declaration rq_set_palletizer_state(palletizer_index, processed_boxes, next_step, other_pallet_state=''INACTIVE'', current_ pallet=''CURRENT'') Parameters palletizer_index: Palletizer nodes for which the state will be numerically ordered, beginning from 0 (the first node number will be 0, the second node number will be 1 and so on).
- Page 83 This function returns the box type being processed when multiple box types are enabled. It must be used inside the palletizer node in order to work properly. Declaration rq_get_current_box_type() Return value This function returns a string which is the name of the box type currently being processed. The string is case-sensitive Palletizing Solution - PE Series - Instruction Manual...
-
Page 84: Specifications
Caution This manual uses the metric system, unless specified, all dimensions are in millimeters. The following subsections provide data on the various specifications for the Robotiq Palletizing Solution. 6.1 .Technical Dimensions 6.1 .1 .Base with Pedestal, Robotiq Controller and Post 6.1 .2.PowerPick Vacuum Gripper... -
Page 85: Mechanical Specifications
The maximum pallet dimensions depend on your box dimensions. Use the Robotiq Configurator to validate the combination. The maximum box throughput depends on box weight, box dimensions, box surface, pallet dimensions, and pallet layout. Table 6-1: Mechanical Specifications of the Robotiq Palletizing Solution... - Page 86 82 dBa Maximum Vacuum level at 5.5 bar Maximum acceleration in operating condition 1.5 g Contaminants and purity classes ISO 8573-1 class 7.4.4 Gripper with the configuration of 200 mm offset tube Palletizing Solution - PE Series - Instruction Manual...
- Page 87 6.2.3.Center of Mass, Tool Center Point (TCP) Center of mass (mm) TCP (mm) Suction Wrist Configuration Offset Tube Cups Mass Extension Bracket 0 mm Small 1066 100 mm Small 100 mm Large 1289 200 mm Small 1020 200 mm Small 1244...
-
Page 88: Electrical Specifications
1.1 A (240V AC) Fig. 6-1: Robotiq Controller electrical specifications Info These are the specifications of the Robotiq controller, excluding the robot. The overall voltage consumption will vary depending on the robot used. Warning The Robotiq controller is CE marked and cCSAus certified. Any modification will void the certification. - Page 89 Info The complete electrical diagram is available on our the Robotiq support website. 6.3.2.PowerPick Vacuum Gripper Info For all information about PowerPick Vacuum Gripper specifications, please consult its instruction manual available on the Robotiq support website. 6.3.3.Universal RobotsController Please, refer to the Installation section for more details about all connections in the UR controller.
-
Page 90: Maintenance
Correct functioning of the equipment; Validity of the warranty; Proper lifetime of the equipment. Caution Maintenance operations are for the average normal usage of the Robotiq Palletizing Solution, the maintenance intervals must be adjusted according to the environmental conditions such as: Operating temperature Humidity Presence of chemical(s) Presence of physical objects (debris, scraps, dust, grease, etc.) -
Page 91: Fasteners
7.1 .Fasteners Periodically ensure that the bolts are tightened all over the Solution. If necessary, tight again according to the specified torques represented in the table below. Tightening Torque Designation Location (Nm) [lb-ft] Strengthening brackets of the PowerPick Gripper Pallet sensors 15.0 11.1 Base - Pedestal... -
Page 92: Powerpick Vacuum Gripper
The Vacuum Gripper only requires external maintenance with limited downtime. Maintenance is required after specified usage, measured in cycles (workpiece pick-up and release) or use time (hours). Warning Unless specified, any repairs done on the Vacuum Gripper will be done by Robotiq. 1 M cycles or Operation... -
Page 93: Spare Parts, Kitsand Accessories
Type B Pallet Sensor Kit for the Robotiq Palletizing Solution 1 x Type B Pallet Sensor 1 x screw kit Type B Pallet Sensor - Palletizing Solution PAL-SENS-B Used for: Left pallet, side sensor Right pallet, back sensor Palletizing Solution - PE Series - Instruction Manual... - Page 94 Ordering Item Description Number Box Sensor Kit for the Robotiq Palletizing Solution 1 x Box Sensor Box Sensor Kit - Palletizing Solution PAL-BOX-SENS-KIT 1 x Cable 1 x Mounting Brackets...
-
Page 95: Troubleshooting
The pallet height value entered is too high. Decrease the pallet height value. Palletizing Solution - PE Series - Instruction Manual... - Page 96 The robot may have reached a singularity or be closed to reaching a singularity. Move the robot to the Home position and restart the program. Should none of the above steps solve the issue, please contact the Robotiq support department.
- Page 97 URCaps use the RTDE Configuration > General: " Use Copilot to from a Safeguard stop" checkbox. interface." manage a soft speed transition when resuming from a Safeguard stop" Palletizing Solution - PE Series - Instruction Manual...
-
Page 98: Powerpick Vacuum Gripper
9.2.PowerPick Vacuum Gripper If you are not able to attain the desired vacuum level or if a diminution of the vacuum level occurs, verify: The feed pressure level The suction cups status That the air path is clean and not obstructed (including the manifold) If a filter cleaning is necessary... -
Page 99: Warranty
Robotiq warrants the Robotiq Palletizing Solution and all its components against defects in material and workmanship for a period of one year from the date of reception when utilized as intended. Robotiq also warrants that this equipment will meet applicable specifications under normal use. - Page 100 Robotiq reserves the right to make changes in the design or construction of any of its products at any time without incurring any obligation to make any changes whatsoever on units already purchased.
-
Page 101: Harmonized Standards
1 1 .1 .Applied Standards This section describes all applied harmonized standards for the design and production of the Robotiq Palletizing Solution and the PowerPick Vacuum Gripper. For more information on the standards used for each individual product, please refer to their respective declaration of conformity. -
Page 102: Ec Declaration Of Incorporation
1 1 .2.1 .Robotiq Palletizing Solution Info For all information about the EC Declaration of Incorporation for the Robotiq Palletizing Solution, please refer to the Robotiq support website. The declarations are available for download (Robotiq Palletizing Solution > Universal Robots >... -
Page 103: Appendix
1 2.Appendix 1 2.1 .Anchoring Pattern Fig. 12-1: Palletizing Work Zones Schema for UR10 Palletizing Solution - PE Series - Instruction Manual... -
Page 104: Contact
Contact Us Phone 1-888-ROBOTIQ (762-6847) (01) 418-380-2788 Outside US and Canada Technical support and engineering option 3 Sales option 2 Head office Robotiq: 966, chemin Olivier Suite 500 St-Nicolas, Québec G7A 2N1 Canada Palletizing Solution - PE Series - Instruction Manual...
Need help?
Do you have a question about the PE Series and is the answer not in the manual?
Questions and answers