
Related Manuals for Reflex Reflexomat Compact RC Series


Summary of Contents for Reflex Reflexomat Compact RC Series
- Page 1 20.06.2017 - Rev. C Reflexomat with Basic controller Reflexomat RS 90 / 1 Reflexomat Compact RC Refexomat RSC Operating manual...
-
Page 3: Table Of Contents
Contents English Reflexomat with B asic con troller 20.06.2017 - Rev. C Contents Notes on the operating manual..............................5 Liability and guarantee................................... 5 Safety........................................ 6 Explanation of symbols ..................................6 3.1.1 Symbols and notes used ..............................6 Personnel requirements ..................................6 Personal protective equipment ................................ - Page 4 Inspection prior to commissioning ..........................53 10.5.3 Inspection intervals ................................. 53 Disassembly ....................................54 Annex ......................................55 12.1 Reflex Customer Service ..................................55 12.2 Conformity and standards ................................. 56 12.3 Certificate No. of the CE type test ..............................57 12.4 Guarantee ......................................
-
Page 5: Notes On The Operating Manual
Reflex Winkelmann GmbH accepts no liability for any damage resulting from failure to observe the information in this operating manual. In addition to the requirements set out in this operating manual, national statutory regulations and provisions in the country of installation must also be complied with (concerning accident prevention, environment protection, safe and professional work practices, etc.). -
Page 6: Safety
Safety Safety Explanation of symbols 3.1.1 Symbols and notes used The following symbols and signal words are used in this operating manual. DANGER • Danger of death and/or serious damage to health • The sign, in combination with the signal word 'Danger', indicates imminent danger; failure to observe the safety information will result in death or severe (irreversible) injuries. -
Page 7: Intended Use
Safety Intended use The device is a pressure maintaining station for heating and cooling water systems. It is intended to maintain the water pressure and to add water within a system. The devices may be used only in systems that are sealed against corrosion and with the following water types: •... -
Page 8: Description Of The Device
Description of the device Description of the device Description Reflexomat Compact RC • One "RG" primary tank as an expansion tank with up to 600 litres nominal volume. • The compact control unit is factory-installed on the primary tank. • All electric and air connections between control unit and expansion tank are pre-installed. -
Page 9: Overview
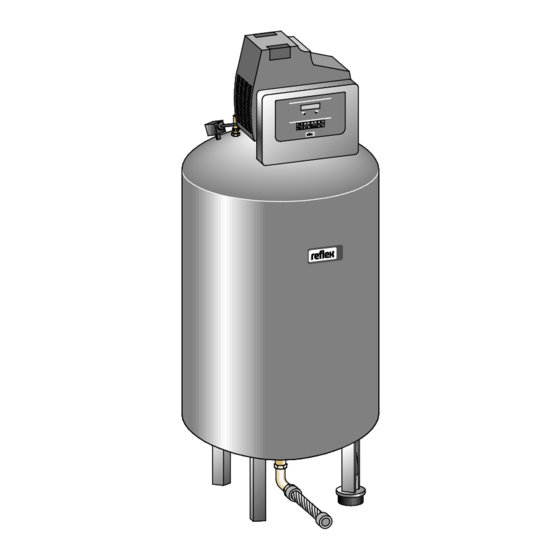
Reflexomat Compact RC / Relfexomat RSC "SV" safety valve "LIS" level sensor "RC" control unit "EC" expansion line • Compressor • "Reflex Control Basic" controller "RG" primary tank Reflexomat with Basic controller — 20.06.2017 - Rev. C English — 9... - Page 10 "SV" safety valve "RF" secondary tank (optional) "RS 90 / 1" control unit "RG" primary tank • Compressor "LIS" level sensor • "Reflex Control Basic" controller "EC" expansion line 10 — English Reflexomat with Basic controller — 20.06.2017 - Rev. C...
- Page 11 "SV" safety valve "RF" secondary tank (optional) "RS 90 / 1" control unit "RG" primary tank • Compressor "LIS" level sensor • "Reflex Control Basic" controller "EC" expansion line Reflexomat with Basic controller — 20.06.2017 - Rev. C English — 11...
-
Page 12: Identification
Description of the device Identification 4.3.1 Nameplate The nameplate provides information about the manufacturer, the year of manufacture, the manufacturing number and the technical data. Information on nameplate Meaning Type Device name Serial No. Serial number min. / max. allowable pressure P Minimum/maximum permissible pressure max. -
Page 13: Function
Control unit The control unit comprises one or – optionally – two "CO" compressor(s) and the "Reflex Control Touch" controller. Via the primary tank, the pressure is measured with the “PIS" pressure sensor and the water level with the “LIS" pressure load cell and the values then displayed in the controller display. -
Page 14: Scope Of Delivery
Solenoid “Fillvalve” with ball valve and Reflex Fillset for make-up with drinking water. • Make-up with pump: – Reflex Fillcontrol Auto, with integrated pump and a system separation vessel or Auto Compact • For water make-up and degassing: • Reflex Servitec 30 (25) •... -
Page 15: Technical Data
Technical data Technical data Control unit Note! The following values apply for all control units: – Permissible flow temperature: 120 °C – Permissible operating temperature: 70 °C – Permissible ambient temperature: 0 °C – 45 °C Type Power Power supply Degree of Number of RS- Electrical voltage... -
Page 16: Tanks
Technical data Tanks Primary vessel Secondary tank Type Diameter Ø "D" Weight Connection Height "H" Height "h" Height "h1" (mm) (kg) (inches) (mm) (mm) (mm) 6 bar - 200 6 bar - 300 1270 6 bar - 400 1255 6 bar - 500 1475 6 bar - 600 1720... -
Page 17: Installation
Confirm that installation and start-up have been carried out correctly using the installation, start-up and maintenance certificate. This action is a prerequisite for the making of warranty claims. – Have the Reflex Customer Service carry out commissioning and the annual maintenance. Reflexomat with Basic controller — 20.06.2017 - Rev. C English — 17... -
Page 18: Installation Conditions
Installation Installation conditions 6.1.1 Incoming inspection Prior to shipping, this device was carefully inspected and packed. Damages during transport cannot be excluded. Proceed as follows: Upon receipt of the goods, check the shipment for • completeness and • possible transport damage. Document any damage. -
Page 19: Positioning
Installation 6.3.1 Positioning Determine the device position. • Control unit • Primary tank • Optional secondary tank – The control unit can be installed on either side or in front of the primary tank. The distance of the control unit to the primary tank results from the connection set supplied. -
Page 20: Tank Installation
Installation 6.3.2 Tank installation ATTENTION Damage due to improper installation Additional device stresses may arise due to the connection of pipes or system equipment. • Ensure that pipes are connected from the device to the system without stresses being induced. •... -
Page 21: Connection To The Facility System
Installation 6.3.3 Connection to the facility system CAUTION Risk of injury due to falls or stumbling Bruising caused by falls or stumbling over cables or pipes during installation. • Wear personal protective equipment (helmet, protective clothing, gloves, safety boots). • Ensure proper installation of cables and pipes between the control unit and the tanks. - Page 22 Notice! For details regarding the switching of Reflexomats or in-line vessels and the dimensions of the expansion lines, please see the planning documents. More information is also provided in the Reflex Planning Guide. 22 — English Reflexomat with Basic controller — 20.06.2017 - Rev. C...
- Page 23 Installation 6.3.3.2 Control unit connection The following describes the exemplary installation of the control unit before the primary tank and the connection of two secondary tanks. Proceed accordingly for other installation variants. Secondary tank PIS Pressure sensor Primary tank Compressed air line Safety valve Expansion line Overflow solenoid valve...
-
Page 24: Connection To An External Compressed Air Line
Safety valve Pressure gauge, site attachment Overflow solenoid valve Solenoid valve, supplied by Reflex Level sensor Instead of the compressor, a solenoid valve is actuated in the external compressed air line, which releases the compressed air for the vessel. The solenoid valve is activated by the controller. The electrical connection of the solenoid valve is made via the terminal for the compressor in the respective controller. -
Page 25: Fitting The Level Sensor
Installation 6.3.5 Fitting the level sensor ATTENTION Damage to the pressure load cell due to unprofessional installation Incorrect installation may result in damage to the "LIS" level sensor, malfunctioning and incorrect measurements from the pressure load cell. • Comply with the instructions regarding the installation of the pressure load cell. The "LIS"... - Page 26 Preferably, you should use the Reflex Fillset with integrated system separator when using drinking water for make-up, see chapter 4.6 "Optional equipment and accessories" on page 14 . If you don't use a Reflex Fillset, you must use an "ST" dirt trap with a mesh size ≥...
- Page 27 Expansion line The Reflex Servitec degassing and make-up station degasses the water from the facility system and the make-up water. The automatic water make-up for the facility system is controlled by the pressure maintenance system. Reflex Fillsoft additionally softens the make-up water.
-
Page 28: Electrical Connection
Installation Electrical connection DANGER Risk of serious injury or death due to electric shock. If live parts are touched, there is risk of life-threatening injuries. • Ensure that the system is voltage-free before installing the device. • Ensure that the system is secured and cannot be reactivated by other persons. •... -
Page 29: Terminal Diagram
Installation 6.5.1 Terminal diagram "L" fuse for electronics and solenoid valves Digital inputs • Water meter • Insufficient water "N" fuse for solenoid valves Motor ball valve (energy connection) Overflow valve (not for motor ball valve) Pressure analogue input Group message External make-up request Optional for second pressure value Make-up valve... - Page 30 Overflow solenoid valve. Factory • For controlling pressure maintenance in the overflow line. 230 V output for make-up. User, optional • To control a Reflex Fillcontrol, for example. Group message (floating). User, optional N.O. Not assigned External make-up request. Make-up (230 V) •...
-
Page 31: Rs-485 Interface
All messages, see chapter 9.2.2 "Messages" on page 44 . – All entries in the fault memory. Notice! If required, please contact the Reflex Customer Service for the protocol of the RS-485 interface, details of the connections and information about the accessories offered. 6.5.2.1 Connecting the RS-485 interface •... -
Page 32: Commissioning
This action is a prerequisite for the making of warranty claims. – Have the Reflex Customer Service carry out commissioning and the annual maintenance. Checking the requirements for commissioning The device is ready for commissioning when the tasks described in Chapter Installation have been concluded. Comply with the following instructions for commissioning: •... -
Page 33: Determining The P
Commissioning Determining the P minimum operating pressure for the controller The "P " minimum operating pressure is determined by the location of the pressure maintaining device. The controller calculates the switching points for the "PV" solenoid valve and the "CO" compressor from the "P "... -
Page 34: Modifying The Controller's Start Routine
Commissioning Modifying the controller's start routine Note! During commissioning, you must once execute the start routine. • For information about controller operation, see chapter 9.1 "Operator panel" on page 38 . The start routine is used to set the required parameters for the device commissioning. It commences with the first activation of the controller and can be run only once. - Page 35 If null balancing is still not possible, confirm with "Yes". The start routine is terminated. Use the customer menu to repeat the null balancing. • Subsequently contact your Reflex Customer Service, see chapter 12.1 "Reflex Customer Service" on page 55 . The start routine restarts.
-
Page 36: Tank Venting
Commissioning Tank venting CAUTION Risk of burns on hot surfaces Excessive surface temperatures on the compressor can result in skin burns. • Wear suitable personal protective equipment (safety gloves, for example). Upon completion of the start routine, you must vent the primary tank and the secondary tanks, if applicable. •... -
Page 37: Operation
Operation Operation Operating modes 8.1.1 Automatic mode After successful commissioning, start the Automatic mode from the device. The Automatic mode is suitable for continuous device operation and the controller monitors the following functions: • Maintain pressure • Compensate expansion volume •... -
Page 38: Controller
Controller Controller Operator panel Error LED "Back" to the previous menu • The Error LED illuminates in the event of a fault Display Auto • For continuous operation Auto LED "Forward" to the next menu • The Auto LED illuminates green in Automatic mode •... -
Page 39: Configuring Settings In The Controller
The "RG" primary tank is empty and the device is installed as per the instructions. If Cancel null balancing null balancing is still not possible, cancel with "Yes". Contact your Reflex Customer Service. Check the prerequisites for the commissioning, see chapter 7.1 "Checking the requirements for commissioning"... - Page 40 Controller Enter the value for the minimum operating pressure. Min.op.pressure 01.8 bar Notice! Calculation of minimum operating pressure, see chapter 7.2 "Determining the P minimum operating pressure for the controller" on page 33 . Switch to the "Make-up" main menu. Make-up •...
- Page 41 Controller This value is only displayed if "YES" has been set in the "With water meter" menu option. Max. make-up qty. • When the set quantity is exceeded, the system interrupts the make-up process and 000100 l returns the error message "Max. make-up quantity exceeded". This value is only displayed if "YES"...
- Page 42 The system displays the values for the volume and the diameter of the "RG" primary tank. Tank info • If you identify differences to the information provided on the primary tank's 00800 l nameplate, please contact the Reflex Customer Service. Information about the software version Reflexomat V1.00 42 — English...
-
Page 43: Default Settings
Controller 9.2.1 Default settings The device controller is shipped with the following default settings. Use the Customer menu to adjust these values to local conditions. In specific cases, it is possible to further adjust the values in the Service menu. Customer menu Parameter Setting... -
Page 44: Messages
The fault memory stores the last 20 alarms for review, see chapter 9.2 "Configuring settings in the controller" on page 39 . Alarm causes can be eliminated by the operator or a specialist workshop. If this is not possible, contact the Reflex Customer Service. - Page 45 Controller ER Code Alarm Floating Causes Remedy Alarm reset contact Compressor run time • Set value exceeded. • Check set value in the Customer or Service menu. • Severe water loss in the system. • Check the water loss and correct, if necessary.
- Page 46 • Time interval for replacement of the softening cartridge exceeded. I/O module fault • I/O module defective. Inform Reflex Customer Service. • Connection between option card and controller faulty. • Option card defective. EEPROM defective • EEPROM defective.
-
Page 47: Maintenance
The annual maintenance is displayed upon expiry of the set operating time. Use "Quit" to acknowledge the "Maintenance recommended" message. Reset the maintenance counter in the Customer menu. Notice! Maintenance work must be carried out and confirmed by specialist personnel or the Reflex Customer Service, see chapter 10.4 "Maintenance certificate " on page 52 . 10.1 Maintenance schedule The maintenance schedule is a summary of maintenance tasks to be carried out regularly. -
Page 48: Checking Switching Points
Maintenance 10.2 Checking switching points Prerequisite for checking the switching points are the following correct settings: • Minimum operating pressure P , see chapter 7.2 "Determining the P minimum operating pressure for the controller" on page 33 . • Level sensor at the primary tank. Preparation 1. - Page 49 Maintenance Activating the device 11. Switch on the main switch. 12. Switch to Automatic mode. – Depending on the filling level and pressure, the "CO" compressor and the automatic make-up will be switched on. 13. Slowly open the cap valves upstream of the tanks and secure them against unintended closing. Checking Insufficient water "Off"...
-
Page 50: Cleaning
Maintenance 10.3 Cleaning 10.3.1 Cleaning the tanks CAUTION Risk of injury due to pressurised liquid Injuries can occur during maintenance work if the connections have been installed incorrectly because condensate under pressure can suddenly escape. • Ensure proper connections for the draining of condensate. •... -
Page 51: Cleaning The Dirt Trap
– Press "Auto" on the controller's operator panel. "ST" dirt trap 2 Dirt trap insert Note! Clean all other installed dirt traps (in the Reflex Fillset, for example). Reflexomat with Basic controller — 20.06.2017 - Rev. C English — 51... -
Page 52: Maintenance Certificate
Maintenance 10.4 Maintenance certificate All maintenance tasks have been completed according to the Reflex Installation, Operating and Maintenance Manual. Date Service organisation Signature Remarks 52 — English Reflexomat with Basic controller — 20.06.2017 - Rev. C... -
Page 53: Inspection
Recommended maximum inspection intervals for operation in Germany pursuant to Section 16 of the Industrial Safety Regulation [Betriebssicherheitsverordnung] and the vessel classification of the device in diagram 2 of the Directive 2014/68/EC, applicable in strict compliance with the Reflex Installation, Operation and Maintenance Manual. External inspection: No requirement according to Annex 2, Section 4, 5.8. -
Page 54: Disassembly
Disassembly Disassembly DANGER Risk of serious injury or death due to electric shock. If live parts are touched, there is risk of life-threatening injuries. • Ensure that the system is voltage-free before installing the device. • Ensure that the system is secured and cannot be reactivated by other persons. •... -
Page 55: Annex
Annex Annex 12.1 Reflex Customer Service Central customer service Switchboard: Telephone number: +49 (0)2382 7069 - 0 Customer Service extension: +49 (0)2382 7069 - 9505 Fax: +49 (0)2382 7069 - 523 E-mail: service@reflex.de Technical hotline For questions about our products Telephone number: +49 (0)2382 7069-9546 Monday to Friday, 8:00 a.m. -
Page 56: Conformity And Standards
The object of the declaration described above is in conformity with the relevant Union harmonisation legislation - Pressure Equipment Directive Manufacturer 2014/68/EU of the European Parliament and of the Council of 15 May Reflex Winkelmann GmbH 2014. Gersteinstraße 19 59227 Ahlen - Germany Telefon: +49 (0)2382 7069 -0 Ahlen, 19.07.2016... -
Page 57: Certificate No. Of The Ce Type Test
Certificate number Reflexomat Compact RC 200 – 500 litres 6 bar – 120 °C 07 202 1403 Z 0368/13/D0045 You will find an up-to-date list under www.reflex.de/zertifikate. Type Certificate number Reflexomat RS 200 – 800 litres 6 bar – 120 °C 07 202 1403 Z 0622/1/D0045 1000 –... - Page 60 Reflex Winkelmann GmbH Gersteinstraße 19 59227 Ahlen, Germany Telephone: +49 (0)2382 7069-0 Fax: +49 (0)2382 7069-588 www.reflex.de...
Need help?
Do you have a question about the Reflexomat Compact RC Series and is the answer not in the manual?
Questions and answers