
Subscribe to Our Youtube Channel
Related Manuals for ergoline JK 103/40-3


Summary of Contents for ergoline JK 103/40-3
- Page 1 Operating instructions Model-No.: JK 103/40-3 Ergoline PASSION 40/3 Turbo Power Soltron S-45 FLIRT 1006351-04B / us-en / 10.2020...
- Page 2 Contact information Contact information Customer Service JK Products & Services 411 West Washington Avenue Suite B Jonesboro, Arkansas 72401 800-445-0624 870-935-9046 http://support.jkamerica.com Manufacturer JK-Products GmbH Rottbitzer Str. 69 53604 Bad Honnef GERMANY Tel.: +49 (0) 22 24 / 818-140 Fax: +49 (0) 22 24 / 818-166 WARNING! Read these operating instructions.
-
Page 3: Table Of Contents
Table of Contents Table of Contents What certain words and signs mean (Glossary) ......6 Definitions ..................6 Warning signs ................. 7 Symbols on the device ..............9 What this device is ..............11 Guidelines ..................11 Export .................... 11 Scope of delivery ................ - Page 4 Table of Contents Vibra Shape (vibration plate) ............33 Foreseeable misuse ..............34 Obligations of the studio operator..........34 Staff training .................. 34 Risks of using this device ............35 Benefits of using this device ............36 How to decide to use this device ..........37 What to do before the treatment ..........
- Page 5 Table of Contents 12.16.6 Cleaning or replacing lamps in the base ........65 12.16.7 Cleaning or replacing the lamps in the side section ...... 66 12.16.8 Cleaning or replacing lamps and filter panels in the canopy ..66 12.16.9 Cleaning or replacing the lamps and filter panels in the shoulder tanner ..........
-
Page 6: What Certain Words And Signs Mean (Glossary)
What certain words and signs mean (Glossary) What certain words and signs mean (Glossary) Definitions Studio operator People who provide tanning devices to users on a commercial basis. The studio operator is trained to operate and maintain the device and is responsi- ble for the orderly operation of the device as well as compliance with the maintenance intervals. -
Page 7: Warning Signs
What certain words and signs mean (Glossary) Warning signs Danger notices, nonobservance will lead to death or serious injury: DANGER! Type and source of danger, e.g. 'DANGER – High volt- age!' Description of the consequences, e.g. 'You can be killed or injured by an electric shock!' Countermeasures: –... - Page 8 What certain words and signs mean (Glossary) Caution notices, nonobservance can lead to less than serious injury or damage of property. CAUTION! Unauthorized lamps! The word 'Caution' together with the warning sign points out that less than serious injury can be expected here. Countermeasures: –...
-
Page 9: Symbols On The Device
What certain words and signs mean (Glossary) Symbols on the device The following symbols are displayed on the device or on the packaging: Manufacturer, company address Type BF applied part Read and comply with the manufacturer's documentation Where there are great differences in temperature between the transport route and the installation site the device may not be put into operation im- mediately after being set up. - Page 10 What certain words and signs mean (Glossary) Recyclable material. Production year, month and day Quantity Article Number/Reference Number Serial Number Unique Device Identification Healthcare Barcode Polystyrene Cardboard Mixed paper Steel Wood Permitted air pressure during transport and storage. 10/88...
-
Page 11: What This Device Is
What this device is What this device is Guidelines This product is in conformity with the performance standards for sunlamp products under 21 CFR 1040.20, FDA and listed with ETL to UL 482 and CAN/CSA 22.2 No. 224. Export This device is exclusively intended for use in the USA, Canada and Central America, and may not be exported to other countries and operated there! The manufacturer assumes no liability whatsoever in the event of non-compliance. -
Page 12: Device Description
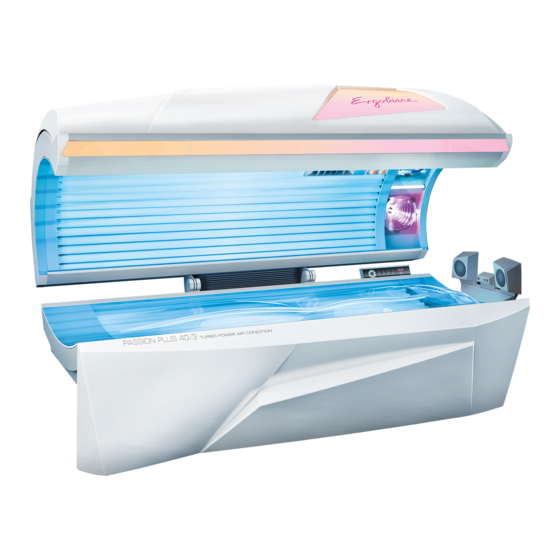
What this device is Device description 1. Facial tanner (high pressure lamps + low pressure lamps) 2. Low pressure lamps, base 3. Operating panel 4. Acrylic panel base 5. Adjustable air nozzles – Facial cooling 6. Body cooling air nozzles 7. -
Page 13: Options
What this device is Options 1. Audio system (Stereo-Sound system PLUS or Stereo-Sound system) 2. Headphone jack (only with Stereo-Sound system PLUS) 3. AUX connection (only with Stereo-Sound system PLUS) Exhaust option As an optional comfort feature, your device can be equipped with an exhaust duct which allows the warm air from the device to be ducted outside of the room or building. -
Page 14: Function Description
What this device is NOTE: Always consult a licensed heating, ventilation, and air conditioning (HVAC) Technician when considering the option to exhaust the warm air from your device. They can help you decide if an exhaust is best for you specific location. -
Page 15: Installation Location
What this device is Installation location This sunlamp product is suitable for tanning salons, fitness studios or similar installation locations. You may find detailed information on installation and setting up in the Installa- tion Instructions (see folder Technical Documentation). 3.8.1 Ventilation NOTICE Danger of failure! - Page 16 What this device is CAUTION! Danger of overheating by obstruction of the air routing! Any liability is excluded in case of damage or injury proven to be the result of the use of non-genuine spare parts. Use of non-compliant lamps voids warranty and risks injury! –...
-
Page 17: Commissioning
What this device is Environmental conditions Optimum ambient temperature: between 59 °F (15 °C) and 89.6°F (32°C) Storage temperature: between 5 °F (-15 °C) and 140 °F (+60 °C) Air pressure: between 794 hPa and 1060 hPa Relative humidity: between 30 % and 70 % ... -
Page 18: Signs And Stickers On The Device
What this device is Signs and stickers on the device Signs which warn of danger areas or give important information on compo- nents are attached to the device. Ensure that the instruction signs are always clearly recognizable and easily legible. Any missing instruction signs or stick- ers must be replaced. - Page 19 What this device is 3: Standards 4: Spring warning sticker (1014118-..) 5: 'Remove lattice' sticker (842971-..) 11978 / 0 The sticker is located at the rear on top of the air outlet. 10/2020 1006351-04B Operating Instructions – 19/88...
- Page 20 What this device is 6: Exposure label 1008189-.. The sticker is mounted on the canopy head end. 20/88...
- Page 21 What this device is 7: Warning sticker UV radiation (801140-..) 8: Sticker 'Follow Operating Instructions' (1014232-..) 9: Sticker (1014367-..) 10: Age warning label (1508746-..) The sticker is mounted on the front panel. 10/2020 1006351-04B Operating Instructions – 21/88...
- Page 22 What this device is 11: CAUTION HIGH VOLTAGE sticker (1014186-..) 12: Adjust canopy movement stickers (1014114-..) 13: Voltage is not switched off sticker (800698-..) 22/88...
- Page 23 What this device is 14: Power unit components sticker (1501531-..) 15: OEM parts sticker (801138-..) The sticker is mounted on the bottom of the bed base. 16: Cable length warning sticker (1014119-..) 10/2020 1006351-04B Operating Instructions – 23/88...
- Page 24 What this device is 17: USA mains connection sticker (1504660-..) The sticker is mounted on the left side panel. 18: Lamp cover base sticker (801139-..) The sticker is mounted on the lamp cover foot end. 19: Canada warning sticker (801371-..) 20: Air conditioning sticker (1002243-..) Not applicable for this device.
-
Page 25: Technical Data
What this device is 3.10 Technical data 3.10.1 Power rating, electrical specifications and noise level Model-No.: JK 103 / 40-3 Power consumption rating: 9,000 W Rated frequency: 60 Hz Rated voltage: 230 V Rated overcurrent protection device: 50 amp 3-pole 90 amp 2-pole Classification: Type BF applied part... -
Page 26: Dimensions
What this device is 3.10.2 Dimensions B = 47 4/16 in 1,200 mm B1 = 30 11/16 in 780 mm B2 = 63/64 in 25 mm BL = 33 15/32 in 850 mm H = 48 7/16 in 1,230 mm H1 = 62 3/16 in 1,580 mm L = 84 10/16 in... -
Page 27: Lamp Configuration
Length Power Control Order-no. UV high pressure lamps 400 W 400 W / 0 W 12645-.. Ergoline ultra C12645 Filter panels Ultra Performance 1504566-.. UV low pressure lamps GENESIS 71 in 120 W 120 W 1504559-.. HPR 15 FR71-T12-BA-120 W 1.8 m... -
Page 28: Accent Lighting
What this device is 3.10.4 Accent lighting Number Description Power Order-no. Low pressure lamp white 36 W 12969-.. Starter S10 10047-.. Low pressure lamp white 18 W 1002513-.. Starter S10 10047-.. 3.10.5 Spare parts Number Description Order-no. Acrylic panel 1504971-.. Filter 55567-.. -
Page 29: Why You Use It
Why you use it Why you use it Intended use This sunlamp product is intended exclusively for aesthetic tanning of the hu- man skin, for one person at a time, at the age of 18 or above. Skin condition You may benefit from the use of this device if you tan in natural sunlight (skin types III, IV and V), ... -
Page 30: Who Cannot Use It
Who cannot use it Who cannot use it Prohibited usage 5.1.1 Tanning system WARNING! UV radiation Danger of skin and eye injuries or skin diseases! The following people must not use the device: People under 18 years of age People with skin lesions or open wounds ... -
Page 31: What You Must Do To Avoid Serious Harm
What you must do to avoid serious harm What you must do to avoid serious harm General DANGER – HIGH VOLTAGE! You can be killed or injured by an electric shock! Assembly and electrical connection must comply with na- tional and local regulations. –... -
Page 32: Sensor
What you must do to avoid serious harm WARNING! Danger of ultraviolet radiation. Ultraviolet radiation - follow instructions. Failure to use protective eyewear may result in severe burns or other eye injury - if discomfort develops, discontinue use and consult a physician. –... -
Page 33: What You Must Do To Avoid Other Harm
What you must do to avoid other harm What you must do to avoid other harm General WARNING! Infections can be transferred through skin contact. All items/equipment components, with which the user can come into contact during tanning, must be cleaned and disinfected after every tanning session: –... -
Page 34: Foreseeable Misuse
What you must do to avoid other harm Foreseeable misuse The following uses of the device are explicitly prohibited: Only one person at a time may use the device. People with body weight of more than 150 kg (330 lb) may not use the ... -
Page 35: Risks Of Using This Device
Risks of using this device Risks of using this device WARNING! Danger through ultraviolet radiation! Danger of skin and eye injuries or skin diseases! This sunlamp product must not be used on individuals who have had skin cancer or have a family history of skin cancer. Persons repeatedly exposed to ultraviolet sunlamp products must be ... -
Page 36: Benefits Of Using This Device
Benefits of using this device Benefits of using this device This device serves the purpose of aesthetic tanning for one adult person with skin suitable for tanning. Different tanning results can be achieved in varying strength tanning devices. This is due to the different strength UV lamps and the different UV-A and UV- B proportions of the UV radiation. -
Page 37: How To Decide To Use This Device
How to decide to use this device How to decide to use this device This device is intended only for commercial use and not for private use. Some people are not permitted to use the device, see chapter 5. The device may not be used by people with reduced physical, sensory or mental capabilities or who have insufficient experience and/or knowledge without supervision. -
Page 38: What To Do Before The Treatment
What to do before the treatment What to do before the treatment Please check for any conditions that may prohibit the use of this device – see chapters 5, 6, 8, 10. Make-up in the tanning device Please do not wear make-up. Clean skin absorbs UV light better. A wide variety of materials is found in cosmetics. -
Page 39: How To Use This Device
How to use this device How to use this device 12.1 How to set this device up After commissioning and cleaning/disinfection, the device is ready for opera- tion. See chapter 12.5. 12.2 How to make sure the device works Before using the device, check for damage to filter panels and acrylic panels. 12.3 How to use it to treat your condition No other persons are permitted inside the cabin while the device is in... -
Page 40: Tanning Times
How to use this device 12.4.2 Tanning times NOTE: The tanning times given in the table must not be exceeded! The sticker is mounted on the canopy head end. 40/88... -
Page 41: How To Operate The Device
How to use this device 12.5 How to operate the device 12.5.1 Control Center Not applicable for this device. 12.5.2 User settings overview Not applicable for this device. 10/2020 1006351-04B Operating Instructions – 41/88... -
Page 42: Functions
How to use this device 12.6 Functions 1. START/STOP button 2. Display – Functions ... 3. Music pictogram 4. Body cooling/facial cooling pictogram 5. Facial tanner pictogram 6. Minus button 7. Left navigation arrow button 8. Plus button 9. Right navigation arrow button 42/88... -
Page 43: Navigation
How to use this device 12.6.1 Navigation The device is operated with the navigation ring. Switch on lamps: —Tip the button once. Switch off lamps/pause tanning: —Hold the button. Select device function (go to pictogram) e.g. MUSIC Select sub-function (if available) Change setting The diodes of the available functions and the navigation ring are illuminated in default mode after starting up the tanning device. -
Page 44: Selection Of The Application
How to use this device 12.8 Selection of the application Not applicable for this device. 12.9 Sun Select setting with the outer inter- face Not applicable for this device. 12.10 Measurement (automatic mode) Not applicable for this device. 44/88... -
Page 45: Connections
How to use this device 12.11 Connections MP3 player and smartphone WARNING! Danger of hearing damage! Using earphones or headphones at high volume can result in permanent hearing damage. – Do not set the volume too high. CAUTION! The heat might damage your MP3 player or smartphone! –... -
Page 46: How To Use
How to use this device 12.12 How to use NOTE: Before use the device must always be cleaned and disinfect- ed! See chapter 12.15 How to clean/disinfect. 12.12.1 How to start The device is started automatically with an internal or external timer. NOTE: See separate document 'Timer Control Module' #1008370-.. -
Page 47: How To Stop
How to use this device 12.12.3 How to stop The tanning session ends automatically after the preset time has run down. The internal body cooling fan continues to run for approx. three (3) minutes to sufficiently cool the device. – To interrupt a tanning session, press and hold button START/STOP any- time during a session. -
Page 48: Safety Instructions For Cleaning/Disinfection And Maintenance
How to use this device 12.14 Safety instructions for clean- ing/disinfection and maintenance DANGER – HIGH VOLTAGE! You can be killed or injured by an electric shock! During maintenance and service work there is a risk of touching live parts and receiving a fatal electric shock. –... - Page 49 How to use this device WARNING! Injuries and damage due to improper maintenance! If the maintenance intervals for the UV lamps are exceeded or incompatible UV lamps are installed, the share of harmful UV radiation may increase. Sunburn and other skin damage may result.
-
Page 50: How To Clean/Disinfect
How to use this device Acrylic panel NOTICE Cosmetics may cause cracks to form on the surface! Over the long-term cosmetics or sunscreens cause damage (e.g. crack for- mation on the surface). – Ensure that cosmetics and sunscreens are removed before tanning. The acrylic panels for the tanning devices are produced of acrylic glass de- veloped especially for this application. -
Page 51: Cleaning And Disinfection Of Surfaces
How to use this device NOTE: For thorough cleaning and disinfection, the product must be allowed to remain in contact with the surface being cleaned and disinfected for a specified amount of time. This specified amount of time depends on the cleaner/ disinfectant which is used. - Page 52 How to use this device Filter panels and lamps Low pressure lamps and filter panels can be cleaned with a damp cloth (without additional cleaning agents) where necessary. High pressure lamps can be cleaned with ethyl alcohol where necessary. ...
-
Page 53: Cleaning/Disinfection Plan
How to use this device 12.15.2 Cleaning/disinfection plan Component Interval Activity See page Handle Cleaning and disinfection Control panel Cleaning and disinfection Acrylic panel Cleaning and disinfection Adjustable air nozzles Cleaning and disinfection Protective goggles Cleaning and disinfection AUX cable Cleaning and disinfection Air nozzles Clean... -
Page 54: How To Maintain
How to use this device NOTE: If desired, you may set the unit to require that clean- ing/disinfection be confirmed after each tanning session by pressing the START/STOP button (when the cool-down time for the main fan has finished). 12.16 How to maintain 12.16.1 Technical modifications... - Page 55 How to use this device Maintenance performed by the studio operator or a JK Factory Certified Technician Component Interval Activity page 1 High pressure lamps Replace 2 Low pressure lamps, base Replace 3 Low pressure lamps, canopy Replace 5 Low pressure lamps, face tanner Replace 2 Starter, low pressure lamps, base Replace...
- Page 56 How to use this device Component Interval Activity page 5 Starter, low pressure lamps, face Replace tanner 6 Starter, accent lighting, canopy Replace 9 Acrylic panel Inspect and replace as necessary 9 Acrylic panel Replace 7 Filter Replace 8 Filter mats Replace Maintenance performed by authorized, trained and qualified staff WARNING!
-
Page 57: Cleaning And Maintenance Work Preparation
How to use this device 12.16.3 Cleaning and maintenance work preparation Service kit 1. Allen key 2. Suction cup for filter panels, acrylic panel and canopy panel 3. Scratch prevention for the entry area (support cushion for the canopy) – The service kit is fitted to the rear wall of the device. - Page 58 How to use this device Removing the acrylic panel – Remove the screws and remove the washers. – Push the bed to the rear with one hand and pull it out of the front guide with the suction cup. – Remove the acrylic panel and carefully lay it aside.
- Page 59 How to use this device Removing the canopy panel – Remove the screws. First remove the outside screws and then remove the screws in the middle. – Push the canopy panel to the rear with one hand and pull it out of the front guide with the suction cup.
- Page 60 How to use this device Removing the front panel – Remove the acrylic panel: see page 58. – If necessary, remove the screws from the inside. – Carefully lift the upper edge of the front panel out of the holder (pull up- wards).
-
Page 61: Instructions For Replacing The Lamps
How to use this device 12.16.4 Instructions for replacing the lamps WARNING! Danger of burns from hot lamps and device parts! If the tanning device was operated before being switched off and opened, lamps and housing parts may be hot. –... - Page 62 How to use this device Low pressure lamps WARNING! Danger of burns from hot lamps and device parts! If the tanning device was operated before being switched off and opened, lamps and housing parts may be hot. – Before replacing lamps or other spare parts, wait until lamps and metal parts of the device have cooled down sufficiently.
- Page 63 How to use this device Starter Replace faulty starters immediately. You can recognize a faulty starter by the blackened ends of the lamps or when the lamps can no longer be started. Operating a lamp with a faulty starter significantly shortens its service life. The lamp loses power and may begin to flicker under certain circumstances.
-
Page 64: Cleaning And Disinfection Of The Sensor
How to use this device – Unplug the lamps. – Clean the reflector. – Only utilize original lamps. – Only touch new lamps in the handling zone. – Test the safety switch to ensure that it works. The safety switch ensures that the device switches off in the event of a faulty filter panel or when a filter panel is missing. -
Page 65: Cleaning Or Replacing Lamps In The Base
How to use this device 12.16.6 Cleaning or replacing lamps in the base – Remove the acrylic panel: see page 57. – Remove the lamp coverings at the head and foot ends. Replace the lamps: see page 61. Replace the starter: see page 63. –... -
Page 66: Cleaning Or Replacing The Lamps In The Side Section
How to use this device 12.16.7 Cleaning or replacing the lamps in the side section Not applicable for this device. 12.16.8 Cleaning or replacing lamps and filter pan- els in the canopy – Remove the canopy panel: see page59. – Remove the lamp cover. -
Page 67: Cleaning Or Replacing The Interior Lights
How to use this device 12.16.10 Cleaning or replacing the interior lights – Remove the canopy panel: see page59. – Remove the lamp cover at the foot end. – Remove the cap for the interior lighting: Remove 1 screw. Replace the lamps: see page 61. Replace the starter: see page 63. -
Page 68: Cleaning Or Replacing The Canopy Accent Lighting
How to use this device 12.16.11 Cleaning or replacing the canopy accent lighting – Remove the screws. Replace the lamp: see page 61. Replace the starter: see page 63. The assembly is the same process in reverse order. 12.16.12 Cleaning or replacing the front panel accent lighting Not applicable for this device. -
Page 69: Cleaning The Filters In The Base
How to use this device 12.16.13 Cleaning the filters in the base – Remove the front panel: see page 60. – Pull out the two outside filters to the front. Remove the middle filter up- wards. – Clean the filter moist or dry: Dry cleaning: Vacuum cleaner (depending on the degree of soiling) Moist cleaning: Water and detergent, or with a dishwasher. -
Page 70: Cleaning The Canopy Filter Mats
How to use this device 12.16.14 Cleaning the canopy filter mats Not applicable for this device. 12.16.15 Cleaning the filter mats in shoulder tanner Not applicable for this device. 12.16.16 Air conditioning: Empty the condensation tank and clean the filter Not applicable for this device. -
Page 71: How To Store The Device
How to use this device 12.17 How to store the device 12.17.1 Decommissioning The device must be disconnected from the power supply in order to tempo- rarily or permanently decommission it. You must abide by the legal disposal requirements when permanently de- commissioning the device. -
Page 72: What To Do When Things Go Wrong
What to do when things go wrong What to do when things go wrong WARNING! Follow instructions! Failure to use protective eyewear may result in severe burns or other eye injury. If discomfort develops, discontinue use and consult a physician. –... -
Page 73: Troubleshooting
What to do when things go wrong NOTE: Occasionally, persons using the tanning device will experi- ence a slight reddening of the skin – usually in small patches – after the second or third session. This redness is often accompanied by an itching sensation. This may be nothing more than a very limited heat 'rash' caused by heat from the lamps within the device. -
Page 74: Where You Can Find Out More
Where you can find out more Where you can find out more If you have any questions, please contact Customer Service (see page 2). 74/88... -
Page 75: How We Studied This Device
How we studied this device How we studied this device The system is built to the state of the art and the applicable safety regulations. We reserve the right to make technical changes which are necessary to im- prove the system or a system component even if they deviate from pictures and information in these instructions. -
Page 76: Appendix
Appendix Appendix 16.1 Model-No.: JK 103 / 40-3: EMC information 16.1.1 Table 201: Guidelines and manufacturer's declaration – Electromagnetic emissions The Tanning system has been designed for use in the electromagnetic envi- ronment specified below. The device operator must ensure that it is used in such an environment. - Page 77 Appendix 16.1.2 Table 202: Guidelines and manufacturer's declaration – Electromagnetic interference The Tanning system has been designed for use in the electromagnetic envi- ronment specified below. The device operator must ensure that it is used in such an environment. Interference IEC 60601 - Defined Electromagnetic...
- Page 78 Appendix 16.1.3 Table 204: Guidelines and manufacturer's declaration – Electromagnetic interference The Tanning system has been designed for use in the electromagnetic envi- ronment specified below. The device operator must ensure that it is used in such an environment. Interference IEC 60601 - Defined Electromagnetic environment –...
-
Page 79: Em-Emission Inside Device
Appendix 16.1.4 Table 206: Recommended safe distances between portable and mobile HF communi- cations equipment and Model-No.: JK 103 / 40-3 Model-No.: JK 103 / 40-3 has been designed for use in an electromagnetic environment in which the radiated HF interference is controlled. The operator of the device can help to reduce electromagnetic interference by maintaining a safe distance between the portable and mobile HF communication devices (transmitters) and the device itself as recommended below with regard to the... -
Page 80: Jk-Products, Inc. - Limited Warranty
JK-Products, Inc. – Limited Warranty JK-Products, Inc. – Limited Warranty JK-Products, Inc. warrants its products to be free from defects in materials and workmanship under intended normal use as described in the unit's Oper- ation and Instruction Manual, for a period of one (1) year from date of sale. This Limited Warranty applies only to the original purchaser of the equipment through JK-Products, Inc. -
Page 81: Limited Acrylic Warranty
JK-Products, Inc. – Limited Warranty 17.1 Limited Acrylic Warranty JK Products, Inc. warrants its acrylic sheets to be free from defects in material and workmanship, under intended normal use, for a period of one (1) year from date of sale of the tanning bed or 1,200 hours of operation whichever comes first. -
Page 82: Warranty Claims
JK-Products, Inc. – Limited Warranty 17.2 Warranty Claims 17.2.1 Policy & Procedures 1. When to file a Warranty Claim: In the event that your tanning system is not functioning properly under intend- ed normal use as described in the unit's Operation and Instruction Manual, you may then have established cause to file a Warranty Claim. -
Page 83: Labor Warranty Claim/Credit Procedures
JK-Products, Inc. – Limited Warranty The proper use also includes compliance with the manufacturer`s instructions, operating and maintenance conditions. This device may only be operated, maintained and repaired by persons familiar with these tasks and who are aware of the dangers involved. 17.2.2 Labor Warranty Claim/Credit Procedures Global Service USA furnishes labor without charge for a period of 90 days... -
Page 84: Limited Lifetime Warranty
JK-Products, Inc. – Limited Warranty 17.3 Limited Lifetime Warranty Global Service USA warrants specific individual components of the tanning system against defects in materials and workmanship for the life of the prod- uct. Coverage is limited to units purchased after November 1, 1994. This warranty is restricted to the following components only: Steel Back Panels ... -
Page 85: Index
Index Index Accent lighting Canopy ..................... 68 Acrylic panel Load ......................25 Air routing ....................... 15 Application tips ....................46 Cleaning ....................47, 50 Filter ......................69 Lamps, filter panels .................. 52 Cleaning or replacing lamps Facial tanner ..................... 66 Cleaning/disinfection Cleaning intervals .................. - Page 86 Index Facial tanner Cleaning/replacing ................... 66 Maintenance intervals ................54 Filter Cleaning ....................69 Filter panels ....................63 Cleaning/replacing ................... 66 Maintenance intervals ................54 Foreseeable misuse ..................34 Functions ....................... 42 Guidelines ..................... 11 High pressure lamps, fire hazard ..............63 Installation location ..................
- Page 87 Index Recycling ....................... 71 Removing the acrylic panel ................58 Removing the canopy panel ................59 Removing the front panel ................60 Safety measures during maintenance work ........... 48 Scope of delivery ................... 11 Service kit ...................... 57 Setup location ....................15 Skin condition ....................
- Page 88 Index 88/88...
Need help?
Do you have a question about the JK 103/40-3 and is the answer not in the manual?
Questions and answers