
Related Manuals for ergoline JK 158/48-0 HT


Summary of Contents for ergoline JK 158/48-0 HT
- Page 1 Operating instructions Model-No.: JK 158 / 48-0 HT JK 158 / 48-0 HT VS 1019931-00 / us / 12.2018...
-
Page 2: Contact Information
Contact information Contact information Customer Service JK Products & Services 411 West Washington Avenue Suite B Jonesboro, Arkansas 72401 800-445-0624 870-935-9046 http://support.jkamerica.com Manufacturer JK-Products GmbH Rottbitzer Str. 69 53604 Bad Honnef GERMANY Tel.: +49 (0) 22 24 / 818-140 Fax: +49 (0) 22 24 / 818-166 WARNING! Read these operating instructions. -
Page 3: Table Of Contents
Table of Contents Table of Contents What certain words and signs mean (Glossary) ......6 Definitions ..................6 Warning signs ................. 7 Symbols on the device ..............9 What this device is ..............11 Guidelines ..................11 Export .................... 11 Scope of delivery ................ - Page 4 Table of Contents Obligations of the studio operator..........33 Staff training .................. 33 Risks of using this device ............34 Benefits of using this device ............35 How to decide to use this device ..........36 What to do before the treatment ..........37 How to use this device ..............
- Page 5 Table of Contents 12.16.8 Cleaning or replacing UV lamps and filter panels in the canopy ............. 73 12.16.9 Cleaning or replacing the UV lamps and filter panels in the shoulder tanner ......73 12.16.10 Cleaning or replacing Ambient Light ..........73 12.16.11 Cleaning or replacing the canopy accent lighting ......
-
Page 6: What Certain Words And Signs Mean (Glossary)
What certain words and signs mean (Glossary) What certain words and signs mean (Glossary) Definitions Studio operator People who provide tanning devices to users on a commercial basis. The studio operator is trained to operate and maintain the device and is responsi- ble for the orderly operation of the device as well as compliance with the maintenance intervals. -
Page 7: Warning Signs
What certain words and signs mean (Glossary) Warning signs Danger notices, nonobservance will lead to death or serious injury: DANGER! Type and source of danger, e.g. 'DANGER – High volt- age!' Description of the consequences, e.g. 'You can be killed or injured by an electric shock!' Countermeasures: –... - Page 8 What certain words and signs mean (Glossary) Caution notices, nonobservance can lead to less than serious injury or damage of property. CAUTION! Unauthorized lamps! The word 'Caution' together with the warning sign points out that less than serious injury can be expected here. Countermeasures: –...
-
Page 9: Symbols On The Device
What certain words and signs mean (Glossary) Symbols on the device The following symbols are displayed on the device: Manufacturer, company address Type BF applied part Follow Operating Instructions. Where there are great differences in temperature between the transport route and the installation site the device may not be put into operation immediately after being set up. - Page 10 What certain words and signs mean (Glossary) Polystyrene Cardboard Mixed paper Steel Wood Permitted air pressure during transport and storage. 10/94...
-
Page 11: What This Device Is
What this device is What this device is Guidelines This product is in conformity with the performance standards for sunlamp products under 21 CFR 1040.20, FDA and listed with ETL to UL 482 and CAN/CSA 22.2 No. 224. Export This device is exclusively intended for use in the USA and Canada and may not be exported to other countries and operated there! The manufacturer assumes no liability whatsoever in the event of non-compliance. -
Page 12: Device Description
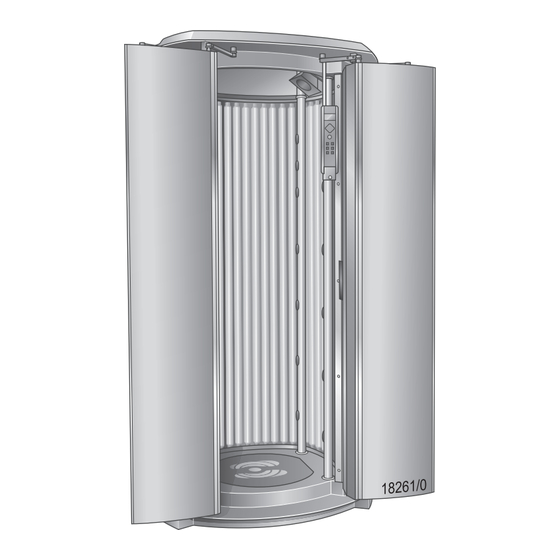
What this device is Device description 19066 / 0 1. Base plate 2. Foot mat 3. Low pressure lamps 4. Operating panel 5. Loudspeaker 6. Fans (door cooling) 7. Door handles (outside / inside) 8. Body cooling air nozzles 9. Exhaust air (equipment cooling) 10. -
Page 13: Options
What this device is Options 1. AUX port 2. Subwoofer 3. Loudspeaker 4. Vibration plate 5. Exhaust option Exhaust option As an optional comfort feature, your device can be equipped with an exhaust duct which allows the warm air from the device to be ducted outside of the room or building. -
Page 14: Function Description
What this device is NOTE: Always consult a licensed heating, ventilation, and air- conditioning (HVAC) Technician when considering theop- tion to exhaust the warm air from your device. Theycan help you decide if an exhaust is best for you specificloca- tion. -
Page 15: Transport
What this device is Transport 1060 hPa +60 °C 794 hPa +140 °F -15 °C < 3 °C > 15 °C + 5 °F < 37 °F > 59 °F L x W x H (max) 228 x 127 x 175 cm (90 x 50 x 69 in.) max 400 kg max 882 lb... -
Page 16: Setup Location
What this device is 3.8.2 Setup location WARNING! Sudden movements and malfunctions! Crushing hazard. – The device is not suitable for operation in mobile facili- ties (ships, buses, trains). Adaptation of the unit is re- quired in order to guarantee trouble-free operation when used in mobile facilities. -
Page 17: Environmental Conditions
What this device is NOTICE Salty air! Contaminated air! Device damage due to corrosion of the housing and electrical components. – Do not install the device near swimming pools. – Do not operate the device in locations with aggressive environmental conditions (e.g. -
Page 18: Commissioning
What this device is 3.8.3 Commissioning DANGER! Damaged mains power cable! Danger to persons through electric shock or burns. – Only the manufacturer or specialist companies are permitted to replace the mains power cable. Initial commissioning will be undertaken by the manufacturer's own service personnel or by a (Level 3) JK Factory Certified Technician. -
Page 19: Signs And Stickers On The Device
What this device is Signs and stickers on the device Signs which warn of danger areas or give important information on compo- nents are attached to the device. Ensure that the instruction signs are always clearly recognizable and easily legible. Any missing instruction signs or stick- ers must be replaced. - Page 20 What this device is The sticker is located inside the device. 2: Standards 3: Sticker (1014367-..) 4: Name plate (example) 60601-1 18410 / 0 The name plate is attached to the interior side of the canopy. It contains im- portant information for identifying the device (e. g. the serial number = Serial- No.) and the conformity mark.
- Page 21 What this device is 6: Sticker EMERGENCY OFF (1018687-..) 18465 / 1 This sticker also includes the language form (see Technical Documentation folder). 7: Lamp cover base sticker (801139-..) The sticker is mounted on the inner face of the door. 8: Warning sticker UV radiation (1510686-..) 1510686-00- 18310 / 0...
- Page 22 What this device is 11: USA mains connection sticker (1510692-..) The sticker is located on the lid below the cover. 22/94...
- Page 23 What this device is 12: Sticker component control USA 1510516-.. The sticker is located on the lid below the cover. 13: Canada warning sticker (801371-..) The sticker is mounted on the rear panel. 12/2018 1019931-00 Operating instructions – 23/94...
-
Page 24: Technical Data
What this device is 3.10 Technical data 3.10.1 Power rating, electrical specifications and noise level Model-No.: JK 158 / 48-0 HT, Model-No.: JK 158 / 48-0 HT VS Power consumption rating: 10.600 W Rated frequency: 60 Hz Rated voltage: 230 V 3 phase 230 V 2 phase Rated overcurrent protection device 40 amp 3-pole... -
Page 25: Dimensions
What this device is 3.10.2 Dimensions BK = 83 14/16 in 2,130 mm BK1 = 13 12/16 in 345 mm BK2 = 13 12/16 345 mm TK = 84 10/16 in 2150 mm TK1 = 24 27/32 in 631 mm TK2 = 51 9/16 in 150 mm B = 48 7/8 in... -
Page 26: Lamp Configuration
What this device is 3.10.3 Lamp configuration NOTICE The use of other lamps voids the operating license! Model-No.: JK 158 / 48-0 HT, Model-No.: JK 158 / 48-0 HT VS Lamp set Number Description Length Power Control Order-no. UV low pressure lamps GENESIS 2,00 m 200 W 80 - 200 W... -
Page 27: Accent Lighting
What this device is 3.10.4 Accent lighting Not applicable for this device. 3.10.5 Spare parts Number Description Order-no. Acrylic panels (side panels) 1509613-.. Acrylic panels (doors) 1509664-.. Acrylic panels (door, inside) 1509721-.. Protective goggles 84592-.. AUX cable 1001855-.. Allen key 83828-.. -
Page 28: Why You Use It
Why you use it Why you use it Intended use This sunlamp product is intended exclusively for cosmetic tanning of the hu- man skin, for one person at a time, at the age of 18 or above. Skin condition You may benefit from the use of this device if you tan in natural sunlight (skin types III, IV and V), ... -
Page 29: Who Cannot Use It
Who cannot use it Who cannot use it Prohibited usage 5.1.1 Tanning system WARNING! UV radiation Danger of skin and eye injuries or skin diseases! The following people must not use the device: People under 18 years of age People with skin lesions or open wounds ... -
Page 30: What You Must Do To Avoid Serious Harm
What you must do to avoid serious harm What you must do to avoid serious harm General DANGER – HIGH VOLTAGE! You can be killed or injured by an electric shock! Assembly and electrical connection must comply with na- tional and local regulations. –... -
Page 31: Sensor
What you must do to avoid serious harm WARNING! Danger of ultraviolet radiation. Ultraviolet radiation - follow instructions. Failure to use protective eyewear may result in severe burns or other eye injury - if discomfort develops, discontinue use and consult a physician. –... -
Page 32: What You Must Do To Avoid Other Harm
What you must do to avoid other harm What you must do to avoid other harm General WARNING! Infections can be transferred through skin contact. All items/equipment components, with which the user can come into contact during tanning, must be cleaned and disinfected after every tanning session: –... -
Page 33: Foreseeable Misuse
What you must do to avoid other harm Foreseeable misuse The following uses of the device are explicitly prohibited: Only one person at a time may use the device. People with body weight of more than 330 lb (150 kg) may not use the ... -
Page 34: Risks Of Using This Device
Risks of using this device Risks of using this device WARNING! Danger through ultraviolet radiation! Danger of skin and eye injuries or skin diseases! This sunlamp product must not be used on individuals who have had skin cancer or have a family history of skin cancer. Persons repeatedly exposed to ultraviolet sunlamp products must be ... -
Page 35: Benefits Of Using This Device
UV-B radiation is primarily responsible for more long-term tanning results. The Ergoline Sunrise Hybrid Light Technology gives you a gentle tanning experience. Traditional UV light with the addition of (beauty) red light results in a natu- rallooking tan. -
Page 36: How To Decide To Use This Device
How to decide to use this device How to decide to use this device This device is intended only for commercial use and not for private use. Some people are not permitted to use the device, see chapter 5. The device may not be used by people with reduced physical, sensory or mental capabilities or who have insufficient experience and/or knowledge without supervision. -
Page 37: What To Do Before The Treatment
What to do before the treatment What to do before the treatment Please check for any conditions that may prohibit the use of this device – see chapters 5, 6, 8, 10. Make-up in the tanning device Please do not wear make-up. Clean skin absorbs UV light better. A wide variety of materials is found in cosmetics. -
Page 38: How To Use This Device
How to use this device How to use this device 12.1 How to set this device up After commissioning and cleaning/disinfection, the device is ready for opera- tion. Via the Control Center the most important settings can be made before start- ing the device. -
Page 39: Tanning Times
How to use this device 12.4.2 Tanning times NOTE: The tanning times given in the table must not be exceeded! Recommended Exposure Schedule 2 Min. 3 Min. 5 Min. 7 Min. 9 Min. 2 Min. 3 Min. 5 Min. 7 Min. 9 Min. -
Page 40: How To Operate The Device
How to use this device 12.5 How to operate the device 19067 / 0 12.5.1 Control Center 1. Display – Functions ... 2. Feature selection 3. OK button (not always visible) 12.5.2 User settings overview Not applicable for this device. 40/94... -
Page 41: Functions
How to use this device 12.6 Functions 1. START/STOP button 2. OK button (not always visible) 3. Audio system pictogram 4. Volume pictogram 5. Voice Guide pictogram 6. Piktogram Bluetooth® (only before tanning) 7. Vibra Shape (additional feature) pictogram 8. Body cooling pictogram 9. -
Page 42: Navigation
How to use this device 12.6.1 Navigation Via the Control Center the most important settings can be made before start- ing the device. During the tanning session, functions may be activated or deactivated via the control panel inside the device. Navigation unit - Control Center The Control Center enables comfortable access to special functions. -
Page 43: Description
How to use this device 12.6.2 Description Pictogram selection / Navigation Description / Display Information key sequence START/STOP The tanning time continues to run if the Switches the UV lamps on / UV lamps are switched off during off during the tanning session. tanning session. - Page 44 How to use this device Pictogram selection / Navigation Description / Display Information key sequence EMERGENCY OFF In standby, the EMERGENCY OFF EMERGENCY EMERGENCY button does not have any function. If the EMERGENCY OFF button is pressed, the device shuts down except for the control element.
- Page 45 How to use this device Pictogram selection / Navigation Description / Display Information key sequence Application type: HIGH, MEDIUM, Selection is possible only before tanning, during tanning the function can not be selected. HIGH: 100% power of Genesis Type U HYBRID Performance UV low pressure lamps and Genesis Type R HYBRID Performance and...
-
Page 46: Selection Of The Application
How to use this device 12.7 Selection of the application Before the session begins, the desired application type must be selected. There are 3 possible selections: – Press the button for the desired type of application. HIGH: 100% power of Genesis Type U HYBRID Performance UV low pressure lamps and Genesis Type R HYBRID Performance and Beauty Light LED MEDIUM: ... -
Page 47: Connections
(e.g.) from their smartphone. The operation is car- ried out during the tanning session conveniently via the control center. NOTE: Ergoline cannot guarantee full compatibility with all Blue- tooth® devices. Before coupling a device with this system, read the user manual to find out more about the Bluetooth®... - Page 48 – Press the Bluetooth® symbol on the operating panel. – Activate Bluetooth® Connect on your audio device. – Select e.g. ERGOLINE 01. Successful coupling on the operating panel. NOTE: Start with the audio player music on the Bluetooth® MP3 player.
-
Page 49: Mp3 Player And Smartphone
How to use this device 12.11.2 MP3 player and smartphone CAUTION! The heat might damage your MP3 player or smartphone! – Do not place the unit directly in the radiation area. The cable might tear, the connectors might be dam- aged. -
Page 50: How To Use
How to use this device NOTE: The personal use of an MP3 player during tanning is not a public broadcast in copyright terms, so that there is no obliga- tion for registration or payment by the studio owner to the corresponding copyright owning company. -
Page 51: Application Tips
How to use this device 12.12.2 Application tips WARNING! Sunburn and skin damage due to burns! Insufficient clearance between the UV lamps and the sur- face of the skin leads to sunburn and skin damage. – Stand upright and straight during the tanning and in the center of the unit. -
Page 52: What To Do After The Treatment
How to use this device 12.13 What to do after the treatment 12.13.1 Cleaning and disinfection WARNING! Infections can be transferred through skin contact. All items/equipment components, with which the user can come into contact during tanning, must be cleaned and disinfected after every tanning session: –... -
Page 53: Safety Instructions For Cleaning/Disinfection And Maintenance
How to use this device 12.14 Safety instructions for clean- ing/disinfection and maintenance DANGER – HIGH VOLTAGE! You can be killed or injured by an electric shock! During maintenance and service work there is a risk of touching live parts and receiving a fatal electric shock. –... - Page 54 How to use this device WARNING! Injuries and damage due to improper maintenance! If the maintenance intervals for the UV lamps are exceeded or incompatible UV lamps are installed, the share of harmful UVB radiation may increase. Sunburn and other skin dam- age may result.
-
Page 55: How To Clean/Disinfect
How to use this device 12.15 How to clean/disinfect WARNING! Infections can be transferred through skin contact. All items/equipment components, with which the user can come into contact during tanning, must be cleaned and disinfected after every tanning session: – Protective goggles –... - Page 56 How to use this device Plastic surfaces For cleaning the remaining painted and unpainted plastic surfaces, it is best to simply use warm water and commercially available soft chamois leather. Never use aggressive cleaning agents containing alcohol or essential oils. These may lead, in the long run, to damages not covered by the warranty.
-
Page 57: Cleaning/Disinfection Plan
How to use this device 12.15.2 Cleaning/disinfection plan Component Interval Activity See page Entry area Cleaning and disinfection Foot mat (Silicone / Cleaning and disinfection Base insert (PMMA) Control panel Cleaning and disinfection Handle Cleaning and disinfection Handle (outside / inside) Cleaning and disinfection Protective goggles Cleaning and disinfection... -
Page 58: How To Maintain
How to use this device 12.16 How to maintain 12.16.1 Technical modifications The device has been constructed in accordance with current safety regula- tions. The illustrations and specifications on these instructions are subject to technical modifications which are required in order to improve the device. Unauthorized modifications and changes to the device and its control unit are prohibited. - Page 59 How to use this device Maintenance performed by the studio operator or a JK Factory Certified Technician Component Interval Activity page Low pressure lamps, rear door Replace Low pressure lamps, side walls Replace Low pressure lamps, front doors Replace Acrylic panels, rear wall Inspect and replace as necessary Acrylic panels, side walls...
- Page 60 How to use this device Component Interval Activity page Filter mats Replace Foot mat (silicone) Inspect and replace as necessary Base plate Replace Maintenance performed by authorized, trained and qualified staff WARNING! Danger to persons from maintenance work that has not been carried out! If maintenance work is not carried out, it can lead to material damage or personal injuries!
-
Page 61: Cleaning And Maintenance Work Preparation
To do so, the lamp card must be held in the middle of the di- rectional pad. On the control panel: Selection of the device function on the directional pad. Functions or settings can be activated, deactivated or changed on the directional pad. Start screen: Welcome to Ergoline 12/2018 1019931-00 Operating instructions – 61/94... - Page 62 How to use this device – Enter the master code. Professional Setup Manager (presetting mode) – Press for 3 seconds to open the Professional Setup Manager. Selection if data are to be transferred. – Press the OK button Part numbers (1) and the operational life (2) of the lamps are displayed. –...
-
Page 63: Low Pressure Lamps
How to use this device Low pressure lamps WARNING! Danger of burns from hot lamps and device parts! If the tanning device was operated before being switched off and opened, lamps and housing parts may be hot. – Before replacing lamps or other spare parts, wait until lamps and metal parts of the device have cooled down sufficiently. -
Page 64: Makrolon Tubes
How to use this device – Turn the lamp 90°. The lettering must be oriented towards the outside (i.e. towards the tan- ning room or towards the user). Makrolon tubes Not applicable for this device. Starter Not applicable for this device. High pressure lamps and filter panels Not applicable for this device. -
Page 65: Cleaning Or Replacing Lamps In The Doors
How to use this device 12.16.6 Cleaning or replacing lamps in the doors NOTICE Acrylic panels unusable due to soiling! Soiling on the panels is burned in by the hot lamps and results in the long term in unserviceable panels. –... - Page 66 How to use this device – Unscrew the screws of the strip. – Fold down the strip. – Remove the acrylic glass panel and carefully lay it aside. Changing the lamps: see page 61. 66/94...
- Page 67 How to use this device – Remove the magnetic cover. – Please maintain the correct order of the Genesis Type R HYBRID Performance low pressure lamps and Genesis Type U HYBRID Performance UV low pressure lamps. a1: Genesis Type R HYBRID Performance low pressure lamps a2: Genesis Type U HYBRID Performance UV low pressure lamps 18524 / 0 –...
- Page 68 How to use this device The assembly is the same process in reverse order. During assembling, observe: – Insert the panel carefully into the rear guide. – Close and screw the strip tight. – Close the rear wall against slight resistance. –...
- Page 69 How to use this device – Fold the strip away. – Remove the acrylic glass panel and carefully lay it aside. Changing the lamps: see page 61. – Remove the lamp cover. – Please maintain the correct order of the Genesis Type R HYBRID Performance low pressure lamps and Genesis Type U HYBRID Performance UV low pressure lamps.
- Page 70 How to use this device – Pull the lamps out downwards in order to remove them. The assembly is the same process in reverse order. During assembling, observe: – Insert the panel carefully into the rear guide. 70/94...
-
Page 71: Cleaning Or Replacing Lamps On The Side Walls
How to use this device 12.16.7 Cleaning or replacing lamps on the side walls NOTICE Acrylic panels unusable due to soiling! Soiling on the panels is burned in by the hot lamps and results in the long term in unserviceable panels. –... - Page 72 How to use this device – Remove the acrylic glass panel and carefully lay it aside. Changing the lamps: see page 61. – Remove the lamp cover. – Please maintain the correct order of the Genesis Type R HYBRID Performance low pressure lamps and Genesis Type U HYBRID Performance UV low pressure lamps.
-
Page 73: Cleaning Or Replacing Uv Lamps And Filter Panels In The Canopy
How to use this device – Pull the lamps out downwards in order to remove them. The assembly is the same process in reverse order. During assembling, observe: – Insert the panel carefully into the rear guide. 12.16.8 Cleaning or replacing UV lamps and filter panels in the canopy Not applicable for this device. -
Page 74: Cleaning Or Replacing The Canopy Accent Lighting
How to use this device 12.16.11 Cleaning or replacing the canopy accent lighting Not applicable for this device. 12.16.12 Cleaning or replacing the front panel accent lighting Not applicable for this device. 12.16.13 Cleaning the filters WARNING! Sharp fan blades! Risk of cuts from the edges when fans are exposed. -
Page 75: Cleaning The Filter Mats
How to use this device – Reinstall the cleaned and dried filters. The assembly is the same process in reverse order. 12.16.14 Cleaning the filter mats – Remove the filter mats on the rear side of the doors. – Dry or moist clean the filter mats or replace with new ones. Dry cleaning: Vacuum cleaner (depending on the degree of soiling) Moist cleaning: Water and detergent –... -
Page 76: Cleaning The Filter Mats In Shoulder Tanner
How to use this device – Refit the cleaned and dried filter mats. 12.16.15 Cleaning the filter mats in shoulder tanner Not applicable for this device. 12.16.16 Air conditioning: Empty the condensation tank and clean the filter Not applicable for this device. 12.16.17 AQUA / AROMA SYSTEM maintenance Not applicable for this device. -
Page 77: How To Store The Device
How to use this device 12.17 How to store the device 12.17.1 Decommissioning The device must be disconnected from the power supply in order to tempo- rarily or permanently decommission it. You must abide by the legal disposal requirements when permanently de- commissioning the device. -
Page 78: What To Do When Things Go Wrong
What to do when things go wrong What to do when things go wrong WARNING! Follow instructions! Failure to use protective eyewear may result in severe burns or other eye injury. If discomfort develops, discontinue use and consult a physician. –... -
Page 79: Troubleshooting
What to do when things go wrong NOTE: Occasionally, persons using the tanning device will experi- ence a slight reddening of the skin – usually in small patches – after the second or third session. This redness is often accompanied by an itching sensation. This may be nothing more than a very limited heat 'rash' caused by heat from the lamps within the device. -
Page 80: Where You Can Find Out More
Where you can find out more Where you can find out more If you have any questions, please contact Customer Service (see page 2). 80/94... -
Page 81: How We Studied This Device
How we studied this device How we studied this device The system is built to the state of the art and the applicable safety regulations. We reserve the right to make technical changes which are necessary to im- prove the system or a system component even if they deviate from pictures and information in these instructions. -
Page 82: Appendix
Appendix Appendix 16.1 Model-No.: JK 158 / 48-0 HT, JK 158 / 48-0 HT VS: EMC information 16.1.1 Table 201: Guidelines and manufacturer's declaration – Electromagnetic emissions The tanning system has been designed for use in the electromagnetic envi- ronment specified below. The device operator must ensure that it is used in such an environment. - Page 83 Appendix 16.1.2 Table 202: Guidelines and manufacturer's declaration – Electromagnetic interference The tanning system has been designed for use in the electromagnetic envi- ronment specified below. The device operator must ensure that it is used in such an environment. Interference IEC 60601 - Defined Electromagnetic...
- Page 84 Appendix 16.1.3 Table 204: Guidelines and manufacturer's declaration – Electromagnetic interference The tanning system has been designed for use in the electromagnetic envi- ronment specified below. The device operator must ensure that it is used in such an environment. Interference IEC 60601 - Defined Electromagnetic environment –...
-
Page 85: Jk 158 / 48-0 Ht, Jk 158 / 48-0 Ht Vs
Appendix 16.1.4 Table 206: Recommended safe distances between portable and mobile HF communications equipment and Model-No.: JK 158 / 48-0 HT, JK 158 / 48-0 HT VS: Model-No.: JK 158 / 48-0 HT and JK 158 / 48-0 HT VS: has been designed for use in an electromagnetic environment in which the radiated HF interfer- ence is controlled. -
Page 86: Jk-Products - Limited Warranty
JK-Products – Limited Warranty JK-Products – Limited Warranty JK-Products, warrants its products to be free from defects in materials and workmanship under intended normal use as described in the unit's Operation and Instruction Manual, for a period of one (1) year from date of sale. This Limited Warranty applies only to the original purchaser of the equipment through JK-Products, or its authorized dealer or distributor, and is not trans- ferable. -
Page 87: Limited Acrylic Warranty
JK-Products – Limited Warranty 17.1 Limited Acrylic Warranty JK Products, warrants its acrylic sheets to be free from defects in material and workmanship, under intended normal use, for a period of one (1) year from date of sale of the tanning bed or 1,200 hours of operation whichever comes first. -
Page 88: Warranty Claims
JK-Products – Limited Warranty 17.2 Warranty Claims 17.2.1 Policy & Procedures 1. When to file a Warranty Claim: In the event that your tanning system is not functioning properly under intend- ed normal use as described in the unit's Operation and Instruction Manual, you may then have established cause to file a Warranty Claim. -
Page 89: Labor Warranty Claim/Credit Procedures
JK-Products – Limited Warranty The proper use also includes compliance with the manufacturer`s instructions, operating and maintenance conditions. This device may only be operated, maintained and repaired by persons familiar with these tasks and who are aware of the dangers involved. 17.2.2 Labor Warranty Claim/Credit Procedures Global Service USA furnishes labor without charge for a period of 90 days... -
Page 90: Limited Lifetime Warranty
JK-Products – Limited Warranty 17.3 Limited Lifetime Warranty Global Service USA warrants specific individual components of the tanning system against defects in materials and workmanship for the life of the prod- uct. Coverage is limited to units purchased after November 1, 1994. This warranty is restricted to the following components only: Steel Back Panels ... - Page 91 JK-Products – Limited Warranty 12/2018 1019931-00 Operating instructions – 91/94...
- Page 92 JK-Products – Limited Warranty 92/94...
-
Page 93: Index
Index Index Acrylic panels Filter mats, cleaning ....75 Maintenance Filter, cleaning ......74 intervals ......54, 58 Foreseeable misuse ....33 Air routing ........15 Functions ........41 Application ........ 46 Application tips ......51 Guidelines ......... 11 Base plate Load ........ - Page 94 Index Recycling ........77 Safety measures during maintenance work ....53 Scope of delivery ...... 11 Sensor ........31 Setup location ......16 Skin condition ......28 Skin types ......... 38 Spare parts ......54, 58 Order numbers ....27 Staff training ......
Need help?
Do you have a question about the JK 158/48-0 HT and is the answer not in the manual?
Questions and answers