
Related Manuals for Stratasys H350


Summary of Contents for Stratasys H350
- Page 1 User Guide H350 3D Printer A SAF Selective Absorption Fusion Powered Product DOC-01005 Rev. C...
- Page 2 Stratasys. This document may be printed for internal use only. All copies shall contain a full copy of this copyright notice.
- Page 3 User Guide Disclaimer Customer acknowledges the contents of this document and that Stratasys parts, materials, and supplies are subject to its standard terms and conditions, available on http://www.stratasys.com/legal/terms-and-conditions-of-sale, which are incorporated herein by reference. The specifications and/or information on which this document is based are subject to change without notice.
- Page 4 OCT 2022 Updated powder-related information. Updated kit information. Updated various screens. Extensively changed post-build maintenance section to reflect changes to cleaning wizard. Updated roller cleaning procedure. (software version 1.0.5 and above) Page iv © Copyright 2022 Stratasys. All rights reserved.
-
Page 5: Table Of Contents
Contents 1 Service and Support ............1 Intended Use ....................1 Reasonably Misuse ..................1 Objective......................1 Reading Instructions ..................1 Knowledge ..................... 2 Availability ...................... 2 Symbols Used....................2 Nameplate ..................... 3 Abbreviations ....................3 User Groups and Qualifications ..............4 Operator .......................... - Page 6 Updating the Controller Software Version............ 23 Installing the H350 Job Preparation Software..........24 Installing and Connecting the H350 3D Printer to the GrabCad Print Client ..... 24 Installing the Stratasys H350 Build Processor ..............24 Stratasys H350 Build Processor Installation Procedure ......... 25 Adding the H350 Build Processor to Materialise™...
- Page 7 H350 User Guide Stratasys Online Resources ................ 39 Stratasys Academy ......................40 Stratasys Support Center ....................40 Stratasys Academy YouTube Channel................41 GrabCAD Community ......................42 3 System Components ............. 43 Printer Overview ..................43 Access Doors and Panels....................43 Lid ...........................
- Page 8 Printing Overview ....................51 Reports ..........................51 Software....................... 52 Printer Software ......................... 52 Build Preparation Using GrabCAD Print for H350 ............. 52 Build Preparation Using Materialise™ Magics™ ............... 52 Opening the software ..................... 53 Loading a scene ..................... 54 Importing a part ...................... 56 Translation and Rotation ..................
- Page 9 Starting a Build Job (Select From List) ................120 Starting a Build Job (Previously Used) ................127 Removing a Build..................128 Prepare the Stratasys H trolley and build removal box............ 130 Placing the build removal box on the printer..............133 Remove the Build Using the Wizard ................140 Remove the Build Removal Box From the Printer ............
- Page 10 H350 User Guide Post-Processing Considerations..............148 Depowdering the Build..................... 148 Powder Reuse ......................... 149 Bead Blasting the Build....................149 Automated Bead Blasting ..................149 Manual Bead Blasting................... 150 Build Warnings......................... 151 Aborting a Build ....................... 151 Abort safely......................152 Force abort ......................152 Next steps......................
- Page 11 H350 User Guide Full Test Image Print ......................213 Procedure ......................214 Cleaning Infrared (IR) Lamps #1, #2, and #3 ..............217 Preparation ......................218 Cleaning IR Lamps #1 and #2 ................219 Cleaning IR lamp #3 ..................... 221 Every 40 Build Cycle Maintenance ............224 Cleaning the Extraction Outlet ..................
- Page 12 H350 User Guide Background information..................266 9 Supplementary Info............268 Declaration of Conformity ................268 Dismantling, Disabling and Scrapping ............268 Special Risk Reduction Measures ................... 268 Personal protective equipment ................268 Sequence or Chronology for Decommissioning .............. 269 Disassembly ......................269 Disposal, Destruction and Recycling ..............
-
Page 13: Service And Support
Absorption Fusion™ Powered 3D printer as well as safety information and safety label locations. Intended Use Intended use for this printer is 3D printing. The H350 SAF Selective Absorption Fusion Powered 3D Printer uses two materials to create parts: High Yield Stratasys PA11 powder and High Absorption Fluid. -
Page 14: Knowledge
Warnings and Cautions precede the paragraph to which they pertain. Caution: Indicates a situation which, if not avoided, could result in damage to equipment. Warnings and Cautions precede the paragraph to which they pertain. Page 2 © Copyright 2022 Stratasys. All rights reserved. -
Page 15: Nameplate
Geometric Safety Contrast Graphical Use Case Meaning Shape Color Color Symbol Color Example Warning Yellow Black Black signs Nameplate Abbreviations Abbreviation Full Name E-Stop Emergency Stop Page 3 © Copyright 2022 Stratasys. All rights reserved. -
Page 16: User Groups And Qualifications
• Trained and/or instructed in the use, handling, etc. of the printer. • Gain knowledge of the location of emergency stops and safety equipment. Page 4 © Copyright 2022 Stratasys. All rights reserved. -
Page 17: Service
“Identifying Your Printer” (page 18)). Software Support If you have a software problem that is not covered in this guide, please contact Stratasys Customer Support. Contact information is available from the Stratasys website at: https:// support.stratasys.com/en/contact-us. When calling in for service, always have your printer’s software version (see “Updating... -
Page 18: Safety Instructions
Do not continue before putting on protective eyewear and draining the fluid from the printer. Warning: Skin Contact Hazard Various printer fluids can cause skin irritation after prolonged contact. Do not continue before putting on protective gloves. Page 6 © Copyright 2022 Stratasys. All rights reserved. -
Page 19: Contact With Powder
It is not permitted to use the printer's surfaces as an access path unless designed for such. • Do not stand or climb on the printer, etc. • Do not use the printer's surfaces as storage, workspaces or similar. Page 7 © Copyright 2022 Stratasys. All rights reserved. -
Page 20: Lack Of Training
Contact with hot surfaces can cause burns or discomfort when touched directly. 1. Power down the printer. 2. Wait until the hot surfaces of the printer have cooled below 60°C, or use protective gloves. Page 8 © Copyright 2022 Stratasys. All rights reserved. -
Page 21: Fluid Hazards
Warning: Skin Contact Hazard HAF can cause skin irritation after prolonged contact. Do not continue before putting on protective gloves. Page 9 © Copyright 2022 Stratasys. All rights reserved. -
Page 22: Location Of Safety Symbols
Danger of hot surface. Inside the build chamber. Ground (earth) point/ Specific screws on the printer chassis and inside Main ground (earth) point the printer. Figure 1: High voltage safety labels Page 10 © Copyright 2022 Stratasys. All rights reserved. -
Page 23: Renewal Of Safety Symbols
Do not use loose clothing, jewelry, etc. while operating the printer. Wearing nitrile gloves while handling the printer powder is strongly recommended. Overview of Printer Safety Functions Warning: Potential Injury. The Emergency Stop does not shut down the printer. Page 11 © Copyright 2022 Stratasys. All rights reserved. - Page 24 The printer is equipped with the above mentioned safety devices, which are located on the exterior of the printer (Figure 3) and inside the top lid (Figure Figure 3: Emergency stop Emergency Stop Page 12 © Copyright 2022 Stratasys. All rights reserved.
-
Page 25: Test Of Safety Functions
A dangerous situation • The occurrence of sudden unknown conditions, e.g. abnormal noises (rumbling, knocking) or movements of printer parts. • Faults in safety equipment that cannot be replaced/repaired during normal operation. Page 13 © Copyright 2022 Stratasys. All rights reserved. -
Page 26: Restart After Emergency Stop
Contact emergency services in the event of serious accidents. • Where appropriate, remove guards to facilitate access to the area and the injured personnel. Identify potential dangers associated with the removal of these e.g. sharp objects, components etc. Page 14 © Copyright 2022 Stratasys. All rights reserved. -
Page 27: Printer Setup
General Information Weight and Dimensions 2 PRINTER SETUP This chapter describes basic setup of the H350 SAF Selective Absorption Fusion Powered 3D Printer. General Information Weight and Dimensions The approximate net weights and dimensions of the printer modules are provided below. -
Page 28: Basic Setup
The open bags of virgin and used powder need to be stored in a room with the specifications provided in the table below. Material Failure: Storing open bags of virgin or used powder outside of these environmental conditions may result in failed or unacceptable build jobs. Page 16 © Copyright 2022 Stratasys. All rights reserved. -
Page 29: Moving The Printer
The service engineer must perform a validation of the new location before moving the printer, and verify the proper functioning of the printer after placing it in the new location. Page 17 © Copyright 2022 Stratasys. All rights reserved. -
Page 30: Identifying Your Printer
The printer can be identified by the serial number plate which is located at the back of the printer. The serial number plate is located next to the electrical cabinet filter. Figure 1: ID Tag Locations ID tag location Page 18 © Copyright 2022 Stratasys. All rights reserved. -
Page 31: Making The Network Connection
Figure 2: ID printer through GUI Making the Network Connection Processed job files can be transferred to the H350 3D printer through your facility’s Ethernet network. An RJ45 network connector is located on the right, rear corner of the printer (as viewed from the rear). -
Page 32: Back Panel Connections
Warning: Electrical Shock Hazard. The power cord serves as the disconnect device. The socket outlet must be easily accessible. Figure 3: Rear Connections Filter RJ-45 socket RJ-45 socket (Service) (External) Main Power Inlet Page 20 © Copyright 2022 Stratasys. All rights reserved. -
Page 33: Connecting To A Local Area Network (Lan)
2. The printer now connects to the DHCP server and acquires an IP address. To see the connection status and the external IP address displayed on the Network screen, first press System info and then press Network. Page 21 © Copyright 2022 Stratasys. All rights reserved. - Page 34 VPN status is Connected it is possible to provide remote support. If a LAN cable is connected to the printer, the LAN interface field shows the status Connected. If no cable is connected, or no connection is established, the status will be Not connected. Page 22 © Copyright 2022 Stratasys. All rights reserved.
-
Page 35: Installing And Connecting The H350 3D Printer To The Grabcad Print Server
Installing and Connecting the H350 3D Printer to the GrabCad Print Server GrabCAD Print Server Software Installing and Connecting the H350 3D Printer to the GrabCad Print Server • Install the GrabCAD Print software on a facility workstation. Navigate to https:// help.grabcad.com/article/201-printing-monitoring-remotely. -
Page 36: Installing The H350 Job Preparation Software
Installing the H350 Job Preparation Software Installing and Connecting the H350 3D Printer to the GrabCad Installing the H350 Job Preparation Software Job preparation software is the software used to nest the parts into the available build volume and generate the buildjob file. The user can choose between GrabCAD Print for H350 (see “Installing and Connecting the H350 3D Printer to the GrabCad Print Client”... -
Page 37: Stratasys H350 Build Processor Installation Procedure
Installing the H350 Job Preparation Software Installing the Stratasys H350 Build Processor Stratasys H350 Build Processor Installation Procedure The build job file is not transferred from the build processor to the printer. 1. On the computer that will run the software, copy the installation file to the computer’s local drive. - Page 38 Installing the H350 Job Preparation Software Installing the Stratasys H350 Build Processor 2. Double-click the file icon to initiate the setup procedure. Click Continue on the first pop-up window. See Figure Figure 7: Installation wizard screen 1 Page 26 © Copyright 2022 Stratasys. All rights reserved.
- Page 39 Installing the H350 Job Preparation Software Installing the Stratasys H350 Build Processor 3. Check the I accept the terms of the license agreement box and click Install. Figure 8: License agreement screen Page 27 © Copyright 2022 Stratasys. All rights reserved.
- Page 40 Installing the H350 Job Preparation Software Installing the Stratasys H350 Build Processor 4. On the next screen, click Proceed. For the installation to continue, the user must have administrator rights for the computer. Figure 9: Installation screen 5. If the computer is limited by the IT administrator, the user will have to type the administrator user name and password before being able to proceed.
- Page 41 Installing the H350 Job Preparation Software Installing the Stratasys H350 Build Processor 6. Once the administrator credentials, if required, are typed in, the installation begins. See Figure Figure 10: Installation in progress Page 29 © Copyright 2022 Stratasys. All rights reserved.
- Page 42 7. When the installation is complete, click Finish to close the installation wizard. Figure 11: Final installation wizard window 8. The Stratasys H350 Build Processor is now installed on the computer. The procedure imports the build processor into the nesting software, for example Materialise™ Magics™.
-
Page 43: Adding The H350 Build Processor To Materialise™ Magics
Preparation, and click Build Processor Manager. Figure 13: Materialise™ Magics™ menu 2. The Build Processor Manager is used to find all available printers. This is where the Stratasys H350 Build Processor must be added. Click Add Machine. See Figure Figure 14: Build Processor Manager screen Page 31 ©... - Page 44 Installing the H350 Job Preparation Software Installing the Stratasys H350 Build Processor 3. The next screen shows all available installed build processors. Choose the Stratasys H350 3D printer and click Add. See Figure Figure Figure 15: Add the H350 build processor 4.
- Page 45 Installing the Stratasys H350 Build Processor • Machine location. Figure 16: Configuring Build Processor user information 5. Click Add to add the Stratasys H350 Build Processor. See Figure Administrator rights may be required again. Page 33 © Copyright 2022 Stratasys. All rights reserved.
- Page 46 Installing the H350 Job Preparation Software Installing the Stratasys H350 Build Processor 6. On the next screen, the software adds the machine. See Figure Figure 17: Adding the machine 7. When the process is completed, click Close. See Figure Figure 18: Adding the build processor complete Page 34 ©...
-
Page 47: Stratasys H350 Build Processor Configuration
Stratasys H350 Build Processor Configuration After performing “Stratasys H350 Build Processor Installation Procedure” (page 25) “Adding the H350 Build Processor to Materialise™ Magics™” (page 31), the Stratasys H350 Printer is available in the Build Processor (BP) Manager. Figure 19: BP manager 1. - Page 48 Installing the H350 Job Preparation Software Installing the Stratasys H350 Build Processor • Show notifications Figure 20: BP manager options Page 36 © Copyright 2022 Stratasys. All rights reserved.
- Page 49 Installing the H350 Job Preparation Software Installing the Stratasys H350 Build Processor 2. From the build processor manager, double click the Stratasys H350 3D Printer icon to open the control panel. The control panel displays the jobs in queue and whether they are completed or failed.
- Page 50 Upload folder field. See Figure Figure 22: Stratasys H350 machine configuration (tab 1) 5. The second tab is the Profile Editor tab. This is where the options for scaling factors and wall growth compensation are found. See...
-
Page 51: Stratasys Online Resources
The build strategy file includes the X,Y,Z scaling factors and the wall growth compensation factor, Border offset. The default values provided by Stratasys should not be changed without an in-depth understanding of the printing process and the printer configuration. For details please contact your Application Engineering representative. -
Page 52: Stratasys Academy
Stratasys Academy is your online learning platform where you can quickly learn and acquire skills on additive technologies and your Stratasys printer. To guide you in your learning, our online academy provides a variety of resources such as an extensive library of videos and eLearning modules. We periodically update the site with new content. -
Page 53: Stratasys Academy Youtube Channel
Stratasys Online Resources Stratasys Academy YouTube Channel In addition, you can check the latest revision of the user guide for your Stratasys 3D printer and download documents in different languages. The Support Center is available in multiple languages. You can change the display language using the language drop-down menu in the top-left corner of the homepage. -
Page 54: Grabcad Community
GrabCAD Community GrabCAD Community Tutorials section of the GrabCAD Community portal is a valuable resource for Stratasys- sponsored and user-generated 3D printing tips. You can also ask 3D-related questions on the portal and download free CAD files. Figure 27: GrabCAD Community Page 42 ©... -
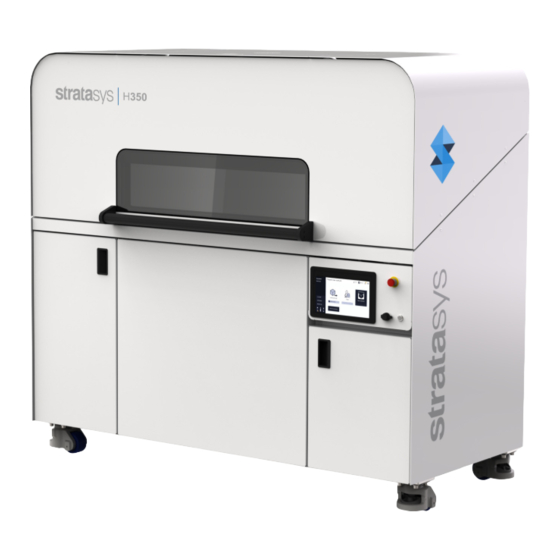
Page 55: System Components
Access Doors and Panels 3 SYSTEM COMPONENTS This chapter describes the components of the H350 SAF Selective Absorption Fusion Powered 3D Pinter. Information regarding the materials and tips that can be used by the printer is also included in this chapter. - Page 56 Figure 1: Access Doors and Panels - Front View Top cover Interface monitor Window Emergency button (E-Stop) On/Off push button HAF and Waste Powder cartridge access container door inlet access door Right side panel (Access to electrical cabinet) Page 44 © Copyright 2022 Stratasys. All rights reserved.
-
Page 57: Lid
HAF cartridge (top) and the four-liter Waste cartridge (bottom). Right side panel The right side panel allows access to the electrical cabinet. Top cover The top cover allows access to the thermal camera and other modules. Page 45 © Copyright 2022 Stratasys. All rights reserved. -
Page 58: Rear Panels
The touchscreen user interface allows the user to control the printer. From the User Interface (UI) various screens and wizards are accessible. The main operations are split into three tasks: • Start a build • Remove the build • Clean the printer Page 46 © Copyright 2022 Stratasys. All rights reserved. -
Page 59: Power Button
Only one lamp is currently used. Print Sled The print sled is equipped with three printheads and two (one left, one right) infrared (IR) lamps. Only one lamp is currently used. Page 47 © Copyright 2022 Stratasys. All rights reserved. -
Page 60: Dosing Blade
Figure 5: Center of processing chamber (bottom) Overflow Build chamber module Dosing blade Sled guide Page 48 © Copyright 2022 Stratasys. All rights reserved. -
Page 61: Upper Processing Chamber Components
The vortex bell with thermal camera window is an assembly with a window for the thermal camera. Spotlights The spotlights are two lights that are used to illuminate the processing chamber. Page 49 © Copyright 2022 Stratasys. All rights reserved. -
Page 62: Air Vents
Modeling Materials Materials Used The H350 printer uses two materials to create parts: powder and HAF high absorption fluid. The powder can be Stratasys High Yield PA11 or SAF™ PA12.The HAF is contained in a four- liter cartridge. Page 50... -
Page 63: Powder
Reports Powder The two powders used in the H350 printer are Stratasys High Yield PA11 or SAF™ PA12. Printers are set up at the factory to run in PA11 Mode. A printer set up to run in PA11 Mode can be converted to run PA12 by following a simple procedure. -
Page 64: Software
Build Preparation Using GrabCAD Print for H350 The printer builds parts by processing an original CAD or STL file into a Stratasys SAFB file which is then downloaded to the printer. GrabCAD Print is the preferred software used to process files and then transfer them to the printer to be built. -
Page 65: Opening The Software
Open Magics software by clicking the desktop icon. Alternatively, open the software using the Start menu. Figure 8: Open Magics screen Once Magics has opened, the following screen displays. Figure 9: Magics home screen Page 53 © Copyright 2022 Stratasys. All rights reserved. -
Page 66: Loading A Scene
Create a new scene by selecting the Build Preparation tab | New Scene button | select the correct printer in the dialog box. Figure 10: Load a scene Page 54 © Copyright 2022 Stratasys. All rights reserved. - Page 67 Software Build Preparation Using Materialise™ Magics™ The build volume will be visible in the blue area of the screen. Figure 11: Build volume Page 55 © Copyright 2022 Stratasys. All rights reserved.
-
Page 68: Importing A Part
Software Build Preparation Using Materialise™ Magics™ Importing a part 1. Using the Import Part button at the top of the screen locate the desired part. Page 56 © Copyright 2022 Stratasys. All rights reserved. -
Page 69: Translation And Rotation
The rotation center circle for that the selected parts will display white. Once the part is selected, locate the Position tab and click Translate. Page 57 © Copyright 2022 Stratasys. All rights reserved. - Page 70 Clicking and dragging the X (blue), Y (red), and Z (green) arrows moves the part around the build volume. Typing in the X, Y, and Z field in the Translate dialog box will also accomplish this. Figure 13: Translation Page 58 © Copyright 2022 Stratasys. All rights reserved.
- Page 71 If a part or section of a part is red, it outside of the build volume. The area in red needs to be moved so that it is completely contained inside the build volume to be printed. Page 59 © Copyright 2022 Stratasys. All rights reserved.
-
Page 72: Rescaling
Rescale parts using the Rescale function found in the Position tab. Figure 15: Rescale Duplication You can add multiple copies of the same part using the Duplicate feature found within the Tools tab. Page 60 © Copyright 2022 Stratasys. All rights reserved. - Page 73 Enter the total number, including the original part, of required parts. Select an orientation for the parts. If the show preview button is selected, the blue, ghost parts indicate the positions of the duplicated parts. Figure 16: Duplication Page 61 © Copyright 2022 Stratasys. All rights reserved.
-
Page 74: Cross Sectional View
On the right side of the screen there are drop down menus labeled: View Pages, Part Pages, Text, Annotation Pages, Measurement Pages, and Fix Pages. Inside the View Pages drop- down menu you will see the following image. Figure 17: Multi-Section tab Page 62 © Copyright 2022 Stratasys. All rights reserved. - Page 75 Figure 18. The bisecting direction can be changed by checking the Active box corresponding to the axis along which you wish to see the cross- section. Figure 18: Viewing a cross-section Page 63 © Copyright 2022 Stratasys. All rights reserved.
-
Page 76: Hollowing
Build Preparation Using Materialise™ Magics™ Hollowing Select the part and click the Hollow button located in the Tools tab. Enter the desired wall thickness in the Hollow Part dialog box. Figure 19: Hollowing a part Page 64 © Copyright 2022 Stratasys. All rights reserved. -
Page 77: Collision Detection
This function allows quick and easy detection of overlapping parts within the build volume. If parts overlap on the screen, then the final printed parts will be attached to one another. Page 65 © Copyright 2022 Stratasys. All rights reserved. - Page 78 The Collision Detection function is found within the Analyze & Report tab. In the Collision Detection results dialog box, select some or all parts and click OK. Figure 21: Collision Detection screen Page 66 © Copyright 2022 Stratasys. All rights reserved.
- Page 79 Build Preparation Using Materialise™ Magics™ If the Collision Detection function finds a problem, the results are displayed in the Collision Detection results dialog box as shown below: Figure 22: Collision detected Page 67 © Copyright 2022 Stratasys. All rights reserved.
-
Page 80: 3D Nesting
Figure 23: No collision detected 3D Nesting Magics software allows you to automatically nest multiple parts by using the 3D nesting feature. This feature is found under the Position tab. Figure 24: 3D nesting Page 68 © Copyright 2022 Stratasys. All rights reserved. - Page 81 When performing 3D nesting, a dialog box displays where parameters such as part rotation, translation around the build volume, and space between parts are set. Figure 25: Setting 3D nesting parameters Page 69 © Copyright 2022 Stratasys. All rights reserved.
- Page 82 Figure 26: Final 3D nesting Here you can see two parts were placed outside of the nesting platform. This was done because the software algorithm could not nest those parts. Page 70 © Copyright 2022 Stratasys. All rights reserved.
-
Page 83: Sinter Box
Build Preparation tab. A dialog box displays allowing the sinter box parameters to be set. Figure 27: Sinter box parameters Page 71 © Copyright 2022 Stratasys. All rights reserved. - Page 84 Software Build Preparation Using Materialise™ Magics™ After creation, the sinter box looks as shown below: Figure 28: Completed sinter box Page 72 © Copyright 2022 Stratasys. All rights reserved.
-
Page 85: Dimensions
Build Preparation Using Materialise™ Magics™ Dimensions The part bounding box dimensions can be toggled on or off as needed. The Part Dimensions button is found under the Analyze & Report tab. Figure 29: Part Dimensions Page 73 © Copyright 2022 Stratasys. All rights reserved. -
Page 86: Fix Wizard
The Fix Wizard allows for correcting errors in a part before the build job is run. These can be errors such as holes or overlapping triangles. The Fix Wizard is found under the Fix tab. Figure 30: Fix Wizard Page 74 © Copyright 2022 Stratasys. All rights reserved. - Page 87 Search for specific errors by checking the appropriate boxes on the Diagnostics dialog box. Press Update. Figure 31: Diagnostics window Magics™ software calculates and highlights the errors. Click the Follow Advice button to identify which errors can be fixed. Figure 32: Follow Advice button Page 75 © Copyright 2022 Stratasys. All rights reserved.
- Page 88 Figure 33: Automatic Fixing Once this process is complete, return to the Diagnostics page and click update. The screen should now display green checks and no errors. Figure 34: Updated Diagnostics Page 76 © Copyright 2022 Stratasys. All rights reserved.
-
Page 89: Submitting A Job
When the preparation process is complete, locate the Build button under the tab that contains the name of the printer upon which you are planning to run the build job. Figure 35: Preparing to submit Page 77 © Copyright 2022 Stratasys. All rights reserved. - Page 90 The Submit a Job dialog box displays. This dialog allows for naming the build and, behind the Configure Machine button, choosing where to save the build file. Click Submit Job and the build will be sliced and saved for print. Figure 36: Submit a build job Page 78 © Copyright 2022 Stratasys. All rights reserved.
-
Page 91: User Interface
Overview 4 USER INTERFACE This chapter provides an overview of the H350 3D Printer User Interface (UI). Specific printer operation information and procedures can be found in Chapter , 5 Operating the Printer (page 101). You must power ON the printer prior to using the touchscreen (see “Powering ON... -
Page 92: Loading A Build Job File
Print to the printer. However, you cannot start the print in GrabCAD Print. The print must started on the H350 printer screen. Magics will generate a .BLD file. This file is a buildjob file that is broken down into slices and is ready for printing. -
Page 93: Deleting A Build Job File
Choose the file that corresponds to the job you wish to delete. Press delete.The file is now removed from the printer. After the file has been deleted, it will not be available on the Select job screen. Figure 3: Printer screen build job list Page 81 © Copyright 2022 Stratasys. All rights reserved. -
Page 94: Viewing Build Job Information
Build job information can be accessed from the Select Job section of the New Build Job screen. Select the build job for review from the list and press Select. Figure 4: Build job information Page 82 © Copyright 2022 Stratasys. All rights reserved. -
Page 95: Live Data Screens
CAN bus. See Figure 19. The Image tab is TBD. The FMS tab displays info about the fluid management system, pressures, rpm, and status. See Figure Figure 5: Temperatures tab Page 83 © Copyright 2022 Stratasys. All rights reserved. - Page 96 Overview Viewing Build Job Information Figure 6: CAN Bus tab Figure 7: FMS tab Page 84 © Copyright 2022 Stratasys. All rights reserved.
-
Page 97: Owner Web Interface
1. Open an internet browser from a computer that is in the same local network (LAN) as the printer. 2. Type the address https://IP/ (for example https://172.23.32.131). See Figure 3. Press enter. Figure 9: URL field Page 85 © Copyright 2022 Stratasys. All rights reserved. - Page 98 The password protected web interface for the printer, in this case printer H350_demo, is now accessible. See Figure 11 (page 87). The username and password are fixed and cannot be changed. User name: owner Password: h350access Page 86 © Copyright 2022 Stratasys. All rights reserved.
-
Page 99: Owner Web Interface
When login is completed, the following menu displays. See Figure 12. The sub-menus and screens accessible from the owner web interface menu are discussed in the sections that follow. Figure 12: Owner web interface menu Page 87 © Copyright 2022 Stratasys. All rights reserved. -
Page 100: Overview Screen
The Overview screen displays system information if the system is idle (see Figure 13) or running a build job (see Figure 14). Figure 13: Overview screen (idle) Figure 14: Overview screen (running) Page 88 © Copyright 2022 Stratasys. All rights reserved. -
Page 101: Live Data Screen
(for example air temperature, powder module temperature, and fluid temperature). See Figure Figure 15: Live data screen When the build job is running, the target values for the different modules are accessible. See Figure Figure 16: Module live data Page 89 © Copyright 2022 Stratasys. All rights reserved. -
Page 102: Live Data Screens
Figure 19. The FMS tab displays info about the fluid management system, pressures, rpm, and status. See Figure Figure 17: Temperatures tab Figure 18: CAN Bus tab Page 90 © Copyright 2022 Stratasys. All rights reserved. -
Page 103: Configuration Menu
Figure 19: Images tab Figure 20: FMS tab Configuration menu The Configuration menu provides access to the Recipe tuning, Spotlight, and Buildjob notifications sub menus. These are discussed in detail in the following paragraphs. Page 91 © Copyright 2022 Stratasys. All rights reserved. - Page 104 The Recipe tuning screen allows for tuning the build bed temperature. See Figure Figure 21: Recipe tuning screen Spotlight The Spotlight screen allows for adjusting the configuration options for the lid lights. See Figure Figure 22: Spotlight screen Page 92 © Copyright 2022 Stratasys. All rights reserved.
- Page 105 (for example, Microsoft Teams). See Figure 23. The printer can broadcast when a job has started, finished, as well as the error code in case a failure occurs. Figure 23: Buildjob notifications screen Page 93 © Copyright 2022 Stratasys. All rights reserved.
-
Page 106: Build File Library
Browse files button. Figure 24: Build file library Clicking the Browse files button allows files to be uploaded via the web interface. Figure 25: Browse files Page 94 © Copyright 2022 Stratasys. All rights reserved. -
Page 107: Build Job History
The Build job history screen displays the history of the buildjobs that have run successfully or have failed. See Figure Figure 26: Build job history (populated) Event log The Event log screen displays system warnings and errors. See Figure Figure 27: Event log screen Page 95 © Copyright 2022 Stratasys. All rights reserved. -
Page 108: System Info
See Figure Figure 28: System info screen Software updates The Software updates screen displays the current software version and the software update history. See Figure Figure 29: Software updates screen Page 96 © Copyright 2022 Stratasys. All rights reserved. -
Page 109: Browse Files
Clicking the Browse files button opens a window which allows for viewing the printer related files. The system provides access to three main folders: • Buildfile_library: the folder that contains the build job files. Page 97 © Copyright 2022 Stratasys. All rights reserved. - Page 110 Buildjob_reports: the folder that contains pdf reports for every job that has run in the printer. • Log: the folder that contains the printer log files. Figure 31: Browse files screen Figure 32: Browsing the Buildfile_library Page 98 © Copyright 2022 Stratasys. All rights reserved.
- Page 111 Owner Web Interface Owner web interface Figure 33: Browsing the Log folder Figure 34: Browsing the Reports folder Page 99 © Copyright 2022 Stratasys. All rights reserved.
- Page 112 This interface provides read only access to the files. There is a search function, which allows for searching for available files. There are also on- screen instructions for connecting via a webdav client that provides read-write access. Page 100 © Copyright 2022 Stratasys. All rights reserved.
-
Page 113: Operating The Printer
Workflow Powering ON the Printer 5 OPERATING THE PRINTER This chapter explains basic steps in operating the H350 SAF Selective Absorption Fusion Powered 3D Printer. Workflow Figure 1 illustrates the workflow from build preparation to final parts. Figure 1: Workflow illustration Basic User Operations The E-Stop button is used in cases of catastrophic failure. - Page 114 Basic User Operations Powering ON the Printer 1. Make sure the printer plug is connected to the power socket. Figure 2: Main power switch Main Power Inlet Page 102 © Copyright 2022 Stratasys. All rights reserved.
- Page 115 The Startup screens shown below display while the system software loads. The software is checking the installed firmware version. Page 103 © Copyright 2022 Stratasys. All rights reserved.
-
Page 116: Reactivating A Dormant Printer
Figure 5: Initializing screen Reactivating a Dormant Printer If the H350 printer has been powered up but unused for a period of two weeks or longer, it is strongly recommended that a paper print test is performed as a reactivation procedure before beginning a new build job. -
Page 117: Powering Off The Printer
Basic User Operations Powering OFF the Printer Stratasys recommends archiving the paper print tests and using the tests as reference of the system performance over time. Powering OFF the Printer Before powering OFF the printer, confirm the distribution sled and print sled are at their park positions. -
Page 118: Accessing Printer Folders
Loading Material Caution: Damage to Printer The H350 printer is material specific, and is set up to use either High Yield PA11 or SAF™ PA12. Do not load the wrong material as it will cause damage to the printer. The information within this section will walk you through the process of loading material in the H350 printer. - Page 119 20% range. In the example seen below, HAF and waste levels are in the range of 40%-60%. Figure 7: Material levels (screen 1) HAF level Waste level Figure 8: Material levels (screen 2) Page 107 © Copyright 2022 Stratasys. All rights reserved.
- Page 120 Attempting to start a print job while the HAF level is too low will result in a warning. Attempting to start a print job while the waste level is too high will result in a warning. Page 108 © Copyright 2022 Stratasys. All rights reserved.
- Page 121 Loading Material Load Material Cartridges The material slots are located at the right side of the printer behind the front right door. Figure 10: Material slot location Material slot location Page 109 © Copyright 2022 Stratasys. All rights reserved.
- Page 122 1. Hold the cartridge from the handle. Make sure the correct side is facing down (see Figure 12). 2. Open the right front door. 3. Insert the cartridge into the slot. Confirm the cartridge is fully inserted. If not, the software will issue a warning. Page 110 © Copyright 2022 Stratasys. All rights reserved.
-
Page 123: Unloading And Replacing A Cartridge
Unloading and Replacing a Cartridge To unload or replace a cartridge: 1. Open the right front door. 2. Remove the cartridge from the slot. 3. Insert a new cartridge. 4. Close the door. Page 111 © Copyright 2022 Stratasys. All rights reserved. -
Page 124: Refilling Powder
SAF™ PA12. Do not load the wrong material as it will cause damage to the printer. The H350 printer is equipped with a powder container that can hold 50 kg (110 lbs.) of powder, which is the equivalent to the amount typically needed for two full builds. There is a mixing wheel inside the powder container that mixes the powder after the container is filled and keeps the power mixed during the build. - Page 125 Attempting to start a print job without enough powder to complete the print will result in a warning. The printer powder container is located at the left side of the printer behind the left front door. Figure 15: Powder container location Powder container location Page 113 © Copyright 2022 Stratasys. All rights reserved.
-
Page 126: Preparing The Powder Mixture
To prepare the powder mix: 1. Remove the Stratasys H350 powder container from the powder retrieval station. 2. Weigh the container to determine how many kilograms of used powder are in the container. - Page 127 Refilling Powder • Stratasys H trolley (part number X3D-01006-V): This is a trolley with an electric motor for lifting the powder container. The trolley includes the powder container tilt assembly, which is a metal bracket mounted on the trolley with quick release bracket. The bracket can be rotated 180 degrees in order to facilitate powder flow from the container to the printer.
- Page 128 114). b. Confirm the powder load adapter is properly mounted. 3. Attach the powder container to the Stratasys H trolley and securely lock in place. 4. Position the trolley near the printer. 5. Open the printer lid. If the lid is kept closed, there is a risk of scratching the printer panel.
- Page 129 Loading Material Refilling Powder 7. Mount the front end of the powder container adapter to the inlet of the printer. Figure 18: Powder load adapter connected to printer Powder load adapter Page 117 © Copyright 2022 Stratasys. All rights reserved.
- Page 130 Loading Material Refilling Powder 8. Position the Stratasys H trolley so it may be rotated vertically. See Figure Figure 19: Position trolley 9. Begin raising the powder container. See Figure 20. The powder container will begin to tilt while it is being raised. Raise the container to the maximum height.
- Page 131 3. Lock the tilt assembly. 4. Disconnect the powder load adapter from the printer. 5. Replace the powder inlet lid. 6. Store the trolley and close the door to the printer powder container. Page 119 © Copyright 2022 Stratasys. All rights reserved.
-
Page 132: Basic Job Build Tasks
Figure 22: New build job 2. Select one of the two options: 1) a list of jobs loaded to the printer or 2) the last job that ran on the printer. Page 120 © Copyright 2022 Stratasys. All rights reserved. - Page 133 Figure 23: New build job type 4. After pressing Select from list, all the build jobs loaded on the printer are listed. Press the name of the desired job. Figure 24: Select a listed build job Page 121 © Copyright 2022 Stratasys. All rights reserved.
- Page 134 Press the X at the top right corner to go back to the previous screen. Figure 25: Verify build 6. Press Build to start. Figure 26: Press Build Page 122 © Copyright 2022 Stratasys. All rights reserved.
- Page 135 The build bed remains in the top position during this step. Figure 27: Build screen during heatup Page 123 © Copyright 2022 Stratasys. All rights reserved.
- Page 136 8. After heatup is completed, the build job begins. The first stage is pre-build. During this phase, 500 layers of power are placed on the build bed. During this phase, the estimated time to build completion can also be viewed. Figure 28: Pre-build Page 124 © Copyright 2022 Stratasys. All rights reserved.
- Page 137 This screen is also useful for verifying there are no major issues with the jetting of the fluid. Figure 29: Current slice Page 125 © Copyright 2022 Stratasys. All rights reserved.
- Page 138 The primary graphic on the build page provides a counter with the number of the current layer being printed. Figure 30: Current layer When the build is complete, 20 additional layers of powder are added on top of the build job. Page 126 © Copyright 2022 Stratasys. All rights reserved.
-
Page 139: Starting A Build Job (Previously Used)
1. Choosing Previously used option runs the build job that was last printed. Figure 31: Previously used build job 2. Once the previously built job is selected, the rest of the procedure is the same as the procedure described. in section (page 120). Page 127 © Copyright 2022 Stratasys. All rights reserved. -
Page 140: Removing A Build
If the job was completed successfully, both sleds should be in their corresponding parked positions. If not, position both sleds as required. The accessories required to remove a build job are: Page 128 © Copyright 2022 Stratasys. All rights reserved. - Page 141 Starting a Build Job (Previously Used) • Stratasys H trolley (part number X3D-01006-V): This is a trolley with an electric motor for lifting the powder container. The trolley also includes a build removal box plate. A quick release bracket is used to mount the build removal box plate to the H trolley. The bracket allows the placement of the of the build removal box on the trolley and the safe transfer to or from the printer.
-
Page 142: Prepare The Stratasys H Trolley And Build Removal Box
Prepare the Stratasys H trolley and build removal box • Stratasys H350 Build Removal box (part number X3D-01001). The removal box consists of two parts: a box and a removable bottom plate. Figure 34: Build removal box and build removal box plate The build can be removed once the build job is finalized, successfully completed, canceled, or fails. - Page 143 Removing a Build Prepare the Stratasys H trolley and build removal box b. Mount the removal box plate bracket. See Figure Figure 35: Mounting the build removal box bracket to the H-trolley Page 131 © Copyright 2022 Stratasys. All rights reserved.
- Page 144 Removing a Build Prepare the Stratasys H trolley and build removal box 2. Confirm the bracket is locked properly in position using the lock pin. See Figure Figure 36: Build removal box bracket mounted and locked Build removal box plate 3.
-
Page 145: Placing The Build Removal Box On The Printer
The processing chamber can reach a temperature of 100ºC (212ºF) and could cause injury. Put on heat resistant gloves before handling. 1. Position the Stratasys H-trolley, with the build removal box, in close proximity to the printer. From the Home screen, press Unlock Lid to open the printer lid. See... - Page 146 3. Move the trolley towards the center of the printer. See Figure 39. The printer has a positioning bracket that will align the trolley to the printer. See Figure Figure 39: Position the H-trolley Page 134 © Copyright 2022 Stratasys. All rights reserved.
- Page 147 Placing the build removal box on the printer Figure 40: Positioning bracket Figure 41: Build removal box lifted above the level of the printer top plate Height indicator The removal box should be lifted above the noted level. Page 135 © Copyright 2022 Stratasys. All rights reserved.
- Page 148 4. Once the trolley is in position, lower the tray until the build removal box bracket is locked in position on the sled guide. See Figure Figure 42: Bottom plate locked in position Sled guide Locking bracket Page 136 © Copyright 2022 Stratasys. All rights reserved.
- Page 149 Placing the build removal box on the printer 5. When the bracket is level with the printer, the indicator is close to the marked level. See Figure Figure 43: Indicator and marks Page 137 © Copyright 2022 Stratasys. All rights reserved.
- Page 150 Placing the build removal box on the printer 6. If the build removal box is not level, the markers will appear as shown below. See Figure Figure 44: Build removal box not level Locking bracket below nominal level. Page 138 © Copyright 2022 Stratasys. All rights reserved.
- Page 151 Figure Figure 45: Unlock build removal box 8. Push the build removal box from the top plate to over the build plate. See Figure Figure 46: Build removal box on printer Page 139 © Copyright 2022 Stratasys. All rights reserved.
-
Page 152: Remove The Build Using The Wizard
10. The remove build wizard can now be initialized. Follow the on screen instructions to perform this task. Remove the Build Using the Wizard 1. Press Remove build to start the process. Figure 48: Home screen Page 140 © Copyright 2022 Stratasys. All rights reserved. - Page 153 3. Press Next. See Figure 49. The the build plate moves upwards and places the powder inside the remover box. Figure 49: Build job removal from Home screen Page 141 © Copyright 2022 Stratasys. All rights reserved.
- Page 154 Remove the Build Using the Wizard 4. When the build plate has moved fully upward and stops moving, pull the build removal box, which now contains the build, onto the Stratasys H-trolley. Figure 50: Press Finish Figure 51: Build removal box placed on tray Page 142 ©...
- Page 155 Removing a Build Remove the Build Using the Wizard 5. When the build removal box is properly positioned on the tray, engage the lock that secures the build removal box to the Stratasys H-trolley. Figure 52: Lock engaged Locking bracket below nominal level.
- Page 156 See Figure Once the build has been removed, the printer can be cleaned and the next build job can be started. Figure 53: Time stamp on a successful build job Page 144 © Copyright 2022 Stratasys. All rights reserved.
-
Page 157: Remove The Build Removal Box From The Printer
1. Lift the tray above the top plate level of the printer to release from the sled guide. See Figure Figure 54: Tray lifted above the printer and build removal box released from sled guide Page 145 © Copyright 2022 Stratasys. All rights reserved. - Page 158 Removing a Build Remove the Build Removal Box From the Printer 2. Pull the Stratasys H-trolley backwards and away from the printer. Figure 55: Trolley retracted from printer Page 146 © Copyright 2022 Stratasys. All rights reserved.
-
Page 159: Cooldown
Removing a Build Cooldown 3. For safer transport of the build removal box, lower the Stratasys H-trolley tray. Figure 56: Build removal box ready for transfer The Stratasys H-trolley can safely and stably carry the build removal box even when fully extended. -
Page 160: Post-Processing Considerations
3. Finish the build. Dyeing and smoothing. Depowdering the Build Caution: Damage to Printer Do not use the same Powder Retrieval Station for PA 11 and PA 12. Damage to the printer may result. Page 148 © Copyright 2022 Stratasys. All rights reserved. -
Page 161: Powder Reuse
The DyeMansion™ PowerShot C™ is an example such a piece of equipment. It is Page 149 © Copyright 2022 Stratasys. All rights reserved. -
Page 162: Manual Bead Blasting
59). To avoid this, keep the blasting focal point moving by moving the part, moving the nozzle, or moving both at the same time. This will remove by powder in a more gentle fashion and will reduce the risk of burning. Page 150 © Copyright 2022 Stratasys. All rights reserved. -
Page 163: Build Warnings
Abort build wizard. The wizard displays a popup window with three abort options. See Figure 60. The options are: • Cancel • Abort safely • Force abort Page 151 © Copyright 2022 Stratasys. All rights reserved. -
Page 164: Abort Safely
Next steps On the second popup window of the wizard, the user can identify the reason for canceling the job: • Operator mistake. For example, the wrong print job was started. Page 152 © Copyright 2022 Stratasys. All rights reserved. - Page 165 Force build complete. In this case, the controlled cool down is stopped and the user is allowed to remove the build. This, however, is not recommended. Page 153 © Copyright 2022 Stratasys. All rights reserved.
-
Page 166: Calibration And Adjustments
To fully calibrate the load cell, two sub-calibrations must be performed: • Full cartridge calibration • No cartridge calibration The following tools are required to complete a calibration: • Full HAF cartridge, part number HAF X3D-01011. Page 154 © Copyright 2022 Stratasys. All rights reserved. - Page 167 1. From the home screen, press Service operations and then Module Test. See Figure 2 Figure Figure 2: Press Service operations Figure 3: Press Module Test 2. Click on Printheads & Fluids to access the calibration tasks for the two load cells. Page 155 © Copyright 2022 Stratasys. All rights reserved.
- Page 168 Load Cell Calibration • Cartridge HAF • Cartridge Waste 3. See Figure Figure 4: Load cell calibration screen Page 156 © Copyright 2022 Stratasys. All rights reserved.
-
Page 169: Haf Load Cell Calibration
1. Insert a full cartridge into the Load Cell and press Full Cartridge Calib. See Figure Follow the instructions on the screen. See Figure Figure 5: Full cartridge calibration Figure 6: Status message displays Page 157 © Copyright 2022 Stratasys. All rights reserved. -
Page 170: Waste Load Cell Calibration
The procedure for the waste load cell calibration is identical to the procedure for the Figure “HAF Load Cell Calibration” (page 157). Perform the following steps for the waste load cell. See Figure Full Cartridge calibration • Page 158 © Copyright 2022 Stratasys. All rights reserved. - Page 171 No cartridge calibration Figure 8: Waste load cell calibration screen When all calibrations have been successfully completed, the warning disappears from the home screen. See Figure Figure 9: System fully calibrated Page 159 © Copyright 2022 Stratasys. All rights reserved.
-
Page 172: Test Load Cell Calibration
The readings can vary 1%-2% • For a full cartridge the reading can be 98-100% • For an empty cartridge the reading will be in the range 0-2% Figure 10: Fluid level test Page 160 © Copyright 2022 Stratasys. All rights reserved. - Page 173 11. If this occurs, the calibration needs to be repeated. For example, this fluid level test for a full cartridge gave the result of 122.72% Figure 11: Fluid level test showing a calibration error Page 161 © Copyright 2022 Stratasys. All rights reserved.
-
Page 174: Maintenance
7 MAINTENANCE This chapter describes various maintenance tasks that will routinely need to be performed on the H350 SAF Selective Absorption Fusion Powered 3D Printer. Updating Controller Software The customer has the possibility to update the printer’s controller software via the GUI. The software upgrade is possible only if the printer is connected to the Internet. -
Page 175: Procedure
Updating Controller Software Procedure 1. From the home screen, press System info. See Figure Figure 2: Home screen 2. Choose Software updates. See Figure Figure 3: System info screen Page 163 © Copyright 2022 Stratasys. All rights reserved. - Page 176 It is possible to see a list of all previous software packages previously installed. See Figure Figure 4: Software updates screen Page 164 © Copyright 2022 Stratasys. All rights reserved.
- Page 177 Figure Figure 5: Multiple software updates available 5. Press update. A popup window displays. Press update again to initiate the software update procedure. See Figure Figure 6: Initiate software update procedure Page 165 © Copyright 2022 Stratasys. All rights reserved.
- Page 178 Updating Controller Software 6. The printer will initiate the software download. See Figure 7 Figure Figure 7: Initiate software download 1 Figure 8: Initiate software download 2 Page 166 © Copyright 2022 Stratasys. All rights reserved.
- Page 179 7. Press the “exclamation mark icon” to check that the software upgrade is in progress. See Figure Figure 9: Software update progress 8. When the software is downloaded, the printer PC reboots. The software installation begins as the pinter PC boots. Page 167 © Copyright 2022 Stratasys. All rights reserved.
- Page 180 Figure 10: Software upgrade message 10. At any time it is possible to go back to the Software update screen and verify the software version currently installed. See Figure Figure 11: Software upgrade installed Page 168 © Copyright 2022 Stratasys. All rights reserved.
-
Page 181: Printhead User Maintenance
3. Print a “Full Black Image”. Print a “Full Test Image” and determine if the blocked or deviating nozzles are still present. If they are present, perform the second sequence again. Page 169 © Copyright 2022 Stratasys. All rights reserved. -
Page 182: Maintenance Schedule
Table 2 lists part numbers for various replacement consumable items. Use the part numbers listed in this table when ordering replacement parts from Stratasys or your regional Stratasys office. Table 1: Maintenance Schedule... -
Page 183: Post-Build Maintenance
• Paper towels • Roller Cleaning Tool (scraper tool) • An industrial vacuum cleaner with a dust class H filter (such as Nilifisk ATIX 332HIC, or equivalent not provided by Stratasys). Page 171 © Copyright 2022 Stratasys. All rights reserved. -
Page 184: Printer Clean Wizard
Post-Build Maintenance Cleaning the Printer Using the Cleaning Wizard • Anti-static vacuum cleaner tube and nozzles (not provided by Stratasys). Example shown below. Figure 13: Vacuum cleaner nozzle • Lens cleaning tissues (contained in cleaning kit X3D-01016) • Heat protective gloves for use if the printer is to be cleaned while warm (contained in cleaning kit X3D-01016). - Page 185 Post-Build Maintenance Cleaning the Printer Using the Cleaning Wizard 1. Initiate the Clean wizard from the Home screen. Follow the instructions as they are displayed. Figure 14: Clean wizard home screen Page 173 © Copyright 2022 Stratasys. All rights reserved.
- Page 186 2. If a sled is not at the parked position, manually move the sleds to their parked positions. If the sleds are in a position allowing for convenient cleaning, proceed with the cleaning process. Figure 15: Cleaning wizard Step 1 Page 174 © Copyright 2022 Stratasys. All rights reserved.
- Page 187 3. Vacuum sleds, rails, and surfaces. Clean the area in between the sleds and the top surfaces of the sleds. Confirm the printer top plate area is free of powder. Figure 16: Cleaning the printer top plate area Page 175 © Copyright 2022 Stratasys. All rights reserved.
- Page 188 Post-Build Maintenance Cleaning the Printer Using the Cleaning Wizard Figure 17: Printer top plate before and after cleaning Page 176 © Copyright 2022 Stratasys. All rights reserved.
- Page 189 Post-Build Maintenance Cleaning the Printer Using the Cleaning Wizard 4. When this area is clean, press Next. Figure 18: Press next 5. The Step 2 wizard image displays. Figure 19: Step 2 Page 177 © Copyright 2022 Stratasys. All rights reserved.
-
Page 190: Cleaning The Distribution Sled
Removing the distribution sled and print sled covers is a preliminary task required for all the areas of distribution sled maintenance. The covers are not identical. The print sled cover is insulated while the distribution sled cover is not. Page 178 © Copyright 2022 Stratasys. All rights reserved. - Page 191 Before removing any screws, confirm the printer is powered down. Figure 20: Distribution and Print Sled Covers (underside view) Print sled cover Distribution (insulated) sled cover (not insulated) Required Tools: • TX20 Screwdriver Page 179 © Copyright 2022 Stratasys. All rights reserved.
- Page 192 1. Using a TX20 screwdriver, partially remove three screws holding the sled cover in place. Loosen the screws until the retaining pins are free from the sled cover. See Figure Figure 21: TX20 screws and retaining pins Screws Retaining pins Page 180 © Copyright 2022 Stratasys. All rights reserved.
- Page 193 Extra attention required when working with the lamp covers removed. The lamps are sensitive to contact with tools and other hard objects. See Figure Figure 22: Removing the print sled lamp cover Page 181 © Copyright 2022 Stratasys. All rights reserved.
- Page 194 Figure 23: Distribution sled and Print sled with covers removed IR lamp 2 IR lamp 3 IR lamp 4 IR lamp 1 3. The covers are now removed and both the distribution sled and print sled are ready for cleaning. Page 182 © Copyright 2022 Stratasys. All rights reserved.
- Page 195 4. To prevent powder contamination of the printer surfaces, place the covers in an area a safe distance from the printer. Use the spatula to scrape off powder collected on the surfaces. Figure 24: Cleaning the sled covers Page 183 © Copyright 2022 Stratasys. All rights reserved.
-
Page 196: Vacuum Cleaning The Distribution Sled With Covers Removed
1. During printing, powder collects in the flat areas under the center cover and under the lamp covers of the distribution sled. Figure 25: Areas where powder most commonly collects Areas clean Areas clean Page 184 © Copyright 2022 Stratasys. All rights reserved. -
Page 197: Cleaning The Distribution Roller
Figure 26: Cleaning the distribution roller with IPA Caution: Damage to the powder distribution system Gloves must be worn during the entire cleaning procedure. Oil and grease from skin-to-roller contact can impact the powder distribution. Page 185 © Copyright 2022 Stratasys. All rights reserved. - Page 198 4. Manually rotate the roller and use dry paper towels to remove any remaining isopropyl alcohol. Figure 27: Use paper towels to remove IPA 5. On the touch screen main menu press Service operations. Figure 28: Service operations Page 186 © Copyright 2022 Stratasys. All rights reserved.
- Page 199 7. Press Run Roller to turn the roller on. Figure 30: Run Roller If excessive resistance is applied to the spinning roller, the roller will stop. Press Run roller to restart the roller and continue the cleaning process. Page 187 © Copyright 2022 Stratasys. All rights reserved.
- Page 200 9. Shut off the roller by pressing cancel on the top left corner of the UI sidebar. 10. Repeat steps 7-8 if any fused powder is observed to be attached to the roller. 11. Reinstall the sled covers. Page 188 © Copyright 2022 Stratasys. All rights reserved.
- Page 201 1. With the lamp cover removed, remove the sled protection strip closest to the distribution sled. Figure 32: Sled protection strip closest to distribution sled Sled protection strip closest to sled 2. When the strip is removed, clean the distribution sled surface of all powder. Page 189 © Copyright 2022 Stratasys. All rights reserved.
- Page 202 Use caution when operating a vacuum cleaner or any other tool around the unprotected lamp. The lamp is easily damaged from any hard contact. Figure 33: Areas for careful cleaning Distribution sled surface that needs Lamp cleaning Areas to clean carefully Page 190 © Copyright 2022 Stratasys. All rights reserved.
- Page 203 3. If the sled protection strip cannot be properly cleaned, it must be replaced. Figure 36: Sled protection strip requiring replacement If the fused powder can be removed the strip can be reused Page 191 © Copyright 2022 Stratasys. All rights reserved.
- Page 204 It is recommended to replace the dirty sled protection strips with clean ones during weekly maintenance. The removed, dirty sled protection strips can then be cleaned while the printer is operating. Page 192 © Copyright 2022 Stratasys. All rights reserved.
- Page 205 1. Determine if the lamp blades need to be replaced. If fused powder is encrusted on the lamp blades, they must be changed. See Figure Figure 38: Lamp blades Lamp blades Page 193 © Copyright 2022 Stratasys. All rights reserved.
- Page 206 Cleaning the Printer Using the Cleaning Wizard 2. Loosen the screw for the lamp bracket, carefully lift the lamp with one hand, while taking out the lamp blades with the other. Figure 39: Lamp bracket Page 194 © Copyright 2022 Stratasys. All rights reserved.
- Page 207 Cleaning the Printer Using the Cleaning Wizard 3. The purpose of the blades are to cover the reflection from the middle top fixture plate, so make sure the blades cover those. Figure 40: This side up Page 195 © Copyright 2022 Stratasys. All rights reserved.
- Page 208 After doing this, use the vacuum cleaner to clean the powder from the sleds and other printer surfaces. Figure 41: Lamp cover with fused powder Page 196 © Copyright 2022 Stratasys. All rights reserved.
-
Page 209: Cleaning The Print Sled
Vacuum the print sled only when the printer is powered down. • Vacuum the print sled daily. • Inspect the print sled monthly. Cleaning the print sled includes the following tasks: Page 197 © Copyright 2022 Stratasys. All rights reserved. - Page 210 Post-Build Maintenance Cleaning the Printer Using the Cleaning Wizard 1. Cleaning the print sled surfaces 2. Cleaning the sled protection strips Figure 43: Pint sled Page 198 © Copyright 2022 Stratasys. All rights reserved.
- Page 211 The powder that collects around the fusion lamp (lamp #3) is often hardened and difficult to remove due to the higher duty cycle. In this case use, a spatula to remove the fused powder from the sled surface. Page 199 © Copyright 2022 Stratasys. All rights reserved.
-
Page 212: Cleaning The Print Sled Protection Strips
3. The lid automatically unlocks when sleds stop moving. Figure 46: Step 4 4. Vacuum the surfaces around the sleds and the build chamber. 5. Wipe away any spilled HAF. Wipe away any HAF from the printhead cleaning nozzles. Page 200 © Copyright 2022 Stratasys. All rights reserved. - Page 213 If this popup displays, press Continue to home the piston. Figure 47: Perform homing 6. The piston in the build chamber moves to the bottom position. Figure 48: Build chamber walls Page 201 © Copyright 2022 Stratasys. All rights reserved.
- Page 214 Cleaning the Printer Using the Cleaning Wizard 7. Vacuum the walls of the build chamber from excessive amounts of powder. See Figure Figure 49: Vacuum build chamber walls Figure 50: Cleaning the pinthead cleaning module Page 202 © Copyright 2022 Stratasys. All rights reserved.
- Page 215 See Figure 51. Wipe the surface with dry paper towel in order to avoid powder sticking to the wet surface. Figure 51: Cleaning the printhead cleaning station area Page 203 © Copyright 2022 Stratasys. All rights reserved.
- Page 216 Cleaning the Printer Using the Cleaning Wizard 9. Wipe away any HAF from the pinthead cleaning nozzles. Figure 52: Cleaning the nozzles Nozzles before cleaning Nozzles after cleaning Figure 53: Cleaning the nozzles (continued) Page 204 © Copyright 2022 Stratasys. All rights reserved.
- Page 217 11. After pressing next, the wizard moves to Step 5. The vacuum pump starts automatically. 12. Check that vacuum is present on each nozzle. 13. Use the pick tool for deep cleaning. 14. Using a squeeze bottle, pour approximately 10ml flushing fluid into each nozzle. Page 205 © Copyright 2022 Stratasys. All rights reserved.
- Page 218 15. If necessary, use a vacuum cleaner to remove powder from the nozzle tip. Figure 55: Step 5 16. While the vacuum pump is running, using a squeeze bottle, inject approximately 10 ml of flushing fluid into each nozzle. Page 206 © Copyright 2022 Stratasys. All rights reserved.
- Page 219 If the pump stops it can be reactivated by pressing Run Vacuum Pump on the screen. Figure 56: Flushing the nozzles Figure 57: Cleaning the nozzles Nozzles before cleaning Nozzles after cleaning Page 207 © Copyright 2022 Stratasys. All rights reserved.
- Page 220 18. Step 6 displays on the wizard. Figure 59: Step 6 19. Inspect the vortex bell and thermal camera window. Confirm both are free of powder and any other contamination. Clean as required. Page 208 © Copyright 2022 Stratasys. All rights reserved.
- Page 221 Figure 60: Press Finish 21. The printer will show a pop up window with the message “Cleaning successful”, while the piston will start homing. See Figure Figure 61: Cleaning successful screen Page 209 © Copyright 2022 Stratasys. All rights reserved.
-
Page 222: Cleaning The Printheads: Full Black Image Test
Put on heat resistant gloves before handling. This maintenance procedure describes how to clean contaminants from the print head nozzles located on the printhead external plate. Perform this procedure after each build. Page 210 © Copyright 2022 Stratasys. All rights reserved. -
Page 223: Procedure
1. In the Build plate area press Home to confirm the piston is in the home position. Figure 63: Common operations screen The full black image test helps to keep the printhead nozzles clear of particles. Page 211 © Copyright 2022 Stratasys. All rights reserved. - Page 224 Secure the sheet of paper to the build plate using two pieces of tape as shown in Figure Figure 64: A3 paper placed on build plate and secured with tape Tape Page 212 © Copyright 2022 Stratasys. All rights reserved.
-
Page 225: Full Test Image Print
The processing chamber can reach a temperature of 100ºC (212ºF) and could cause injury. Put on heat resistant gloves before handling. This procedure describes how to print a full test image and evaluate the condition of the printheads. Page 213 © Copyright 2022 Stratasys. All rights reserved. -
Page 226: Procedure
Post-Build Maintenance Full Test Image Print Procedure 1. Under the Build plate heading press Home to confirm the piston is in the home position. Figure 66: Common operations screen Page 214 © Copyright 2022 Stratasys. All rights reserved. - Page 227 Secure the sheet of paper to the build plate using two pieces of tape as shown in Figure Figure 67: A3 paper placed on build plate and secured with tape Tape Page 215 © Copyright 2022 Stratasys. All rights reserved.
- Page 228 Figure 69: View of the completed full image test 4. Remove the paper from the build plate. 5. Refer to the H350 service manual for how to interpret a full test image print. Page 216 © Copyright 2022 Stratasys. All rights reserved.
-
Page 229: Cleaning Infrared (Ir) Lamps #1, #2, And #3
The process for cleaning each of the three lamps involves turning each lamp on for 10 second. This is the time required to burn any containments. The residue is removed by the extraction. Page 217 © Copyright 2022 Stratasys. All rights reserved. -
Page 230: Preparation
2. Lower the build plate approximately half way by accessing the Service operations screen and pressing the Build plate slider until it is approximately half way down. See Figure Figure 71: Service operations screen for lowering build plate and parking distribution sled Page 218 © Copyright 2022 Stratasys. All rights reserved. -
Page 231: Cleaning Ir Lamps #1 And #2
Press Lamp left. The software turns on IR lamp #1 for 10 seconds. b. Repeat four times c. Press Lamp right. The software turns on IR lamp #2 for 10 seconds. d. Repeat four times. Page 219 © Copyright 2022 Stratasys. All rights reserved. - Page 232 When both lamps have been lit once for 10 seconds, move the distribution sled back to the park position by pressing Common operations at the top of the operations list and then Left park. See Figure Page 220 © Copyright 2022 Stratasys. All rights reserved.
-
Page 233: Cleaning Ir Lamp #3
Cleaning IR lamp #3 1. On the Service operations screen, press Center to move the print sled to the center of the process chamber. See Figure Figure 74: Service operations screen Page 221 © Copyright 2022 Stratasys. All rights reserved. - Page 234 3. Once the print sled has moved to the center, press Module Test | Sleds | Print sled. See Figure a. Press Lamp left. The software turns on IR lamp #3 for 10 seconds. Page 222 © Copyright 2022 Stratasys. All rights reserved.
- Page 235 When the lamp is lit once for 10 seconds, move the print sled back to the park position by pressing Common operations at the top of the operations list and then Right park. Figure Page 223 © Copyright 2022 Stratasys. All rights reserved.
-
Page 236: Every 40 Build Cycle Maintenance
This procedure needs to be repeated monthly. Required Tools The following tools are required: • Screwdriver or other tool for disconnecting the extraction tube from the printer • Vacuum cleaner Page 224 © Copyright 2022 Stratasys. All rights reserved. -
Page 237: Procedure
When removing the exhaust tube, there is a risk that small amounts of powder will be dislodged. Airborne powder will be generated during this procedure. Figure 77: Extraction outlet 2. Use the vacuum cleaner to clean the area around the extraction outlet. Page 225 © Copyright 2022 Stratasys. All rights reserved. - Page 238 The extraction outlet is a T-shaped junction and all three sides must be cleaned. The bottom of the T-junction connects to a tube from the waste cyclone separator. See the red arrow in Figure Figure 78: Extraction outlet in printer Page 226 © Copyright 2022 Stratasys. All rights reserved.
- Page 239 Every 40 Build Cycle Maintenance Cleaning the Extraction Outlet Vacuum the right side of the T-junction. See Figure Figure 79: Vacuum extraction outlet Page 227 © Copyright 2022 Stratasys. All rights reserved.
-
Page 240: Cleaning The Front Sled Guide
HAF can cause skin irritation after prolonged contact. Do not continue before putting on protective gloves. Warning: Hot Surface Hazard The processing chamber can reach a temperature of 100ºC (212ºF) and could cause injury. Put on heat resistant gloves before handling. Page 228 © Copyright 2022 Stratasys. All rights reserved. -
Page 241: Required Tools
1. Open the lid of the printer. When the lid is open, the sled motors are deactivated. It is recommended to perform this procedure after cleaning powder from the top plate and sled guide areas. Page 229 © Copyright 2022 Stratasys. All rights reserved. - Page 242 Every 40 Build Cycle Maintenance Cleaning the Front Sled Guide 2. Scrape away the fused polymer from the guide surfaces. Figure 82: Removing fused polymer Page 230 © Copyright 2022 Stratasys. All rights reserved.
- Page 243 See Figure Figure 83: Accessing entire guide 4. Use a wet wipe to clean waste from the guide. 5. Use a dry cloth to dry the guide. Page 231 © Copyright 2022 Stratasys. All rights reserved.
- Page 244 Every 40 Build Cycle Maintenance Cleaning the Front Sled Guide 6. Use your hand to check if the guides are smooth and free of fused powder. Figure 84: Cleaned sled guides Page 232 © Copyright 2022 Stratasys. All rights reserved.
-
Page 245: As-Needed Maintenance
If it is necessary to clean the lens, do not apply any direct force to the glass. Remove contamination without rubbing the lens surface. Figure 85: Vortex bell and thermal camera window Vortex bell Thermal camera window Page 233 © Copyright 2022 Stratasys. All rights reserved. - Page 246 2. Keeping the thermal camera window clean is very important for the process control. Start by cleaning the powder from the Vortex bell surface with a wet wipe. Figure 87: Cleaning the vortex bell surface Page 234 © Copyright 2022 Stratasys. All rights reserved.
- Page 247 4. Before the liquid from the towelettes evaporates, use a swab to wipe the thermal window dry using a gentle circular motion and applying very little pressure. See Figure Figure 89: Swab the thermal window Page 235 © Copyright 2022 Stratasys. All rights reserved.
-
Page 248: Cleaning The Touchscreen Display
It is recommended that you apply LCD cleaner to the microfiber cloth rather than applying cleaner directly to the touchscreen display, as excess moisture may damage the display. Page 236 © Copyright 2022 Stratasys. All rights reserved. -
Page 249: Cleaning Blocked Nozzles On The Printhead Cleaning Module
1. Move the nozzles to the middle position. In this position they are raised above the level of the top plate. 2. Use a wet wipe to clean away any residual fluid. Page 237 © Copyright 2022 Stratasys. All rights reserved. - Page 250 Cleaning Blocked Nozzles on the Printhead Cleaning Module 3. Use a vacuum cleaner to remove any powder particles present at the top of the nozzles. Figure 91: Vacuum cleaning the blocked printhead cleaning nozzles Page 238 © Copyright 2022 Stratasys. All rights reserved.
-
Page 251: Additional Areas Requiring Cleaning
HAF can cause skin irritation after prolonged contact. Do not continue before putting on protective gloves. Warning: Hot Surface Hazard The processing chamber can reach a temperature of 100ºC (212ºF) and could cause injury. Put on heat resistant gloves before handling. Page 239 © Copyright 2022 Stratasys. All rights reserved. - Page 252 1. Vacuum any excess powder from the lid area, including the overhead heater and the extraction inlet. Figure 93: Vacuum overhead heater and extraction inlet Excess Powder powder around extraction overhead inlet heater Page 240 © Copyright 2022 Stratasys. All rights reserved.
- Page 253 3. Clean powder from the vortex bell and the thermal camera window as needed. 4. Clean fused powder from the sled protection strips or replace the sled protection strips as required. 5. Wipe excess powder from the sled guides as needed. Page 241 © Copyright 2022 Stratasys. All rights reserved.
-
Page 254: Clean The Powder System
Figure 95: Remove vacuum powder extraction lid Vacuum Powder Extraction 2. Insert the vacuum filter adapter into the vacuum powder extraction port. Figure 96: Vacuum filter adapter insertion Vacuum Powder Extraction Port Vacuum Filter Adaptor Page 242 © Copyright 2022 Stratasys. All rights reserved. - Page 255 3. Insert the vacuum tube into the vacuum filter adapter and start the vacuum cleaner. If the powder needs to be re-used, connect a cyclone to the vacuum outlet. Figure 97: Vacuum tube Page 243 © Copyright 2022 Stratasys. All rights reserved.
- Page 256 4. On the touch screen select Service Operations. Figure 98: Service operations 5. At the Service Operations screen, press Powder System | Powder Flow | Empty Powder System. Figure 99: Empty powder system Page 244 © Copyright 2022 Stratasys. All rights reserved.
- Page 257 7. If something is stuck in the powder system, choose Reverse. This will cause the agitators and auger to reverse rotation. In all other cases, choose Forward. Figure 101: Rotation direction Page 245 © Copyright 2022 Stratasys. All rights reserved.
-
Page 258: Test Powder Distribution
40% to 55%. Even if the powder that was stored outside of these environmental conditions is stored in the printer room for a minimum of 48 hours before use, it is still recommend that the test powder distribution task is performed. Page 246 © Copyright 2022 Stratasys. All rights reserved. - Page 259 As-Needed Maintenance Test Powder Distribution 1. Access the Service operations screen. Figure 103: Service operations screen 2. Press the Powder system button. Figure 104: Press Powder system button Page 247 © Copyright 2022 Stratasys. All rights reserved.
- Page 260 As-Needed Maintenance Test Powder Distribution 3. The Powder Flow sub menu displays. Press the Test Powder Distribution button. Run the test for at least 15 minutes. Figure 105: Test powder distribution Page 248 © Copyright 2022 Stratasys. All rights reserved.
-
Page 261: Customer Replaceable Units
Replacing Spot Light Bulb Customer Replaceable Units The following service procedures outline the replacement instructions for the customer replaceable units of the H350 3D printers. Replacing Spot Light Bulb Warning: Electrical Shock Hazard Contact with live circuits could cause serious electric shock. Do not continue before disconnecting the power cable. -
Page 262: Procedure
Warning: Skin Contact Hazard HAF can cause skin irritation after prolonged contact. Do not continue before putting on protective gloves. Page 250 © Copyright 2022 Stratasys. All rights reserved. -
Page 263: Required Tools
The following tools are required: • TX20 screwdriver Procedure Warning: Crushing Hazard To prevent injury, before removing any of the sled screws, press the emergency stop button or turn off the power to the printer. Page 251 © Copyright 2022 Stratasys. All rights reserved. - Page 264 Figure 109: Mounted (left), and removed protection strip (right) Notch facing up 3. Insert the new sled protection strip with the notches on the ends facing upwards, as shown Figure 109. Page 252 © Copyright 2022 Stratasys. All rights reserved.
- Page 265 The protection strip will bend if not inserted into each of the grooves in the cover. Figure 110: Grooves for protection strip in cover Page 253 © Copyright 2022 Stratasys. All rights reserved.
- Page 266 Customer Replaceable Units Replacing the Sled Protection Strips Page 254 © Copyright 2022 Stratasys. All rights reserved.
- Page 267 Customer Replaceable Units Replacing the Sled Protection Strips Page 255 © Copyright 2022 Stratasys. All rights reserved.
-
Page 268: Troubleshooting
8 TROUBLESHOOTING This chapter describes troubleshooting steps that can be performed to correct basic problems with the H350 SAF Selective Absorption Fusion Powered 3D Printer. Getting Help If you have a problem with your printer or the printer’s materials that is not covered in this guide, or if you need to order replacement parts, please contact Customer Support for your region. - Page 269 Ambient temperature too low AmbientTemperatureHigh 3211 Ambient temperature too high CANInterfaceError 4000 CAN Interface error CANSendError 4001 CAN bus send error CANBoardNoConnection 4002 No CAN board connection CANBoardLostConnection 4003 Lost CAN board connection Page 257 © Copyright 2022 Stratasys. All rights reserved.
- Page 270 HighCurrent230VAC 4037 High Current for 230VAC CameraConnectionError 5000 Camera connection error CameraInvalidReading 5001 Camera reading invalid CamCoolingError 5002 Camera cooling problem FMS_InitializationError 5100 FMS initialization error FMS_ConnectionError 5101 FMS connection error Page 258 © Copyright 2022 Stratasys. All rights reserved.
- Page 271 FMS_RecircPumpTooSlowError 5120 FMS recirc pump running too slow FMS_RecircPumpTooFastWarning 5121 FMS recirc pump running too fast FMS_RecircPumpTooFastError 5122 FMS recirc pump running too fast FMS_InfeedPressureTargetWarning 5123 FMS infeed pressure off target Page 259 © Copyright 2022 Stratasys. All rights reserved.
- Page 272 RFID reader connection error MoveTimeout 5600 Move timeout MoveFailure 5601 Move failure MoveStartTriggerError 5602 Move did not start on trigger MoveStopTriggerError 5603 Move did not stop on trigger HomeFailure 5604 Homing failure Page 260 © Copyright 2022 Stratasys. All rights reserved.
- Page 273 8107 Speed zero detected during move Bldc_ENotMoving 8108 No move registered Bldc_ECollisionDetect1 8109 Collision detected on sensor 1 Bldc_ECollisionDetect2 8110 Collision detected on sensor 2 Bldc_ENo24VPower 8111 No 24V driver voltage Page 261 © Copyright 2022 Stratasys. All rights reserved.
- Page 274 HighPowerAc_ELampOnTimeout 8308 Lamp-On safety timeout HighPowerAc_EMaxTemperature 8309 Maximum temperature exceeded HighPowerAc_ENo24VPower 8310 No 24V driver voltage Pos-duty profile goal not reached HighPowerAc_EGoalNotReachedTimeout 8311 in time LowPowerAc_EGeneric 8400 EGeneric LowPowerAc_ENotHandled 8401 ENotHandled Page 262 © Copyright 2022 Stratasys. All rights reserved.
- Page 275 ENotImpl LowPowerDc_ERange 8603 ERange LowPowerDc_EInvalidData 8604 EInvalidData LowPowerDc_EInvalidParam 8605 EInvalidParam LowPowerDc_EBusy 8606 EBusy LowPowerDc_ESafetyTimeout 8607 Safety timeout LowPowerDc_EMaxTemperature 8608 Maximum temperature exceeded LowPowerDc_ENo24VPower 8609 No 24V driver voltage StepperDr_EGeneric 8700 EGeneric Page 263 © Copyright 2022 Stratasys. All rights reserved.
- Page 276 EInvalidData InkWaste_EInvalidParam 8805 EInvalidParam InkWaste_EBusy 8806 EBusy InkWaste_ENo24VPower 8807 No 24V driver voltage InkWaste_EPumpTimeout 8808 Pump timeout Ink container microswitch state InkWaste_EMicroSwitchInkContainer 8809 unknown Waste container microswitch state InkWaste_EMicroSwitchWasteContainer 8810 unknown Page 264 © Copyright 2022 Stratasys. All rights reserved.
- Page 277 9002 ENotImpl LidLock_ERange 9003 ERange LidLock_EInvalidData 9004 EInvalidData LidLock_EInvalidParam 9005 EInvalidParam LidLock_EBusy 9006 EBusy LidLock_ESafetyTimeout 9007 Safety timeout LidLock_ENo24VPower 9008 No 24V driver voltage LidLock_ENotRunning 9009 Board not in running mode Page 265 © Copyright 2022 Stratasys. All rights reserved.
-
Page 278: Warnings And Errors
Current level of fluid in the FMS tank isillustrated with red line. The FMS tank will be full when the fluid raises to the level of the green line. Figure 1: FMS Tank Page 266 © Copyright 2022 Stratasys. All rights reserved. - Page 279 The possible causes for this failure are: • The printer has been running with empty HAF cartridge. • The printer has been emptied from fluid as part of service activities and not properly primed. Page 267 © Copyright 2022 Stratasys. All rights reserved.
-
Page 280: Supplementary Info
Declaration of Conformity Special Risk Reduction Measures 9 SUPPLEMENTARY INFO Declaration of Conformity Declaration of Conformity information is available from your Stratasys representative. Please contact your local regional office for a copy of this document. Dismantling, Disabling and Scrapping Energy isolation... -
Page 281: Sequence Or Chronology For Decommissioning
Before disassembling the printer, a plan for disassembly must be prepared. The plan must include a risk assessment for the work, as well as for the disposal of the printer and its parts. Page 269 © Copyright 2022 Stratasys. All rights reserved. -
Page 282: Disposal, Destruction And Recycling
EMC Class A Warning Warning: This is a Class A product. In a domestic environment this product may cause radio interference in which case the user may be required to take adequate measures. Page 270 © Copyright 2022 Stratasys. All rights reserved. -
Page 283: Fcc Statements (U.s.a.)
Radio Interference Regulations of the Canadian Department of Communications. MSDS (Material Safety Data Sheet) You can obtain current Material Safety Data Sheets for printer materials from the Stratasys website at: http://www.stratasys.com/materials/material-safety-data-sheets. Page 271 © Copyright 2022 Stratasys. All rights reserved. -
Page 284: Disposal Of Waste Equipment By Users In Private Households In The European Union
For more information about where you can drop off your waste equipment for recycling, please contact your local city office, your household waste disposal service or the shop where you purchased the product. Page 272 © Copyright 2022 Stratasys. All rights reserved. - Page 285 Copyright © 2022 Stratasys Ltd. All rights reserved. DOC-01005 Rev.C...
Need help?
Do you have a question about the H350 and is the answer not in the manual?
Questions and answers