GE MAC 1600 Operator's Manual
Ecg analysis system
Hide thumbs
Also See for MAC 1600:
- Manual (9 pages) ,
- Service manual (54 pages) ,
- Service manual (146 pages)

Related Manuals for GE MAC 1600


Summary of Contents for GE MAC 1600
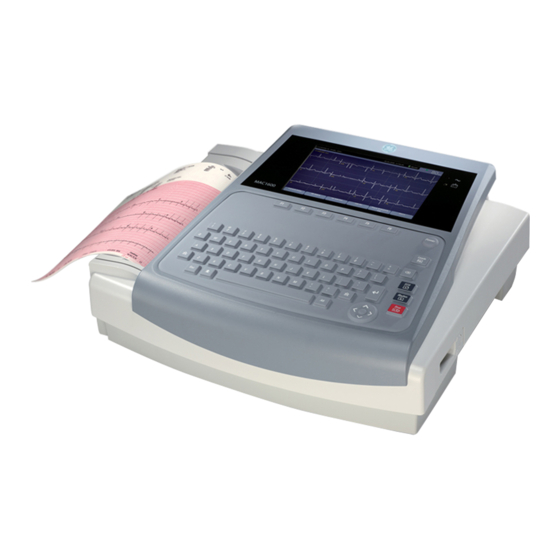
- Page 1 GE Healthcare MAC™ 1600 ECG Analysis System Software Version 1.0 Operator's Manual 2028451-182 Revision B...
- Page 2 Archivist, CardioSoft, CASE, Hookup Advisor, MAC, Mactrode, Multi-Link, MUSE, SilverTRACE, and 12SL are trademarks owned by General Electric Company. All other marks are not owned by GE and are instead owned by their respective owners. ©2008 General Electric Company. All rights reserved.
-
Page 3: Table Of Contents
Contents Introduction Manual Information ........... 1-2 Purpose . - Page 4 Using the MAC 1600 Keyboard........
- Page 5 Arrhythmia Mode Recording Introduction ............6-2 Arrhythmia Mode.
- Page 6 Replacing the Battery ..........10-12 Conditioning the MAC 1600 Battery Pack ......10-13 Supplies and Accessories .
- Page 7 ECG Data Contains Noise ......... . A-3 ACI-TIPI Statement is Not Included on Report .
- Page 8 MAC™ 1600 2028451-182B...
-
Page 9: Introduction
Introduction 2028451-182B MAC™ 1600... -
Page 10: Manual Information
Introduction Manual Information Purpose This manual describes the safe and effective operation of the MAC™ 1600 . Intended Audience This manual is written for clinical professionals who use, maintain, and/ or troubleshoot the MAC™ 1600 . Clinical professionals are expected to have a working knowledge of appropriate medical procedures, practices, and terminology used in the treatment of patients. -
Page 11: Product References
Introduction Product References The name of the product described in this manual is MAC 1600 ECG Analysis System. It will be referred to as “the system” or “the device” throughout this document. Illustrations and Names All illustrations in this manual are provided as examples only. They may not necessarily reflect your system’s setup or the data on your system. - Page 12 Introduction WARNING ACCIDENTAL SPILLS — If liquids have entered a device, take it out of service and have it checked by a service technician before it is used again. To avoid electric shock or device malfunction liquids must not be allowed to enter the device. WARNING BATTERY OPERATION —...
- Page 13 Introduction WARNING ELECTRODES — Polarizing electrodes (stainless steel or silver constructed) may cause the electrodes to retain a residual charge after defibrillation. A residual charge will block acquisition of the ECG signal. Whenever patient defibrillation is a possibility, use non- polarizing (silver/silver chloride construction) electrodes for ECG monitoring.
- Page 14 CAUTION ACCESSORIES (SUPPLIES) — To ensure patient safety, use only parts and accessories manufactured or recommended by GE. Parts and accessories used must meet the requirements of the applicable IEC 60601 series safety standards and essential performance standards, and/or the system configuration must meet the requirements of the IEC 60601-1-1 medical electrical systems standard.
- Page 15 If you have questions concerning disposal of the product, please contact GE or its representatives. 2028451-182B MAC™ 1600...
- Page 16 Introduction WARNING PACKAGING DISPOSAL — Dispose of all packaging material, observing all applicable waste control regulations and keeping out of children’s reach. CAUTION EQUIPMENT DAMAGE — Devices intended for emergency application must not be exposed to low temperatures during storage and transport to avoid moisture condensation at the application site.
-
Page 17: Classification
Introduction CAUTION SERVICEABLE PARTS — This equipment contains no user serviceable parts. Refer servicing to qualified service personnel. CAUTION SUPERVISED USE — This equipment is intended for use under the direct supervision of a licensed health care practitioner. CAUTION EQUIPMENT CONFIGURATION — The equipment or system should not be used adjacent to, or stacked with other equipment. -
Page 18: Biocompatibility
The parts of the product described in this operator’s manual, including all accessories, that come in contact with the patient during the intended use, fulfill the biocompatibility requirements of the applicable standards. If you have questions in this matter, please contact GE or its representatives. Legal Notice Our equipment contains several fields which can be filled in before performing an ECG. -
Page 19: Contraindications
Arrhythmia detection is provided for the convenience or automatic documentation. Contraindications The MAC 1600 device is NOT intended: to be used during patient transport, to be used for intra-cardiac applications, to be used as a vital signs physiological monitor, or to provide alarms for Arrhythmia detection. -
Page 20: Accuracy Of The Input Signal Reproduction
If the installation of this equipment, in the USA, will use 240 V rather than 120 V, the source must be a center-tapped, 240 V, single-phase circuit. Contact GE for information before connecting any devices to this equipment not recommended in this manual. Parts and Accessories To ensure patient safety, use only parts and accessories manufactured or recommended by GE. -
Page 21: Equipment Symbols
Introduction Equipment Symbols The following symbols may appear on the product, its packaging, and or its documentation. Defibrillation-proof type BF equipment. Equipotential ground point Protective earth terminal Indicates that the waste of electrical and electronic equipment must not be disposed as unsorted municipal waste and must be collected separately. - Page 22 Introduction Atmospheric limits. Temperature limits. Humidity limits. Keep dry. Fragile. Do not throw or dispose of in fire. Indicates the device is classified as type 20 for solid and liquid ingress per IEC/EN 60529. X = Ingress of solid objects: 0 non-protected 1 >= 50 mm dia 2 >=12.5 mm dia...
-
Page 23: Service Information
Refer equipment servicing to GE authorized service personnel only. Any unauthorized attempt to repair equipment under warranty voids that warranty. It is the user’s responsibility to report the need for service to GE or to one of their authorized agents. Equipment Identification Every GE device has a unique serial number for identification. - Page 24 Introduction 1-16 MAC™ 1600 2028451-182B...
-
Page 25: Equipment Overview
Equipment Overview 2028451-182B MAC™ 1600... -
Page 26: Equipment Description
Equipment Overview Equipment Description Front View Name Description Display Presents waveform and text data. Power LED Indicates the unit is plugged in and receiving power. Battery LED Indicates various battery states: Solid amber light indicates the battery is charging. Flashing amber light indicates the battery is low. Off indicates the battery is neither charging nor low. -
Page 27: Side View
D-sub 15-pin female connector for the acquisition cable. KISS Connector Connection port for the optional KISS lead system. Carrying handle Handle for carrying the MAC 1600 device. Back View Name Description External Power 12V power supply for future external devices. Do not Connector use. -
Page 28: Keyboard Layout
RJ45 network connector. SD card slot Secure Digital card slot. Insert card as indicated by the icon. The MAC 1600 system supports only SD cards formatted for the FAT or FAT16 file systems. External Video Monitor Standard 15-pin VGA connector for an external connection monitor. - Page 29 Equipment Overview Name Description Leads key Changes the leads when the screen is being used to display waveforms. Backspace Key Deletes characters. ECG key Acquires a resting ECG, prints a 10-second report in Arrhythmia mode, and prints a 12-lead report in Stress mode.
-
Page 30: Acquisition Modules
Equipment Overview Acquisition Modules The MAC 1600 system supports a variety of acquisition modules. 041A WARNING BURN PROTECTION — To ensure defibrillator protection and protection against high-frequency burns, use only the acquisition cable that ships with this equipment. Otherwise, serious injury could result. -
Page 31: Leadwire Adapters
4 mm pin grabber Mactrode clip Setting Up the Equipment Setting up the MAC 1600 system consists of the following steps: 1. Inserting the battery. 2. Connecting the AC power adapter. 3. Connecting leadwires. 4. Inserting paper. 2028451-182B... -
Page 32: Inserting The Battery
Do not use the system on battery power until the battery is fully charged as indicated by the on-screen battery gauge and the blank LED next to the display. You may use the MAC 1600 system on AC power while the battery is charging. -
Page 33: Connecting Leadwires
Before printing ECG reports, do the following: Make sure the system is set up for the correct paper size. The MAC 1600 system can print on either A4 or 8.5” x 11” paper. For instructions, refer to “Adjusting the Paper Tray for Paper Size”... -
Page 34: Connecting The Barcode Reader
Connecting External Devices (Stress Option) If the Stress option was purchased, connect the external stress device to the MAC 1600 system via a serial cable to the Comm A on the back panel. The MAC 1600 system can work with any of the following devices. -
Page 35: Turning On The System
SD card and use that card to import the settings to other MAC 1600 systems. Testing the Device After the MAC 1600 unit has been set up and configured, test the device completely before using it with patients. Test scenarios include: Conducting and printing a resting ECG Refer to Chapter 5 for instructions on resting ECGs. -
Page 36: System Description
STAT ECG to begin taking an ECG without logging into the MAC 1600 system. Using the MAC 1600 Keyboard You interact with the MAC 1600 system by using the keyboard. In addition to entering data as you would any keyboard, use it to: Select menu options... - Page 37 Controlling Optional Stress Equipment If you purchased the optional stress module, use the stress keys on the MAC 1600 keyboard to control stress equipment connected to the MAC 1600. For a description of the stress keys and their function, refer to “Stress Test Keys”...
- Page 38 Equipment Overview 2-14 MAC™ 1600 2028451-182B...
-
Page 39: Preparing The Patient
Preparing the Patient 2028451-182B MAC™ 1600... -
Page 40: Prepare The Patient's Skin
Preparing the Patient Prepare the Patient’s Skin Careful skin preparation is the key to an interference-free ECG. The signal quality is shown on the Hookup Advisor indicator. NOTE See the KISS operator’s manual for instructions on how to use the KISS Electrode Application System. -
Page 41: Applying The Electrodes
Preparing the Patient WARNING SHOCK HAZARD — Ensure that conductive parts of the electrodes or lead wires do not come in contact with other conductive parts, including earth. This would cancel the protection provided by the isolated signal input. 6. Verify the leads are all connected and working properly. NOTE You can use the Hookup Advisor module to review connection quality before beginning the ECG. -
Page 42: Resting Ecg Electrodes
Preparing the Patient Resting ECG Electrodes Standard 12 Lead Placement To acquire a standard 12 lead ECG, use the placement shown in the following illustration. 026A IEC Label Electrode Placement Label V1 red C1 red Fourth intercostal space at the right sternal border. V2 yellow C2 yellow Fourth intercostal space at the left sternal border. - Page 43 Preparing the Patient IEC Label Electrode Placement Label RL green N black Above right ankle. (Alternate placement, upper leg as close to torso as possible.) RA white R red Right deltoid. NEHB Lead Placement To acquire a NEHB ECG, use the standard 12 lead electrode placement and items A and B as shown in the following figure.
-
Page 44: Stress Ecg Electrodes
Preparing the Patient Stress ECG Electrodes Standard 12 Lead Placement To acquire a standard 12 lead ECG, use the placement shown in the following illustration. 061A IEC Label Electrode Placement Label V1 red C1 red Fourth intercostal space at the right sternal border. V2 yellow C2 yellow Fourth intercostal space at the left sternal border. - Page 45 Preparing the Patient IEC Label Electrode Placement Label RL green N black On waistline, above right thigh. RA white R red Under right clavicle at furthest point from the sternum. 2028451-182B MAC™ 1600...
- Page 46 Preparing the Patient MAC™ 1600 2028451-182B...
-
Page 47: Entering Patient Information
Entering Patient Information 2028451-182B MAC™ 1600... -
Page 48: Entering Patient Information Manually
Entering Patient Information Entering Patient Information Manually Patient information should be entered for each new patient from whom readings are taken. Use the following procedure to enter the information if you do not use a barcode reader or if you want to modify or add to the patient data entered with a barcode reader. -
Page 49: Entering Patient Information With A Barcode Reader
To use the barcode reader, it must be connected to the USB port on the MAC 1600 back panel and properly configured. Refer to Chapter 9 for instructions on setting up the optional barcode reader. - Page 50 Entering Patient Information MAC™ 1600 2028451-182B...
-
Page 51: Recording A Resting Ecg
Recording a Resting ECG 2028451-182B MAC™ 1600... -
Page 52: Introduction
Recording a Resting ECG Introduction The Resting ECG function is part of the basic MAC 1600 system. Resting ECG mode is the default Power up mode. When the system is turned on, the Resting ECG display will appear, similar to the following figure. The default can be modified in the Basic Setup. -
Page 53: Resting Ecgs
Red = disconnected lead. Resting ECGs A resting ECG is the default mode of the MAC 1600, although this may be changed in the system configuration. This section describes how to record a resting ECG as well as the available options. -
Page 54: Ecg Options
For more information on each option, refer to “Post-Acquisition Options” on page 5-6. ECG Options The MAC 1600 provides several options for configuring an ECG. The options, presented as option keys across the bottom of the display, are listed in the following table. F Key Option... - Page 55 Recording a Resting ECG F Key Option Description Gain Changes the magnitude of the ECG signal on the display or in the report. Measurement is in millimeter per millivolt (mm/mV) and includes the following options: 5 mm/mV 10 mm/mV 20 mm/mV 40 mm/mV 2.5 mm/mV Automatic...
-
Page 56: Post-Acquisition Options
Recording a Resting ECG F Key Option Description More Toggles between the first row of options (above) and the second row of options (below). Printer Leads Selects which leads to include in the printout. Options are: First Six Second Six Rhythm Six Used only when conducting rhythm ECGs. -
Page 57: Generating A Rhythm Report (Manual Recording)
Recording a Resting ECG F Key Option Description Reanalyze Allows you to edit the global measurements and t-wave dispersion. Available only if the Measurement option is enabled and the Reanalysis option is selected in the Resting ECG Setup window. For more information, refer to “Reanalyzing an ECG”... -
Page 58: Ecg Reanalysis
Recording a Resting ECG If you press the Rhythm key after pressing the Stop key, the new report will either begin printing immediately on the current sheet of paper or advance to a new page, depending on the setting of the Start rhythm report on a new page field on the Resting ECG Setup window. -
Page 59: Reanalysis Layout
Recording a Resting ECG b. When the correct point is selected, use the trimpad to adjust its position. To verify correct positioning, refer to the values in the Measurement Legend in the lower left corner of the display. For more information on the Measurement Legend, refer to “Reanalysis Layout”... -
Page 60: Reanalysis Options
Recording a Resting ECG Feature Description Waveforms A composite view of the ECG reading generated by superimposing the median waveforms from all 12 leads. Press the Leads key to toggle through the individual waveforms. The selected waveform is brighter than the others. - Page 61 Recording a Resting ECG F Key Option Description P Measurement Toggles the format of the P Duration and PR Interval measurements in the Measurement Legend and toggles the fiducial points from solid lines (certain) to dotted lines (uncertain). Available only when the P-onset or P-offset fiducial points are selected.
-
Page 62: Hookup Advisor Module
Recording a Resting ECG Hookup Advisor Module The Hookup Advisor module is a visual indication of the quality of lead signals. Monitoring it can help reduce or eliminate poor quality ECGs, saving time and preventing the need to take additional ECGs. 046A The Hookup Advisor indicator is positioned in the upper right corner of the screen, to the left of the heart rate. -
Page 63: Recording Ecgs Of Pacemaker Patients
DC offset voltage. This will block ECG signal acquisition for several minutes. If polarizing electrodes are used, GE recommends that the leadwires be disconnected from the patient before delivering the shock. To prevent polarization, GE recommends the use of non-polarizing disposable electrodes with defibrillation recover ratings as specified in AAMI EC12 3.2.2.4 (MMS PN 9623-105 Silver MacTrodes, MMS spec... - Page 64 100mV five seconds after a defibrillation discharge. WARNING EQUIPMENT DAMAGE — For patient safety, use only the original GE patient cable. Before connecting the cable to the device, check it for signs of mechanical damage. Do not use a damaged cable.
-
Page 65: Arrhythmia Mode Recording
Arrhythmia Mode Recording 2028451-182B MAC™ 1600... -
Page 66: Printing An Arrhythmia Report
Arrhythmia Mode Recording Introduction The Arrhythmia mode is part of the basic MAC 1600 system. It allows you to manually generate an arrhythmia printout in a table format, an episode format, or a summary format. The interface of the Arrhythmia mode is identical to the interface for the Resting ECG mode. -
Page 67: Arrhythmia Options
For more information, refer to “Arrhythmia Codes” on page 6-5. Arrhythmia Options The MAC 1600 provides several options for configuring an Arrhythmia report. The options, presented as option keys across the bottom of the display, are listed in the following table. F Key... - Page 68 Arrhythmia Mode Recording F Key Option Description Gain Changes the magnitude of the ECG signal on the display or in the report. Measurement is in millimeter per millivolt (mm/mV) and includes the following options: 5 mm/mV 10 mm/mV 20 mm/mV 40 mm/mV 2.5 mm/mV Automatic...
-
Page 69: Printing Options
Arrhythmia Mode Recording F Key Option Description Pace Enhance Improves the readability of pacemaker ECGs. Options are On and Off. Patient Data Opens the patient data entry window. Main Menu Exits the Arrhythmia function and returns to the Main Menu. Printing Options When printing an arrhythmia report, you have the following options. - Page 70 Arrhythmia Mode Recording Code Arrhythmia Event Learn phase PAU1 Pause of 1 missed beat PAU2 Pause of 2 missed beats PCAP Pacemaker capture PERR Pacemaker malfunction PSVC Premature supraventricular contraction Premature ventricular contraction QRSL Learned QRS complex Ventricular run (3 PVCs) VBIG Ventricular bigeminy VFIB...
-
Page 71: Stress Testing
Stress Testing 2028451-182B MAC™ 1600... -
Page 72: Introduction
Master Step This device does not connect to the MAC 1600 unit. The system emits a tone to instruct the patient when to take a step. Stress tests include the following parameters:... -
Page 73: Stress Mode Interface
Stress Test Information Bar The Stress ECG mode adds an information bar on the right side of the MAC 1600 display, as seen in the following illustration. Descriptions of the bar’s key elements follow the illustration. 2028451-182B MAC™ 1600... - Page 74 Stress Testing 049A Feature Description Target Rate The target heart rate and the current heart rate’s percentage of that target. VE/min Ventricular ectopics per minute. Also known as premature ventricular contraction. Calculated as the sum of all PVCs and ESCs detected in the past 60-second interval.
-
Page 75: Stress Test Keys
Metabolic equivalent of the current exercise level. Stress Test Keys The Stress ECG mode makes use of the double row of stress keys near the top of the MAC 1600 keyboard, as seen in the following illustration. Your keyboard may differ slightly from that shown. Description Pretest Initiates the test. -
Page 76: Stress Options
“Keyboard Layout” on page 2-4. Stress Options The MAC 1600 system provides several options for configuring a Stress ECG. The options, presented as option keys across the bottom of the display, are listed in the following table. F Key Option... - Page 77 Stress Testing F Key Option Description Sweep Speed Changes the speed of the waveform on the display and printout. Changing the measurement also changes the speed of the wiper bar on the display. Measurement is in millimeter per second (mm/s) and includes the following options: 25 mm/s 50 mm/s...
-
Page 78: Conducting Stress Tests
Stress Testing F Key Option Description More Toggles between the first, second, and third rows of options. Pace Enhance Increases the readability of pacemaker ECGs. Options are On and Off. Printer Leads Selects which leads to include in the printout. Options are: First Six Second Six... - Page 79 Stress Testing ergometers with remote start. Deviations for specific devices are noted where appropriate. DANGER PATIENT INJURY — When on a moving treadmill, a patient could fall and sustain an injury. To minimize the possibility of a falling caused by the belt’s sudden movement, have the patient step onto the belt only after it begins moving.
- Page 80 Stress Testing For more information on making these adjustments, refer to “Stress Test Keys” on page 7-5. 8. When the exerecise phase is complete, press the Recovery key to begin the recovery phase of the test. NOTE When using an ergometer with remote start, you do not need to press the Recovery key because the recovery phase begins automatically at the end of the last stage.
-
Page 81: Conducting A Stress Test With A Master's Step Device
This prevents the patient from tripping on the leadwires during the test. b. Instruct the patient to take a step whenever the MAC 1600 system beeps. Press the Pretest key. 7. Press the Exercise key to begin the test. - Page 82 Stress Testing 7-12 MAC™ 1600 2028451-182B...
-
Page 83: Managing Internal Storage
Managing Internal Storage 2028451-182B MAC™ 1600... -
Page 84: Introduction
Managing Internal Storage Introduction The File Manager provides an interface to the system’s optional internal storage. It provides the tools to: import records from an external source, print the internal storage directory, search stored records, edit a record’s patient data, delete records, print records, transmit records to an external device, and... -
Page 85: Importing Records
Managing Internal Storage Importing Records In addition to saving ECGs recorded with the MAC 1600 device, you can also import ECG records to internal storage from the following sources: Secure Digital (SD) cards, Other MAC devices connected via serial port or modem, CardioSoft systems connected via serial port or modem, or MUSE systems connected via modem. -
Page 86: Printing The File Manager Directory
1. From the Main Menu, press F4 (File Manager). The File Manager window opens. 2. Press F4 (Print Directory). The directory prints on the MAC 1600 writer. Finding Records The File Manager may have up to 100 records to manage, making it difficult to find a specific record. -
Page 87: Editing Patient Data
Managing Internal Storage 054A 3. Enter your search criteria. 4. Press F1 (Search). The File Manager retrieves all the records that match your search criteria. 5. To clear the search results, do one of the following: Press F6 (Main Menu) > F4 (File Manager). Press F5 (Search) >... -
Page 88: Deleting Records
Managing Internal Storage 4. Press F1 (Edit). The Enter Patient Data window opens. 052A 5. Edit the information as appropriate. For instructions on editing patient information, refer to Chapter 4. 6. When the information has been updated, press F6 (Save). The updated information is saved, and you return to the File Manager window. -
Page 89: Printing Records
9-19 for more information. Connect the MAC 1600 unit to the communication device. For an external modem, see the MAC 1600 Field Service Manual. For a LAN connection to a MUSE system, see the LAN Option for MAC Series Installation and Troubleshooting Guide. -
Page 90: Exporting Records
SD card capacity and manufacturer. This may affect the time required to read or write ECG records and other information to the SD card. GE recommends the use of a 128 MB, 256 MB or 512 MB card manufactured by SanDisk No additional setup is required to export data to an SD card. - Page 91 Imported records have a Sent status of Recv. To transmit all records in storage, press F2 (Select All). 3. If you are exporting to an SD card, insert the card into the MAC 1600 SD Card slot. Make sure the card has sufficient free space for the selected records and that it is not write protected.
- Page 92 Managing Internal Storage NOTE When exporting to a shared directory, the MAC 1600 device logs on to the directory with the user name and password defined on the Communications Setup window. If either of those values are incorrect, a window will open and prompt you to log in. If this...
-
Page 93: System Configuration
System Configuration 2028451-182B MAC™ 1600... -
Page 94: Introduction
Introduction System Configuration provides access to functions that allow you to customize the MAC 1600 settings and to utilities to help manage those settings. This chapter describes the settings managed by each function and the process followed by each utility. - Page 95 For more information on the ERGO and CFRA options, refer to “Options Setup” on page 9-29. To reach the Basic Setup from the MAC 1600 Main Menu, press F5 (System Configuration) > F1 (Basic Setup). The following table describes each setting available on Basic Setup.
- Page 96 Enable this option only if you use the GE supplied cable and an external GE modem that has been modified to obtain its power through the serial cable. Enabling this option when using a standard cable or modem may cause communication issues.
- Page 97 System Configuration Field Comment Blood Pressure Indicates whether the patient’s blood pressure should be taken by the stress device. Options are No and In Ergometer. Page 3 High Security Mode Enables/disables high security mode. It can be activated only if at least one user with Edit Users and Edit Setup privileges has been configured with a password.
-
Page 98: Resting Ecg Setup
Storage options (if the internal storage option is activated) Transmission options (if a communications option is activated) To reach the Resting ECG Setup from the MAC 1600 Main Menu, press F5 (System Configuration) > F2 (Resting ECG Setup). The following table describes each setting available on the Resting ECG Setup. - Page 99 System Configuration Field Comment Low Pass Filter [Hz] Sets the maximum frequency to include in the waveform. Restricting frequencies can help eliminate noise in the waveform. Frequencies are measured in Hertz (Hz) and include the following options. Selecting a frequency eliminates signals above that frequency.
- Page 100 System Configuration Field Comment 12 leads: 4x3 Enables/disables a display option that shows four three- waveform columns. Available only if the R12L system option is enabled. Display Format Selects the display format of the resting ECG. Default value is 3 leads: 1x3. Other values depend on which of the previous four fields are set.
- Page 101 System Configuration Field Comment Preview before Analysis Determines waveform preview options. Values include: Waveforms are never previewed. Always Waveforms are always previewed. Yellow electrodes Waveforms are previewed when the Hookup Advisor indicator shows a yellow or red electrode. Red electrodes Waveforms are previewed when the Hookup Advisor indicator shows a red electrode.
- Page 102 System Configuration Field Comment Screening Criteria Enables/disables the inclusion of the screen criteria. This setting is available only if the MI12 option is activated. Suppress normal statement Enables/disables the inclusion of the normal statement. This setting is available only if the MI12 option is activated. Suppress abnormal / Enables/disables the inclusion of the abnormal/borderline borderline...
- Page 103 System Configuration Field Comment 1–12 Lead Twelve fields that allow you to define the sequence in which the leads will appear. Available only if SEQ4 is selected for the Lead Sequence. 1–12 Label Twelve fields that allow you to define the labels that will appear/print for the corresponding leads.
-
Page 104: Arrhythmia Setup
Analysis options Lead sequence Report options To reach the Arrhythmia Setup from the MAC 1600 Main Menu, press F5 (System Configuration) > F3 (Arrhythmia Setup). Most of the fields on the Arrhythmia Setup windows are the same as those on the Resting ECG Setup. The following table lists the arrhythmia settings that are unique or differ from the resting ECG. -
Page 105: Stress Ecg Setup
The Stress ECG Setup function allows you to define: Waveform parameters Lead usage Analysis options Report options Lead sequence To reach the Stress ECG Setup from the MAC 1600 Main Menu, press F5 (System Configuration) > F4 (Stress ECG Setup). 2028451-182B MAC™ 1600 9-13... - Page 106 System Configuration Many of the fields on the Stress ECG Setup windows are the same as those on the Resting ECG Setup or the Arrhythmia Setup. The following table lists the settings that are unique or differ from the resting or arrhythmia setups.
- Page 107 System Configuration Field Comment Protocol / Master’s Step Determines which protocol will be used to conduct the Mode stress test. Protocol determines the test phases, stages, stage durations, stage loads, and the times at which auto reports are printed and blood pressure are recorded. You can create custom protocols by selecting the Edit Protocols button.
- Page 108 System Configuration Field Comment Median Report Speed Determines the speed in millimeters per second at which [mm/s] the waveforms will be represented on the report. Options are: 12-lead Report Determines the layout of a 12-lead report. Options are: 1x12 One column showing 10 seconds from all 12 leads. Two columns each showing 5 seconds from 6 leads.
- Page 109 You can modify the pre-defined protocols to create custom protocols. Use the following instructions to create a custom protocol. 1. From the MAC 1600 Main Menu, press F5 (System Configuration) > F4 (Stress ECG Setup). The Stress ECG Setup window opens.
- Page 110 System Configuration 3. Select the Edit Protocols button and press either Enter or the trimpad button. For treadmills and ergometers, the Select Protocol window opens to display applicable protocols. Perform step 4 through step 16. For Master’s Step devices, the Edit Master Step Post-Exercise window opens to display the display the post-exercise stages.
-
Page 111: Communication Setup
Destination location settings Modem settings (if a modem option is activated) LAN settings (if a LAN option is activated) To reach the Communication Setup from the MAC 1600 Main Menu, press F5 (System Configuration) > F6 (More) > F1 (Communication Setup). - Page 112 Available only if the Allow Export Using Shared Directory field is checked. Username Identifies the user name that the MAC 1600 system will use to log on to the shared directory. The user must be set up on the domain with the appropriate permissions to access the shared directory.
- Page 113 System Configuration Field Comment Device Identifies the type of device to be used to transmit data to the location. Options are: Serial Modem Modem and LAN will be available only if the corresponding option has been activated. This field becomes active only after a corresponding location has been entered.
- Page 114 PIN Dialing Page 4 Cardiograph Device Name Identifies the name that identifies the MAC 1600 unit on the network. By default, the value is set to GE_<serial number>. A valid network device name contains between 1 and 20 alphanumeric and underscore characters.
-
Page 115: Country Setup
Date and time formats Measurement units Line filter Lead label To reach the Country Setup from the MAC 1600 Main Menu, press F5 (System Configuration) > F6 (More) > F2 (Country Setup). The following table identifies the settings on Country Setup. Field... -
Page 116: Patient Setup
Barcode reader settings Only if the BCRD USB Barcode Reader option is activated To access Patient Setup from the MAC 1600 Main Menu, press F5 (System Configuration) > F6 (More) > F4 (Patient Setup). The following table identifies the settings on Patient Setup. - Page 117 System Configuration Field Comment Date of Birth Determines whether date of birth will be available when entering patient data. Determines whether age will be available when entering patient data. Height Determines whether height will be available when entering patient data. Weight Determines whether weight will be available when entering patient data.
- Page 118 System Configuration Field Comment Test Information Window Systolic BP Determines whether systolic blood pressure will be available when entering test information. Diastolic BP Determines whether diastolic blood pressure will be available when entering test information. Location Determines whether location will be available when entering test information.
-
Page 119: User Setup
System Configuration Field Comment Dose Type Determines whether Dose Type will be available when entering clinical trial information. If this field is set, use the Dose List… button to define the types of doses that will available when entering clinical trial information. Investigator ID Determines whether investigator ID will be available when entering clinical trial information. - Page 120 If High Security Mode is enabled, anyone who will use the MAC 1600 device must be set up as a user with a user ID, a password, and privileges to be able to log on to the device. For more information on setting system defaults and enabling High Security Mode, see “Basic...
-
Page 121: Options Setup
System Configuration Field Comment Attending Determines whether the user fills the role of attending physician. If this is the role that was selected on the Edit User List window, this field will be checked by default. Multiple roles may be selected, but at least one role must be selected. -
Page 122: Service Setup
2034995-016 USB Barcode Reader TIPI 2034995-017 ACI-TIPI Service Setup The Service Setup option allows service personnel to configure the following: Device settings Event log System diagnostics Software update See the MAC 1600 Service Manual for details. 9-30 MAC™ 1600 2028451-182B... -
Page 123: Date/Time Setup
The Date/Time Setup function allows you to configure the MAC 1600 system’s date and time settings. To reach Date/Time Setup from the MAC 1600 Main Menu, press F5 (System Configuration) > F6 (More) > F6 (More) > F6 (More) > F1 (Date/ Time Setup). -
Page 124: Select Setup
System Configuration Basic Setup Resting Setup Arrhythmia Setup Stress Setup Communication Setup Country Setup Patient Setup User Setup Options Setup Complete Setup 3. When you are done, press F6 (Return) to return to the Main Menu. Select Setup The Select Setup utility allows you to save up to five system configurations and switch between them. -
Page 125: Export Setup
Export Setup The Export Setup utility allows you to export saved settings from the MAC 1600 system to an SD card. This SD card can then be used to import the settings to another MAC 1600 system, greatly simplifying the installation and configuration of multiple MAC 1600 systems. -
Page 126: Import Setup
The Audit Trail Export function copies the system audit trail in XML format to an SD card and then clears the audit trail on the MAC 1600 system. If a previous audit trail exists on the SD card, it will be overwritten automatically by the new audit trail. - Page 127 After the XML file has been exported, you can review or print the audit trail as needed. For more information on how to parse the XML file for viewing or printing, refer to the GE Cardiology Open XML manual (PN 2025762-163).
- Page 128 System Configuration 9-36 MAC™ 1600 2028451-182B...
-
Page 129: Maintenance
Maintenance 2028451-182B MAC™ 1600 10-1... -
Page 130: Introduction
MAC 1600 Maintenance The MAC 1600 ECG Analysis System is designed to require little more than regular inspection and cleaning to function properly. Any additional maintenance should be performed by qualified GE service personnel. -
Page 131: Inspecting The Equipment
Discontinue using the device until the appropriate repairs can be made. Cleaning the Device Clean the exterior surface of the MAC 1600 device monthly, or more frequently if needed. Cleaning Materials to Use Use the following materials to clean the device:... -
Page 132: Cable And Leadwire Maintenance
Maintenance 2. Soak a clean cloth in the solution and wring out any excess. 3. Thoroughly wipe the surface of the MAC 1600 device with the damp cloth. Do NOT drip the solution or any liquid on the writer assembly. - Page 133 Maintenance Disinfectant to Use In accordance with the APIC Guidelines for Selection and Use of Disinfectants (1996), use sodium hypochlorite (5.2% household bleach) to disinfect the cables and leadwires. Sodium hypochlorite can be in the form of a liquid or a wipe as long as it falls within the following range: Minimum dilution of 1:500 (minimum of 100 ppm free chlorine) Maximum dilution of 1:10...
- Page 134 Maintenance Never autoclave or steam clean cables or leadwires. Always wipe gently to avoid pulling long wires from the connectors. Always remove cables and leadwires from the device before cleaning. Failure to observe these cautions could result in damage to the contact metal ends, thereby affecting signal quality.
-
Page 135: Storing Cables And Leadwires
Maintenance Sterilizing Cables and Leadwires Although NOT RECOMMENDED, cables and leadwires can be sterilized with ethylene oxide gas (EtO) at a maximum temperature of 50° C (122° F). Follow the instructions provided by the sterilizer manufacturer. NOTE Frequent sterilization reduces the useful life of cables and leadwires. Storing Cables and Leadwires To ensure that the cables and leadwires are in proper working order, use the following guidelines to store them between use:... -
Page 136: Paper Maintenance
Maintenance Paper Maintenance For the proper handling of the MAC 1600 thermal writer, you need to know how to: Replace paper Adjust the paper tray for different paper sizes Store thermal paper Replacing Paper Use the following procedure to replace the paper in the MAC 1600 thermal writer. -
Page 137: Adjusting The Paper Tray For Paper Size
Maintenance Adjusting the Paper Tray for Paper Size The MAC 1600 thermal writer supports two paper sizes: U.S. Letter (8.5” x 11”) and A4. When the device ships, the paper tray is configured to use the appropriate paper size for the destination location. Use the following instructions to change the paper size by moving the spacers in the paper tray. -
Page 138: Storing Thermal Paper
(C) over the left end of the roller. NOTE The beige spacer is secured to the MAC 1600 unit with two small screws. If the spacer is not being used, it is attached to the back of the gray spacer with the screws. -
Page 139: Battery Maintenance
Maintenance will not fade for seven years if (a) the following storage guidelines are observed and (b) the GE equipment used is maintained in accordance with the equipment’s service manuals and memoranda. If fading occurs, notify GE promptly. If your retention requirements exceed seven years, consider alternate storage methods. -
Page 140: Battery Safety
2-2 and “System Errors” on page A-7). When the LED flashes amber, connect the MAC 1600 system to AC power to charge the battery to full capacity. As the battery ages, the full charge capacity of the battery will degrade and be permanently lost. -
Page 141: Conditioning The Mac 1600 Battery Pack
A condition cycle consists of an uninterrupted “charge-discharge-charge” cycle. Use the following instructions to condition the MAC 1600 battery. 1. Insert the battery into a MAC 1600 unit that is not being used to record patient tests. 2028451-182B MAC™... -
Page 142: Supplies And Accessories
7. Remove the AC mains power and turn on the MAC 1600 unit. 8. Allow the battery to discharge until MAC 1600 unit shuts down. 9. Reconnect the AC mains power to the MAC 1600 unit and leave the unit turned off. -
Page 143: Troubleshooting
Troubleshooting 2028451-182B MAC™ 1600... -
Page 144: General Troubleshooting Tips
Verify the equipment has not been modified. Unauthorized modifications to the equipment may cause unexpected results, poor performance, or system failure. If the equipment has had unauthorized modifications, contact GE Technical Support. Verify the software has not been updated. Updated software may change system functionality. If the user is unaware of the changes, they may appear as unexpected results. -
Page 145: System Will Not Power Up
Troubleshooting System Will Not Power Up If the system will not power up, do the following: Verify the unit is turned on. If it is not, turn the unit on. Refer to “Turning on the System” page 2-11 for instructions. Verify the battery is installed and charged. -
Page 146: Aci-Tipi Statement Is Not Included On Report
“Connecting External Devices (Stress Option)” on page 2-10. Verify the device is connected to the MAC 1600 unit. External stress devices connect to the MAC 1600 unit via a serial cable. For more information, refer to “Back View” on page 2-3. -
Page 147: Paper Jams
“Connecting External Devices (Stress Option)” on page 2-10. Verify the device is connected to the MAC 1600 unit. External stress devices connect to the MAC 1600 unit via a serial cable. For more information, refer to “Back View” on page 2-3. -
Page 148: Cannot Import Or Transmit Records Via Modem
Verify the correct communication option has been activated. The MAC 1600 system supports two options for communicating via modem: MODC (for communicating with a CardioSoft system) and MODM (for communicating with a MUSE system). For more information, refer to “Options Setup”... -
Page 149: System Errors
“Communication Setup” on page 9-19 for instructions on setting these values. Ping the MAC 1600 unit from the file server to verify that the two devices can communicate. Verify the logon information is correct. Check the user name, password, and domain information. Refer to “Communication Setup”... - Page 150 9-27. Verify the user typed the Username and Password correctly. Contact the administrator to reset the user’s Username or Password. Contact GE Technical Support to obtain a temporary supervisor password. Error message appears while printing: The printer encountered a temporary To restart any of the following reports, push Printer internal error –...
-
Page 151: B Creating Barcodes
Creating Barcodes 2028451-182B MAC™ 1600... -
Page 152: Introduction
ID length set up on the system in the Patient Setup window. If the MAC 1600 system is communicating with a MUSE system, the length of the patient ID should also be the same as that used by the MUSE system. -
Page 153: Configuring The Barcode Reader
Creating Barcodes Configuring the Barcode Reader The barcode reader is configured on the MAC 1600 Patient Setup window. You can choose to configure it manually or automatically. The requirements for each method are described in the following sections. For instructions on configuring the barcode reader, refer to “Patient Setup”... -
Page 154: Configuring The Barcode Reader Automatically
Creating Barcodes Configuring the Barcode Reader Automatically The barcode reader can be configured automatically by scanning a barcode that has been set up using the following information: Item Character used to reserve byte space Patient ID First name Last name Year of birth Month of birth Day of birth... - Page 155 Index Index Numerics Auto Transmit ECG ..........9-11 12 Lead Display for Resting ECG ......9-30 12 Lead Display for Stress Test ......9-30 Bal (protocol)............9-17 12SL Measurement..........9-30 Balkeware (protocol) ..........9-16 12SL Measurement and Interpretation ....9-30 barcode reader 21 CFR Part 11 Audit Trail ........
- Page 156 Index communication protocol ........9-21 Communication Setup E12L option............9-30 cardiogoraph device name ......9-22 eBike ergometer............ 2-11 default location ..........9-19 device ............. 9-21 deleting ............. 8-6 DHCP settings ..........9-22 editing patient information ........ 8-5 DNS settings........... 9-23 exporting............
- Page 157 Index export XML............9-20 input signal accuracy ..........1-12 exporting ECG records ........... 8-8 inspecting a MAC 1600 device ......10-3 external devices intended use ............1-10 connecting to ..........2-10 internal storage, see File Manager eBike............... 2-11 Ergoline ergometer ......... 2-11 J+x Point Formula ..........
- Page 158 File Manager....8-5 modem setup connecting to ........... 2-10, 8-7 auto configure .......... 9-27 powered by the MAC 1600 unit ......9-4 barcode reader settings ......9-27 settings ............9-21 custom fields ........9-26, 9-27 troubleshooting ..........A-6 dose list ............
- Page 159 Arrhythmia ECG description ............1-15 Basic Setup where to find ........... 1-15 Communication Setup service requirements..........1-15 Country Setup Service Setup, see the MAC 1600 Service Manual option, setup Setup Report ............9-31 2028451-182B MAC™ 1600 Index-5...
- Page 160 Index patient, setup Resting ECG Underwriters Laboratories........1-9 Stress ECG USAFSAM (protocol) ..........9-16 the MAC 1600 Service Manual USB (Universal Serial Bus)........2-4 User Setup USB connector ............2-10 User Setup MUSE ID............9-28 T2000 treadmill ............. 2-11 overview ............9-27 T2100 treadmill .............
- Page 162 Asia Headquarters World Headquarters GE Medical Systems GE Medical Systems GE Medical Systems Information Technologies GmbH Information Technologies Asia; GE (China) Co., Ltd. Information Technologies, Inc. Munzinger Straße 3-5 24th Floor, Shanghai MAXDO Center, 8200 West Tower Avenue D-79111 Freiburg...
Need help?
Do you have a question about the MAC 1600 and is the answer not in the manual?
Questions and answers