Table of Contents
Advertisement
Quick Links
Advertisement
Table of Contents

Related Manuals for StarTech.com FHA-TV-WALL-MOUNT


Summary of Contents for StarTech.com FHA-TV-WALL-MOUNT
- Page 1 Adjustable TV Wall Mount up to 55 in and 66 lb - VESA Compatible *Actual product may vary from photos User Manual SKU: FHA-TV-WALL-MOUNT For the latest information and specifications visit www.StarTech.com/FHA-TV-WALL-MOUNT Manual Revision: 05/26/2022...
- Page 2 This manual may make reference to trademarks, registered trademarks, and other protected names and/or symbols of third-party companies not related in any way to StarTech.com. Where they occur these references are for illustrative purposes only and do not represent an endorsement of a product or service by StarTech.com, or an endorsement of the product(s) to which this manual...
-
Page 3: Safety Statements
Säkerhetsåtgärder • Installation och/eller montering får endast göras av behöriga yrkespersoner och enligt gällande lokala förordningar för säkerhet och byggnormer. To view manuals, videos, drivers, downloads, technical drawings, and more visit www.startech.com/support... -
Page 4: Warning Statements
• Fästets viktkapacitet: 8 till 30 kg (17.6 till 66 lb.). • Låt inte barn klättra på produkten eller använda produkten utan uppsikt. • Produkten är endast avsedd för användning inomhus och ska inte användas utomhus. To view manuals, videos, drivers, downloads, technical drawings, and more visit www.startech.com/support... - Page 5 • Voordat u de wagen gaat verplaatsen, moet u de zwenkwielen ontgrendelen. To view manuals, videos, drivers, downloads, technical drawings, and more visit www.startech.com/support...
- Page 6 • 本製品は、 二人がかりでの組み立てを想定しています。 手助けなしに単独で 組み立てと設置を行わないで下さい。 • コードやケーブルの上、 または凹凸のある床面でカートを移動させないで 下さい。 • 反動注意! 本製品にはスプリング機構が搭載されており、 作動させるとアセ ンブリ部品やディスプレイが反動で上方向に大きく動く場合があります。 付 属の説明書に従い、 ハンドルを操作する際には常に注意を払ってください。 設置手順のステップ4より前にハンドルを操作しないでください。 ディスプ レイの高さを調整するときは、 必ず両手でディスプレイを支え、 ハンドルを 握って安全にディスプレイの昇降をコントロールしてください (図参照) 。 誤 った操作をすると、 破損や怪我につながる可能性があります。 • 危険 ! 可動部品に近づかないでください。 To view manuals, videos, drivers, downloads, technical drawings, and more visit www.startech.com/support...
- Page 7 à assembler et utiliser ce produit. • Ne dépassez pas la capacité pondérale du produit. Une surcharge du produit peut entraîner des blessures ou des dommages matériels. To view manuals, videos, drivers, downloads, technical drawings, and more visit www.startech.com/support...
- Page 8 • Montar este produto é uma tarefa para duas pessoas. Não tentar montar este produto e instalar o equipamento sem assistência. To view manuals, videos, drivers, downloads, technical drawings, and more visit www.startech.com/support...
- Page 9 • Antes de empezar a mover el carrito, asegúrese de haber desbloqueado las ruedas. Antes de empezar a mover el carrito, asegúrese de haber desbloqueado las ruedas. To view manuals, videos, drivers, downloads, technical drawings, and more visit www.startech.com/support viii...
- Page 10 • Gefahr durch gespeicherte Energie! Dieses Produkt enthält einen Federmechanismus, der dazu führen kann, dass sich die Montagekomponenten und/oder das Display bei Betätigung gewaltsam und schnell nach oben bewegen. Befolgen Sie die mitgelieferten Anweisungen To view manuals, videos, drivers, downloads, technical drawings, and more visit www.startech.com/support...
- Page 11 Anheben oder Absenken des Displays sicher zu steuern. Andernfalls kann es zu Sachschäden und/oder schweren Personenschäden kommen. • Einklemmgefahr! Halten Sie Ihre Finger fern von beweglichen Teilen. To view manuals, videos, drivers, downloads, technical drawings, and more visit www.startech.com/support...
-
Page 12: Table Of Contents
Height Adjustment Tension of the Arm Assembly ................................................15 Cable Management ........................15 Adjust the Tilt Tension of the TV Warranty Information ................16 Limitation of Liability ................16 To view manuals, videos, drivers, downloads, technical drawings, and more visit www.startech.com/support... -
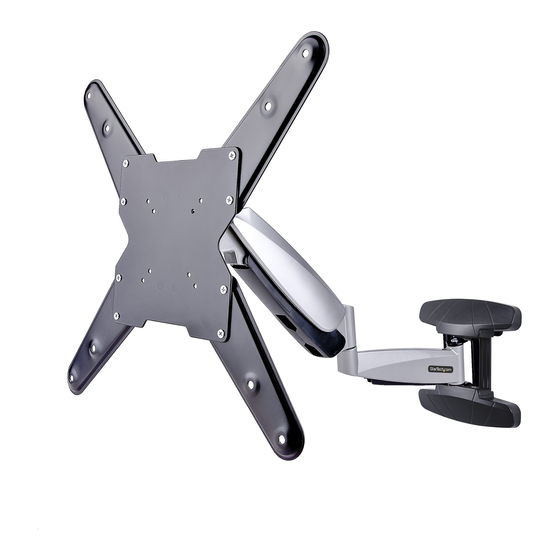
Page 13: Product Diagram
Product Diagram VESA Plate Arm Assembly VESA Extension Plates Decorative Covers Height Adjustment Tension Wall Mount Screw To view manuals, videos, drivers, downloads, technical drawings, and more visit www.startech.com/support... -
Page 14: Product Dimensions
Product Dimensions Side View To view manuals, videos, drivers, downloads, technical drawings, and more visit www.startech.com/support... -
Page 15: Product Information
VESA Plate with VESA Extension Plates: 300 x 300, 400 x • 200, and 400 x 400. Tools Phillips Head Screwdriver • To view manuals, videos, drivers, downloads, technical drawings, and more visit www.startech.com/support To view manuals, videos, drivers, downloads, technical drawings, and more visit www.startech.com/support... -
Page 16: Package Contents
Package Contents Arm Assembly VESA Extension Decorative VESA Extension Plates, Left Covers Plates, Right Qty: 1 Qty: 2 Qty: 2 Qty: 2 VESA Extension Wrench 4 mm Hex Key 6 mm Hex Key Plates Screws Qty: 1 Qty: 1 Qty: 1 Qty: 8 M5 x 14 Screws M6 x 14 Screws... - Page 17 M8 x 30 Screws M8 x 50 Screws Display Washers, Display Washers, Small Large Qty: 4 Qty: 4 Qty: 4 Qty: 4 Wall Mounting Concrete Short Spacers Tall Spacers Screws Anchors Qty: 8 Qty: 8 Qty: 5 Qty: 5 Wall Mounting User Manual Washers Qty: 1...
-
Page 18: Installation
Nuts as they will be used in a later step. Slide out the bottom and lift upwards to remove the VESA Plate from the Arm Assembly. (Figure 1) Figure 1 To view manuals, videos, drivers, downloads, technical drawings, and more visit www.startech.com/support... -
Page 19: Mounting The Wall Mount
If the two mounting holes on the VESA Plate are not compatible with the mounting holes on the TV or display, use the VESA Extension Plates to create a compatible mounting hole configuration. To view manuals, videos, drivers, downloads, technical drawings, and more visit www.startech.com/support... -
Page 20: Mount A Tv With A Flush Mounting Surface
Determine the depth of the mounting holes on the TV. • Determine the diameter of the mounting holes on the TV. • Note: If using a TV with a flush mounting surface, you don’t To view manuals, videos, drivers, downloads, technical drawings, and more visit www.startech.com/support... - Page 21 Head Screwdriver Warning! Do not overtighten the screws. If you encounter resistance while tightening the screws, stop tightening. M5 x 14 Screw M6 x 14 Screw Washer Figure 4 To view manuals, videos, drivers, downloads, technical drawings, and more visit www.startech.com/support...
-
Page 22: Mount A Tv With A Recessed Mounting Surface
• Refer to the images below to see the possible hardware • combinations of Screws and Spacers. M6 x 30 M8 x 30 Combined with Spacers Figure 5 To view manuals, videos, drivers, downloads, technical drawings, and more visit www.startech.com/support... - Page 23 Plate or VESA Extension Plates, the Spacers, and into the VESA Mounting Holes, located in the back of the TV. (Figure 7) Tighten the appropriately sized M-Type Screws, using a Phillips Head Screwdriver To view manuals, videos, drivers, downloads, technical drawings, and more visit www.startech.com/support...
- Page 24 Failure to do so could result in damage to the TV. M6 x 30 Screw M8 x 30 Screw M8 x 50 Screw Washer Large VESA Extension Plates Spacers Figure 7 To view manuals, videos, drivers, downloads, technical drawings, and more visit www.startech.com/support...
-
Page 25: Attach A Tv To The Arm Assembly
Insert the Two Nuts, from Step 1 of Installation - Release the VESA Plate from the Arm Assembly, located on the back of the VESA Plate Assembly. Use the provided Wrench to tighten all the Nuts (x 4). To view manuals, videos, drivers, downloads, technical drawings, and more visit www.startech.com/support... -
Page 26: Operation
Using the 6 mm Hex Key rotate the Height Tension Screw Clockwise to Increase the Tension for Heavier/Larger TVs, and rotate Counterclockwise to Decrease the Tension for Smaller/Lighter TVs. (Figure 9) Figure 9 To view manuals, videos, drivers, downloads, technical drawings, and more visit www.startech.com/support... -
Page 27: Cable Management
To set the TV at a fixed angle, tilt the TV to the desired angle and fully tighten the Tilt Tension Adjustment Screws, using the 4 mm Hex Key. To view manuals, videos, drivers, downloads, technical drawings, and more visit www.startech.com/support... -
Page 28: Warranty Information
Limitation of Liability In no event shall the liability of StarTech.com Ltd. and StarTech.com USA LLP (or their officers, directors, employees or agents) for any damages (whether direct or indirect, special, punitive, incidental, consequential, or otherwise), loss of profits, loss of business, or any pecuniary loss, arising out of or related to the use of the product exceed the actual price paid for the product. - Page 29 Hard-to-find made easy. At StarTech.com, that isn’t a slogan. It’s a promise. StarTech.com is your one-stop source for every connectivity part you need. From the latest technology to legacy products — and all the parts that bridge the old and new — we can help you find the parts that connect your solutions.
Need help?
Do you have a question about the FHA-TV-WALL-MOUNT and is the answer not in the manual?
Questions and answers