
Related Manuals for StarTech.com V934459


Summary of Contents for StarTech.com V934459
- Page 1 TV Wall Mount | Heavy-Duty | Tilt Actual product may vary from photos User Manual SKU#: FPWTLTB1 For the latest information and specifications visit www.startech.com/FPWTLTB1 Manual Revision: 10/16/2018...
- Page 2 This manual may make reference to trademarks, registered trademarks, and other protected names and/or symbols of third-party companies not related in any way to StarTech.com. Where they occur these references are for illustrative purposes only and do not represent an endorsement of a product or service by StarTech.com, or an endorsement of the product(s) to which this manual...
- Page 3 • Kablar (inklusive elkablar och laddningskablar) ska dras och placeras på så sätt att risk för snubblingsolyckor och andra olyckor kan undvikas. For the State of California WARNING: Cancer and Reproductive Harm www.P65Warnings.ca.gov To view manuals, videos, drivers, downloads, technical drawings, and more visit www.startech.com/support...
-
Page 4: Warning Statements
To view manuals, videos, drivers, downloads, technical drawings, and more visit www.startech.com/support... - Page 5 Wenn Ihnen die nötigen Fachkenntnisse zum Anbringen dieses Produkts an einer Wand fehlen, lassen Sie einen Fachmann den Wandhalter anbringen, oder lassen Sie sich von einem Fachmann Montageanweisungen für Ihre Wand erteilen. To view manuals, videos, drivers, downloads, technical drawings, and more visit www.startech.com/support...
- Page 6 Om du saknar nödvändiga kunskaper för att fästa denna produkt på väggstrukturen som du använder, kontakta en professionell konstruktör för att installera väggmonteringen eller för att ge specifika monteringsinstruktioner för din väggstruktur. To view manuals, videos, drivers, downloads, technical drawings, and more visit www.startech.com/support...
- Page 7 • El hardware de montaje incluido con este producto puede no ser adecuado para algunas estructuras de pared. Si no tiene la experiencia suficiente para fijar este producto a la estructura de la pared correspondiente, póngase en To view manuals, videos, drivers, downloads, technical drawings, and more visit www.startech.com/support...
- Page 8 い。 この注意を怠ると、 怪我をする恐れや器物破損の恐れがあります。 設 置する装置の少なく とも4倍の重量に耐えられる壁面構造が必要となり ます。 • 壁面の構造によっては、 本製品に付属の取り付け金具では十分な強度が 得られないことがあります。 ご使用の壁面に適切に設置できるか判断し かねる場合は、 内装工事の専門業者にお問い合わせの上、 本製品の壁面 設置を依頼するか、 特定の壁面に適した設置方法について助言を受けて ください。 • 反動注意 ! 本製品には、 リフト機構が組み込まれており、 積載した装置を取 り外すと反動で急激に上昇する可能性があります。 装置を取り外す前に、 本製品を最も高い位置に移動させて下さい。 この操作を怠ると怪我をす る恐れや器物破損の恐れがあります。 To view manuals, videos, drivers, downloads, technical drawings, and more visit www.startech.com/support...
-
Page 9: Table Of Contents
Mounting the Wall Bracket ..............17 Attaching the Vertical Brackets (Flush Mounting) ......19 Recessed Mounting ..........................21 Spacer Combination ................23 Mounting the TV ..................24 Adjusting the Tilt ...................25 Removing the TV ..................26 To view manuals, videos, drivers, downloads, technical drawings, and more visit www.startech.com/support... -
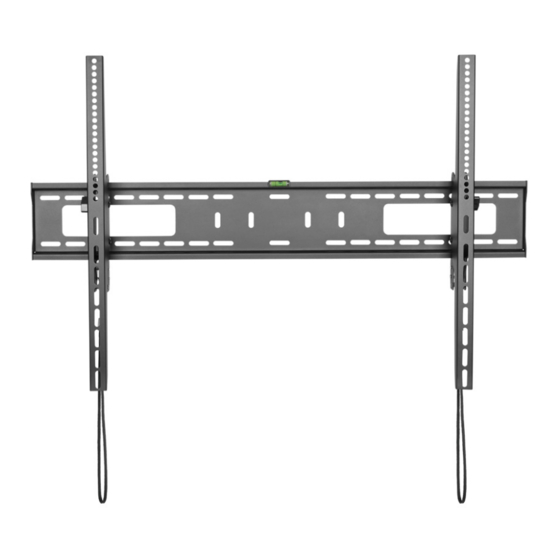
Page 10: Product Diagram
Product Diagram Number Part Bubble Level (1) Wall Bracket (1) Vertical Brackets (2) Release Straps (2) To view manuals, videos, drivers, downloads, technical drawings, and more visit www.startech.com/support... -
Page 11: Product Information
Product Information Package Contents Wall Bracket Vertical Brackets Qty: One Qty: Two To view manuals, videos, drivers, downloads, technical drawings, and more visit www.startech.com/support... - Page 12 Tilt Adjustment Knobs Bubble Level Qty: Two Qty: One M5x14 mm Screws M6x14 mm Screws Qty: Four Qty: Four To view manuals, videos, drivers, downloads, technical drawings, and more visit www.startech.com/support...
- Page 13 M6x30 mm Screws M8x50 mm Screws Qty: Four Qty: Four M8x30 mm screw Rectangular Washers Qty: Four Qty: Four To view manuals, videos, drivers, downloads, technical drawings, and more visit www.startech.com/support...
- Page 14 Small Spacers Large Spacers Qty: Eight Qty: Eight Wall Screws Concrete Anchors Qty: Six Qty: Six To view manuals, videos, drivers, downloads, technical drawings, and more visit www.startech.com/support...
-
Page 15: Requirements
Installing the Tilt Adjustment Knobs On the Vertical Bracket, remove the top nut located on the side of the Vertical Bracket. Once removed the nuts can be discarded. To view manuals, videos, drivers, downloads, technical drawings, and more visit www.startech.com/support... - Page 16 Removing Nut To view manuals, videos, drivers, downloads, technical drawings, and more visit www.startech.com/support...
- Page 17 Replace the nut with one of the Tilt Adjustment Knobs. Tilt Adjustment Knob Repeat steps 1 - 2 to install the second Tilt Adjustment Knob on the other Vertical Bracket. To view manuals, videos, drivers, downloads, technical drawings, and more visit www.startech.com/support...
-
Page 18: Installing The Bubble Level
Using the Bubble Level (included), adjust the Wall Bracket until the bubble inside the Bubble Level is centered between the two hash marks. Proper Use of Bubble Level To view manuals, videos, drivers, downloads, technical drawings, and more visit www.startech.com/support... -
Page 19: Attaching The Vertical Brackets (Flush Mounting)
Align one of the Vertical Brackets (with the Adjustment Knob facing outward) with the Mounting Holes of the back of the TV. Place the Rectangular Washers over the Screw Holes on the Vertical Bracket. To view manuals, videos, drivers, downloads, technical drawings, and more visit www.startech.com/support... - Page 20 Insert the either the M5x14 mm or M6x14 mm Screws (depending on the hardware requirement), through the Rectangular Washers, Vertical Brackets, and into the TV. Securing the Vertical Bracket To view manuals, videos, drivers, downloads, technical drawings, and more visit www.startech.com/support...
-
Page 21: Recessed Mounting
Align one of the Vertical Brackets (with the Adjustment Knob facing outward) with the Mounting Holes of the back of the TV. Place a Rectangular Washer over the Screw Holes on the Vertical Bracket. To view manuals, videos, drivers, downloads, technical drawings, and more visit www.startech.com/support... - Page 22 Note: Do not over-tighten the screws. If you encounter resistance while you’re tightening the screws, stop tightening. Failure to do so could result in damage to the TV. To view manuals, videos, drivers, downloads, technical drawings, and more visit www.startech.com/support...
-
Page 23: Spacer Combination
Spacer Combination Screw Type Spacer Combination M6 x 30 mm M8 x 30 mm M8 x 50 mm To view manuals, videos, drivers, downloads, technical drawings, and more visit www.startech.com/support... -
Page 24: Mounting The Tv
TV has been mounted to the Wall Bracket successfully. Warning! Do not let go of the TV until you are sure that it’s properly hooked onto the wall mount. To view manuals, videos, drivers, downloads, technical drawings, and more visit www.startech.com/support... -
Page 25: Adjusting The Tilt
Tilt the TV (either up or down) into the desire location. Re-tighten both Tilt Adjustment Knobs to lock the TV into the desired position. TV Wall Mount Tilt Adjustment To view manuals, videos, drivers, downloads, technical drawings, and more visit www.startech.com/support... -
Page 26: Removing The Tv
While supporting the weight of the TV, pull down on both of the Release Straps. The Lock will disengage. Release Straps The bottom of the TV will release from the Wall Bracket. To view manuals, videos, drivers, downloads, technical drawings, and more visit www.startech.com/support... - Page 27 Tilt the bottom of the TV away from the Wall Bracket and lift the TV up to unhinge (disengage) the TV from the top of the Wall Bracket. Place the TV in a secure spot. To view manuals, videos, drivers, downloads, technical drawings, and more visit www.startech.com/support...
- Page 28 To view manuals, videos, drivers, downloads, technical drawings, and more visit www.startech.com/support...
- Page 29 Limitation of Liability In no event shall it be the liability of StarTech.com Ltd. and StarTech.com USA LLP (or their officers, directors, employees or agents) for any damages (whether direct or indirect, special, punitive, incidental, consequential, or otherwise), loss of profits, loss of business, or any pecuniary loss, arising out of or related to the use of the product exceed the actual price paid for the product.
- Page 30 StarTech.com is an ISO 9001 Registered manufacturer of connectivity and technology parts. StarTech.com was founded in 1985 and has operations in the United States, Canada, the United Kingdom and Taiwan servicing a worldwide market.
Need help?
Do you have a question about the V934459 and is the answer not in the manual?
Questions and answers