Advertisement
Instruction Manual
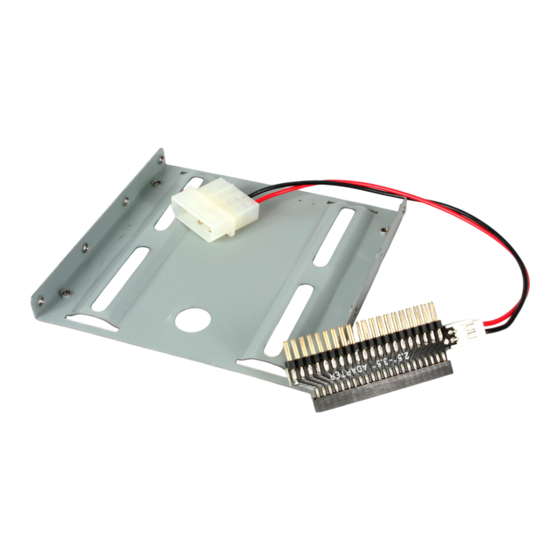
2.5in IDE Hard Drive to 3.5in Drive Bay Mounting Kit
BRACKET25
DE: Bedienungsanleitung - de.startech.com
FR: Guide de l'utilisateur - fr.startech.com
ES: Guía del usuario - es.startech.com
IT: Guida per l'uso - it.startech.com
NL: Gebruiksaanwijzing - nl.startech.com
PT: Guia do usuário - pt.startech.com
Packaging Contents
• 2.5in to 3.5in Mounting Bracket
• 40-pin to 44-pin IDE Adapter
• LP4 Power Adapter cable
• Screw Kit
Installation
WARNING! Computer equipment can be severely damaged by static
electricity. Be sure that you are properly grounded before opening
your computer case or touching your hard drive. StarTech.com
recommends that you wear an anti-static strap when installing any
computer component. If an anti-static strap is unavailable, discharge
yourself of any static electricity build-up by touching a large grounded
metal surface (such as the computer case) for several seconds. Be sure
to handle your hard drive carefully and consult your hard drive and
laptop manufacturer for details on how to remove the drive.
1. Connect the power cable to the adapter, if it is not already
connected. The adapter has a "B" (for black wire) on one side and an
"R" (for red wire) on the other to help you connect the power cable.
2. Connect the female end of the adapter to your notebook hard
drive making sure that Pin 1 on the hard drive is aligned with Pin
1 on the adapter. (Pin 1 on the adapter is the labeled pin furthest
from the power connector)
WARNING! Connecting the adapter to the drive incorrectly can
severely damage or destroy your hard drive. The location of Pin 1 on
the hard drive depends on the model of hard drive you are using. If
you are unsure of the location of Pin 1 on your hard drive, contact
the hard drive manufacturer before attempting to connect the drive.
For the most up-to-date information, please visit: www.startech.com
3. Make sure that your computer is turned off and that you are
grounded. Remove the cover from your PC.
4. Secure the hard drive to the bracket using the provided screws.
Insert the bracket into an open 3.5" drive bay and secure the
bracket to your computer case.
5. Attach an internal IDE connector to the male end of the adapter,
making sure that the red stripe is on Pin 1. Pin 1 on the adapter is
the labeled pin furthest from the power connector.
6. Attach an internal power cable to the power connector on the
adapter. The connector is formed so that it is difficult to connect
the connector incorrectly.
Configuring Your Adapter
If the drive is the only drive on the IDE controller, you will not need
to set any jumpers on your hard drive. If there is another drive on the
controller, you will need to set the Master/Slave jumper pins on your
hard drive. Consult your hard drive documentation for Master/Slave
pin location and configuration.
*actual product may vary from photos
Manual Revision: 12/10/2012
Advertisement
Table of Contents

Subscribe to Our Youtube Channel
Related Manuals for StarTech.com BRACKET25


Summary of Contents for StarTech.com BRACKET25
- Page 1 6. Attach an internal power cable to the power connector on the adapter. The connector is formed so that it is difficult to connect 1. Connect the power cable to the adapter, if it is not already the connector incorrectly. connected. The adapter has a “B” (for black wire) on one side and an “R” (for red wire) on the other to help you connect the power cable. 2. Connect the female end of the adapter to your notebook hard Configuring Your Adapter drive making sure that Pin 1 on the hard drive is aligned with Pin 1 on the adapter. (Pin 1 on the adapter is the labeled pin furthest If the drive is the only drive on the IDE controller, you will not need from the power connector) to set any jumpers on your hard drive. If there is another drive on the controller, you will need to set the Master/Slave jumper pins on your WARNING! Connecting the adapter to the drive incorrectly can hard drive. Consult your hard drive documentation for Master/Slave severely damage or destroy your hard drive. The location of Pin 1 on pin location and configuration. the hard drive depends on the model of hard drive you are using. If you are unsure of the location of Pin 1 on your hard drive, contact the hard drive manufacturer before attempting to connect the drive. For the most up-to-date information, please visit: www.startech.com Manual Revision: 12/10/2012...
- Page 2 • Consult the dealer or an experienced radio/TV technician for help. Use of Trademarks, Registered Trademarks, and other Protected Names and Symbols This manual may make reference to trademarks, registered trademarks, and other protected names and/or symbols of third-party companies not related in any way to StarTech.com. Where they occur these references are for illustrative purposes only and do not represent an endorsement of a product or service by StarTech.com, or an endorsement of the product(s) to which this manual applies by the third-party company in question. Regardless of any direct acknowledgement elsewhere in the body of this document, StarTech.com hereby acknowledges that all trademarks, registered trademarks, service marks, and other protected names and/or symbols contained in this manual and related documents are the property of their respective holders.
Need help?
Do you have a question about the BRACKET25 and is the answer not in the manual?
Questions and answers