Table of Contents
Advertisement
Quick Links
Flat-Screen TV Wall Mount
- Low Profile - Fixed - Anti-Theft
FPWFXBAT
FR: Guide de l'utilisateur - fr.startech.com
DE: Bedienungsanleitung - de.startech.com
ES: Guía del usuario - es.startech.com
NL: Gebruiksaanwijzing - nl.startech.com
PT: Guia do usuário - pt.startech.com
IT: Guida per l'uso - it.startech.com
JP: 取扱説明書 - jp.startech.com
For the latest information, technical specifications, and support for
this product, please visit www.StarTech.com/FPWFXBAT.
Manual Revision: 09/05/2018
*actual product may vary from photos
Advertisement
Table of Contents

Subscribe to Our Youtube Channel
Related Manuals for StarTech.com FPWFXBAT


Summary of Contents for StarTech.com FPWFXBAT
- Page 1 Flat-Screen TV Wall Mount - Low Profile - Fixed - Anti-Theft FPWFXBAT *actual product may vary from photos FR: Guide de l’utilisateur - fr.startech.com DE: Bedienungsanleitung - de.startech.com ES: Guía del usuario - es.startech.com NL: Gebruiksaanwijzing - nl.startech.com PT: Guia do usuário - pt.startech.com IT: Guida per l’uso - it.startech.com...
- Page 2 StarTech.com. Where they occur these references are for illustrative purposes only and do not represent an endorsement of a product or service by StarTech.com, or an endorsement of the product(s) to which this manual applies by the third-party company in question. Regardless of any direct acknowledgement elsewhere in the body of this document, StarTech.com hereby...
- Page 3 Warning statements Mensagens de aviso Make sure to assemble this product according to the instructions. Failure to do so might result in personal Certifique-se de que monta este produto de acordo com as instruções. O incumprimento pode resultar injury or property damage. em ferimentos pessoais ou danos de propriedade.
-
Page 4: Table Of Contents
Table of Contents Warnings ..............................i Introduction ....................1 Product dimensions ..........................1 Product diagram ............................1 Technical specifications .......................... 2 Package contents ............................3 Requirements ............................. 6 Installation ....................7 Attach the decorative covers ........................ 7 Attach the wall mount to the wall ...................... 8 Attach the adapter brackets to a flush mounting surface ............ -
Page 5: Introduction
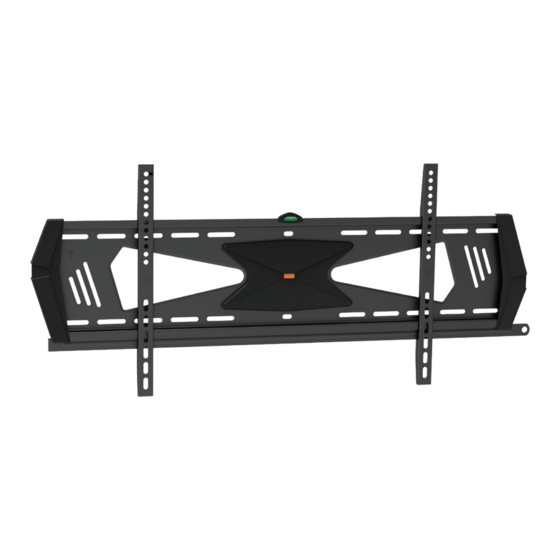
Introduction Product dimensions 22 mm 985 mm min 300 mm to max 810 mm 29 mm Product diagram Level Decorative cover Decorative cover Wall mount Safety bar Adapter bracket Adapter bracket Instruction manual... -
Page 6: Technical Specifications
Technical specifications Unless otherwise indicated, the technical specifications in the table below apply to the TV or display. Type of measurement Measurement VESA mounting hole pattern on the TV mount 300x300 400x200 400x400 600x400 800x400 Weight capacity of TV mount 40 kg (88 lb.) Screen size Between 762 mm and 1905 mm... -
Page 7: Package Contents
Package contents Wall mount Safety bar Qty: One Qty: One Adapter brackets Level Qty: Two Qty: One Decorative covers Decorative cover screws Qty: Two Qty: Four Instruction manual... - Page 8 M5x14 mm screws M6x14 mm screws Qty: Four Qty: Four M6x30 mm screws M8x30 mm screws Qty: Four Qty: Four M8x50 mm screws Rectangular washers Qty: Four Qty: Four Instruction manual...
- Page 9 Large spacers Small spacers Qty: Eight Qty: Eight Circular washers Screws Qty: Six Qty: Six Concrete anchors Instruction manual Qty: Six Qty: One Instruction manual...
-
Page 10: Requirements
Requirements • A display or TV that is compatible with one of the VESA mounting hole patterns FPWFXBAT supports • A Phillips screwdriver • A padlock if you want to secure the display or TV Requirements are subject to change. For the latest requirements, please visit www.StarTech.com/FPWFXBAT. -
Page 11: Installation
Installation Attach the decorative covers 1. Place a decorative cover over one end of the wall mount. 2. On the back of the wall mount, insert a decorative cover screw through the top hole in the wall mount and into the decorative cover. Tip! There are arrows on the front of the wall mount to indicate which side is the front. -
Page 12: Attach The Wall Mount To The Wall
Attach the wall mount to the wall Warning! The wall mount is designed to be installed on a wood stud, solid concrete, or cinder block wall. The wall structure should be capable of supporting at least four times the weight of the mounted equipment. The mounting hardware included with this product may not be adequate for installation on certain wall structures. - Page 13 figure 4 Instruction manual...
-
Page 14: Attach The Adapter Brackets To A Flush Mounting Surface
Attach the adapter brackets to a flush mounting surface To accommodate different TV designs, the FPWFXBAT comes with five sets of screws of different lengths and diameters, washers with two hole sizes, and two sizes of spacers. 1. To select the combination of mounting hardware that you need to use to attach the adapter brackets to the TV, complete the following: •... - Page 15 3. Line up the adapter brackets with the mounting holes on the back of the TV. 4. Place the rectangular washers over the adapter brackets. 5. Insert the M5x14 mm screws or M6x14 mm screws through the rectangular washers, adapter brackets, and into the back of the TV. 6.
-
Page 16: Attach The Adapter Brackets To A Recessed Mounting Surface
Attach the adapter brackets to a recessed mounting surface To accommodate different TV designs, the FPWFXBAT comes with five sets of screws of different lengths and diameters, washers with two hole sizes, and two sizes of spacers. 1. To select the combination of mounting hardware that you need to use to attach the adapter brackets to the TV, complete the following: •... - Page 17 3. Position the adapter brackets so that the arrows on the flat side of the adapter brackets are pointing towards the top of the TV and the nuts on the adapter brackets are pointing towards the outside edges of the TV. (figure 7) figure 7 top of the TV Left adapter bracket...
- Page 18 4. Line up the adapter brackets with the mounting holes on the back of the TV. 5. Place the rectangular washers over the adapter brackets. 6. Insert the M6x30 mm screws, M8x30 mm screws, or the M8x50 mm screws through the rectangular washers, adapter brackets, spacers, and into the back of the TV.
-
Page 19: Hook The Tv Onto The Wall Mount
Hook the TV onto the wall mount Warning! Make sure that the weight of the TV doesn’t exceed the weight capacity of this product. If you exceed the weight capacity, you might experience personal injury or damage to the product. This product can support the following weight: Up to 40 kg (88 lb.) Warning! Attaching the TV is a two-person job. -
Page 20: Attach The Safety Bar
Attach the safety bar 1. Slide the safety bar into the groove in the adapter brackets. (figure 10) figure 10 Groove Safety bar Instruction manual... - Page 21 2. To prevent someone from removing the safety bar, attach a padlock (not provided) to the hole in the end of the safety bar. (figure 11) figure 11 Padlock Instruction manual...
-
Page 22: Technical Support
Limitation of liability In no event shall the liability of StarTech.com Ltd. and StarTech.com USA LLP (or their officers, directors, employees or agents) for any damages (whether direct or indirect, special, punitive, incidental, consequential, or otherwise), loss of profits, loss of business, or any pecuniary loss, arising out of or related to the use of the product exceed the actual price paid for the product. - Page 23 StarTech.com is an ISO 9001 Registered manufacturer of connectivity and technology parts. StarTech.com was founded in 1985 and has operations in the United States, Canada, the United Kingdom and Taiwan servicing a worldwide market.
Need help?
Do you have a question about the FPWFXBAT and is the answer not in the manual?
Questions and answers