Table of Contents
Advertisement
Quick Links
Advertisement
Table of Contents

Related Manuals for StarTech.com TV-Wall-Mount-65FS


Summary of Contents for StarTech.com TV-Wall-Mount-65FS
- Page 1 Articulated TV Wall Mount up to 65 in and 99 lb - VESA Compatible *Actual product may vary from photos User Manual SKU: TV-Wall-Mount-65FS For the latest information and specifications visit www.StarTech.com/TV-Wall-Mount-65FS Manual Revision: 01/13/2023...
- Page 2 This manual may make reference to trademarks, registered trademarks, and other protected names and/or symbols of third-party companies not related in any way to StarTech.com. Where they occur these references are for illustrative purposes only and do not represent an endorsement of a product or service by StarTech.com, or an endorsement of the product(s) to which this manual...
-
Page 3: Safety Statements
Säkerhetsåtgärder • Installation och/eller montering får endast göras av behöriga yrkespersoner och enligt gällande lokala förordningar för säkerhet och byggnormer. To view manuals, videos, drivers, downloads, technical drawings, and more visit www.startech.com/support... -
Page 4: Warning Statements
• Innan du lägger till utrustning på produkten, se till att produkten är korrekt monterad, installerad och att produkten klarar av vikten på utrustningen som du lägger till. • Se till att all utrustning är korrekt installerad innan du börjar justera To view manuals, videos, drivers, downloads, technical drawings, and more visit www.startech.com/support... - Page 5 • マウントの耐荷重 : 99 lb (45 kg). • 本製品に小さなお子様が乗って遊ばないようにして下さい。 お子様が使用 する際には、 適切な監視を怠らないようにして下さい。 • 本製品は、 室内での使用を想定しています。 戸外では使用しないで下さい。 • 本製品を組み立てる際、 ネジを締めすぎないようにして下さい。 ネジを締め ているうちに手応えを感じたら、 締めるのを止めてください。 • 本製品は、 二人がかりでの組み立てを想定しています。 手助けなしに単独で 組み立てと設置を行わないで下さい。 • 危険 ! 可動部品に近づかないでください。 To view manuals, videos, drivers, downloads, technical drawings, and more visit www.startech.com/support...
- Page 6 équipements que vous y ajoutez. • Risque de pincement ! Ne pas approcher les doigts des composants mobiles. To view manuals, videos, drivers, downloads, technical drawings, and more visit www.startech.com/support...
- Page 7 • Se requieren dos personas para el ensamblaje de este producto. No intente ensamblar este producto e instalar otros equipos sin la debida asistencia de otra persona. • Antes de instalar equipos en este producto, asegúrese de haberlo To view manuals, videos, drivers, downloads, technical drawings, and more visit www.startech.com/support...
- Page 8 Sie es ordnungsgemäß montiert und installiert haben und dass das Produkt das Gewicht der Geräte, die Sie hinzufügen möchten, tragen kann. • Einklemmgefahr! Halten Sie Ihre Finger fern von beweglichen Teilen. To view manuals, videos, drivers, downloads, technical drawings, and more visit www.startech.com/support...
-
Page 9: Table Of Contents
Attach a TV to the Wall Mount Assembly ..................16 Cable Management ..........................17 Operation ....................18 Adjust the Tilt ............................. 19 Adjust the Swivel ............................20 Warranty Information ................21 Limitation of Liability ................21 To view manuals, videos, drivers, downloads, technical drawings, and more visit www.startech.com/support... -
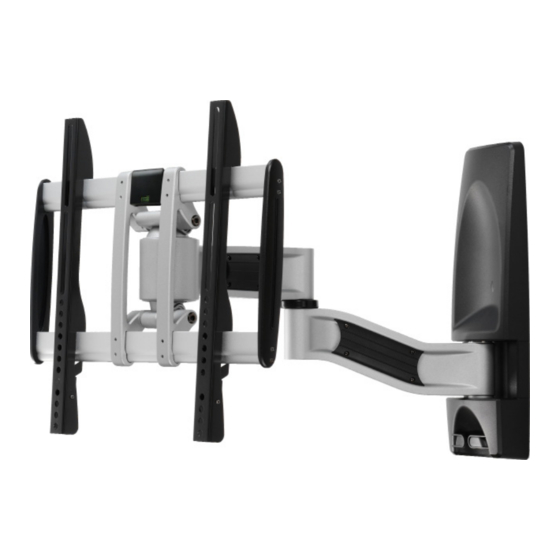
Page 10: Product Diagram
Product Diagram VESA Vertical Bracket Upper Decorative Cover Cable Management Attachment Spirit Level Tilt Adjustment Screw Lower Decorative Cover Wall Mount Assembly To view manuals, videos, drivers, downloads, technical drawings, and more visit www.startech.com/support... -
Page 11: Product Dimensions
Product Dimensions Front View Top View To view manuals, videos, drivers, downloads, technical drawings, and more visit www.startech.com/support... -
Page 12: Side View
Product Dimensions Side View To view manuals, videos, drivers, downloads, technical drawings, and more visit www.startech.com/support... -
Page 13: Product Information
VESA Plate: 200x100, 200x200, 200x300, 200x400, 300x200, • 300x300, 400x200, 400x300, and 400x400 Tools Phillips head screwdriver • To view manuals, videos, drivers, downloads, technical drawings, and more visit www.startech.com/support To view manuals, videos, drivers, downloads, technical drawings, and more visit www.startech.com/support... -
Page 14: Package Contents
Package Contents Wall Mount 6 mm Hex Key Vertical Brackets Vertical Brackets Assembly Screws Qty: 1 Qty: 1 Qty: 2 Qty: 2 Concrete Wall Mounting M4 x 12 mm M4 x 18 mm Anchors Screws Screws Screws Qty: 8 Qty: 8 Qty: 4 Qty: 4 M6 x 12 mm... - Page 15 M8 x 18 mm M8 x 25 mm Mounting Screws Screw Flat Washers Template Qty: 4 Qty: 4 Qty: 4 Qty: 1 User Manual Qty: 1 To view manuals, videos, drivers, downloads, technical drawings, and more visit www.startech.com/support...
-
Page 16: Installation
While Pressing Both Sides at the Top of the Lower • Decorative Cover, slide Down from Wall Mount Assembly to remove it. (Figure 1) Wall Mount Plate Decorative Covers Figure 1 To view manuals, videos, drivers, downloads, technical drawings, and more visit www.startech.com/support... -
Page 17: Mounting The Wall Mount Assembly
15/64 in (~6 mm) wood drill bit. Minimum 2.5 in (65 mm) • long. A 15/32 in (~12 mm) concrete drill bit. Minimum 2.5 in (65 • mm) long. To view manuals, videos, drivers, downloads, technical drawings, and more visit www.startech.com/support... -
Page 18: Fasten The Wall Mount Assembly To A Stud Wall
Mounting Template and mark the locations for drilling. The X is the center of the hole. (Figure 2) 1.02 in (26 mm) Key Hole Green Markings Bubble Level Figure 2 To view manuals, videos, drivers, downloads, technical drawings, and more visit www.startech.com/support... - Page 19 Screws (x 5) with the 1/2 in (13 mm) Wrench to fasten the Wall Mount Assembly to the Stud. (Figure 3) Wall Mounting Screws Wall Mount Plate Bubble Level Figure 3 To view manuals, videos, drivers, downloads, technical drawings, and more visit www.startech.com/support...
-
Page 20: Fasten The Wall Mount Assembly To A Concrete Wall
Use the Pencil to perforate the Red Markings on the Mounting Template and mark the locations for drilling. The X is the center of the hole. (Figure 4) Key Hole Bubble Level Red Markings Figure 4 To view manuals, videos, drivers, downloads, technical drawings, and more visit www.startech.com/support... - Page 21 Screws (x 7) with the 1/2 in (13 mm) Wrench to fasten the Wall Mount Assembly to the Wall. (Figure 5) Wall Mounting Screws Wall Mount Plate Bubble Level Figure 5 To view manuals, videos, drivers, downloads, technical drawings, and more visit www.startech.com/support...
-
Page 22: Install The Decorative Covers
Attach the Upper and Lower Decorative Covers by sliding each Decorative Cover along the Wall Mount Plate until the Tabs of each Decorative Cover snaps into place. (Figure 6) Wall Mount Plate Decorative Covers Figure 6 To view manuals, videos, drivers, downloads, technical drawings, and more visit www.startech.com/support... -
Page 23: Mount The Tv
Warning! Do not overtighten the M-Type Screws. If you encounter any unexpected resistance as you are fastening them, immediately stop and attempt to use a different length of M-Type Screw. To view manuals, videos, drivers, downloads, technical drawings, and more visit www.startech.com/support... - Page 24 Figure 7 To view manuals, videos, drivers, downloads, technical drawings, and more visit www.startech.com/support...
-
Page 25: Attach A Tv To The Wall Mount Assembly
Lift and Hang the TV on the Wall Mount Assembly. (Figure 8) Note: Align the top hooks of the Vertical Brackets with the top rails of the Wall Mount Assembly. Vertical Bracket Wall Mount Assembly Figure 8 To view manuals, videos, drivers, downloads, technical drawings, and more visit www.startech.com/support... -
Page 26: Cable Management
Route the TV Cables through the Cable Management Attachments (x 2) on either side of the Wall Mount Assembly and through the Lower Decorative Cover. (Figure 10) Figure 10 To view manuals, videos, drivers, downloads, technical drawings, and more visit www.startech.com/support... -
Page 27: Operation
Phillips Head Screws (x 4). Operation Adjust the TV Caution! Ensure that your fingers are clear from all moving parts and pinch points while adjusting the TV. To view manuals, videos, drivers, downloads, technical drawings, and more visit www.startech.com/support... -
Page 28: Adjust The Tilt
Adjustment Screws located on the Wall Mount Assembly using the 6 mm Hex Key. (Figure 11) Tilt Adjustment Screws Figure 11 *The TV mount shown is for illustration purposes only To view manuals, videos, drivers, downloads, technical drawings, and more visit www.startech.com/support... -
Page 29: Adjust The Swivel
Loosen or Tighten the Swivel Adjustment Screw on the Wall Mount Assembly using the 6 mm Hex Key. (Figure 12) Swivel Adjustment Screw Figure 12 *The TV mount shown is for illustration purposes only To view manuals, videos, drivers, downloads, technical drawings, and more visit www.startech.com/support... -
Page 30: Warranty Information
Limitation of Liability In no event shall the liability of StarTech.com Ltd. and StarTech.com USA LLP (or their officers, directors, employees or agents) for any damages (whether direct or indirect, special, punitive, incidental, consequential, or otherwise), loss of profits, loss of business, or any pecuniary loss, arising out of or related to the use of the product exceed the actual price paid for the product. - Page 31 To view manuals, videos, drivers, downloads, technical drawings, and more visit www.startech.com/support...
- Page 32 Hard-to-find made easy. At StarTech.com, that isn’t a slogan. It’s a promise. StarTech.com is your one-stop source for every connectivity part you need. From the latest technology to legacy products — and all the parts that bridge the old and new — we can help you find the parts that connect your solutions.
Need help?
Do you have a question about the TV-Wall-Mount-65FS and is the answer not in the manual?
Questions and answers