Table of Contents
Advertisement
Quick Links
Advertisement
Table of Contents

Related Manuals for Kelfar Technologies AK-5 PRO SE

Summary of Contents for Kelfar Technologies AK-5 PRO SE
- Page 1 AK5 Pro SE GUIDE/MANUAL FIRMWARE VERSION 4.2...
-
Page 2: Pro Special Edition (Se) World Scale Tuning
A lightweight, compact design, making it portable and easy to carry to gigs, concerts, or • jam sessions with friends. And with the new AK-5 PRO SE World Scale Tuning, you have the ability to: Connect to TWO synthesizers at once. •... -
Page 3: Supported Instruments/Models Firmware 3.0 And Up
AK-5 Pro SE/VERSION 4 www.kelfar.net Supported Instruments/Models Firmware 3.0 and up Korg Pa80, Pa50, Pa60, Pa55Tr, Pa1&2x (Pro), Pa800, Pa3x series, Pa4x series, Pa1000, PA700 series, Pa500, P500 ORT, Pa600, Pa600QT, Triton Classic, Karma, Studio, Extreme, Le, Tr, Micro X, X50, Kronos series (with firmware 2.3 and up), *M3 series, *Oasys, *Trinity, Korg Z1, and Korg Prophecy. -
Page 4: Table Of Contents
AK-5 Pro SE/VERSION 4 www.kelfar.net Table of Contents AK-5 PRO SPECIAL EDITION (SE) WORLD SCALE TUNING........... 2 SETUP GUIDE ..........................2 ............. 3 UPPORTED NSTRUMENTS ODELS IRMWARE AND UP ........................4 ABLE OF ONTENTS ......................... 6 ASIC UNCTIONS A. I ...... - Page 5 AK-5 Pro SE/VERSION 4 www.kelfar.net © ......................33 RITON SERIES © ..........................33 URZWEIL XG ©........................... 33 AMAHA X © ....................... 33 OLAND ANTOM 800/ P /PA4 / PA 1000, PA 700, PA ........34 SERIES AK-5 P ..............37...
-
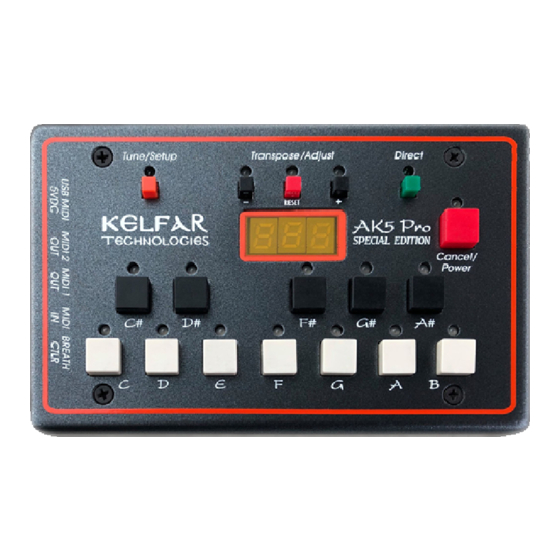
Page 6: Basic Unit Functions
AK-5 Pro SE/VERSION 4 www.kelfar.net AK-5 PRO SE World Scale Tuning © KELFAR TECHNOLOGIES Basic Unit Functions 1. 5V USB bus power (side-USB Mini b) 2. Midi Out 2 (side-MIDI2) - Secondary Instrument midi connection. (Standard mode) 3. Midi Out 1 (side-MIDI1) - Primary Instrument midi connection. (Standard mode) 4. - Page 7 AK-5 Pro SE/VERSION 4 www.kelfar.net 11. Cancel/Power (front) - Power the AK-5 Pro SE Off/On (Standby mode) 12. DIRECT (front) 13. Real-Time BC On/Off by holding the DIRECT for one second (front) 14. Reset (front) – Use to return functions to original settings (red) 15.
-
Page 8: Initial Setting And Viewing Instrument Selections On Power-Up
AK-5 Pro SE/VERSION 4 www.kelfar.net A. Initial Setting and Viewing Instrument Selections on Power-up Primary Instrument: 1. Brand shown on Table of Key Values below using keys indicated. LED Display shows 2. Model shown beneath Brand on table using keys indicated. - Page 9 AK-5 Pro SE/VERSION 4 www.kelfar.net The LED Display shows Cxx (xx=00 to 119) or UL (Master Volume) i.e C11 6. Curvature Number (Cux) (x=0 to 8) 7. User Scale LED Display shows Ux (x=0-9) 8. USB ON - OFF (USb ON or OFF)
-
Page 10: Changing Programming/Selecting The Primary & Secondary Instruments
AK-5 Pro SE/VERSION 4 www.kelfar.net B. Changing Programming/Selecting the Primary & Secondary Instruments PRESS and HOLD the CANCEL/POWER. Then, while holding down the CANCEL/POWER button, PRESS the TUNE/SETUP button. Primary Instrument LED Display shows Press CANCEL to skip programming the Primary. - Page 11 Press CANCEL to skip programming the Secondary Instrument. The LED Display shows FP The AK-5 Pro SE will reboot without programming the Secondary Instrument and the (MIDI2) port will not output any data. In another word, the MIDI PORT for (MIDI2) has been flittered OFF.
- Page 12 AK-5 Pro SE/VERSION 4 www.kelfar.net The LED Display shows Cxx (xx=00 to 119) i.e C11 Select the Control Change Number by using the Transpose/Adjust buttons. 7. Press CANCEL to setup the Curvature by using the Transpose/Adjust buttons. The LED Display shows Cux (x=0 to 8) 8.
-
Page 13: Short-Cuts Mode
AK-5 Pro SE/VERSION 4 www.kelfar.net C. Short-Cuts Mode This mode will allow you to disable and enable functions related to Expression Pedal, Breath Controller, and USB interface without the need to reprogramming the AK-5 Pro. Press and hold the Tune/Setup for 3 seconds The LED Display shows --- (three dashes) 1. - Page 14 AK-5 Pro SE/VERSION 4 www.kelfar.net The LED Display shows EP or OFF or BC Use the Transpose buttons to Turn ON/OFF: Expression Pedal is ON - TR (-) OFF Expression Pedal and Breath Controller are OFF for (MIDI2) - RESET Breath Controller is ON for Primary (MIDI2) - TR (+) Press CANCEL to Exit EXPRESSION AND BREATH CONTROLLER MODE.
- Page 15 AK-5 Pro SE/VERSION 4 www.kelfar.net 4. USB INTERFACE ENABLE / DISABLE PORTS 1 & 2 By Default the AK-5 Pro USB INTERFACE PORT 1 IS ENABLED Press DIRECT to ENABLE / DISABLE. The LED Display shows P01 Enable/Disable the USB PORTS by using the Transpose/Adjust buttons.
-
Page 16: Table Of Key Values (Supported Brands And Models)
AK-5 Pro SE/VERSION 4 www.kelfar.net Table of Key Values (supported brands and models) FIRMWARE VERSION 4 Korg Korg Yamaha Kurzweil Roland Ayoub Ketron Native MOOG/DSI/Sequential/M MOOG/DSI/Sequential/ Universal Mode Instruments BRAND Pa1x/Pa800/ Pa600/QT Motif-ES (Voice, Kurz 16CH, GM2 16CH Kontakt2 MTS, Sub Phatty and Sub... -
Page 17: Pro Breath Controller Curvature
AK-5 Pro SE/VERSION 4 www.kelfar.net AK-5 Pro Breath Controller Curvature The AK-5 Pro supports nine curvatures to give you the best dynamic and expressive sounds for your keyboard synthesizer and plug-in VSTi or standalone VSTi performances. Create the best sounds you’ve ever imagined with the Pro Breath Controller Curvature. - Page 18 AK-5 Pro SE/VERSION 4 www.kelfar.net Translation Table: Cu0 = Linear Cu1 = Exponential 1 Cu2 = Exponential 2 Cu3 = Exponential 3 Cu4 = Exponential 4 Cu5 = Exponential 5 Cu6 = Logarithmic Cu7 = S-Type Cu8 = N-Type Copyright © 2005-20 Kelfar Technologies...
-
Page 19: Programming Universal Modes 1/ 2 (Polyphonic / Two Tracks)
AK-5 Pro SE/VERSION 4 www.kelfar.net D. Programming Universal Modes 1/ 2 (Polyphonic / Two Tracks) 1. PRESS and HOLD the CANCEL/POWER. Then, while holding down the CANCEL/POWER button, PRESS the TUNE/SETUP button. LED Display shows 2. Press the key "A#"... - Page 20 After displaying FP the AK-5 Pro reboots indicating successful programming by displaying the initial setting and Viewing Instrument Selections. Notes: 1. For Universal Mode 1/2 to work, connect the AK-5 Pro SE to your MIDI IN/OUT multitimbral sequencer/Synthesizer/Keyboard Midi-In and Midi-Out or USB MIDI Out.
-
Page 21: Connecting The Ak-5 Pro Se To A Keyboard Or Synthesizer
AK-5 Pro SE/VERSION 4 www.kelfar.net Connecting the AK-5 Pro SE to a Keyboard or Synthesizer Midi USB-In Midi In Midi Out Keyboard / Synthesizer Local Control Off (Figure 1) Connecting the AK-5 SE to a Computer Sequencer using external Keyboard or Controller:... -
Page 22: Programming The Universal Mode 3 / 6 (Monophonic/Single Track)
AK-5 Pro SE/VERSION 4 www.kelfar.net E. Programming the Universal Mode 3 / 6 (Monophonic/Single Track) PRESS and HOLD the CANCEL/POWER Then, while holding down the button, PRESS the button. CANCEL/POWER TUNE/SETUP LED Display shows Press the key "A#". LED Display shows Select Mode 3 using the "D"... - Page 23 OFF then the step will be skipped by pressing the CANCEL button to program the Secondary Instrument (MIDI2). Notes: 1. For Universal Mode 3 /6 to work, connect the AK-5 Pro SE to your MIDI IN/OUT multitimbral sequencer/Synthesizer/Keyboard Midi-In and Midi-Out. (see Figures 1 and 2 above .)
-
Page 24: Programming The Universal Mode 4 / 7 (Polyphonic 12 Notes Max)
AK-5 Pro SE/VERSION 4 www.kelfar.net F. Programming the Universal Mode 4 / 7 (Polyphonic 12 notes max) PRESS and HOLD the CANCEL/POWER Then, while holding down the button, PRESS the button. CANCEL/POWER TUNE/SETUP LED Display shows Press the key "A#". - Page 25 AK-5 Pro SE/VERSION 4 www.kelfar.net B. (RESET) Enable/Disable Port 2: 0 is OFF, 1 is ON Options available: A. P01 PORT 1 is ON. B. P11 PORTS 1&2 are ON. C. P10 PORT 2 is ON. D. P00 PORTS 1&2 are OFF.
-
Page 26: Programming The Universal Mode 5 / 8 (Monophonic-Legato/Single Track )
AK-5 Pro SE/VERSION 4 www.kelfar.net G. Programming the Universal Mode 5 / 8 (Monophonic-Legato/Single Track ) PRESS and HOLD the CANCEL/POWER Then, while holding down the button, PRESS the button. CANCEL/POWER TUNE/SETUP LED Display shows Press the key "A#". LED Display shows Select Mode 5 using the "E"... - Page 27 Press CANCEL to Exit programming the Secondary Instrument (MIDI2). The LED Display shows FP (Fully PROGRAMMED) Notes: 1. For Universal Mode 5/8 to work, connect the AK-5 Pro SE to your MIDI IN/OUT multitimbral sequencer/Synthesizer/Keyboard Midi-In and Midi-Out. (see Figures 1 and 2 above ) 2.
-
Page 28: Programming User Scales (Bank 01 To 09)
AK-5 Pro SE/VERSION 4 www.kelfar.net H. Programming User Scales (Bank 01 to 09): 1. Press TUNE/SETUP Ux x=0-9 LED display shows Select a User Scale "1=C#, 2 =D, 3=D#, 4=E, 5=F, 6=F#, 7=G, 8=G#, 9=A". User 0 is default of -50 cents and cannot be programmed or edited. -
Page 29: Operating The Ak-5 Pro
AK-5 Pro SE/VERSION 4 www.kelfar.net Operating the AK-5 Pro 1. Standard Mode In Standard Mode, the AK-5 Pro sends a particular System Exclusive midi message to a selected instrument/brand. In order for this operation to work, your midi keyboard/synthesizer Midi In port should be Enabled and ready to receive System Exclusive midi data. - Page 30 Aftertouch * Control Change * *Program Change * Pitch Bend * System Exclusive * System Common * System Realtime* Mode 5 (Pitch Bend) / Mode 8 (Fine Tune): In this mode the AK-5 Pro SE operation will be in mono- legato.
-
Page 31: User Scales
Note: The transpose feature is defined by your synthesizer and specific to each manufacture. The following midi events are supported: GM2, XG, GS, Ketron, DSI / Sequential, Coarse Tuning. In © Universal Mode, Kelfar Technologies Transpose Algorithms Copyright © 2005-20 Kelfar Technologies... -
Page 32: Standby Mode
AK-5 Pro SE/VERSION 4 www.kelfar.net 5. Standby mode 1. Hold the for more than 5 seconds, and the AK-5 Pro will power off. CANCEL/POWER 2. Power-up the AK-5 Pro from standby mode by pressing the again. CANCEL/POWER 3. AK-5 will reboot. -
Page 33: Korg Triton Series
AK-5 Pro SE/VERSION 4 www.kelfar.net *Korg Triton series © Go to Global mode then navigate to MIDI Check the midi filter box for Sysexlusive Write Global into the memory. Change the User Scale for each Program/Combo./Moss to User 00, Scale C and WRITE Program/Combo/Moss. -
Page 34: Pa 1000, Pa 700, Pa Series
AK-5 Pro SE/VERSION 4 www.kelfar.net Korg Pa800/ Pa2x Pro/ Pa3x/PA4x/ PA 1000, PA 700, PA series 1. Press the MENU button to open the Global Edit Menu 2. Select Midi Copyright © 2005-20 Kelfar Technologies... - Page 35 AK-5 Pro SE/VERSION 4 www.kelfar.net 3. Select the FILTERS tab 4. By default the Midi In Filter is set to Sys. Excl. Change it to Off Copyright © 2005-20 Kelfar Technologies...
- Page 36 AK-5 Pro SE/VERSION 4 www.kelfar.net 5. Press the MENU button to open the Global edit menu. Select General Controls 6. Select the Transp.Control tab 7. Select the Lock tab. Select Tuning. Unlock Master Transpose. Lock Perf. M. Transpose, Style Perf. M. Transpose, Subscale/Quarter Tone, STS Subscale/Quarter Tone, and Auto Octave.
-
Page 37: Programming The Ak-5 Pro - Korg Pa Series
AK-5 Pro SE/VERSION 4 www.kelfar.net 8. Write your settings. Touch the page menu icon to open the menu. Touch a command to select it. Touch anywhere in the display to close the menu without selecting a command. Programming the AK-5 Pro - Korg PA series... - Page 38 AK-5 Pro SE/VERSION 4 www.kelfar.net The LED Display shows CCn 7. Press CANCEL to setup the Control Change. 8. The LED Display shows Cxx (xx=00 to 119) or UL (Master Volume) i.e C11 9. Select the Control Change Number by using the Transpose/Adjust buttons.
-
Page 39: Yamaha Tyros And Psr Series
AK-5 Pro SE/VERSION 4 www.kelfar.net Yamaha Tyros and Psr series 1. Press FUNCTION 2. Select MIDI 3. Select MIDI OFF then Press EDIT Copyright © 2005-20 Kelfar Technologies... - Page 40 AK-5 Pro SE/VERSION 4 www.kelfar.net 4. Enable RECEIVE Sysex (SYS/EX.) Rx:ON 5. Select the RECEIVE tab and assign PART to the appropriate MIDIA/USB1 CHANNEL 6. Press the EXIT button and Select the USER tab Copyright © 2005-20 Kelfar Technologies...
-
Page 41: Programming The Ak-5 Pro - Tyros / Psr Series
AK-5 Pro SE/VERSION 4 www.kelfar.net 7. Give your MIDI setup a name i.e AK 2_pro and select SAVE. Press the [EXIT] button. Programming the AK-5 Pro - Tyros / PSR series PRESS and HOLD the CANCEL/POWER Then, while holding down the CANCEL/POWER button, PRESS the TUNE/SETUP button. - Page 42 AK-5 Pro SE/VERSION 4 www.kelfar.net Use the Transpose buttons to Turn ON/OFF: Expression Pedal is ON - TR (-) OFF Expression Pedal and Breath Controller are OFF for (MIDI1) - RESET Breath Controller is ON for Primary (MIDI1) - TR (+) 4.
- Page 43 AK-5 Pro SE/VERSION 4 www.kelfar.net Use the Transpose buttons to Turn ON/OFF: Expression Pedal is ON - TR (-) OFF Expression Pedal and Breath Controller are OFF for (MIDI1) - RESET Breath Controller is ON for Secondary (MIDI1) - TR (+) 4.
-
Page 44: Korg M3 Series
AK-5 Pro SE/VERSION 4 www.kelfar.net Korg M3 series Making your own sound set to work with AK-5 Pro Select a Program that you want to work with the AK-5 Pro Press PAGE SELECT SELECT P2/OSC PITCH SELECT OSC1/ Pitch or OSC2/Pitch MAKE AMS to Poly After and the Intensity to -00.50 (cents) as show below... - Page 45 AK-5 Pro SE/VERSION 4 www.kelfar.net 11. Write Global Settings. Select the arrow down >Write Global Setting. The Write Global Setting dialog box will appear. Copyright © 2005-20 Kelfar Technologies...
-
Page 46: Programming The Ak-5 Pro - Korg M3
AK-5 Pro SE/VERSION 4 www.kelfar.net Programming the AK-5 Pro - Korg M3 PRESS and HOLD the CANCEL/POWER Then, while holding down the CANCEL/POWER button, PRESS the TUNE/SETUP button Primary Instrument The Display shows P1 1. Press "C" The Display shows P2 2. - Page 47 AK-5 Pro SE/VERSION 4 www.kelfar.net Note: If either the Expression and Breath controller are ON then you will be able to select the MIDI CHANNELS, CONTROL CHANGE, and CURVATURE. If the Expression or Breath controller are OFF then the step will be skipped by pressing the CANCEL button to program the Secondary Instrument (MIDI2).
-
Page 48: Programming And Setup Yamaha Genos
AK-5 Pro SE/VERSION 4 www.kelfar.net Programming and Setup Yamaha GENOS AK-5 Pro Version 2.5 and later 1. Press the [MENU] button to call up the Menu display. Then touch [Menu 2] to move to page 2 on the display, and touch [MIDI]. - Page 49 AK-5 Pro SE/VERSION 4 www.kelfar.net 3. Touch [Receive] and setup the appropriate parts for Channels 1,2,3, and 4. 4. Touch [External Controller]. Select Midi Port [MIDI B] and set Midi Ch to [16]. Assign CC#5 to Transpose - and CC#6 to Transpose +...
- Page 50 AK-5 Pro SE/VERSION 4 www.kelfar.net 5. When you’ve finished editing in each display, touch (Save) to save the MIDI settings as your original MIDI template. Give it a name: AK-5 TransposeV2 Programming the AK-5 Pro and connecting to Yamaha GENOS [MIDI B IN]...
- Page 51 AK-5 Pro SE/VERSION 4 www.kelfar.net 4. Press CANCEL to Select the MIDI CHANNELS by using the following buttons: (C to B) 1CH to 12CH, Tune/Setup 13CH, TR (-) 14CH, RESET 15CH, TR (+) 16CH. The LED Display shows PCH 5. Press Cancel to setup the Control Change The LED Display shows CCn 6.
- Page 52 AK-5 Pro SE/VERSION 4 www.kelfar.net 4. Press CANCEL to Select the MIDI CHANNELS by using the following buttons: (C to B) 1CH to 12CH, Tune/Setup 13CH, TR (-) 14CH, RESET 15CH, TR (+) 16CH. The LED Display shows SCH 5. Press Cancel to setup the Control Change The LED Display shows CCn 6.
-
Page 53: Korg Trinity V3 Firmware Version 3
MUSIC WORKSTATION DRS. MAKING THE CONNECTIONS 1. Connect the Midi1 Out of the AK-5 Pro SE to Midi In Korg Trinity 2. Connect the Midi In of the AK-5 Pro SE to Midi Out Korg Trinity 3. Local Control Off (Please follow the instructions bellow to avoid any MIDI FEEDBACK and or stuck notes ) 4. - Page 54 21.Press CANCEL to skip programming the Secondary Instrument. Skip to step # 31 The AK-5 Pro SE will reboot without programming the Secondary Instrument and the (MIDI2) port will not output any data. In another word, the MIDI PORT for (MIDI2) has been flittered OFF.
- Page 55 AK-5 Pro SE/VERSION 4 www.kelfar.net Press CANCEL to Select the MIDI CHANNELS by using the following buttons: (C to B) 1CH to 12CH, Tune/Setup 13CH, TR (-) 14CH, RESET 15CH, TR (+) 16CH. The LED Display shows SCH Press Cancel to setup the Control Change.
- Page 56 AK-5 Pro SE/VERSION 4 www.kelfar.net Follow the steps below to ensure that the AK5 Pro SE operates correctly with Korg Trinity V3. If some of the sounds are not micro-tuned properly, then it is possible that the Pitch Bend range is not set to 2/-2 or the Jump Bend boxes are unchecked.
- Page 57 AK-5 Pro SE/VERSION 4 www.kelfar.net 2. Press the Global button. Then Press the Global button P2 Uncheck the boxes: (Enable Program Change, Enable Bank Change, Enable Combination Change, Enable Exclusive) Check the boxes: (Enable Aftertouch, Enable Control Change) 3. Initialize Octave Notes (User Scale) (C - B) to +00...
- Page 58 AK-5 Pro SE/VERSION 4 www.kelfar.net 4. Setting the Pitch Bend range to 2/-2 and the step to Continuous for Programs Banks A, B, C, D Press the Edit Button Press the Button P2 Touch OSC1 P. Mod Set the Pitch Bend Range to JS (+X) +2, Step > Continuous Set the Pitch Bend Range to JS (-X) -2, Step >...
- Page 59 AK-5 Pro SE/VERSION 4 www.kelfar.net 5. Setting the Pitch Bend range to 2/-2 and the step to Continuous for Programs Bank M (MOSS) Press the Edit Button Press the Button P1 Touch OSC Basic Set the Pitch Bend Range to JS (+X) +2, Step > Continuous Set the Pitch Bend Range to JS (-X) -2, Step >...
- Page 60 AK-5 Pro SE/VERSION 4 www.kelfar.net 7. Combinations Banks A, B, C, D Press the Edit Button Press the Button P2 Set the Bend Range to +2 for the Track(s) that are needed adjustment Write Combination "If you turn the power off or select a different combination before writing, the data cannot be recovered."...
-
Page 61: Important Information
(1) USB mini cable (1.2m/4ft) • (2) 1/8" to 5-pin din (1m/3.2ft and 1.5m/5ft) • Note: Breath Controller and Expression Pedal are NOT included. The AK-5 works best with the BCK-1 (Kelfar Technologies Breath Controller) available here: http://kelfar.net/bck-1-breath-controller/ Copyright © 2005-20 Kelfar Technologies... - Page 62 Registration: Register your AK-5 Pro today: register@kelfar.net Date of Purchase: Warranty: 1 year limited warranty by Kelfar Technologies from the date of purchase. Support: Email: support@kelfar.net *Specifications subject to change without notice. Document last updated: Wednesday, January 29, 2020...
Need help?
Do you have a question about the AK-5 PRO SE and is the answer not in the manual?
Questions and answers