
Related Manuals for ZeeVee ZyPerMX2


Summary of Contents for ZeeVee ZyPerMX2
- Page 1 ZyPerMX4/MX2 Quad/Dual Video Encoders User Manual November 2019 Firmware Release 2.12...
- Page 2 Safety Instructions INSTRUCTIONS PERTAINING TO A RISK OF FIRE, ELECTRIC SHOCK, OR INJURY TO PERSONS Important Safety Instructions. Save These Instructions. WARNING: When using electronic products, basic precautions should always be followed, including: Keep these instructions. Heed all warnings. Follow all instructions. Do not use this apparatus near water.
- Page 3 ● Audio input as component of HDMI input. ○ LPCM, AC3, MPEG1 Layer 2. ● Analog audio and/or composite video for Closed Captions. CC requires use of ZeeVee composite cable ● Output: one standard 10/100/1000Base-T Ethernet port. ○ Common communications protocols/methods supported to include TCP/IP, ARP, DHCP, ICMP (ping), IGMP, HTTP, RTP, UDP, RTMP and HLS.
-
Page 4: Table Of Contents
Table of Contents Getting Started Panel Descriptions ....................1 Front View .....................1 Rear View ......................1 Installation ......................2 Basic Connections ..................2 Connecting to the ZyPerMX4 ...............2 Sample Application Diagram ................2 Basic Operation The Maestro Web Interface ..................3 Logging In ......................3 Network Configuration..................4 IP Stream Configuration ................7 IP Stream Configuration (HLS) ..............9 HLS Stream Viewing ...................11... -
Page 5: Getting Started
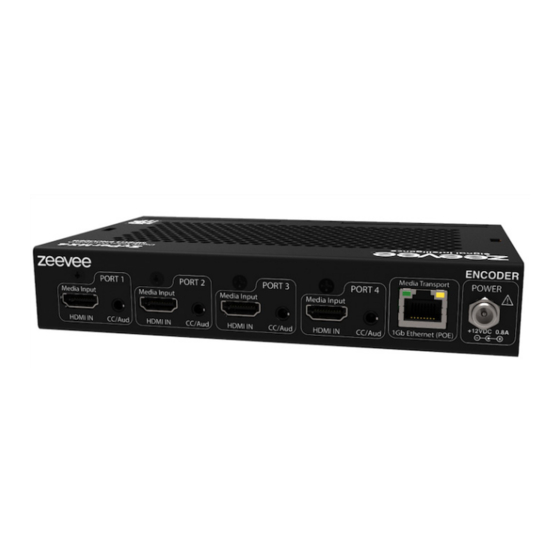
Getting Started Panel Descriptions Front View Name Description POWER This LED indicator glows bright blue when the ZyPerMX4 is powered. STATUS The LED glows bright blue when the System Boot Process is complete and the ZyPerMX4/MX2 unit is functioning normally. LED Panel This LED Panel shows IP address for config and management... -
Page 6: Installation
Getting Started Installation Basic Connections Connect an HDMI cable from one of the HDMI In ports on the ZyPerMX4/MX2 to an HD video source. Connect an Ethernet cable from the TRANSPORT connector, on the rear panel of the ZyPerMX4, to a LAN or directly to the PC. Connect the included 12V DC power supply to the POWER connector on the rear panel of the ZyPerMX. -
Page 7: Basic Operation
Basic Operation The Maestro Web Interface The ZyPerMX4/MX2 features the Maestro web interface. Maestro allows you to control and manage all features of the ZyPerMX4/MX2. To access Maestro, open a web browser and enter the IP address of the ZyPerMX4/MX2 into the address bar. We recommend using Firefox or Chrome browsers. -
Page 8: Network Configuration
The default setting for IPType is DHCP. Note that the ZyPerMX4 has 2 independent IP address while the ZyPerMX2 has only one IP address. There is an IP address for AV ports 1 & 2 and a different IP address for AV ports 3 & 4. - Page 9 Basic Operation Locate the IP Type field: ► If this field is set to DHCP, then all network parameters are assigned automatically, providing there is a DHCP server connected to the network. ► If the IP Type is set to Static, then follow steps 6 - 9. Enter the IP address in the IP Address field.
- Page 10 Basic Operation IP Stream Configuration (UDP, RTP and RTMP) The ZyPerMX4/MX2 can be configured to output either unicast or multicast IP streams using UDP or RTP protocols. It can unicast using the RTMP protocol. Login to the Maestro web interface. See Logging In (page 3) for more information.
-
Page 11: Ip Stream Configuration
Basic Operation Select either UDP or RTP or RTMP for the stream type from the Transport drop-down list. (Note that HLS configuration is covered in the next section.) Enter the destination IP address in the Stream IP field. If you enter a valid IP multicast address (range 224.0.0.0 to 239.255.255.255), any endpoint registered with that multicast receives the stream. - Page 12 Basic Operation Move to the Channel Plan tab. Enter a Program number for each stream in the Prog # field. 10. Enter a description of the content in the Name field. Often, the viewing client will display the short channel name when tuning to different streams. The short name cannot exceed 7 characters in length.
-
Page 13: Ip Stream Configuration (Hls)
Basic Operation IP Stream Configuration (HLS) The ZyPerMX4/MX2 can be configured to output an on-demand HLS stream via HTTP/HTTPS. Login to the Maestro web interface. See Logging In (page 3) for more information. Click the IP Streaming tab. To enable IP streaming, be sure that the Enabled drop-down box is set to Enabled. The defaults settign is Disabled. - Page 14 Click the Apply button to save the changes or click the Reset button to discard any changes. Note: Any input to the ZyPerMX4 or ZyPerMX2 can be configured to simultaneously output both a multicast and HLS stream. Select either “UDP+HLS” or “RTP+HLS” in step 4 above.
-
Page 15: Hls Stream Viewing
Basic Operation HLS Stream Viewing To view an HLS stream, point a browser to the following address: http://<IP_ADDRESS>/media/<name>.m3u8 Example: http://192.168.1.15/media/MYTV-1.m3u8 You can also find the Stream URL in the IP Streaming tab on the far right. Important Note The browser used to view HLS streams must be enabled for Native HLS Playback. This may involve installing a Plug-In to enable this functionality. -
Page 16: Hls Stream Limit
Basic Operation HLS Stream Limit The ZyPerMX4-4 and ZyPerMX2-4 products can output up to 4 simultaneous HLS streams per HDMI input. Once this limit is reached, any additioanal devices attempting to access the HLS stream will receive the following message. -
Page 17: Adjusting Video Settings
Basic Operation Adjusting Video Settings The ZyPerMX4/MX2 Video Encoder employs Variable Bit Rate (VBR) encoding when transmitting IP streams. Specifying the “High Bitrate” , “Low Bitrate” and “Low Resolution” for video will define the limits of IP stream transmission, without overloading the network bandwidth. Login to the Maestro web interface. - Page 18 Basic Operation When in HLS mode, the ZyPerMX4/MX2 will output both a High Bitrate stream and a Low Bitrate stream simultaneously using the target bitrates specified. The High Bitrate stream will always be output at the same resolution and frame rate as the orignal input. The Low Bitrate stream will put out a reduced resolution stream.
-
Page 19: Av Source Settings
Basic Operation AV Source Settings The ZyPerMX4/MX2 Video Encoder by default will provide HDCP handshaking to any connected source. This can cause undesired HDCP encrypted video to be sent to the ZyPerMX4/MX2 that will be not be encoded. For example an Apple laptop computer will automacilly output HDCP compatible video if it detects the HDCP handshake. -
Page 20: Adjusting Audio Settings
Basic Operation Adjusting Audio Settings The ZyPerMX4/MX2 Video Encoder supports either MP2, AC3 or AAC audio formats in the created stream. The default is MP2. You can change the desired audio format manually. Login to the Maestro web interface. See Logging In (page 3) for more information. -
Page 21: Hls Encryption
(issued by a certificate issuing service – NOT by ZeeVee). These certificates are typically only valid for a period of time and then they expire and the user has to renew them. Failure to do so will result in https no longer working properly. - Page 22 Basic Operation Click the SSL/RTMP tab Generate CSR (Certificate Signing Request). This will provide you with 2 files: The CSR and your Private key. Send your CSR file off to a signing authority and they will return via email a signed certificate file to you along with a certificate chain file.
- Page 23 Basic Operation When you are sent the certificate by the certificate signing authority you want to use; you need to go back to the “SSL” tab and upload it. Once you upload your certificate, private key file, and certificate chain files, select “Upload and Reboot Later”...
-
Page 24: Stream Rtmp To A Wowza Server
Basic Operation Stream RTMP to a Wowza Server RTMP streams can be sent directly to a Wowza server for more widespread distribution of the AV signal. Login to the Maestro web interface. See Logging In (page 3) for more information. Select the SSL/RTMP tab. -
Page 25: Displaying Device Information
Basic Operation Displaying Device Information The Status page is automatically displayed after logging in to Maestro. This page displays video and audio input/output information, firmware version, and status messages. Login to the Maestro web interface. See Logging In (page 3) for more information. -
Page 26: Changing The Device Name
Changing the Device Name By default, the ZyPerMX4/MX2 is automatically assigned a name by combining the string “ZyPerMX4” or “ZyPerMX2” and the MAC address of the ZyPerMX4/MX2. This name can easily be changed to something more descriptive using the procedure below. -
Page 27: Resetting The Zypermx4
Basic Operation Resetting the ZyPerMX4 The ZyPerMX4/MX2 can be reset to factory-default settings by clicking the Default button under the Device tab or by pressing the NAV / Control button on the unit. (See next page for details) When the ZyPerMX4 is reset to factory-default settings, the IP address will be reset to will be set to DHCP mode. -
Page 28: Rebooting The Zypermx4
Basic Operation ► Using the Reset Button/Wheel (NAV / Control) Locate the NAV / Control button on the front of the unit. This is both a button and wheel. Disconnect power from the ZyPerMX4/MX2. While applying power, rotate dial to the Left to reset the ZyPerMX4/MX2 to factory defaults. -
Page 29: Setting The Password
Basic Operation Setting the Password The default login password for the Maestro web interface is admin. This password can be changed using the following procedure. To recover a lost or forgotten password, see Recovering a Lost Password (page 26). Login to the Maestro web interface. See for more information. -
Page 30: Recovering A Lost Password
Basic Operation Recovering a Lost Password The ZyPerMX4/MX2 does not provide any built-in safeguards for lost or forgotten passwords. The ZyPerMX4/MX2 must be reset to factory-default settings using the NAV / Control button on the front panel. Use the admin password to login and then change the password under the Device tab. -
Page 31: Updating The Firmware
Basic Operation Updating the Firmware Firmware updates will be available when required. Contact Technical Support for more information. Download the firmware to the desired location on your computer. Login to the Maestro web interface. See for more information. Logging In (page 3) Click the Device tab. -
Page 32: Stb Tab Directv H.25 Set Top Box Control
Basic Operation STB Tab DirecTV H.25 Set Top Box Control The ZyPerMX4/MX2 has the ability to remotely control/manage DirecTV H.25 set top boxes. Important: If you do not have a DirecTV H.25 please do not make changes to any fields found in this tab. Click on the STB tab Enter the IP address of the H.25 into the STB IP field. - Page 33 Basic Operation...
-
Page 34: The Support Page
If the check box for a “full report” is checked the report may take several minutes to generate. If the unit is connected to the internet and can communicate with the servers at ZeeVee, the reports generated will automatically be sent to the server. If the unit cannot communicate with servers at ZeeVee, an option to download the report will be shown and the report can be emailed to the support team at support@zeevee.com. - Page 35 This field allows for ZeeVee to enable specially licensed features, such as private test mode(s), on a case by case basis. The code will be provided by ZeeVee technical support after specific approval from ZeeVee management. Enter the code into the field and click apply.
-
Page 36: Appendix
Appendix... -
Page 37: Specifications
Appendix Specifications Video Input 2 or 4 x HDMI Type A, 19-pin, female Input Signal 0.5 ~ 1.2 Vp-p Input DDC Signal 5 Vp-p (TTL) Video Output 1 x LAN (PoE), 10/100/1000Base-T Output Type H.264/MPEG-4 AVC, HLS (Low/High datarate) Video Encoding Bit Rate 1 Mbps ~ 10 Mbps (configurable) Input / Output Resolutions 60 Hz... -
Page 38: Faq
Answer: First, on the networking front be sure that both the MX4/MX2 and MXE+ are set for static IP with addresses on the same subnet. ZeeVee would recommend RTP for P2P installations. RTP has more timing and synchronization information built into the protocol. - Page 39 Question: What is the max length of HDMI cable that can be used on the MX4/MX2 before it starts to not detect the source? Answer: This will depend on the quality of the HDMI cable. ZeeVee has verified functionality with HDMI cables up to 25 feet in length.
-
Page 40: Recommeded Switches
Basic Operation Recommended Switches The following 1Gbit switches are recommended for use with the MX4/MX2. Please note this is not an all-inclusive list. There are many other switches available that will function with the MX4/MX2. Manufacturer Model # Number of Notes 1Gbit Ports Netgear... -
Page 41: Switch Configuration Options
Some Switches will work directly out of the box with zero configuration required. Nearly all switches however will provide the user some ability to customize the configuration. The list below includes various switch configuration options that ZeeVee has encountered. Look for these or similar options when configuring your switch. -
Page 42: Warranty
EXCLUSIVE REMEDY FOR ZEEVEE ZyPerMX4 EQUIPMENT At the option of ZeeVee, the ZeeVee ZyPerMX 4Equipment will be repaired or replaced with a new, repaired or refurbished product (whichever ZeeVee deems as necessary) if it becomes defective or inoperative. - Page 43 LIMITATION OF LIABILITY In no event will ZeeVee be liable for any amount greater than the retail price of the ZeeVee ZyPerMX4 Equipment. ZeeVee shall not be liable for any incidental or consequential dam- ages (including lost profits) for breach of any express or implied warranty on the ZeeVee ZyPerMX4 Equipment.
- Page 44 North America: +1 (347) 851-7364 • sales@zeevee.com International: +1 (347) 851-7364 • sales@zeevee.com EMEA: +44 1494 956677 • EMEAsales@zeevee.com BOSTON | DENVER | LONDON www.zeevee.com...
Need help?
Do you have a question about the ZyPerMX2 and is the answer not in the manual?
Questions and answers