ZeeVee ZyPer4K Configuration Manual
Hide thumbs
Also See for ZyPer4K:
- User manual (121 pages) ,
- User manual (44 pages) ,
- User manual (14 pages)
Table of Contents
Advertisement
Quick Links
Download this manual
See also:
User Manual
Advertisement
Table of Contents

Related Manuals for ZeeVee ZyPer4K


Summary of Contents for ZeeVee ZyPer4K
- Page 1 ZyPer4K ™ CO NF IG UR AT ION G U ID E...
-
Page 2: Fcc Statement
I N S T R U C T I O N S P E R TA I N I N G T O A R I S K O F F I R E , E L E C T R I C S H O C K , O R I N J U R Y T O P E R S O N S Important Safety Instructions. -
Page 3: Table Of Contents
Warranty ..... 15 • Fiber optic patch cables Contact ZeeVee ....16 • 10Gb network switch with IGMP Snooping capability... -
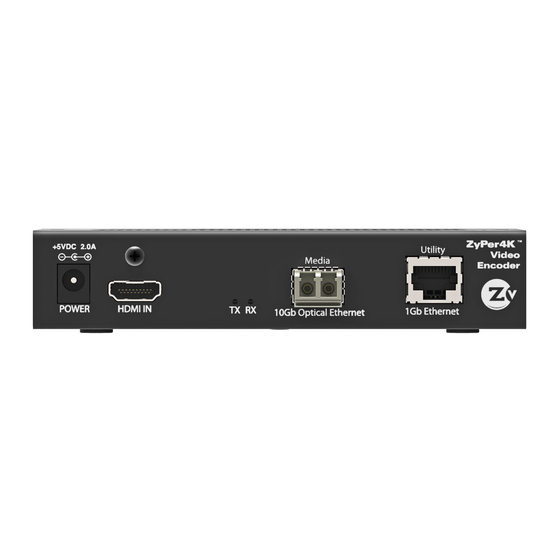
Page 4: Front And Back Panels
RX – Flashes when system is operating and data is being received across fiber link Media/10Gb Ethernet – Slot for SFP+ Fiber Optic BACK PANEL — DECODER Module (available from ZeeVee) Utility/1Gb Ethernet – Network port for connection of local Ethernet device into network Page 4 Zy Pe r 4K C o n f ig u r a t i o n G u id e ww w.z e ev e e.c o m... -
Page 5: Setting Up Zyper4K In A Point To Point Environment
ZyPer4K management software and is a true “plug and play” setup. If using analog audio, RS232 or Infrared, you may need to configure the Encoder and Decoder with our management software. See the Using the Tabs in ZyPer4K Management Software section for more information. Digital Signage... -
Page 6: Setting Up Zyper4K In A Many To Many Environment
A many to many, or switched environment involves connecting many sources to many displays. ZyPer4K allows you a flexible and scalable amount of input-output options without limitations. For example, in a 24-port configuration, you can configure a 1x23, 6x18, or 4x20 (and so on) system. - Page 7 Installing ZyPer4K Management Software ZyPer4K management software is available from ZeeVee technical support. If presented with a Windows security dialog box, ensure that both private and public networks are checked and click Allow. The telnet dialog box will then appear.
-
Page 8: Connecting Encoders To The 10Gb Network Switch
Connecting Encoders to the 10Gb Network Switch 1. Connect HDMI cable from active source to Encoder (HDMI In port). Ensure Encoder is plugged in and pwr LED light is illuminated. When HDMI cable is connected, the video (vid) light will illuminate. 2. -
Page 9: Connecting Decoders To The 10Gb Network Switch
Connecting Decoders to the 10Gb Network Switch 1. Connect HDMI cable from active display to Decoder (HDMI Out port). Ensure Decoder is plugged in and LED light is on. When HDMI cable is connected, the video (vid) light will illuminate. 2. -
Page 10: Configuring Encoder And Decoder Options
Configuring Encoder and Decoder Options For ease of switching, you should define a name for each device. You can also make other configurations (such as IP address and RS232) for your Encoder and Decoder. To define Encoder and Decoder settings: 1. -
Page 11: Switching (Routing) Video
Once you have connected all Encoders and Decoders to sources and displays, use the management software to route the video on your system. ZyPer4K allows you to “drag and drop” the sources to displays by dragging Encoder icons to the desired Decoder icons. -
Page 12: Using The Tabs In Zyper4K Management Software
Using the Tabs in ZyPer4K Management Software Video Genlocked tab The Video Genlocked tab allows you to switch video between sources and displays without any video processing and frame buffering. When switching between sources, the display loses video/sync momentarily. Display Wall tab (default tab) In the Display Wall tab you can: • Switch sources with video buffering so there is no loss of video at the display. -
Page 13: Audio Tab
Audio tab Here you can route analog audio signals (independent from video) from any Encoder to any Decoder on the network. Contact Technical Support for more information. RS232/Infrared tabs Allows you to configure specifics for your IR or RS232 peripherals. Contact Technical Support for more information. ZyP er4K Co nf i gura t io n G ui de P age 13... -
Page 14: Additional Connections
2. Connect 3.5 mm connector cable from audio port on Decoder to speakers or into a separate audio distribution system. Analog Audio can also be embedded into the HDMI signal at a Decoder. For configuration, see Configuring Encoder/Decoder Options on page 10 and the Using the Tabs in ZyPer4K Management Software section or call ZeeVee Technical Support. -
Page 15: Warranty
LIMITATION OF LIABILITY and in lieu of all other warranties, guarantees, modifications, “hacks,” or utilizing service access In no event will ZeeVee be liable for any amount agreements and similar obligations of ZeeVee. or “back doors” will void these limited warranties. -
Page 16: Contact Zeevee
Contact ZeeVee Support Contact us for installation and technical support, repairs, and warranty service: +1 (877) 4-ZEEVEE (1.877.493.3833) support@zeevee.com Representatives are available from 9:00 AM to 6:00 PM, Monday through Friday (Eastern Time). Sales North America: +1 (347) 851-7364 Phone sales@zeevee.com...
Need help?
Do you have a question about the ZyPer4K and is the answer not in the manual?
Questions and answers