Table of Contents
Advertisement
Quick Links
AGROWtEK
Technology to Help You Grow
1
1
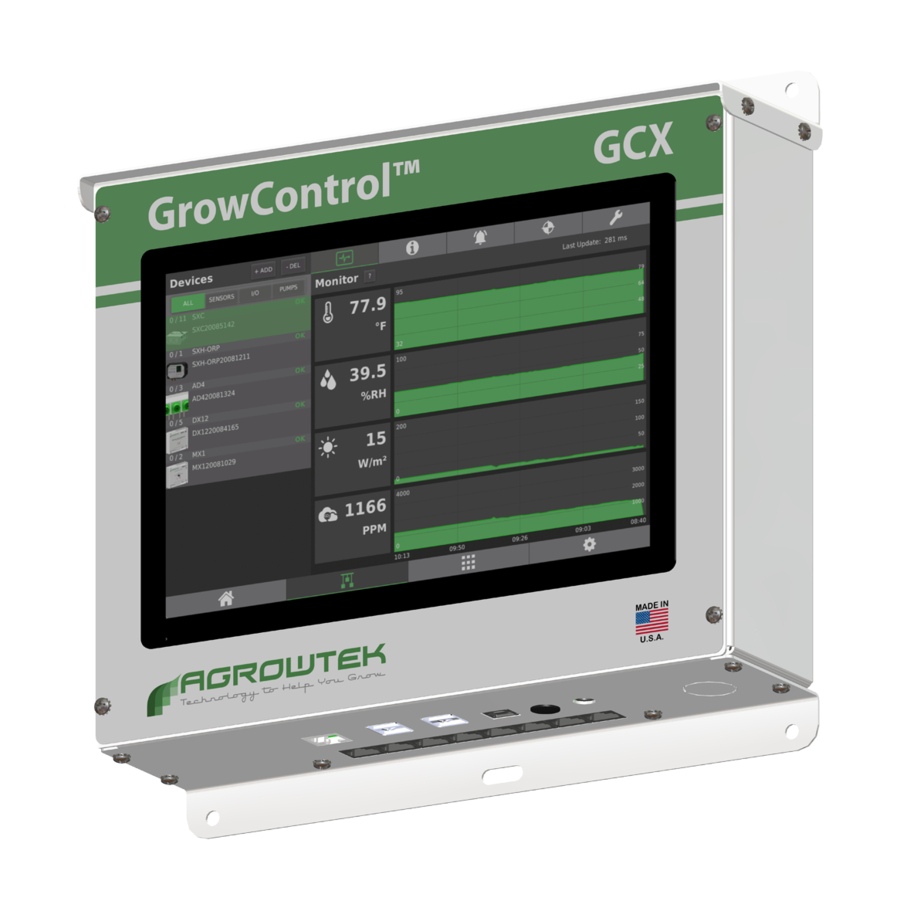
GrowControl™ GCX
Cultivation Control Systems
© Agrowtek Inc. | www.agrowtek.com | Technology to Help You Grow™
© Agrowtek Inc. | www.agrowtek.com | Technology to Help You Grow™
© Agrowtek Inc. | www.agrowtek.com | Technology to Help You Grow™
INSTRUCTION MANUAL
GCX / GCX+
Advertisement
Table of Contents

Related Manuals for Agrowtek GrowControl GCX


Summary of Contents for Agrowtek GrowControl GCX
- Page 1 Technology to Help You Grow GrowControl™ GCX Cultivation Control Systems © Agrowtek Inc. | www.agrowtek.com | Technology to Help You Grow™ © Agrowtek Inc. | www.agrowtek.com | Technology to Help You Grow™ © Agrowtek Inc. | www.agrowtek.com | Technology to Help You Grow™...
-
Page 2: Table Of Contents
Device Management Speci cations Add a Device Storage and Disposal Remove a Device Warranty Sort Device List Change Address Replace a Device Device Name Input/Output Name Where Used Search © Agrowtek Inc. | www.agrowtek.com | Technology to Help You Grow™... -
Page 3: Overview
• Cycle Timers • Tank Level (Refill) Control • Thermostats • Nutrient & pH Dosing • Humidistats • Sensor Averaging • Photostats/Light Dimming Controls • Math • CO2 Injection/Exhaust • Logic © Agrowtek Inc. | www.agrowtek.com | Technology to Help You Grow™... -
Page 4: Physical Features
USB Ports for WIFI, memory sticks, and other USB accessories (4 ports.) 5. GrowNET™ Ports 8-port, 100 device GrowNET™ bus 0 (RJ-45.) 6. Ethernet 10/100 Ethernet for Internet connection GCX+ Only 7. GrowNET™ Ports 8-port, 100 device GrowNET™ bus 1. © Agrowtek Inc. | www.agrowtek.com | Technology to Help You Grow™... -
Page 5: Dimensions, Gcx
Dimensions, GCX 11.92 3.27 11.05 10.42 10.50 Dimensions, GCX+ 3.27 17.92 14.42 13.80 16.50 © Agrowtek Inc. | www.agrowtek.com | Technology to Help You Grow™... -
Page 6: Installation Instructions
(except dosing pumps and 120V outlet relays.) Network A Ethernet connection is recommended if available. WiFi is also available as an alternative to Ethernet. © Agrowtek Inc. | www.agrowtek.com | Technology to Help You Grow™... -
Page 7: Mounting The Controller
• Other Silicone or Lithium based insulating grease NOTICE GrowNET™ ports use standard RJ-45 connections but are NOT compatible the Ethernet network equipment. Do not connect GrowNET™ ports to Ethernet ports or network switch gear. © Agrowtek Inc. | www.agrowtek.com | Technology to Help You Grow™... -
Page 8: User Interface Introduction
Press the “?” button on the page header to display the help dialog. Loader Screen The Agrowtek Leaf logo appears while the system boots. Once the Linux operating system boots, the system loader screen appears which displays the status of the system memory, and searches for downloaded rm- ware updates, or for updates on USB memory. -
Page 9: Login Screen
Enter your password by pressing on the text eld to bring up the keyboard. 3. Login Button Once you have entered the correct user name and password, press LOGIN. 4. Keyboard The on-screen keyboard pops-up when ever a text eld is selected. © Agrowtek Inc. | www.agrowtek.com | Technology to Help You Grow™... -
Page 10: Home
Device graphs, manual controls, alarms, calibration and management. 3. Controls Page Workspace and function editor for control logic con guration and monitoring. 4. System Page Network, email accounts, users, les, updates and system con guration. © Agrowtek Inc. | www.agrowtek.com | Technology to Help You Grow™... -
Page 11: Devices Page
For devices with alarm settings, con gure high/low alarm values. 4. Calibration Page Standard calibration of sensors and dosing pump ow rates. 5. Manage Device Device manufacturing info, address, sort order, out-of-service mode and more. © Agrowtek Inc. | www.agrowtek.com | Technology to Help You Grow™... -
Page 12: Device List
The GrowNET™ device address. 8. Bus Number The GrowNET™ bus number the device is on (100 devices per bus.) 9. Selected Device The selected device is highlighted in a transparent green. © Agrowtek Inc. | www.agrowtek.com | Technology to Help You Grow™... -
Page 13: Input & Sensor Monitoring
Graph history pane showing 1440 points; touch a pane to enlarge the graph. 6. X-Axis Time axis of graph panes (all share the same time axis.) Enlarge graph for dates. © Agrowtek Inc. | www.agrowtek.com | Technology to Help You Grow™... -
Page 14: Output & Pump Monitoring
Reference name for the output or pump. 3. Manual/Auto Manually set outputs/pumps Off/On, or set to AUTO for function control. 4. Output Status Graphic and info displaying the output status. © Agrowtek Inc. | www.agrowtek.com | Technology to Help You Grow™... -
Page 15: Mx Motor Monitoring
Graph history pane of the motor position. 6. Output Graph Graph history pane of the motor outputs (forward, reverse.) NOTE The MX position is calibrated on the calibration page; see the calibration section. © Agrowtek Inc. | www.agrowtek.com | Technology to Help You Grow™... -
Page 16: Graph Window
High/Low value on the current graph page. 6. Cursor Data Data at the point shown by the cursor line when the chart area is touched. Only on newest data page. © Agrowtek Inc. | www.agrowtek.com | Technology to Help You Grow™... -
Page 17: Device Information
Output (or input) channel name; typically named for what is connected to the channel. 7. Save Button When highlighted Green, there are changes that are not saved. Press the Save button to save the changes to system memory. © Agrowtek Inc. | www.agrowtek.com | Technology to Help You Grow™... -
Page 18: Device Alerts
4. Enable Checkbox Check to enable the alerts for this sensor channel. 5. Save Button When highlighted Green, there are changes that are not saved. Press the Save button to save the changes to system memory. © Agrowtek Inc. | www.agrowtek.com | Technology to Help You Grow™... -
Page 19: Device Calibration
4 & pH 7 solution are typically used for pH calibration. Always begin with pH7 calibration and follow the prompts on the display. © Agrowtek Inc. | www.agrowtek.com | Technology to Help You Grow™... - Page 20 • Manually operate the MX controller until it reaches 0% (closed) and the motor stops at the working limit. • Set the position to a known value using the device calibration page. © Agrowtek Inc. | www.agrowtek.com | Technology to Help You Grow™...
-
Page 21: Device Management
After adding a new device, it can “replace” an o ine device to assume its role. 5. De-Comission When removing a device to be used on another system it should be decomissioned. Decomissioning removes the device address from the device. © Agrowtek Inc. | www.agrowtek.com | Technology to Help You Grow™... -
Page 22: Controls
Opens a dialog to move the current group to a new position in the group list. 9. Remove Group Opens a dialog to delete the current group and all of it’s controls from the system. © Agrowtek Inc. | www.agrowtek.com | Technology to Help You Grow™... -
Page 23: Network Settings
Status and con guration of wireless network connection (if equipped.) 3. TCP/IP Server Enable or disable the TCP/IP command server for MODBUS integration. 4. VNC Password Change the default VNC remote access password (default = gcxvnc). © Agrowtek Inc. | www.agrowtek.com | Technology to Help You Grow™... -
Page 24: Email Settings
7. Test Button Send a test message to recipients using the email account con gured. 8. General Alerts Select the alerts to be sent by the system to the recipients. © Agrowtek Inc. | www.agrowtek.com | Technology to Help You Grow™... -
Page 25: User Accounts
Select an Administrator or Operator level for the new user. 3. User List List of users on the system. 4. Options Check the box to require login when the system boots up. © Agrowtek Inc. | www.agrowtek.com | Technology to Help You Grow™... -
Page 26: System Files
4. File Commands Commands to import/export or delete the selected le. 5. Service Email Sends all system les to Agrowtek using the service email account. Email con guration is not required to use this function. 6. Log Memory Total memory consumed by data log les. -
Page 27: System Settings
Chart data can be populated newest on the left or right depending on preference. 9. Debug Displays debugging information and messages in the noti cation view. 10. Sequnce Delay Sets a minimum delay between simultaneously activated outputs. © Agrowtek Inc. | www.agrowtek.com | Technology to Help You Grow™... -
Page 28: Device Management
2. Ensure the device is powered by the hub (dosing pumps and RX relays require their own power source.) 3. Navigate to the Devices page and press the [ + ADD ] button. © Agrowtek Inc. | www.agrowtek.com | Technology to Help You Grow™... - Page 29 7. If desired, modify the device name then press [ SAVE ]. The device will now be shown in the system device list. Select the device in the list to monitor the device or modify the device properies. © Agrowtek Inc. | www.agrowtek.com | Technology to Help You Grow™...
-
Page 30: Remove A Device
4. Press the [DELETE DEVICE] button to confirm removal of the device or press [CANCEL] to leave the device on the system. The device will be deleted from the device list and the data logs will be erased from the system memory. © Agrowtek Inc. | www.agrowtek.com | Technology to Help You Grow™... -
Page 31: Sort Device List
3. When the dialog opens, select the location in the list to move the device to. 4. Press [ MOVE DEVICE ] to perform the move operation. 5. The device will now be moved to the new location in the device list. © Agrowtek Inc. | www.agrowtek.com | Technology to Help You Grow™... -
Page 32: Change Address
2. Select a new address from the list of available addresses (not in use on the bus.) 3. Press [ SET ADDRESS ] to con rm the new address. © Agrowtek Inc. | www.agrowtek.com | Technology to Help You Grow™... -
Page 33: Replace A Device
4. Select the o ine device you want to replace with the new device. 5. The new device will replace the old device. Use the [ CHANGE ADDRESS ] button to modify the device address. © Agrowtek Inc. | www.agrowtek.com | Technology to Help You Grow™... -
Page 34: Device Name
1. Select the device and then select the device name text eld. 2. A keyboard will appear; enter the new name. 3. Press the save button to save the new name to the system memory. © Agrowtek Inc. | www.agrowtek.com | Technology to Help You Grow™... -
Page 35: Input/Output Name
To set an input/output name: 1. Select the output (or input) channel to edit. 2. Enter the new name. 3. Press the save button to store the new name in system memory. © Agrowtek Inc. | www.agrowtek.com | Technology to Help You Grow™... -
Page 36: Where Used Search
3. The search results dialog is shown indicating the control group and control function name of any func- tions using the output or input. If the same function is using the output for multiple settings, it will be shown for each setting. © Agrowtek Inc. | www.agrowtek.com | Technology to Help You Grow™... -
Page 37: Controls
Select and edit the properties of the workspace. 2. Toolbar Add functions to the workspace by pressing them on the toolbar. 3. Workspace Area where controls in the group are monitored, edited and added. © Agrowtek Inc. | www.agrowtek.com | Technology to Help You Grow™... -
Page 38: Control Groups
The toolbar is used to add new control functions to a workspace. 2. Workspace Functions Workspace functions show the logic in the workspace. Click the workspace function to edit the settings. © Agrowtek Inc. | www.agrowtek.com | Technology to Help You Grow™... - Page 39 When the control group is paused, the run/pause button (1) and workspace background (3) change to a red shade to indicate they are stopped. The function icons status dot (2) will turn yellow to indicate it is paused. © Agrowtek Inc. | www.agrowtek.com | Technology to Help You Grow™...
- Page 40 If a function has an analog output, the priority output value is shown here. 5. Invalid Status An invalid or disabled function will show a red dot; this function is not active. © Agrowtek Inc. | www.agrowtek.com | Technology to Help You Grow™...
-
Page 41: Controls Toolbar
12. Dosing Nutrient and pH dosing for stock tanks, reserviors and recirculating hydroponics systems. Auto- mate ppm and pH control for up to 24 nutrient parts with a recipe library. © Agrowtek Inc. | www.agrowtek.com | Technology to Help You Grow™... -
Page 42: Adding & Editing Controls
General operations including function name, save, delete and exit. 2. Setting List List of settings in the control function. 3. Settings Area Display for the currently selected settings for editing. © Agrowtek Inc. | www.agrowtek.com | Technology to Help You Grow™... - Page 43 2. Copy Copy the selected setting to a new setting. 3. Add Add a new blank setting to the function. 4. Setting List List of all settings in the function. © Agrowtek Inc. | www.agrowtek.com | Technology to Help You Grow™...
-
Page 44: Enabling Control Functions
This type of feature is useful for enabling or disable equipment in coordination. For example, it may be desir- able to disable a CO2 control when the exhaust output is activated. © Agrowtek Inc. | www.agrowtek.com | Technology to Help You Grow™... -
Page 45: Control Setting Schedule
5. Start Time Time of day that the setting will be enabled (time range mode.) 5. End Time Time of day that the setting will be disabled (time range mode.) © Agrowtek Inc. | www.agrowtek.com | Technology to Help You Grow™... -
Page 46: Control Setting Output
2. Output Select the analog output to be set by the function. 3. Value Enter a value (0-100%) to be sent to the output when the function is active. © Agrowtek Inc. | www.agrowtek.com | Technology to Help You Grow™... -
Page 47: Clock Timer
In the example above, the timer is “enabled” without any pre-conditions. The output named “Output 1” on the device named “Dry Contact Relays” will be turned on according to the schedule setting from 7am to 3pm (20:00). © Agrowtek Inc. | www.agrowtek.com | Technology to Help You Grow™... -
Page 48: Count Timer
O -Delay One-Shot On One-Shot O To setup a count timer: • Set the function enable mode. • Set the function schedule if applicable. • Configure the timer settings. © Agrowtek Inc. | www.agrowtek.com | Technology to Help You Grow™... -
Page 49: Cycle Timer
To ensure accurate timing, cycle timers operate locally at the GrowNET™ device. The cycle timer function will show active when the timer is operating but will not change status based on the cycle timer. Observe the physical output for the status of the cycle. © Agrowtek Inc. | www.agrowtek.com | Technology to Help You Grow™... -
Page 50: Thermostat
This will activate the fan with the heat or cool signal and inlcude an off-delay retaining the fan on for a set time after the heat/cool signal. See the “Programming” section for more details. © Agrowtek Inc. | www.agrowtek.com | Technology to Help You Grow™... -
Page 51: Humidistat
The target sensor value to achieve. 4. Deadband The allowed drift from the target before taking action to return to the target. 5. Preview A preview of the function settings. © Agrowtek Inc. | www.agrowtek.com | Technology to Help You Grow™... -
Page 52: Photostat
Light sensor input to evaluate the set point against. 3. Setpoint The target sensor value to achieve. 4. Deadband The allowed drift from the target before activating the function. 5. Preview A preview of the function settings. © Agrowtek Inc. | www.agrowtek.com | Technology to Help You Grow™... -
Page 53: Carbon Dioxide (Co2)
• Turn on the “Disable when Dark” switch to disable when the CO2 sensor detects the ambient light level is 0. • Set the function time schedule to the lighting or other schedule time. © Agrowtek Inc. | www.agrowtek.com | Technology to Help You Grow™... -
Page 54: Lights
Select a device and an analog output on the device to operate the dimming control. 5. Output Intensity Target intensity for the dimmable output. 6. Ramp Rate Rate of change from current dimmable output intensity to new intensity. © Agrowtek Inc. | www.agrowtek.com | Technology to Help You Grow™... - Page 55 2. Temperature Sensor Select the light sensor input to measure sunlight intensity. 3. Max Temperature Temperatre to start dimming (or shutdown.) 4. Preview Preview display of the dimming settings. © Agrowtek Inc. | www.agrowtek.com | Technology to Help You Grow™...
-
Page 56: Position
Minimum and maximum positions that the setting will allow. 4. Static Mode Enables the setting of a xed position (such as a light dep curtain.) 5. Static Position Adjust the slider to set the fixed position. © Agrowtek Inc. | www.agrowtek.com | Technology to Help You Grow™... - Page 57 Select the sensor to read the temperature. 7. Temperature Position Maximum %open position when limit is exceeded. 8. Temperature Limit Temperature high limit; if reached, the position limit is activated. © Agrowtek Inc. | www.agrowtek.com | Technology to Help You Grow™...
- Page 58 Select how many stages to break the position movements into. 10. Stage Separation Degrees between ventilation stages. Separation is used both when rising and falling to segregate stage reversal. © Agrowtek Inc. | www.agrowtek.com | Technology to Help You Grow™...
- Page 59 Sets the maximum position allowed during a rain alarm. 3. Wind Position Sets the maximum position allowed during a high wind alarm. 4. Temperature Position Sets the maximum position allowed during a low temperature alarm. © Agrowtek Inc. | www.agrowtek.com | Technology to Help You Grow™...
-
Page 60: Irrigation
Duration to run the stage output for irrigation. 5. Stage Output Stage output device and channel (irrigation valve.) 6. Repeat Settings If the irrigation is to repeat, set the number and delay between repeat cycles. © Agrowtek Inc. | www.agrowtek.com | Technology to Help You Grow™... - Page 61 Set the output device and output channel that the valve is connected to. 3. Drain Duration Enter a time duration (seconds) that the valve should drain before the system proceeeds to the next irrigation stage. © Agrowtek Inc. | www.agrowtek.com | Technology to Help You Grow™...
- Page 62 To set alternate time intervals or irrigation schedules for lighter or heavier waterings at different times, copy and create multiple settings within the irrigation function. © Agrowtek Inc. | www.agrowtek.com | Technology to Help You Grow™...
-
Page 63: Tank Level
Water level in a tank can be automated with a high and low sensor, and a ll valve. Tank level can be controlled for either lling or draining modes. NOTE Agrowtek’s SXL optical liquid level sensors are an excellent choice for sensing water level, or oat switches and other sensors are also suitable. Mode Settings 1. -
Page 64: Dosing
(2). 1. Dosing Recipe Use the drop-down to select a recipe from the library. 2. Recipe Editor Open the recipe editor to create or modify dosing recipes. © Agrowtek Inc. | www.agrowtek.com | Technology to Help You Grow™... - Page 65 6. Add Pump Adds a new pump to the pump list. To edit the pump assignment, select the pump then modify the pump device or pump head, and save the settings. © Agrowtek Inc. | www.agrowtek.com | Technology to Help You Grow™...
- Page 66 1. Enable Output Enable the discrete output to show the output device settings. 2. Output Device Settings Select a device and output to operate when the dosing function is active. © Agrowtek Inc. | www.agrowtek.com | Technology to Help You Grow™...
-
Page 67: Recipe Editor
Select the recipe to edit or use the buttons to create or delete recipes. 2. Targets Enable dosing modes and set the sensor target values and deadbands. 3. Nutrient Parts Editor area for nutrient recipe. © Agrowtek Inc. | www.agrowtek.com | Technology to Help You Grow™... - Page 68 1. Target Enable Enable the switches to turn on dosing modes. 2. Target Value Target value for the dosing mode. 3. Deadband Deadband (drift) for the dosing mode. © Agrowtek Inc. | www.agrowtek.com | Technology to Help You Grow™...
- Page 69 The smallest dose that the ADi-200 pumps can produce is 3ml. Recipes with parts smaller than 3ml will have the entire recipe multiplied automatically to produce a minimum dose of 3ml when dosing. © Agrowtek Inc. | www.agrowtek.com | Technology to Help You Grow™...
-
Page 70: Vnc Remote Access
IP address to test the VNC application. 1. Locate the Ethernet or Wi-Fi I.P. address of the controller on the Network page: 2. Open the app and press the + button. © Agrowtek Inc. | www.agrowtek.com | Technology to Help You Grow™... -
Page 71: Remote Network Access
• If the internet service is not static IP, consider dyndns or similar service for a static access url. For “port forwarding” instructions, please reference the manual for your network router. Each router has unique menus, however, the process is generally the same. © Agrowtek Inc. | www.agrowtek.com | Technology to Help You Grow™... -
Page 72: Email Con Guration
1. Log into your google account (manage your account) and select “security. ” 2. Locate the “Signing in to Google” panel and click “2-Step Verification”. Follow the prompts to turn on 2-step veri cation. © Agrowtek Inc. | www.agrowtek.com | Technology to Help You Grow™... - Page 73 6. Enter a name for reference, then click the “GENERATE” button to create the app password. 7. Use the password in the yellow box in place of your account password in the email account settings. © Agrowtek Inc. | www.agrowtek.com | Technology to Help You Grow™...
-
Page 74: Firmware Update
Firmware Update Agrowtek occasionally releases updates to system rmware that add new features or resolve bugs. Firmware may be updated via the internet if an internet connection is available, or by USB memory. A system reboot is required to complete a firmware update. It is recommended to place all relays into “Off” status. -
Page 75: Usb Update
Some memory cards are not read properly by the GCX system. If the rmware le is not detected by the Sys- tem Loader, then please try another USB ash drive or another format when formatting the ash drive. Recommended Format: Fat16 © Agrowtek Inc. | www.agrowtek.com | Technology to Help You Grow™... -
Page 76: System Firmware Loader
To con rm the rmware has loaded go to the System Settings page and press the [ ABOUT ] button. Check the rmware version matches the expected new version. © Agrowtek Inc. | www.agrowtek.com | Technology to Help You Grow™... -
Page 77: Technical Information
Wash hands after handling internal components, tubing or PCB’s. © Agrowtek Inc. | www.agrowtek.com | Technology to Help You Grow™... -
Page 78: Warranty
Warranty Period. In no event or circumstance shall Agrowtek Inc. be liable to any third party or the claimant for damages in excess of the price paid for the product, or for any loss of use, inconvenience, com- mercial loss, loss of time, lost pro ts or savings or any other incidental, consequential or special damages arising out of the use of, or inability to use, the product.
Need help?
Do you have a question about the GrowControl GCX and is the answer not in the manual?
Questions and answers