Avaya J169 Manual
Aura
Hide thumbs
Also See for J169:
- User manual ,
- Installing and administering (203 pages) ,
- Instructions manual (179 pages)

Related Manuals for Avaya J169


Summary of Contents for Avaya J169
- Page 1 Using Avaya J169 and J179 SIP IP ® Phones in Avaya Aura Release 4.0.8 Issue 1 February 2021...
- Page 2 RESERVES THE RIGHT TO TAKE LEGAL ACTION AGAINST YOU the express behalf of Avaya. End User agrees to indemnify and hold AND ANYONE ELSE USING OR SELLING THE SOFTWARE harmless Avaya, Avaya's agents, servants and employees against all WITHOUT A LICENSE.
- Page 3 MAY BE OBTAINED FROM MPEG LA, L.L.C. SEE HTTP:// written consent of Avaya can be a criminal, as well as a civil offense WWW.MPEGLA.COM. under the applicable law. Compliance with Laws...
- Page 4 AC adapters shipped with the equipment or specified by These limits are designated to provide reasonable protection against Avaya to be used with the equipment. If you use any harmful interferences in a residential installation. This equipment other equipment, it may cause failures, malfunctioning, generates, uses and can radiate radio frequency energy and, if not or fire.
- Page 5 ™ The Bluetooth word mark and logos are registered trademarks owned by Bluetooth SIG, Inc. and any use of such marks by Avaya • Connect the equipment into an outlet on a circuit different from Inc. is under license. that to which the receiver is connected.
-
Page 6: Table Of Contents
Redialing a number .................... 40 Making a call by using speed dial ................. 40 Making a call from the local Сontacts list ® February 2021 Using Avaya J169 and J179 SIP IP Phones in Avaya Aura Comments on this document? infodev@avaya.com... - Page 7 Making a conference call with a shortcut key .................... 61 Activating the screen saver ...................... 61 Activating Send All Calls ........................ 62 Automatic Callback ® February 2021 Using Avaya J169 and J179 SIP IP Phones in Avaya Aura Comments on this document? infodev@avaya.com...
- Page 8 Extending a call to your cell phone ........................ 82 Hunt Group Busy .................... 82 Using Hunt Group Busy .................. 83 Interrupting a call with a whisper page ® February 2021 Using Avaya J169 and J179 SIP IP Phones in Avaya Aura Comments on this document? infodev@avaya.com...
- Page 9 Setting the dialing mode ..................... 102 Displaying сall timers .................... 103 Setting key repeat delay ..................... 103 Setting redial options ................... 104 Assigning speed dial entries ® February 2021 Using Avaya J169 and J179 SIP IP Phones in Avaya Aura Comments on this document? infodev@avaya.com...
- Page 10 Updating your phone .............. 127 Checking your phone periodic automatic update Chapter 14: Maintenance..................... 129 .................... 129 Limited access during failover ® February 2021 Using Avaya J169 and J179 SIP IP Phones in Avaya Aura Comments on this document? infodev@avaya.com...
- Page 11 Finding documents on the Avaya Support website ................. 134 Avaya Documentation Center navigation .................... 135 Viewing Avaya Mentor videos .......................... 136 Support ® February 2021 Using Avaya J169 and J179 SIP IP Phones in Avaya Aura Comments on this document? infodev@avaya.com...
-
Page 12: Chapter 1: Introduction
Chapter 1: Introduction Purpose This document describes the features of the Avaya J169/J179 IP Phone and also provides instructions on how to use this phone. This document is for end users. ® February 2021 Using Avaya J169 and J179 SIP IP Phones in Avaya Aura... -
Page 13: Chapter 2: Phone Overview
Navigation Cluster. Optionally, the phone supports up to three button modules, and each button module supports displaying 24 buttons of the 96 buttons. Avaya J169 IP Phone has a grayscale display, and Avaya J179 IP Phone has a color display. Physical specifications •... - Page 14 Connection jacks for J169/179 IP Phone on page 17 Optional components on page 19 Understanding Avaya J179 IP Phone Configuring the Avaya J100 Expansion Module ® February 2021 Using Avaya J169 and J179 SIP IP Phones in Avaya Aura Comments on this document? infodev@avaya.com...
-
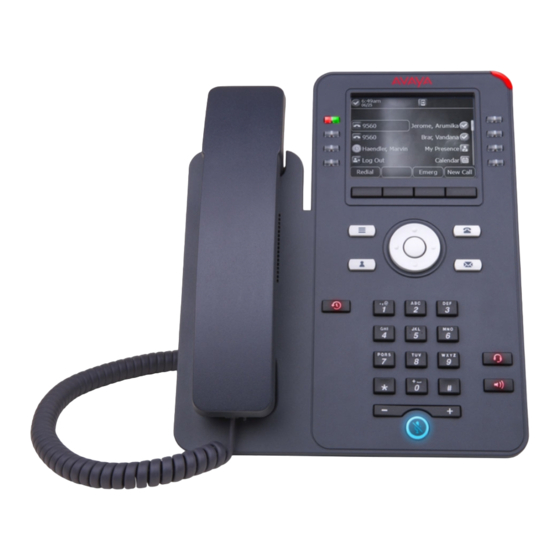
Page 15: Physical Layout Of A J169/179 Ip Phone
Physical layout of a J169/179 IP Phone Physical layout of a J169/179 IP Phone ® February 2021 Using Avaya J169 and J179 SIP IP Phones in Avaya Aura Comments on this document? infodev@avaya.com... - Page 16 • (-): To decrease the volume. Mute button Used to mute or unmute the outgoing audio. Handset Used to receive or make calls. ® February 2021 Using Avaya J169 and J179 SIP IP Phones in Avaya Aura Comments on this document? infodev@avaya.com...
-
Page 17: Connection Jacks For J169/179 Ip Phone
Phone overview on page 13 Connection jacks for J169/179 IP Phone The following image illustrates the connection jacks that are present on the back panel of Avaya J169/J179 IP Phone. The image schematically describes which device to connect to which jack. - Page 18 Phone overview ® February 2021 Using Avaya J169 and J179 SIP IP Phones in Avaya Aura Comments on this document? infodev@avaya.com...
-
Page 19: Optional Components
• PSAC12R–050 – 5V DC Power adapter • Avaya J100 Expansion Module • GSPPoE - Avaya 48V PoE power inserter Related links Phone overview on page 13 ® February 2021 Using Avaya J169 and J179 SIP IP Phones in Avaya Aura Comments on this document? infodev@avaya.com... -
Page 20: Chapter 3: Getting Started
Enter provisioning details screen. 2. On Enter provisioning details screen, press one of the following: • Config: To enter the provisioning server address. ® February 2021 Using Avaya J169 and J179 SIP IP Phones in Avaya Aura Comments on this document? infodev@avaya.com... -
Page 21: Identifying The Device Type During Phone Boot-Up
Setting Up the Avaya J179 IP Phone Identifying the device type during phone boot-up About this task Avaya J100 Series IP Phones screen displays the device type during the phone boot-up. This feature is supported only in the phone software version 4.0.3 and later. Procedure 1. -
Page 22: Logging In To Your Phone
To lock the phone, press Main menu, and select Applications > Lock. ® February 2021 Using Avaya J169 and J179 SIP IP Phones in Avaya Aura Comments on this document? infodev@avaya.com... -
Page 23: Unlocking Your Phone
• Wi-Fi: To connect phone to a Wi-Fi network. 5. Press one of the following: • Toggle • Right arrow key • Left arrow key ® February 2021 Using Avaya J169 and J179 SIP IP Phones in Avaya Aura Comments on this document? infodev@avaya.com... -
Page 24: Setting The Network Configuration
The Network configuration shows following two options: • Auto: To automatically connect a network. • Manual: To manually connect to a network. ® February 2021 Using Avaya J169 and J179 SIP IP Phones in Avaya Aura Comments on this document? infodev@avaya.com... -
Page 25: Connecting To A Wi-Fi Network
• Depending on the type of security in the Wi-Fi network, obtain the required credentials. Contact your system administrator for more details. Procedure 1. Press the Main menu. 2. Scroll to Settings and press Select. ® February 2021 Using Avaya J169 and J179 SIP IP Phones in Avaya Aura Comments on this document? infodev@avaya.com... - Page 26 If the credentials are authenticated successfully, the phone automatically restarts to complete the connection. Related links Setting the network mode on page 23 ® February 2021 Using Avaya J169 and J179 SIP IP Phones in Avaya Aura Comments on this document? infodev@avaya.com...
-
Page 27: Chapter 4: Navigation
The directional keys are context-sensitive. Up Arrow and Down Arrow Use these keys to scroll vertically in lists, menus, and pop- up windows. Table continues… ® February 2021 Using Avaya J169 and J179 SIP IP Phones in Avaya Aura Comments on this document? infodev@avaya.com... -
Page 28: Text Input
• Displays the new character on the left side of the current character. • Deletes the character on the right side of the cursor when you press Backspace. ® February 2021 Using Avaya J169 and J179 SIP IP Phones in Avaya Aura Comments on this document? infodev@avaya.com... -
Page 29: Line Keys
The following table lists the Main menu icons used in Avaya J169/J179 IP Phones: Note: The icons of Avaya J169 IP Phone and Avaya J179 IP Phone look similar but Avaya J169 IP Phone has grayscale icons and Avaya J179 IP Phone has color icons. -
Page 30: General Phone Icons
The following table lists the icons used in Avaya J169/J179 IP Phones: Note: The icons of Avaya J169/J179 IP Phones look similar but the Avaya J169 IP Phone has grayscaled icons and the Avaya J179 IP Phone has colored icons. - Page 31 Indicates that the audio of this call is secure. Indicates that the audio alert for incoming calls is off. Indicates the Bluetooth feature is on. Table continues… ® February 2021 Using Avaya J169 and J179 SIP IP Phones in Avaya Aura Comments on this document? infodev@avaya.com...
-
Page 32: Presence Icons
9. Autodialing feature Presence icons Presence icons for Avaya J169 IP Phone and Avaya J179 IP Phone look similar, but Avaya J169 IP Phone has grayscale icons and Avaya J179 IP Phone has color icons. Icon... -
Page 33: Multiple Level Precedence And Preemption Icons
Multiple Level Precedence and Preemption icons The following table lists the icons used in Avaya J169/J179 IP Phone. Note that the icons of Avaya J169 IP Phoneand Avaya J179 IP Phone look similar but Avaya J169 IP Phone has grayscale icons and Avaya J179 IP Phone has color icons. -
Page 34: Wi-Fi Icons
Navigation Wi-Fi icons The following table lists the Wi-Fi icons used in the Avaya J179 IP Phone: Note: Avaya J169 IP Phone does not support the Wi-Fi feature. Icon Description Non-secure Wi-Fi network is detected. Secure Wi-Fi network is detected. -
Page 35: Chapter 5: Handling Incoming Calls
You can receive a call on a secondary call appearance only if the call appearance is free. Procedure Press one of the following: • The Answer soft key ® February 2021 Using Avaya J169 and J179 SIP IP Phones in Avaya Aura Comments on this document? infodev@avaya.com... -
Page 36: Handling Calls And Conferences Using Multiple Device Access
Navigation cluster to select the call and answer it. Procedure On the Incoming call screen, press one of the following: • Ignore soft key • + volume button ® February 2021 Using Avaya J169 and J179 SIP IP Phones in Avaya Aura Comments on this document? infodev@avaya.com... -
Page 37: Declining A Call
The call is declined. Depending on your Call decline policy, the caller receives one of the following alert: • An audio message alert • A busy tone alert ® February 2021 Using Avaya J169 and J179 SIP IP Phones in Avaya Aura Comments on this document? infodev@avaya.com... -
Page 38: Chapter 6: Handling Outgoing Calls
In an auto-dial mode, when you initiate a call by off-hook, you hear a dial tone until you press any digit from the dial pad. You can edit a partially entered dialed input after initiating a call. You hear a ® February 2021 Using Avaya J169 and J179 SIP IP Phones in Avaya Aura Comments on this document? infodev@avaya.com... -
Page 39: Redialing A Number
2. (Optional) To see the list of dialed numbers: a. Scroll to the number you want to redial. b. Press Call. Related links Setting redial options on page 103 ® February 2021 Using Avaya J169 and J179 SIP IP Phones in Avaya Aura Comments on this document? infodev@avaya.com... -
Page 40: Making A Call By Using Speed Dial
2. Press Search. 3. Enter the digits on the dial pad that correspond to the name of the person you want to call. ® February 2021 Using Avaya J169 and J179 SIP IP Phones in Avaya Aura Comments on this document? infodev@avaya.com... -
Page 41: Making An International Call
In the IP Office environment, the Emerg soft key is unavailable. You must dial the emergency number by using the dial pad. For more information on IP Office, see IP Office documents in https://support.avaya.com/. ® February 2021 Using Avaya J169 and J179 SIP IP Phones in Avaya Aura Comments on this document? infodev@avaya.com... -
Page 42: Making An Emergency Call
• On the Phone screen, press the Emerg soft key, and again press Emerg when the phone prompts you for confirmation. • Dial the emergency number by using the dial pad. ® February 2021 Using Avaya J169 and J179 SIP IP Phones in Avaya Aura Comments on this document? infodev@avaya.com... -
Page 43: Chapter 7: Call Related Features
2. To resume the held call, press the Resume soft key, or press the line key of the held call. ® February 2021 Using Avaya J169 and J179 SIP IP Phones in Avaya Aura Comments on this document? infodev@avaya.com... -
Page 44: Chapter 8: Managing Contacts
(,), plus (+), and dot (.). 6. Press Save. Related links Adding a contact to the local group on page 49 Using Contacts ® February 2021 Using Avaya J169 and J179 SIP IP Phones in Avaya Aura Comments on this document? infodev@avaya.com... -
Page 45: Adding A Contact From The Recents List
Contacts list without entering the entire name of the contact. Before you begin Ensure that at least one contact is available in the Contacts list. ® February 2021 Using Avaya J169 and J179 SIP IP Phones in Avaya Aura Comments on this document? infodev@avaya.com... -
Page 46: Viewing The Contact Details
• To edit the contact, press Edit. • To delete the contact, press Delete. • To view more options, press More. ® February 2021 Using Avaya J169 and J179 SIP IP Phones in Avaya Aura Comments on this document? infodev@avaya.com... -
Page 47: Searching For A Contact
Use this procedure to merge the phone number of the current contact with the existing local contact. Before you begin Ensure the Contacts list is not empty. Procedure 1. Press Contacts. ® February 2021 Using Avaya J169 and J179 SIP IP Phones in Avaya Aura Comments on this document? infodev@avaya.com... -
Page 48: Deleting A Contact
Scroll to Contacts and press Select. 3. Press Groups. 4. Press NewGroup. 5. In the Enter group name field, type your group name. ® February 2021 Using Avaya J169 and J179 SIP IP Phones in Avaya Aura Comments on this document? infodev@avaya.com... -
Page 49: Adding A Contact To The Local Group
3. Press Groups. 4. Scroll to the group, and press Members. The phone displays the list of contacts in the group. ® February 2021 Using Avaya J169 and J179 SIP IP Phones in Avaya Aura Comments on this document? infodev@avaya.com... -
Page 50: Assigning A Ringtone To A Contact
You can combine any found LDAP contact with an existing local contact with the help of the Combine soft key. ® February 2021 Using Avaya J169 and J179 SIP IP Phones in Avaya Aura Comments on this document? infodev@avaya.com... -
Page 51: Setting Ldap Directory As The Contact Search Source
• Scroll to Contacts, and press Select. 3. If you are searching from a LDAP Directory, scroll to LDAP Directory, and press Select. ® February 2021 Using Avaya J169 and J179 SIP IP Phones in Avaya Aura Comments on this document? infodev@avaya.com... - Page 52 9. (Optional) Press Combine from the Details view to select an existing local contact and merge it with the selected LDAP contact. ® February 2021 Using Avaya J169 and J179 SIP IP Phones in Avaya Aura Comments on this document? infodev@avaya.com...
-
Page 53: Chapter 9: Managing Recents
• Call time-stamp • Call duration Avaya J100 Series IP Phones software version 4.0.3 and later always encrypts the content of the call log file. When the offline call log feature is disabled in System Manager, if you downgrade the software of your phone to a version earlier than 4.0.3, you will lose the call log details. -
Page 54: Viewing The Recents Details
Applications, and press Select. b. Recents, and press Select. 3. Select a number that you want to delete. 4. Press Details. ® February 2021 Using Avaya J169 and J179 SIP IP Phones in Avaya Aura Comments on this document? infodev@avaya.com... -
Page 55: Clearing The Recents List
4. Select one of the following when the phone prompts for confirmation: • Delete: To delete all entries. • Cancel: To cancel and return to the previous menu. ® February 2021 Using Avaya J169 and J179 SIP IP Phones in Avaya Aura Comments on this document? infodev@avaya.com... -
Page 56: Chapter 10: Managing Conference Calls
3. Press Held Call soft key to see a list of held calls. 4. Select the call on hold that you want to add to the conference. ® February 2021 Using Avaya J169 and J179 SIP IP Phones in Avaya Aura Comments on this document? infodev@avaya.com... -
Page 57: Putting A Conference Call On Hold And Resuming A Call
4. When the person answers, press Join or OK to add the person to the existing call. 5. Press Add and repeat the steps to add another person to the conference. ® February 2021 Using Avaya J169 and J179 SIP IP Phones in Avaya Aura Comments on this document? infodev@avaya.com... -
Page 58: Dropping Or Disconnecting The Last Participant From A Conference Call
The participant who was added last gets disconnected from the conference. Related links Adding a participant to no hold conference on page 89 Making Conference Calls ® February 2021 Using Avaya J169 and J179 SIP IP Phones in Avaya Aura Comments on this document? infodev@avaya.com... -
Page 59: Chapter 11: Advanced Features
• Adding the selected user to an active call to set up a conference call To configure any of these shortcut actions, contact your system administrator. ® February 2021 Using Avaya J169 and J179 SIP IP Phones in Avaya Aura Comments on this document? infodev@avaya.com... -
Page 60: Making A Call Transfer With A Shortcut Key
If you need to include the other agent in your conversation with the caller, you can add an Autodial user or a contact to an active call to set up a conference call. ® February 2021 Using Avaya J169 and J179 SIP IP Phones in Avaya Aura Comments on this document? infodev@avaya.com... -
Page 61: Activating The Screen Saver
Enabling both features at the same time can cause duplicate entries in the call log. Procedure 1. Navigate to the Features screen. 2. Scroll to choose Do not disturb. ® February 2021 Using Avaya J169 and J179 SIP IP Phones in Avaya Aura Comments on this document? infodev@avaya.com... -
Page 62: Automatic Callback
Your system administrator might set up few frequently called numbers, such as the IT Help Desk for autodialing. These numbers are displayed on the phone screen. ® February 2021 Using Avaya J169 and J179 SIP IP Phones in Avaya Aura Comments on this document? infodev@avaya.com... -
Page 63: Blocking Your Extension From Displaying During Calls
Use this procedure to make a call on another user’s bridged line. Before you begin Ensure that the required bridged line is idle. ® February 2021 Using Avaya J169 and J179 SIP IP Phones in Avaya Aura Comments on this document? infodev@avaya.com... -
Page 64: Answering A Bridged Line Call
• Select an active bridge line number, and press Bridge. Note: On Avaya J179 IP Phone, do not use Headset, Handset or Speaker softkeys to join the call on a bridged line. Pressing Headset, Handset or Speaker opens the Dial screen. To cancel dialing and to press the required line button for joining a call, press the Headset, Handset or Speaker softkey again. -
Page 65: Busy Indicator
The following table displays the Busy Indicator icons and LED indication for Avaya J169/J179 IP Phone, JBM24 Button Module, and Avaya J100 Expansion Module. The icons of Avaya J169 IP Phone and Avaya J179 IP Phone look similar, but Avaya J169 IP Phone has grayscaled icons and Avaya J179 IP Phone has color icons. -
Page 66: Busy Indicator Call Operations
Making a blind transfer to a monitored user About this task Use this procedure to transfer immediately an active call to a monitored user. ® February 2021 Using Avaya J169 and J179 SIP IP Phones in Avaya Aura Comments on this document? infodev@avaya.com... -
Page 67: Calendar
Calendar information is updated whenever you log in to your phone, change calendar settings, or access the Calendar. ® February 2021 Using Avaya J169 and J179 SIP IP Phones in Avaya Aura Comments on this document? infodev@avaya.com... -
Page 68: Accessing Calendar
6. (Optional) To enable or disable Name/Password Prompt, do one of the following: • Toggle: To enable or disable the prompt. ® February 2021 Using Avaya J169 and J179 SIP IP Phones in Avaya Aura Comments on this document? infodev@avaya.com... -
Page 69: Reviewing Your Calendar Event
• Day: To view calendar event of the selected day. Related links Enabling and disabling Exchange calendar on page 112 Enabling and Disabling Calendar reminder on page 112 ® February 2021 Using Avaya J169 and J179 SIP IP Phones in Avaya Aura Comments on this document? infodev@avaya.com... -
Page 70: Call Forwarding
5. In the Destination field, enter the number where you want to forward the incoming calls. 6. Press Enter. The phone generates a confirmation tone and returns to the Features screen. ® February 2021 Using Avaya J169 and J179 SIP IP Phones in Avaya Aura Comments on this document? infodev@avaya.com... -
Page 71: Setting Enhanced Call Forwarding
To edit the already set rules, you can use the following procedure. Before you begin Ensure that the Enhanced Call Forward feature is activated by your administrator. ® February 2021 Using Avaya J169 and J179 SIP IP Phones in Avaya Aura Comments on this document? infodev@avaya.com... -
Page 72: Call Forwarding To Your Cell Phone Using Ec500
Call forwarding to your cell phone using EC500 About this task Use this procedure to forward calls from your Avaya deskphone to your personal phone. Before you begin • Ensure that the feature is activated by the administrator. Contact your administrator for details. -
Page 73: Calling In Your Intercom Group
You can dial your extension number from any other phone to retrieve the call. Related links Call Parking ® February 2021 Using Avaya J169 and J179 SIP IP Phones in Avaya Aura Comments on this document? infodev@avaya.com... -
Page 74: Parking A Call
® Avaya J100 Series IP Phones support the following three ways of Call Pickup in Avaya Aura Communication Manager. Ensure that your administrator configures the call pickup feature for your extension. -
Page 75: Answering A Call For A Call Pickup Group Member
4. To answer a call in the same pickup group, enter the extension number of the ringing phone. 5. Press Enter. ® February 2021 Using Avaya J169 and J179 SIP IP Phones in Avaya Aura Comments on this document? infodev@avaya.com... -
Page 76: Answering A Call Using The Extension Number
Ensure that the feature is activated by the administrator. Contact your administrator for details. Procedure 1. Press Main menu, and scroll to Features. 2. Press Select. 3. Scroll to Audix Rec, and press Select. ® February 2021 Using Avaya J169 and J179 SIP IP Phones in Avaya Aura Comments on this document? infodev@avaya.com... -
Page 77: Call Transfer
The call transfer is complete. This is also called attended transfer. • Press Complete after the recipient’s number starts ringing. The call transfer is complete. This is also called unattended transfer. ® February 2021 Using Avaya J169 and J179 SIP IP Phones in Avaya Aura Comments on this document? infodev@avaya.com... -
Page 78: Making A Blind Transfer
• Audio alert: An alert tone plays continuously until the watcher acknowledges it. • Visual alert: The green feature LED flashes. ® February 2021 Using Avaya J169 and J179 SIP IP Phones in Avaya Aura Comments on this document? infodev@avaya.com... -
Page 79: Acknowledging The Crisis Alert
The emergency caller extension. ® The following fields will display details only if Avaya Aura Communication Manager has this information. Table continues… ® February 2021 Using Avaya J169 and J179 SIP IP Phones in Avaya Aura Comments on this document? infodev@avaya.com... -
Page 80: Stopping The Crisis Alert
Before you begin Ensure that your system administrator designates you as a crisis alert watcher. Procedure 1. Press the Main menu. ® February 2021 Using Avaya J169 and J179 SIP IP Phones in Avaya Aura Comments on this document? infodev@avaya.com... -
Page 81: Displaying Your Extension On Outgoing Calls
When you activate Exclusion during a call, all parties except you, the calling and the called party are dropped from the call. ® February 2021 Using Avaya J169 and J179 SIP IP Phones in Avaya Aura Comments on this document? infodev@avaya.com... -
Page 82: Extending A Call To Your Cell Phone
2. To turn off the Hunt Group Busy feature for a particular hunt group and start receiving calls, press the corresponding Hunt Group Busy button. ® February 2021 Using Avaya J169 and J179 SIP IP Phones in Avaya Aura Comments on this document? infodev@avaya.com... -
Page 83: Interrupting A Call With A Whisper Page
You can activate the Limit Incoming Calls feature to limit the number of incoming calls and change multiple call appearance to a single call appearance. ® February 2021 Using Avaya J169 and J179 SIP IP Phones in Avaya Aura Comments on this document? infodev@avaya.com... -
Page 84: Deactivating Limit Incoming Calls
The Limit Incoming Calls feature will be deactivated. Long-term acoustic exposure protection Avaya J100 Series IP Phones have the long-term acoustic exposure protection to prevent the users from getting acoustic shocks. This feature reduces the loud volume of the conversations on the phone call to permissible acoustic limits. -
Page 85: Configuring Long Term Acoustic Protection
• 8 hours: Sets the acoustic protection to 8 hours. 6. Press Save. Related links Setting a headset profile on page 120 ® February 2021 Using Avaya J169 and J179 SIP IP Phones in Avaya Aura Comments on this document? infodev@avaya.com... -
Page 86: Multiple Device Access
2. Press the Call soft key to make the call. Related links Setting the dialing mode on page 102 ® February 2021 Using Avaya J169 and J179 SIP IP Phones in Avaya Aura Comments on this document? infodev@avaya.com... -
Page 87: Making A Priority Call
A multicast page is ignored if the agent is on an active call and has the Do Not Disturb status, or making an emergency call. Related links Customizing phone keys on page 106 ® February 2021 Using Avaya J169 and J179 SIP IP Phones in Avaya Aura Comments on this document? infodev@avaya.com... -
Page 88: Sending A Multicast Page
No Hold Conference button, the call is placed to the pre-configured number when the participant answers the call joins the no hold conference. If the participants do not answer the call within the configured time-out duration Avaya J100 Series IP Phones will display the appropriate message on the phone screen. -
Page 89: Adding A Participant To No Hold Conference
• Routine: Lowest precedence. Routine is highlighted on the call session line if no call is made within five minutes. You can start a precedence call from Bridged Appearance, but not from the Team button. ® February 2021 Using Avaya J169 and J179 SIP IP Phones in Avaya Aura Comments on this document? infodev@avaya.com... -
Page 90: Making A Precedence Call By Using The Main Menu
The phone configuration is forced by the system administrator, and you cannot change the mapping or labels of pre-configured keys. ® February 2021 Using Avaya J169 and J179 SIP IP Phones in Avaya Aura Comments on this document? infodev@avaya.com... -
Page 91: Presence
Procedure 1. Press the Main menu. 2. Scroll to Applications and press Select. 3. Scroll to My Presence and press Select. ® February 2021 Using Avaya J169 and J179 SIP IP Phones in Avaya Aura Comments on this document? infodev@avaya.com... -
Page 92: Retrieving A Voice Message
You can also provide on the job training by coaching the agent during the service observe. You can activate the feature from the phone. ® February 2021 Using Avaya J169 and J179 SIP IP Phones in Avaya Aura Comments on this document? infodev@avaya.com... -
Page 93: Activating Service Observe
• Talk: In the Talk mode, you can talk to the agent and the caller. Use the Computer Telephony Integration (CTI) client to remotely activate or deactivate the Service ® Observe feature. For information on using the CTI client, see Avaya Aura Application Enablement Services documentation. -
Page 94: Deactivating Service Observe
While on the Call Observation line, press the Talk softkey to talk to your agent and the caller. ™ SLA Mon ™ SLA Mon technology is a patented Avaya technology embedded in Avaya products to facilitate ™ advanced diagnostics. The phones supports Avaya Diagnostic Server with SLA Mon agent. ™... -
Page 95: Shared Control
- To monitor hop-by-hop QoS markings for voice and video traffic. Shared control With the Shared Control feature, you can operate phones from the Avaya Workplace Client client and use high quality audio of the phone. Shared control is supported on all the Avaya J100 Series IP Phones models. ®... -
Page 96: Team Button
For more information to set the overriding permission on Avaya Aura Session Manager, see ® Administering Avaya Aura System Manager. The following table shows icons of the Team Button feature icons for Avaya J169/J179 IP Phone and Avaya J100 Expansion Module: Icon Description The monitored extension is idle. -
Page 97: Answering An Active Call On A Monitored Extension
Ensure that the monitored phone to which you make the call is in an idle state. Procedure 1. Press Main menu, and scroll to Features. ® February 2021 Using Avaya J169 and J179 SIP IP Phones in Avaya Aura Comments on this document? infodev@avaya.com... -
Page 98: Transferring A Call To A Monitored Phone
Ensure that the feature is activated by the administrator. Contact your administrator for details. Procedure 1. Press Main menu, and scroll to Features. 2. Press Select. ® February 2021 Using Avaya J169 and J179 SIP IP Phones in Avaya Aura Comments on this document? infodev@avaya.com... -
Page 99: Tracing A Malicious Call
You need to re-login if the phone reboots. Before you begin Ensure that the feature is activated by the administrator. Contact your administrator for details. ® February 2021 Using Avaya J169 and J179 SIP IP Phones in Avaya Aura Comments on this document? infodev@avaya.com... -
Page 100: Wml Browser
Logging out of your phone on page 22 WML browser Wireless Markup Language (WML) is an XML-based markup language used by Avaya J100 Series IP Phones. The WML browser feature allows you to view WML web pages. With the WML browser feature, you can access the Home page, Click to Dial and Add to Contacts applications. - Page 101 Home to go to the Home page e. Refresh to reload the current card f. Exit to return to the Applications menu ® February 2021 Using Avaya J169 and J179 SIP IP Phones in Avaya Aura Comments on this document? infodev@avaya.com...
-
Page 102: Chapter 12: Customization
Displaying сall timers About this task Use this procedure to display the duration of calls. Procedure 1. Press the Main menu. ® February 2021 Using Avaya J169 and J179 SIP IP Phones in Avaya Aura Comments on this document? infodev@avaya.com... -
Page 103: Setting Key Repeat Delay
1. Press the Main menu. 2. Scroll to Settings and press Select. 3. Scroll to Phone and press Select. 4. Scroll to the Redial option. ® February 2021 Using Avaya J169 and J179 SIP IP Phones in Avaya Aura Comments on this document? infodev@avaya.com... -
Page 104: Assigning Speed Dial Entries
Assign a contact to a Speed Dial number. Procedure 1. Press the Main menu. 2. Scroll to Settings and press Select. ® February 2021 Using Avaya J169 and J179 SIP IP Phones in Avaya Aura Comments on this document? infodev@avaya.com... -
Page 105: Setting Mute Alert
• If the speaker is on during an active call and there are new voice mail messages, the beacon LED turns off every 15 seconds. ® February 2021 Using Avaya J169 and J179 SIP IP Phones in Avaya Aura Comments on this document? infodev@avaya.com... -
Page 106: Customizing Phone Keys
7. (Optional) On the phone screen, if the selected line is empty, press Add, and do the following: • To add a contact, press Contact. • To add a feature, press Feature. ® February 2021 Using Avaya J169 and J179 SIP IP Phones in Avaya Aura Comments on this document? infodev@avaya.com... -
Page 107: Restoring Customized Keys To Default
4. Scroll to Phone keys customization, and press Select. 5. Scroll to Restore, and press Select. 6. In the confirmation window, press Restore. ® February 2021 Using Avaya J169 and J179 SIP IP Phones in Avaya Aura Comments on this document? infodev@avaya.com... -
Page 108: Applications
You can enter any value from 0 to 999. If you do not enter any value, the phone uses the administrator set value. 6. Press Save. ® February 2021 Using Avaya J169 and J179 SIP IP Phones in Avaya Aura Comments on this document? infodev@avaya.com... -
Page 109: Turning Call History On And Off
2. Scroll to Settings and press Select. 3. Scroll to Applications and press Select. 4. Scroll to Exchange credentials and press Select. ® February 2021 Using Avaya J169 and J179 SIP IP Phones in Avaya Aura Comments on this document? infodev@avaya.com... -
Page 110: Entering Microsoft Exchange Credentials For Oauth Authentication
• Email address • Sever address 7. Press Save. The Save soft key appears only after you enter the valid details. ® February 2021 Using Avaya J169 and J179 SIP IP Phones in Avaya Aura Comments on this document? infodev@avaya.com... -
Page 111: Enabling And Disabling Microsoft Exchange Contact Integration
If you want to use Basic authentication, please contact your administrator. Before you begin Ensure that you have a valid exchange credential. Procedure 1. Press the Main menu. ® February 2021 Using Avaya J169 and J179 SIP IP Phones in Avaya Aura Comments on this document? infodev@avaya.com... - Page 112 Enabling and Disabling Calendar reminder Procedure 1. Press the Main menu. 2. Scroll to Settings and press Select. 3. Scroll to Applications and press Select. ® February 2021 Using Avaya J169 and J179 SIP IP Phones in Avaya Aura Comments on this document? infodev@avaya.com...
- Page 113 6. Scroll to Snooze Time, and enter the number of minutes. The range is 0 to 99. 7. Press Save. Setting a day of the week for calendar reminder Procedure 1. Press the Main menu. ® February 2021 Using Avaya J169 and J179 SIP IP Phones in Avaya Aura Comments on this document? infodev@avaya.com...
-
Page 114: Activating Do Not Disturb
Before you begin Your system administrator must activate the feature for your extension. ® February 2021 Using Avaya J169 and J179 SIP IP Phones in Avaya Aura Comments on this document? infodev@avaya.com... -
Page 115: Redirecting Calls When Do Not Disturb Is Active
• Two-way link: Activate the Send all call feature when you enable Do Not Disturb and vice versa. 7. Press Save. Related links Activating Send All Calls on page 61 ® February 2021 Using Avaya J169 and J179 SIP IP Phones in Avaya Aura Comments on this document? infodev@avaya.com... -
Page 116: Audio
• Toggle: To enable or disable Bluetooth. • Right Arrow key: To enable Bluetooth. • Left Arrow key: To disable Bluetooth. ® February 2021 Using Avaya J169 and J179 SIP IP Phones in Avaya Aura Comments on this document? infodev@avaya.com... -
Page 117: Pairing A Bluetooth Enabled Headset With Your Phone
4. Use the Down Arrow key to go to the Button clicks screen. 5. Press Toggle to turn the audio on or off. ® February 2021 Using Avaya J169 and J179 SIP IP Phones in Avaya Aura Comments on this document? infodev@avaya.com... -
Page 118: Turning Error Tones On And Off
• Switch hook only: Activates the link to the headset if you press Headset. When the phone receives an incoming call, you do not hear the alert tone in the headset. 6. Press Save. ® February 2021 Using Avaya J169 and J179 SIP IP Phones in Avaya Aura Comments on this document? infodev@avaya.com... -
Page 119: Setting Headset Mic Level
The amplified audio level will return to normal when the call is ended. • Hearing Aid: Optimizes the sound quality of hearing aids. 6. Press Save. ® February 2021 Using Avaya J169 and J179 SIP IP Phones in Avaya Aura Comments on this document? infodev@avaya.com... -
Page 120: Setting A Headset Profile
• CS500 Series: CS510, CS520, CS530, CS540 (APV-63) ® • Savi 700 Series: W710, W720, W730, W740, W745 (APV-63) Table continues… ® February 2021 Using Avaya J169 and J179 SIP IP Phones in Avaya Aura Comments on this document? infodev@avaya.com... -
Page 121: Setting A Personalized Ringtone
8. (Optional) To play the ringtone, press Play. 9. Press Save. Display Changing the background image Procedure 1. Press the Main menu. ® February 2021 Using Avaya J169 and J179 SIP IP Phones in Avaya Aura Comments on this document? infodev@avaya.com... -
Page 122: Changing The Screen Saver
4. Scroll to Screen saver details, and press Select. 5. To change the screen saver time, scroll down to Timer (min), and enter time in minutes. ® February 2021 Using Avaya J169 and J179 SIP IP Phones in Avaya Aura Comments on this document? infodev@avaya.com... -
Page 123: Adjusting The Brightness Of A Phone Screen
6. Press one of the following when the phone prompts for confirmation: • Confirm • Cancel The phone returns to the Display screen and the language changes to the selected language. ® February 2021 Using Avaya J169 and J179 SIP IP Phones in Avaya Aura Comments on this document? infodev@avaya.com... -
Page 124: Setting The Backlight Timer
4. Use the Down Arrow key to go to the Date format screen. The phone displays one of the following: • Default • mm/dd ® February 2021 Using Avaya J169 and J179 SIP IP Phones in Avaya Aura Comments on this document? infodev@avaya.com... -
Page 125: Setting The Time Zone
2. Scroll to Settings and press Select. 3. Scroll to Display and press Select. 4. Scroll down to Text size, and press Select. ® February 2021 Using Avaya J169 and J179 SIP IP Phones in Avaya Aura Comments on this document? infodev@avaya.com... -
Page 126: Setting The Phone Screen Width
• Default: Each call appearance or feature occupies the entire width of a line. 6. Press Save. ® February 2021 Using Avaya J169 and J179 SIP IP Phones in Avaya Aura Comments on this document? infodev@avaya.com... -
Page 127: Chapter 13: Phone Update
The Automatic update screen shows the following: • Automatic update policy: Displays the frequency of the phone update set by your administrator. ® February 2021 Using Avaya J169 and J179 SIP IP Phones in Avaya Aura Comments on this document? infodev@avaya.com... - Page 128 • Last update: Displays the date and time of the last update of the phone. • Next update: Displays the date and time of the next update of the phone. ® February 2021 Using Avaya J169 and J179 SIP IP Phones in Avaya Aura Comments on this document? infodev@avaya.com...
-
Page 129: Chapter 14: Maintenance
• Emergency calls might or might not work, depending on the stage of failover and the functionality available on the alternate server. ® February 2021 Using Avaya J169 and J179 SIP IP Phones in Avaya Aura Comments on this document? infodev@avaya.com... -
Page 130: Recording Audio Parameters
1. Press the Main menu. 2. Scroll to Network information, and press Select. 3. Scroll to System, and press Select. 4. Scroll to Product ID. ® February 2021 Using Avaya J169 and J179 SIP IP Phones in Avaya Aura Comments on this document? infodev@avaya.com... -
Page 131: Viewing The Device Type
Viewing the Device type About this task View your device type when your system administrator asks you to provide your device type information. The device type can be either Avaya SIP or Open SIP. Procedure 1. Press the Main menu. -
Page 132: Chapter 15: Resources
Avaya Aura install, configure, and ® Session Manager. verify Avaya Aura Session Manager on ® Avaya Aura System Platform. Table continues… ® February 2021 Using Avaya J169 and J179 SIP IP Phones in Avaya Aura Comments on this document? infodev@avaya.com... - Page 133 See information about the maintenance For people who ® Manager tasks for Avaya Aura Session Manager. maintain Avaya ® Aura Session Manager. Table continues… ® February 2021 Using Avaya J169 and J179 SIP IP Phones in Avaya Aura Comments on this document? infodev@avaya.com...
-
Page 134: Finding Documents On The Avaya Support Website
The latest customer documentation for some programs is now available on the Avaya Documentation Center website at https://documentation.avaya.com. Important: For documents that are not available on Avaya Documentation Center, click More Sites > Support on the top menu to open https://support.avaya.com. Using the Avaya Documentation Center, you can: •... -
Page 135: Viewing Avaya Mentor Videos
Some functionality is only available when you log on to the website. The available functionality depends on the role with which you are logged in. Viewing Avaya Mentor videos Avaya Mentor videos provide technical content on how to install, configure, and troubleshoot Avaya products. ®... -
Page 136: Support
Resources About this task Videos are available on the Avaya Support website, listed under the video document type, and on the Avaya-run channel on YouTube. • To find videos on the Avaya Support website, go to https://support.avaya.com/ and do one of... - Page 137 ............calendar integration setting a primary ringtone ........... new phone ..............111 setting headset mic level ..........119 call Autodialing recents ................53 ® February 2021 Using Avaya J169 and J179 SIP IP Phones in Avaya Aura Comments on this document? infodev@avaya.com...
- Page 138 PDF ............deactivating sharing content ............LNCC, limiting incoming calls ........conference, add participant using no hold conference ..deleting ® February 2021 Using Avaya J169 and J179 SIP IP Phones in Avaya Aura Comments on this document? infodev@avaya.com...
- Page 139 ............74 editing a rule ..............error tones turn off .................118 turn on .................118 handset Exchange authentication AGC ................basic ................® February 2021 Using Avaya J169 and J179 SIP IP Phones in Avaya Aura Comments on this document? infodev@avaya.com...
- Page 140 ................blocking extension display ..........63 international ..............calls ................unblocking extension display ........81 encryption ..............overview ................13 ® February 2021 Using Avaya J169 and J179 SIP IP Phones in Avaya Aura Comments on this document? infodev@avaya.com...
- Page 141 .........134 Speaker AGC ................specifications ............... speed dialing recents contacts ..............clearing all ..............removing contact ............clearing all entries ............55 ® February 2021 Using Avaya J169 and J179 SIP IP Phones in Avaya Aura Comments on this document? infodev@avaya.com...
- Page 142 Hunt Group Busy ............videos ................Viewing product ID ..............watch list ................Wi-Fi icons ............... 33, WML browser accessing application ..........overview ..............® February 2021 Using Avaya J169 and J179 SIP IP Phones in Avaya Aura Comments on this document? infodev@avaya.com...
Need help?
Do you have a question about the J169 and is the answer not in the manual?
Questions and answers
screen went blank but now asking to input an extension
The Avaya J169 screen appears blank with no button labels after a reboot of the IPO. However, the screen is lit. The issue is resolved when the POE switch is rebooted or when the phone is unplugged and plugged back in. This suggests that the phones are not properly recovering from the IPO reboot and may require a power cycle to restore functionality.
This answer is automatically generated