Avaya J169 Manual
Hide thumbs
Also See for J169:
- User manual ,
- Installing and administering (203 pages) ,
- Instructions manual (179 pages)
Advertisement
Quick Links
Advertisement

Subscribe to Our Youtube Channel
Related Manuals for Avaya J169


Summary of Contents for Avaya J169
- Page 1 AVAYA IX IP PHONE J169/J179 DESK PHONE © 2020 Avaya Inc. All rights reserved.
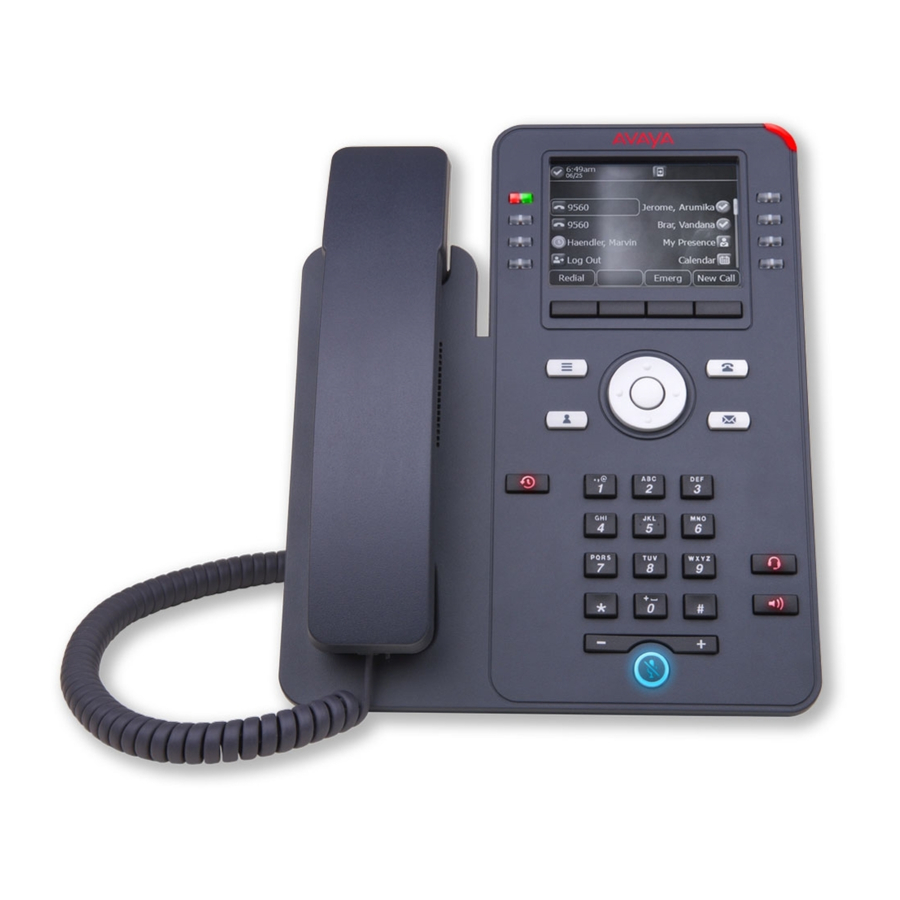
- Page 2 Avaya IX IP Phone J169/J179 Physical Layout Line Keys Soft Keys Main Menu Phone Key Contacts Voicemail Recents Headset Speaker Handset Volume Mute button © 2020 Avaya Inc. All rights reserved.
- Page 3 ▪ Green light: incoming call and enabled features. ▪ Red and green light: phone is off-hook Phone Key - Displays the Phone screen. Voicemail - Used to dial the configured voice mail number to receive a voice message. © 2020 Avaya Inc. All rights reserved.
- Page 4 ▪ (+) To increases the volume. ▪ (-) To decrease the volume. Mute button - Used to mute and Headset unmute the outgoing audio. Speaker Volume Mute button © 2020 Avaya Inc. All rights reserved.
- Page 5 Features, Applications, Settings, and Network Information. Main Menu Contacts – Displays the entries in your Contacts list. Contacts Recents – Displays call history list Recents Handset – Used to receive and make calls Handset © 2020 Avaya Inc. All rights reserved.
-
Page 6: Make And Answer A Call
▪ Make/Pickup a call using the Headset Pickup ▪ Make/Pickup a call using Speakerphone Do one of the following: Lift the handset. ▪ ▪ Press Speaker. ▪ Press OK. ▪ Press the Answer soft key. ▪ Press Headset. © 2020 Avaya Inc. All rights reserved. - Page 7 Avaya IX IP Phone J169/J179 Muting and Unmuting a Call To mute an active call, press Mute. The Mute button is lit. To unmute the call, press Mute again. © 2020 Avaya Inc. All rights reserved.
- Page 8 To put an active call on hold, press the Hold soft key, or press the line key of the active call. To resume the held call, press the Resume soft key, or press the line key of the held call. © 2020 Avaya Inc. All rights reserved.
-
Page 9: Blind Transfer
▪ Dial the number to which you want to transfer the call. ▪ Search for the number in Contacts or Recents. To initiate a blind transfer, press Now. The call transfer is complete. © 2020 Avaya Inc. All rights reserved. -
Page 10: Consultative Transfer
▪ Search for the number in Contacts or Recents. To initiate a consultative transfer, press Talk. The call transfer recipient’s phone starts ringing. Press Complete after the recipient answers the call. The call transfer is complete. © 2020 Avaya Inc. All rights reserved. -
Page 11: Assigning Speed Dials
Press one of the following: Replace: To assign a contact to an assigned entry. ▪ Clear: To remove a contact from the entry. ▪ Press Save. Enabling the Away timer. © 2020 Avaya Inc. All rights reserved. - Page 12 ▪ Call the person from the Contacts list or the Recents list. When the third participant answers the call, press the Join softkey. To add another person, press Add and repeat Step 2 and 3. © 2020 Avaya Inc. All rights reserved.
- Page 13 Thank you. © 2020 Avaya Inc. All rights reserved.
Need help?
Do you have a question about the J169 and is the answer not in the manual?
Questions and answers