Hiwin D1-N Series Assembly And Commissioning Instructions
Servo drive amplifier
Hide thumbs
Also See for D1-N Series:
- User manual (283 pages) ,
- Assembly and commissioning instructions (160 pages)

Subscribe to Our Youtube Channel
Related Manuals for Hiwin D1-N Series


Summary of Contents for Hiwin D1-N Series
- Page 1 Assembly and Commissioning Instructions D1-N Servo Drive Amplifier with EtherCAT® and Safe Torque Off (STO) Safety Function Version: 1.05 As of: 05.10.2015...
- Page 2 Tel.: +49 (0)781 / 9 32 78-77 These assembly and commissioning instructions are protected by copyright. The written consent of HIWIN GmbH is required for reproduction, publication in part or in whole, modification or abridgement of these instructions. Subject to technical changes.
-
Page 3: Table Of Contents
Contents 1 Content ...................... 7 1.1 Version of this documentation ................7 1.2 Information about the document ................7 1.3 Requirements ......................7 1.4 Availability ......................8 1.5 Scope of validity for these assembly and commissioning instructions....8 1.6 Depiction of safety notices ..................8 1.7 Symbols used ...................... - Page 4 5.7.3 Wiring of encoder output on X6 ............... 41 5.7.4 Wiring of analogue input on X6 ................ 41 5.8 X7 and X8 – STO safety function connection ............42 5.9 X9 – motor temperature sensor ................. 43 5.10 X10, X11, X12 – encoder connection ..............44 5.11 X13 - EtherCAT ....................
- Page 5 8.4 “Configuration center” without/with EtherCAT ..........73 8.4.1 AC servo motor parameterisation ..............74 8.4.2 Linear motor parameterisation ............... 82 8.4.3 TM motor parameterisation ................91 8.4.4 Motor parameterisation with EnDat 2.2 encoder ......... 100 8.5 “Application center” ..................101 8.5.1 Homing ......................
- Page 6 10.4 Programming examples (no liability accepted) ..........163 10.5 Writing PDL program to D1-N and saving ............. 166 10.6 Stopping PDL program, allowing it to run on and deleting it ....... 169 11 Troubleshooting ..................172 11.1 Error codes and troubleshooting ..............172 11.2 Warnings and troubleshooting ...............
-
Page 7: Content
1.2 Information about the document These assembly and commissioning instructions are intended for planners, devel- opers and operators of machines and equipment in which Hiwin D1-N servo drive amplifiers are already integrated or are to be used. They are also intended for peo-... -
Page 8: Availability
D1-N servo drive amplifier. 1.5 Scope of validity for these assembly and commissioning instructions These assembly and commissioning instructions apply to servo drive amplifiers from HIWIN with the following product designations: • D1-N-09-xx-x-x-xx •... -
Page 9: Symbols Used
Table 1.3: Signs giving orders Information Note Describes general information and recommendations. Table 1.4: Information 1.8 Warranty and liability The “General conditions of sale and delivery” of HIWIN GmbH apply. 9 / 183 Assembly and Commissioning Instructions Servo amplifier D1-N 15.10.2015... -
Page 10: Manufacturer's Details
EnDat is a registered trademark of Dr. Johannes Heidenhain GmbH • Beckhoff®, TwinCAT® and EtherCAT® are registered and licenced trade- marks of Beckhoff Automation GmbH. 1.11 Product monitoring As the manufacturer of the D1-N servo drive amplifier, please inform HIWIN about: • accidents • potential sources of risk misunderstandings in these assembly instructions •... -
Page 11: Safety
20. Only use copper cables for wiring in the switch cabinet. The drive amplifiers of the D1-N series must not be used in unprotected outdoor areas or areas at risk of explosion. The D1-N servo drive amplifier can only be declared to be conforming if operated with the accessories supplied and the other HIWIN components required (motor, cables). -
Page 12: Disclaimer In The Event Of Modification Or Improper Use
Only genuine parts from HIWIN are approved as spare parts and accessories. Spare parts and accessories not supplied by HIWIN are not checked for operation with HIWIN drive amplifiers and may restrict operational safety. HIWIN assumes no liability for damage caused through use of non-approved spare parts and accesso- ries. -
Page 13: General Safety Notices
2.4 General safety notices DANGER! The following safety notices must be observed. Non-compliance with safety notices may put life and limb at risk. • The drive amplifiers should be de-energised before and during all assem- bly, disassembly or repair work. Ensure that no-one can re-establish the mains connection. -
Page 14: Safety Notices Regarding Working With Energised And Live Products
The housing must not be touched during or shortly after operation. Leave the drive amplifier to cool for at least 15 minutes after switching off. 2.9 Technical support If you have any questions, please contact the technical support team at HIWIN: HIWIN Technical Support Tel.: +49 (0) 781 / 9 32 78-77... -
Page 15: Product Description
3 Product description The D1-N supports rotary servo motors, linear and torque motors and therefore the entire range of HIWIN motor types. The wide range of supported encoder inter- faces (digital, analogue 1 V , EnDat 2.2, resolver) and analogue and digital Hall sensors allow the D1-N to be used in many different ways, especially with linear motors in conjunction with various position measuring systems. -
Page 16: Order Code
3.1 Order code Figure 3.1: Order code for D1-N Assembly and Commissioning Instructions Servo amplifier D1-N 15.10.2015 16 / 183... -
Page 17: Type Plates
Figure 3.2: Type plate, right-hand side of device Figure 3.3: Type plate, front Number Description Type designation of drive amplifier HIWIN item number Serial number of device Barcode Electrical properties of the device CE compliant Compliance Functional Safety STO QR code Table 3.1: Content of type plates... -
Page 18: Guidelines And Standards
Plug connectors for all connections • The latest documentation, commissioning software “Lightening” and other valuable tools are free to download from www.hiwin.de. Accessories Please refer to chapter 13 of this document or the current HHIWIN D1-N catalogue for the extensive range of accessories. For more information, you can also visit www.hiwin.de. -
Page 19: Technical Specification
3.5 Technical specification HIWIN D1-N servo drive amplifier 220 to 240 VAC 220 to 400 VAC Voltage ±10 % ±10 % Frequency 50 to 60 Hz (±5 %) Number of phases 1 or 3 Control voltage 24 VDC ±10 % Maximum control current 1.5 A... - Page 20 HIWIN D1-N servo drive amplifier Input resistance 10 kΩ Analogue Input voltage ±10 VDC Resolution 12 bit Function Step/direction, CW/CCW Digital PWM frequency Min. 36.5 kHz, max. 100 kHz Min. pulse duration 220 ns PDO communication (flexible mapping) Functions SDO communication...
-
Page 21: Assembly
4 Assembly WARNING! Before and during all assembly, disassembly and repair work, the drive am- plifier must be de-energised. Ensure that no-one can re-establish the mains connection. Otherwise there is a serious risk of injury or death. 4.1 Assembling the drive amplifier This drive amplifier has to be mounted on a hard surface and is only mounted us- ing the mounting holes provided. -
Page 22: Dimensions
4.2 Dimensions All measurements are in millimeters. Figure 4.1: Dimensions of D1-N-09, D1-N-18 Assembly and Commissioning Instructions Servo amplifier D1-N 15.10.2015 22 / 183... - Page 23 Figure 4.2: Dimensions of D1-N-36 23 / 183 Assembly and Commissioning Instructions Servo amplifier D1-N 15.10.2015...
- Page 24 Figure 4.3: Dimensions of D1-N-90 Assembly and Commissioning Instructions Servo amplifier D1-N 15.10.2015 24 / 183...
-
Page 25: Switch Cabinet Assembly
4.3 Switch cabinet assembly CAUTION! During assembly, ensure sufficient earthing of the drive amplifier. Conductive screws should be used for this purpose. The assembly surface may have to be treated to produce a low-ohm electrical connection between the housing and assembly plate in the switch cabinet. The following minimum spacing must be observed when assembling several drive amplifiers. -
Page 26: Electrical Connection
5 Electrical connection DANGER! Always ensure that the drive amplifiers are correctly earthed using the PE bar in the switch cabinet as reference potential. Safety is not guaranteed if there is no low-ohm earthing. Power connections may be live even if the motor is not moving. Never discon- nect the electrical connections of motors and drive amplifiers when live. -
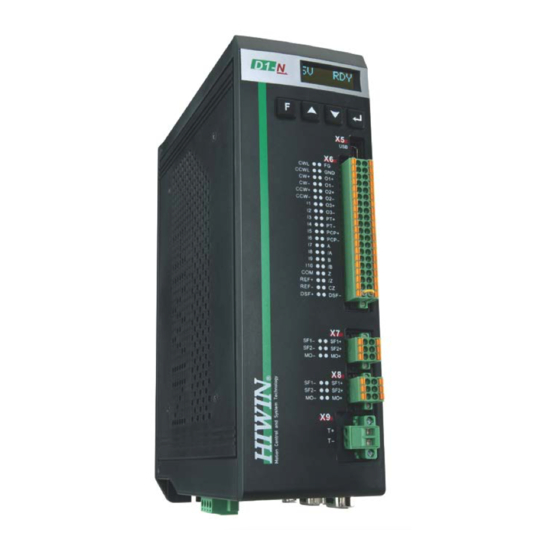
Page 27: Overview Of Electrical Connections
5.1 Overview of electrical connections All of the D1-N's connections are labelled and designed to be pluggable, ensuring simple installation and rapid device replacement. All mating connectors are sup- plied. Figure 5.1 provides an overview of all connections on the D1-N drive amplifi- X2 –... - Page 28 A diagram showing all electrical connections on the D1-N can be seen in Figure 5.2. Please note that the wiring of the inputs and outputs on the X6 connector is shown as NPN-switching in this overview. Figure 5.2: Diagrammatic overview of electrical connections (NPN) Assembly and Commissioning Instructions Servo amplifier D1-N...
-
Page 29: X1 - Mains Connection
D1-N. 5.2.1 1-phase mains connection with mains filter Figure 5.3: 1-phase mains filter HIWIN recommends the mains filter described in Table 5.2 for the D1-N's 1-phase mains connection. 29 / 183 Assembly and Commissioning Instructions Servo amplifier D1-N 15.10.2015... -
Page 30: 3-Phase Mains Connection With Mains Filter
2 kV, IEC 61000-4-5 Table 5.2: Technical data for Schaffner FN2412-8-44 filter 5.2.2 3-phase mains connection with mains filter Figure 5.4: 3-phase mains filter HIWIN recommends the mains filter described in Table 5.3 for the D1-N's 3-phase mains connection. Filter Schaffner FN3258-7-45 Maximum 30 ×... -
Page 31: X2 - Brake Resistor Connection
5.3 X2 – brake resistor connection When an electric drive is braked, the kinetic energy is converted into electric ener- gy and fed back to the drive amplifier's intermediate circuit. The energy fed back is absorbed by the internal capacitors provided they have sufficient capacity. If not, the excess energy must be dissipated via a brake resistor. - Page 32 Figure 5.6: Possible connections on X2 Name Table 5.4: X2 – brake resistor connection Assembly and Commissioning Instructions Servo amplifier D1-N 15.10.2015 32 / 183...
-
Page 33: Brake Resistor Calculation
5.3.1 Brake resistor calculation 5.3.2 DCbus capacity of D1-N servo drives D1-N-09 = 940uF D1-N-18 = 940uF D1-N-36 = 1880uF D1-N-90 = 940uF 33 / 183 Assembly and Commissioning Instructions Servo amplifier D1-N 15.10.2015... -
Page 34: X3 - Motor Connection
5.4 X3 – motor connection Name PE motor Table 5.5: X3 – motor connection ATTENTION! The motor cable without output filter must not exceed a length of 15 m. If longer cables are used, suitable filters must be fitted to effectively dampen any voltage peaks which arise. -
Page 35: X4 - Control Voltage And Motor Brake Connection
5.5 X4 – control voltage and motor brake connection The D1-N allows motors with an electric brake to be controlled. The brake output supplies a voltage of 24 VDC and a current of up to 1 A. For brakes requiring other voltages or higher currents, we would recommend a relay or optocoupler circuit (see Figure 5.8, Figure 5.9 and Figure 5.10). -
Page 36: X5 - Parameterisation Interface
Figure 5.10: Brake control via relay 5.6 X5 – parameterisation interface A standard USB interface is provided to set pa- rameters for and commission the drive amplifier. This takes the form of a mini type B USB bush on the X5 connector. Figure 5.11: X5 –... -
Page 37: X6 - Input And Output Connection
5.7 X6 – Input and output connection Assign- sign- Function ment Voltage adaptation (12 VDC and 24 VDC) for step/ direction input CCWL (see chapter 5.7.1) Channel 1 for step/direction input (step, CW, track A) (see chapter 5.7.1) Channel 2 for step/direction input CCW+ (direction, CCW, track B) CCW-... -
Page 38: Wiring Variants For Step/Direction Input On X6
Encoder output track B, differential Encoder output track /B, differential Encoder output track Z, differential Encoder output track /Z, differential Z-track open collector output DSF- Reset function input for STO Table 5.7: X6 – inputs and outputs connection ATTENTION! Please only use shielded cables for all cables carrying encoder signals. This minimises the effect of perturbation and avoids incorrect motor responses. -
Page 39: Switching Characteristics Of Digital Inputs On The X6
Figure 5.14: “Single-ended” step/direction without external resistor 5.7.2 Switching characteristics of digital inputs on the X6 The switching characteristics of the digital inputs can be defined by their wiring on the X6 connector. Either PNP or NPN characteristics can be selected. See the dia- grams below. - Page 40 Figure 5.16: NPN I/O switching characteristics Assembly and Commissioning Instructions Servo amplifier D1-N 15.10.2015 40 / 183...
-
Page 41: Wiring Of Encoder Output On X6
5.7.3 Wiring of encoder output on X6 The D1-N can forward encoder signals to other participants, e.g. a superordinate controller, via the X6 connector. Figure 5.17 shows the wiring needed for this. Figure 5.17: Encoder output wiring 5.7.4 Wiring of analogue input on X6 The D1-N's analogue input can be used to specify analogue (±10 VDC) speed and torque nominal values. -
Page 42: X7 And X8 - Sto Safety Function Connection
5.8 X7 and X8 – STO safety function connection The D1-N drive amplifier's integrated STO (Safe-Torque-Off) safety function is op- erated using the X7 and X8 connectors. A detailed description of this function and wiring examples can be found in chapter 6 from page 46 onwards. Name Function Safety input 1... -
Page 43: X9 - Motor Temperature Sensor
5.9 X9 – motor temperature sensor For motor temperature monitoring, the D1-N provides the option of evaluating both PTC resistors and NTC resistors. The temperature sensors are connected to the X9 connector. Name Function Thermal protection contact Thermal protection contact Table 5.9: X9 –... -
Page 44: X10, X11, X12 - Encoder Connection
Depending on the type used, the encoder system is connected to the D1-N via the X10, X11 or X12 connector. Connection Connector type Digital encoders Analogue encoders HIWIN resolvers Function and digital Hall and EnDat 2.2 sensors Signal SIN+ SIN1+... -
Page 45: X13 - Ethercat
ATTENTION! Never disconnect or loosen the encoder cable from the drive amplifier during operation. This could destroy highly sensitive electronic components in the encoder systems. First shut down the power supply and control voltage before plugging or un- plugging the connections on X10, X11 or X12. The same applies to changes on the encoder system itself. -
Page 46: Sto Safety Function
6 STO safety function The D1-N servo drive amplifier features a STO (Safe-Torque-Off) safety function according to IEC61800-5-2 as standard. 6.1 Definition STO The STO (Safe-Torque-Off) safety function according to IEC61800-5-2 allows the motor torque to be safely cut off. The drive amplifier's supply voltage (1-/3-phase 230 VAC or 3-phase 400 VAC) does not have to be interrupted in the process. -
Page 47: Functional Principle Of The Sto Function On The D1-N
6.2 Functional principle of the STO function on the D1-N The D1-N's STO safety function can be used to perform a stop category 0 emergen- cy stop in the sense of IEC 60204-1. To perform a stop category 1 emergency stop, an approved safety module must be used. - Page 48 WARNING! Loss of safety function Incorrect use of the STO reset function may result in a loss of the STO safety func- tion. Follow the requirements relating to use of the safety function in chapter 6.5, page 53 onwards. As well as resetting the STO function, the DSF+ and DSF- connections on the X6 connector can also be used to deactivate the STO function.
- Page 49 Name Function Safety input 1 SF1+ This input deactivates SF2- the final stage. Safety input 2 SF2+ This input deactivates SF2- the final stage. Status feedback contact of STO function. Name Function Safety input 1 SF1+ This input deactivates SF2- the final stage.
-
Page 50: Activation Of The Sto Function
6.4 Activation of the STO function The STO safety function is triggered by the two redundant inputs SF1 and SF2. The logical statuses of the two inputs in relation to the activation of the safety function STO can be seen in Table 6.4. Function Connection Logical status... - Page 51 If disabling the safety inputs is not leading to the desired function (motor disable) or the restart of the device with DSF+ and DSF- fails, please con- tact the HIWIN support (See section 2.9 on page 14). 51 / 183...
-
Page 52: Timing Diagram For Activating The Sto Function
6.4.1 Timing diagram for activating the STO function Figure 6.6: Timing diagram for activating the STO function Assembly and Commissioning Instructions Servo amplifier D1-N 15.10.2015 52 / 183... -
Page 53: Timing Diagram For Releasing The Sto Function
6.4.2 Timing diagram for releasing the STO function Figure 6.7: Timing diagram for releasing the STO function Info As soon as the command for energising the motor is executed, the internal stand- ard process starts with relevant timing for energising the motor. 6.5 Preconditions for using the safety function DANGER! Electric shock due to incorrect use... -
Page 54: Category 0 Stop 0
DANGER! Loss of safety function Incorrect use of the safety function may result in it being lost. Note the require- ments relating to use of the safety function. Unexpected motor movements When the STO safety function is active, the motor without an external brake may move unexpectedly due to external load or its use in vertical applications. -
Page 55: Protected Cable Routing
6.5.7 Protected cable routing If short-circuits and/or cross-circuits may arise in conjunction with safety-related signals and are not detected by upstream devices, protected routing in accordance with ISO 13849-2 is needed. In the event of unprotected routing, the cables for safety-related signals (SF1 and SF2) may be damaged. -
Page 56: Risk Analysis
6.5.9 Risk analysis As system integrator you need to perform a risk analysis for the entire system and incorporate these results in the design of the safety function. The resultant safety circuit may deviate from the example circuits provided in chapter 6.6. In this case, the safety circuit from your risk analysis should be used. - Page 57 Undertaking a category 1 stop To undertake a category 1 stop, a separate safety module is needed. A correspond- ing example circuit is shown in Figure 6.9. Figure 6.9: Example of circuit for stop category 1 When the emergency stop button is pressed, a category 1 emergency stop is trig- gered.
-
Page 58: Safety Function Certified By Tüv
The delay T resulting from the “Dec. kill” and “Smooth factor” parameters is calcu- lated under consideration of the D1-N cycle time (sampling time) as described below: T= (smooth factor × 8)/sampling time, Max. dec. = speed/T Example: Smooth factor= 100, sampling time = 16,000, speed = 400 mm/s T= (100 ×... -
Page 59: Ethercat
EtherCAT with CoE (CAN over EtherCAT) protocol is supported only by devices with the following type code: D1-N-xx-Ex-x-x-xx EtherCAT with mega_ulink (HIWIN) protocol (see section 10) is supported only by devices with the following type code: D1-N-xx-Fx-x-x-xx Features •... -
Page 60: Adding Devices By Scan
Launching the TwinCAT development environment automatically reads in and adds the new file to the list of available devices. 7.1.3 Adding devices by scan The easiest way to add a new device or all new devices to a project is to scan them in. -
Page 61: Setting The Axis Resolution
Figure 7.3: Automatically adding NC axes When the TwinCAT system detects a drive, its NC axis may be added automatically as well (Figure 7.3). The great advantage here is that all PDOs are linked automati- cally for this NC axis. Figure 7.4 depicts a device that has been integrated correct- Figure 7.4: Completely linked device Automatically adding a drive’s NC axis also configures most of the basic parame- ters. -
Page 62: Setting The Maximum Speed
Figure 7.5: Parameterising the axis resolution For example, a linear, analogue position measuring system with 1 mm graduations and an interpolation factor of 1000 operates with a resolution of 0.001 mm/inc. The values must be calculated analogously for rotary axes. 7.1.5 Setting the maximum speed The “Lightening”... -
Page 63: "Lightening" Commissioning Software
8.1 Installation of the software To install the “Lightening” commissioning software, run the “Setup.exe” file. The desired installation location can be changed under “Destination” (standard: “C:\HIWIN\”). Press the “Start” button to start installation. Figure 8.1: Installation software 63 / 183... - Page 64 If Windows tells you during the installation that drivers without a signature need to be installed, confirm this message and install the driver. This is the driver for the USB interface of the D1-N which is essential to operation. Successful installation is confirmed by the following dialogue. Figure 8.2: End of installation “Lightening”...
-
Page 65: Initial Launch Of The "Lightening" Software
8.2 Initial launch of the "Lightening" software 8.2.1 Establishing connection with device To establish communication between PC and D1-N, proceed as follows: Connect drive amplifier to PC. Windows will automatically detect the new device and select the previously installed driver. As soon as the driver installation is complete, “Lightening”... - Page 66 Figure 8.5: Setting the communication parameters Confirm your selection with “Apply” and “Close”. If the connection has been estab- lished successfully, it will look like this in the status bar. Figure 8.6: Confirmation of connection in the status bar Assembly and Commissioning Instructions Servo amplifier D1-N 15.10.2015 66 / 183...
-
Page 67: Operating Interface
8.3 Operating interface ATTENTION! While the “Lightening” software is connected to the drive amplifier, the mo- tor can be de-energised at any time with the F12 button. COMMENT: F12 for emergency shutdown during parameter setting ATTENTION! Any change in value in a field must be confirmed with the “Enter” button, other- wise the change does not take effect. - Page 68 The following screenshot shows the main operating interface of the “Lightening” software. Main operating toolbar Device status Errors and warnings Variable rapid access Figure 8.11: Main operating interface Assembly and Commissioning Instructions Servo amplifier D1-N 15.10.2015 68 / 183...
-
Page 69: The "Conf./Tune" Menu
8.3.1 The “Conf./Tune” menu Figure 8.12: Conf./Tune menu This menu contains all the functions needed for commissioning. With the exception of “Advanced gains” and “Errors and warnings log”, these functions can also be found on the shortcut bar for quicker access. Overview of functions: •... -
Page 70: The "Tools" Menu
8.3.2 The “Tools” menu Figure 8.13: “Tools” menu This menu contains other useful functions relating to management of the drive amplifier. It also contains tools for checking the settings. Overview of functions: • “Communication setup” – setting connection parameters to device “Open plot view”... -
Page 71: The Shortcut Bar
8.3.3 The shortcut bar The shortcut bar makes it easier for the user to find commonly needed functions. The left area contains the functions from the menus. Figure 8.14: Shortcut bar The main interface provides the “Save” and “Load” functions for loading parame- ter sets or saving on the PC. -
Page 72: Status
8.3.5 Status The “status” field contains LEDs to evaluate the device status : Active status : Inactive status 8.3.6 Errors and warnings The last messages to be displayed are shown in the “errors and warnings” area. In this example, the lack of a power supply to the drive amplifier is reported. 8.3.7 Variable rapid access The setting of user units can be adapted in this area using the “Position Units”... -
Page 73: Configuration Center" Without/With Ethercat
First, the parameters are set for the motor used. There are three motor types to choose from (AC servo, linear motor, torque motor: each with or without EtherCAT functions). When using a HIWIN motor, the corresponding data record can be easily selected from the list (see Figure 8.15). -
Page 74: Ac Servo Motor Parameterisation
When using a toothed belt axis, the spindle pitch corresponds to the circumference of the driving belt wheel (feed constant). If a HIWIN AC servo motor has been selected, the matching encoder is automati- cally selected. If using a non-HIWIN motor, all motor parameters must be taken from the motor manufacturer's manual and entered in the corresponding fields. - Page 75 The encoder database contains all encoders which are sold in the direct context of the HIWIN drive components. If using a non-HIWIN motor or special encoder, the corresponding data from the encoder manufacturer's manual must be entered. Figure 8.17: “Configuration center” – AC servo encoder without CoE ...
- Page 76 AC servo Hall sensor The “Hall Sensor” tab contains all settings for commutating the motor with Hall sensors. If this function is activated, there is no commutation finding when the drive amplifier is restarted. Both digital and analogue Hall sensors are available. Figure 8.18: “Configuration center”...
- Page 77 AC servo mode selection The drive amplifier operation mode is defined in the “Mode” tab. The “Stand- Alone” mode should be selected for commissioning without an external controller. Depending on the device type present, not all operation modes are available. Oper- ation modes with I/O control are not available for devices with an EtherCAT inter- face.
- Page 78 Position Mode: The drive amplifier receives the nominal position value via I/O interface X6. Differ- ent signal types, e.g. “Pulse and Direction”, “Pulse Up/Pulse Down” and “Quadra- ture (A B I)” can be selected here. “Electronic gear” signal scaling can also be un- dertaken.
- Page 79 Velocity Mode: The drive amplifier receives the nominal speed value via I/O interface X6. Here the nominal value can be supplied via the analogue input or via a digital input using PWM. Figure 8.21: “Configuration center” – velocity mode The “Dead band” is an area around the stationary point in which “small” signals in the mV range do not trigger movement in order to compensate for any zero point deviations.
- Page 80 Force/Torque Mode: The drive amplifier receives the nominal force/torque value via I/O interface X6. Here the nominal value can be supplied via the analogue input or via a digital input using PWM. The setting is made in the same way as in “Velocity mode”. Figure 8.23: “Configuration Center”...
- Page 81 End of configuration Once all the parameters have been selected correctly, close the “Configuration Center” with the “OK” button. The parameters are listed again in a new window for checking purposes. Changes compared with the data from the drive amplifier's RAM are highlighted in red.
-
Page 82: Linear Motor Parameterisation
Figure 8.26: “Configuration Center” – LM motor without CoE If a non-HIWIN motor is used, all motor parameters must be taken from the motor manufacturer’s manual and entered in the corresponding fields. “Customized Lin- ear” with these parameter settings can be added to the motor database. - Page 83 The encoder database contains all encoders which are sold in the direct context of the HIWIN drive components. If a non-HIWIN motor or special encoder is used, the corresponding data from the encoder manufacturer’s manual must be entered.
- Page 84 LM Hall sensor The “Hall Sensor” tab contains all settings for commutating the motor with Hall sensors. If this function is activated, there is no commutation finding when the drive amplifier is restarted. Both digital and analogue Hall sensors are available. Figure 8.28: “Configuration center”...
- Page 85 LM operation mode selection The drive amplifier operation mode is defined in the “Mode” tab. “Stand-Alone” mode should be selected for commissioning without an external controller. De- pending on the device type present, not all operation modes are available. Opera- tion modes with I/O control are not available for devices with an EtherCAT inter- face.
- Page 86 “Position mode”: The drive amplifier receives the nominal position value via I/O interface X6. Differ- ent signal types, e.g. “Pulse and Direction”, “Pulse Up /Pulse Down” and “Quadra- ture (A B I)” can be selected here. “Electronic gear” signal scaling can also be un- dertaken.
- Page 87 “Velocity mode”: The drive amplifier receives the nominal speed value via I/O interface X6. Here the nominal value can be supplied via the analogue input or via a digital input using PWM. Figure 8.31: “Configuration Center” – velocity mode “Dead band” is an area around the stationary point in which “small” signals in the mV range do not trigger movement in order to compensate for any zero point devi- ations.
- Page 88 Force/torque mode: The drive amplifier receives the nominal force/torque value via I/O interface X6. Here the nominal value can be supplied via the analogue input or via a digital input using PWM. The setting is made in the same way as in “Velocity mode”. Figure 8.33: “Configuration Center”...
- Page 89 AC servo drive The last tab lists the drive’s connected voltage. Figure 8.34: “Configuration Center” – drive selection without CoE Connect the 24 and 48 VDC supplies via X2 plugs (see Table 5.4). 89 / 183 Assembly and Commissioning Instructions Servo amplifier D1-N 15.10.2015...
- Page 90 End of configuration Once all the parameters have been selected correctly, close the configuration cen- ter with the “OK” button. The parameters are listed again in a new window for checking purposes. Changes compared with the data from the drive amplifier’s RAM are highlighted in red.
-
Page 91: Tm Motor Parameterisation
Figure 8.36: “Configuration Center” – TM motor without CoE If a non-HIWIN motor is used, all motor parameters must be taken from the motor manufacturer’s manual and entered in the corresponding fields. “Customized Torque” with these parameter settings can be added to the motor database. - Page 92 The encoder database contains all encoders which are sold in the direct context of the HIWIN drive components. If a non-HIWIN motor or special encoder is used, the corresponding data from the encoder manufacturer’s manual must be entered.
- Page 93 TM Hall sensors The “Hall Sensor” tab contains all settings for commutating the motor with Hall sensors. If this function is activated, there is no commutation finding with motion when the drive amplifier is restarted. Both digital and analogue Hall sensors are available. Figure 8.38: “Configuration Center”...
- Page 94 TM operation mode selection The drive amplifier operation mode is defined in the “Mode” tab. “Stand-Alone” mode should be selected for commissioning without an external controller. De- pending on the device type present, not all operation modes are available. Opera- tion modes with I/O control are not available for devices with an EtherCAT inter- face.
- Page 95 “Position mode”: The drive amplifier receives the nominal position value via I/O interface X6. Differ- ent signal types, e.g. “Pulse and Direction”, “Pulse Up /Pulse Down” and “Quadra- ture (A B I)” can be selected here. “Electronic gear” signal scaling can also be un- dertaken.
- Page 96 “Velocity mode”: The drive amplifier receives the nominal speed value via I/O interface X6. Here the nominal value can be supplied via the analogue input or via a digital input using PWM. Figure 8.41: “Configuration Center” – velocity mode “Dead band” is an area around the stationary point in which “small” signals in the mV range do not trigger movement in order to compensate for any zero point devi- ations.
- Page 97 “Force/torque mode”: The drive amplifier receives the nominal force/torque value via I/O interface X6. Here the nominal value can be supplied via the analogue input or via a digital input using PWM. The setting is made in the same way as in “Velocity mode”. Figure 8.43: “Configuration Center”...
- Page 98 AC servo drive The last tab lists the drive amplifier’s connected voltage. Figure 8.44: “Configuration Center” – drive selection without CoE Assembly and Commissioning Instructions Servo amplifier D1-N 15.10.2015 98 / 183...
- Page 99 End of configuration Once all the parameters have been selected correctly, close the configuration cen- ter with the “OK” button. The parameters are listed again in a new window for checking purposes. Changes compared with the data from the drive amplifier’s RAM are highlighted in red.
-
Page 100: Motor Parameterisation With Endat 2.2 Encoder
8.4.4 Motor parameterisation with EnDat 2.2 encoder If an encoder with EnDat 2.2 protocol is connected, the configuration center detects this automatically, and there is no other encoder in the selection window. Figure 8.46: “Configuration Center” – Example LM encoder with EnDat 2.2 Assembly and Commissioning Instructions Servo amplifier D1-N... -
Page 101: Application Center
8.5 “Application center” Launch the “application center” by clicking on the corresponding button in the “Lightening” start interface or the “Lightening” “Conf./Tune” menu. Figure 8.47: Accessing the “application center” ATTENTION! Be sure to correctly set the maximum permissible position error "maximum pos error". - Page 102 There are different ways in which homing can be undertaken to record the absolute position: Method -3: (for absolute encoders with EnDat interface only) Method -3 overwrites the absolute position in the drive amplifier with a us- er definable value. This value can be set in the field “Adjust machine posi- tion”.
- Page 103 Method -1: Move at “Faster Speed” in the negative direction • • Move up to the hard stop until “End stop current” is reached On reaching this, decelerate, stop, and move at “Slower Speed” in the posi- • tive direction until the next index pulse is reached “End stop current”...
- Page 104 Method 2: Move at “Faster Speed” in the positive direction • • Move until the positive limit switch outputs a rising edge On reaching this, decelerate, stop, and move at “Slower Speed” in the neg- • ative direction until the next index pulse Figure 8.53: Homing method 2 Method 7: •...
- Page 105 Method 9: Move at “Faster Speed” in the positive direction • • Until the home sensor outputs a falling edge On reaching this, decelerate, stop, and move at “Slower Speed” in the neg- • ative direction until the home sensor (logical 1) and the next index pulse is reached Figure 8.56: Homing method 9 Method 10:...
- Page 106 Method 11: Move at “Faster Speed” in the negative direction • • When the home sensor outputs a rising edge, decelerate and stop. Move at “Slower Speed” in the positive direction • • Until the next index pulse is reached Figure 8.58: Homing method 11 Method 12: •...
- Page 107 Method 13: Move at “Faster Speed” in the negative direction • • Until the home sensor outputs a falling edge and On reaching this, decelerate, stop, and move at “Slower Speed” in the posi- • tive direction until the home sensor (logical 1) and the next index pulse is reached Figure 8.60: Homing method 13 Method 14:...
- Page 108 Method 33: Move at “Slower Speed” in the negative direction • • Until the index pulse is reached This method is intended for position measuring systems that feature only one index mark (single index). Figure 8.62: Homing method 33 Method 34: •...
-
Page 109: Backlash
8.5.2 Backlash The accuracy for axes with backlash can be increased by means of backlash com- pensation. The backlash simply needs to be known in advance. Figure 8.65: “Application center” – backlash 109 / 183 Assembly and Commissioning Instructions Servo amplifier D1-N 15.10.2015... -
Page 110: Error Map
8.5.3 Error map The D1-N drive amplifier allows up to 16 000 position correction points to be stored directly in the drive amplifier. The raw data for the correction points can be cap- tured with a glass scale or laser interferometer for example. Figure 8.66: “Application center”... - Page 111 Figure 8.68: Correction on a belt axis 111 / 183 Assembly and Commissioning Instructions Servo amplifier D1-N 15.10.2015...
-
Page 112: Resolver
8.5.4 “Resolver” Motors with resolver feedback can also be operated on the D1-N. The resolver is learnt by clicking on the "Start learning" button. Figure 8.69: “Application center” – resolver Assembly and Commissioning Instructions Servo amplifier D1-N 15.10.2015 112 / 183... -
Page 113: Protection Center" (Limitations)
8.6 “Protection center” (limitations) Figure 8.70: Toolbar Depending on application, the position error may have to be kept within certain limits. The same applies to the speed. The “protection center” therefore allows you to set limit values for these parameters. The software limit switches “sw limit” can also be set here. -
Page 114: Hw Limit Protection
8.6.2 HW limit protection If limit switches are used, switch monitoring can be activated in this tab. Figure 8.72: “Protection center” – HW limit protection The relevant inputs for limit switches can be configured in the "I/O center". See capture 8.7. - Page 115 delMaxEnToBrk States the maximum time which may pass after the “controller enable” disappears before the brake is closed (regardless of vel_stop). Dec. Kill Shows the delay with which the motor is braked after the “controller enable” dis- appears. This delay can be changed in the “performance center”. Attention: This acceleration ramp also depends on the “smooth factor”.
-
Page 116: Digital Inputs And Outputs / "I/O Center
8.7 Digital inputs and outputs / “I/O center” In the “I/O center” all digital inputs and outputs for the D1-N can be configured and monitored. Launch the “I/O center” by clicking on the corresponding button in the main oper- ating interface or the “Lightening” “Conf./Tune” menu. Figure 8.74: Launching “I/O center”... -
Page 117: Outputs
CAUTION! When inverting the I/O settings, a “controller enable” may be issued and the motor may commutate and move in an uncontrolled manner. For safety reasons, initial start-up should be performed with the motor plug dis- connected to prevent accidents. The “State”... - Page 118 Figure 8.77: “I/O center” – configuration of Ox Assembly and Commissioning Instructions Servo amplifier D1-N 15.10.2015 118 / 183...
-
Page 119: Commissioning
9 Commissioning Once the parameters for the motor have been set as described in chapter 8.4, commissioning can begin. 9.1 Commissioning WARNING! Drive amplifiers should always be operated together with appropriate protec- tive equipment; this protective equipment must be designed, installed and regularly checked in accordance with applicable national and international legislation and specifications. -
Page 120: Auto Phase Center
9.2 “Auto phase center” In the “auto phase center”, the motor is energised to test the configuration and the encoder parameter settings are checked. The encoder's counting direction can be established automatically and inverted if necessary. Automatic establishment of the control parameters is also possible using the “auto phase center”. The count- ing direction of the system can also be inverted. - Page 121 The appearance of “Auto phase center” changes depending on the motor type and method selected. The following screenshots show examples of possible structures. Figure 9.2 depicts the interface for linear and torque motors. Figure 9.3 is the startup interface for AC servo motors. Figure 9.2: “Auto phase center”: For linear/torque motor with SW method 1 Figure 9.3: “Auto phase center”: For servo motor LSWIR 121 / 183...
-
Page 122: Servo Motors
9.2.1 Servo motors Pressing the button “Auto phase center” opens the window depicted in Figure 9.3. Pressing the button “View” opens the “Invert” area. In this “Invert” area, users can correct wiring errors by ticking the motor or encoder to invert their connections. The button “Details”... - Page 123 Before pressing the button “Execute”, make sure that the axis slide can move freely and is ideally at the centre of the axis or that motion cannot cause any damage. Pressing the button “Execute” opens the window “Auto tune”, at the same time subjecting the axis to control.
-
Page 124: Linear And Torque Motors
9.2.2 Linear and torque motors Figure 9.7: “Auto phase center” – Linear and torque motors with/without Hall sen- “SM mode” (Stepper Mode) means that the motor is operated with open control circuit and constantly memorised current. The “Current (SM-Mode)” value is automatically set to 95 % of the permanent mo- tor current (peak value, not as RMS). - Page 125 CAUTION! In the following step the motor is now energised and depending on position may jerk. This jerk may be up to half a pole space wide. Now click on the “SM enable” button. The motor is now energised. Figure 9.8: Controller is enabled Figure 9.9: Starting SM mode ...
- Page 126 Figure 9.10: Moving axis with constant current Use the slider to move the motor in one direction (at least over the distance of one pair of poles, further if possible). Ensure that the pointer of the “Phase error” clock ALWAYS remains in the green range during movement with the slider. Figure 9.11: “Phase error”...
- Page 127 Go to “Advanced view” in the “Auto phase center” Figure 9.12: “Auto phase center” – “Advanced view” If the pointer exits the green range during travel, it may be for one of the following reasons: • In some cases, a second attempt may remedy the situation. This may be due to a particularly unfavourable initial position when starting.
-
Page 128: Frequency Analysis" - Automatically Adapting Control Parameters
9.2.3 “Frequency analysis” – automatically adapting control parameters The frequency analyser allows you to activate a particular frequency over the entire control section with motor. The amplification of the control circuit is measured by the drive amplifier during this process. Suitable control parameters can therefore be automatically established quickly and easily. - Page 129 “Simple Version“ CAUTION! In the following step the motor is energised with a frequency of around 25 Hz and starts to oscillate this way and that. If necessary, you can abort the pro- cess at any time by deactivating the “HW enable” or pressing the “F12” but- ton.
- Page 130 CAUTION! In the following step the motor is energised with different frequencies and starts to oscillate this way and that. A loud, increasingly high-pitched whis- tling sound can be heard. If necessary, you can abort the process at any time by deactivating the “HW enable”...
- Page 131 Figure 9.17: Evaluation of stimulated frequencies Once the process has been completed, the amplitude characteristic can be seen depending on the input frequency. To determine the control parameters, click in the diagram window to display a “-20 Db/dec” line. Figure 9.18: Frequency analyser – -20 dB/dec line 131 / 183 Assembly and Commissioning Instructions Servo amplifier D1-N ...
- Page 132 The inserted “-20 Db/dec” line is moved with the mouse so that it is positioned as well as possible on the falling part of the curve. If the curve doesn't cleanly match the falling -20 Db line, gauge the centre between the individual points by eye and place the line between them.
-
Page 133: Phase Initialisation" - First Commutation
9.2.4 “Phase initialisation” – first commutation To subject the motor to control for the first time, click on the “Start phase initiali- zation” button. Only perform this step when you have completed all the previous steps of the “Auto phase center” as described above. The motor is then subject to control. - Page 134 you see permanent oscillation in the curve or hear it from the motor. Once you reach oscillation, reduce the value again slightly. It is important that you then click on “Start SMCL” more frequently because if “st_cg” is close to the limit value not every click on start will necessarily trigger permanent oscillation.
-
Page 135: Lm And Tm With Endat 2.2
9.2.6 LM and TM with EnDat 2.2 Selecting an encoder with EnDat 2.2 (section 8.4.4) opens “Auto phase center” in “Phase initialization mode” “STABS”. The order of steps is the same as for com- mutation finding for linear and torque motors in the preceding section. Figure 9.24: “Auto phase center”... - Page 136 The only difference is step 5. “STABS test/tune”. Figure 9.25: „Auto phase center“– „STABS test/tune“ VORSICHT! The motor is energised and moved in the following step. Assembly and Commissioning Instructions Servo amplifier D1-N 15.10.2015 136 / 183...
-
Page 137: Performance Center", Controller Parameter Optimisation
9.3 "Performance center", controller parameter optimisation In the “performance center” you can move your motor/axis in a controlled manner in manual mode using defined parameters. Continuous travel between two points is also possible. To launch the “performance center”, go to the main screen in the “Lightening” software and click on the “performance center”... - Page 138 Buttons • Enable: Software controller enable. If “HW enable” and “enable” are active, the motor is energised. ATTENTION: When first energising after resetting the drive amplifier, commutation is undertaken first. • Disable (F12): Software controller enable is deactivated. • Zero: Sets the current position to 0.
-
Page 139: First Travel Subject To Control
9.4 First travel subject to control Under “Position Units” define a unit which is appropriate for your application. Enter realistic values and start with lower values for “Speed”, “Acc”, “Dec” and “Dec. Kill”. Now start the control process by clicking on the “Enable” button. CAUTION! The motor is now energised and will commutate if this has not already been done. -
Page 140: Debounce Time" And "Target Radius" In The "Performance Center
9.4.1 “Debounce time” and “Target radius” in the “Performance center” The “Moving” flag remains in place for as long as the speed is not 0. It switches to “Low” as soon as the speed reaches a value of 0. The “Debounce time” is a counter and starts counting down (e.g. 100 ms to 0) as soon as the actual position is within the “+/- Target radius”. -
Page 141: Using The "Scope" Functions
9.5 Using the “scope” functions The “scope” function can be used to measure all important drive amplifier values and depict their course graphically. The software constantly accesses the current values from the drive. To start the scope function, simply click on the “Set scope” button in the “Perfor- mance center”... - Page 142 The “scope” is operated using the elements arranged along the right hand edge of the screen: Switch scope on/off “Continuous paper” depiction mode Full-screen mode for one channel. Press several times to switch between the active channels Adapt Y-axis scaling to window size Adapt Y-axis scaling dynamically to window size Adapt Y-axis scaling dynamically to window size, but only in the direction of larger values.
- Page 143 Figure 9.33: “Plot view” Example of a curve analysis: Analysis of position error (pos_err). Measuring of minimum and maximum and FFT analysis: To analyse a curve, we would advise only displaying one single curve so that as many details as possible can be seen. Do this using the “Set show mode” button in the toolbar.
- Page 144 Figure 9.35: Enlarged area The “Statistics table” button in the toolbar for the “Plot view” tool allows you to automatically display the characteristics of the selected area. Figure 9.36: Starting the “Statistics table” The “Plot statistic” now automatically shows you the maximum and minimum for the section displayed.
- Page 145 In the new window, first select the curve that you want to analyse, in this case, the position error. Select the “Direct FFT” method and press the “Run FFT” button to start the process. Figure 9.39: Setting up the FFT analysis The “Plot view”...
- Page 146 The “scope” function also provides a function for recording value trends and then displaying them with “Plot view”. Access this function using the “Open record win- dow” button in the “scope” toolbar or via the “Tools” menu in the “Lightening” in- terface.
- Page 147 Figure 9.42: Curves recorded 147 / 183 Assembly and Commissioning Instructions Servo amplifier D1-N 15.10.2015...
-
Page 148: Controller Tuning
9.6 Controller tuning To optimise the control parameters, scope is used in conjunction with a continuous point-to-point movement. Figure 9.43 shows the scope recording of a motor dis- playing a position error of up to 2° during movement. The motor was operated here with a “Common Gain” of 0.5. Figure 9.43: “Scope”... - Page 149 Figure 9.45: Position error after increasing the “Common Gain” The optimum value for the “Common Gain” is highly dependent on the motor used and its application. Proceed as shown above to establish the “Common Gain”. Use the scope function to display the values of importance to your application (e.g. the “position error”).
-
Page 150: Advanced Gains" - Filter
9.7 “Advanced gains” – filter The control parameters can be further optimised with “Advanced gains”. To under- take further fine tuning of the control circuit and to set filters, open the “Advanced gains” menu. Here you can filter frequency elements out of the control circuit and activate special controller functions. -
Page 151: Setting Filters
• “Filter” provides filter functions for frequencies or frequency ranges. • “Acc feedforward” provides settings for the acceleration feedforward. • “Schedule Gains +vpg” allows the amplification factor for the accelerator controller to be set manually. • “Analog input” contains functions for setting and evaluating the analogue input •... -
Page 152: Advanced Gains" - "Acc Feedforward
9.7.2 “Advanced gains” – “Acc feedforward” Figure 9.48: Setup of acceleration feedforward Proceed as follows to correctly set the feedforward: First set the value for “Acc feedforeward gain” to 0. Then start the “scope” using the button in the window. Ensure that the motor performs the desired acceleration profile during the record- ing. - Page 153 Figure 9.49: “Scope” for determining the acceleration feedforward The position error in the acceleration was reduced from 90 to 60 counts. Figure 9.50: Result obtained with feedforward 153 / 183 Assembly and Commissioning Instructions Servo amplifier D1-N 15.10.2015...
-
Page 154: Advanced Gains" - "Schedule Gains + Vpg
9.7.3 “Advanced gains” – “Schedule Gains + vpg” Figure 9.51: “Advanced gains” – “Schedule Gains + vpg” The D1-N has what is known as a “common gain (CG)” for speed and position con- troller amplification. The effect of this amplification can also be adapted in three sections of the motion profile: •... -
Page 155: Advanced Gains" - "Analog Input
9.7.4 “Advanced gains” – “Analog input” Figure 9.52: “Advanced gains” – “Analog input” If a nominal analogue value is used for speed or torque/force control, an offset correction can be undertaken. If the voltage value at zero volts is not zero or is slightly unstable, the negative effect of this offset can be corrected by pressing the “Set Offset”... -
Page 156: Advanced Gains" - "Current Loop
9.7.5 “Advanced gains” – “current loop” Figure 9.53: “Advanced gains” – “current loop” The drive amplifier calculates the amplification factors for the current loop using motor inductance and motor resistance. For most applications, these values do not have to be adapted. The “Freq analyzer” can be used to determine whether these values are ideal or require tuning. -
Page 157: Advanced Gains" - "Vsf" (Velocity Suppression Function)
9.7.6 “Advanced gains” – “VSF” (velocity suppression function) Figure 9.54: “Advanced gains” – “VSF” This function is used to filter low-frequency oscillation. The frequency in question can be determined with the “scope” and/or “plot view”. 157 / 183 Assembly and Commissioning Instructions Servo amplifier D1-N 15.10.2015... -
Page 158: Advanced Gains" - "Friction Compens
9.7.7 “Advanced gains” – “Friction Compens.” Figure 9.55: “Advanced gains” – friction compensation Before determining the appropriate value, set the start value to 0. Start the desired movement via the “performance center” or specify the corresponding nominal values. Start the “scope” by clicking on the “Set scope” button. Figure 9.56: Recording current and position error Assembly and Commissioning Instructions Servo amplifier D1-N... - Page 159 Use the plot view's statistics function to assess the position error and current. Figure 9.57: Assessing with “plot view” Figure 9.58: Assessing current and position error Enter the command's “Avr” value in the field for friction compensation. You will see a reduction in the position error.
-
Page 160: Error History
9.8 Error history The “Lightening” software logs all errors and warnings since the drive amplifier's logic was last restarted. You can display the logged errors and error statistics us- ing the “Errors and Warnings Log”. You can also save this log as a text file on your ... -
Page 161: Mega-Ulink Protocol
A detailed description of this library and how to use it can be found in a separate document called mpi.pdf and can be downloaded from www.hiwin.de. Alternative- ly, contact the technical support team at HIWIN (see section 2.9). This library can run on Microsoft Visual C++, Visual Basic and LabView applications and can be installed with the following operating systems: Windows 95/98/2000/XP/Win7. -
Page 162: Pdl (Process Description Language) Programming
PDL programming language. A detailed description of this programming and how to use it can be found in a sep- arate document called PDL.pdf and can be downloaded from www.hiwin.de. Alter- natively, contact the technical support team at HIWIN (see section 2.9). -
Page 163: Programming Examples (No Liability Accepted)
10.4 Programming examples (no liability accepted) Example 1: Simple absolute positioning between 2 positions with zero point correction #task/1; // First task, this task runs immediately after controller initialisation call _sequence program; // Program called _sequence program is called up ret;... - Page 164 sleep 2000; move_p_v_a_d(166350,20000,200000,200000); // in incr. till(~X_run); sleep 500; _Loop: // Jump mark for jumping to program // reset signals after cover up if (~I1) do // If input 1 is reset, then …. setoff O1; // Deactivate O1 setoff O2; // Deactivate O2 setoff O3;...
- Page 165 Example 3: Simple relative positioning between 2 positions with zero point correction #task/1; // First task; this task runs immediately after controller initialisation call _sequence program; // Program called “_sequence program” is called up ret; _sequence program: till(X_en=1); // Wait for controller enable and/or until motor is energised till(X_I_flag=2);...
-
Page 166: Writing Pdl Program To D1-N And Saving
numero = numero+1; // Count ciclo = numero; // Number of cycles if (numero = 10000000) do // Stop condition stop 1; // Task 1 is stopped else do // otherwise goto _Test1; // Return to jump mark ret; end; // End of if/else do condition 10.5 Writing PDL program to D1-N and saving “Lightening”... - Page 167 Figure 10.4: PDL compiler Programs can be written as txt files and copied/pasted to User-PDL. Alternatively, the program can be written directly in the compiler. The syntax check looks for spelling mistakes or whether variables and parameters not available have been used. It is important that there are no errors (Errors: 0). Figure 10.5: PDL compiler, result of syntax check 167 / 183 Assembly and Commissioning Instructions Servo amplifier D1-N ...
- Page 168 The program can now be sent to the D1-N and permanently saved in the flash memory. The drive amplifier is restarted (rebooted) in this procedure. VORSICHT! If you press the “Download to amplifier” button while the motor is ener- gised / moving, the drive amplifier immediately de-energises the motor. The motor is NOT decelerated by the drive amplifier and coasts to a stop.
-
Page 169: Stopping Pdl Program, Allowing It To Run On And Deleting It
Open “Advanced” menu and select “PDL task list…”. Figure 10.7: “PDL task list…” in “Lightening” selection If “Run” is displayed in the “State” column of the individual tasks, the saved pro- gram is running in the D1-N. Figure 10.8: “Task List” in “Lightening” selection 10.6 Stopping PDL program, allowing it to run on and deleting it The “Lightening”... - Page 170 Figure 10.10: “Message window” – “Messages + command prompts” Task 1 (see Figure 10.8) can be stopped using the following command: stop 1 Enter commands in message window and press the Enter button. Figure 10.11: “Message window” – stopping task 1 The drive amplifier confirms the command with “OK”.
- Page 171 Figure 10.12: “Message window” – task 1 stopped Task 1 (see Figure 10.12) can be started using the following command: cont 1 Enter commands in message window and press the Enter button. Figure 10.13: “Message window” – task 1 started again Task 1 (see Figure 10.12) can be cancelled using the following command: kill 1 Enter commands in message window and press the Enter button.
-
Page 172: Troubleshooting
11 Troubleshooting 11.1 Error codes and troubleshooting Code Display Error shown in Description “Lightening” E01SHORT Motor short (overcurrent) Short-circuit in the motor detected power supply Rectification of problem: Check the motor cable and plug for damage and short-circuits. If this doesn’t solve the problem, check the motor for damage, too. - Page 173 E07D.HOT Amplifier overtemperature Drive amplifier is too hot Rectification of problem: Check whether the area around the drive amplifier has sufficient ventila- tion. E08M.HOT Motor overtemperature Motor overtemperature sensor activated sensor triggered Rectification of problem: Check whether the motor temperature sensor is correctly connected and set.
- Page 174 Digital Hall sensor elec- E14PHERR Hall phase check error trical angle Careless mistake Rectification of problem: Check that the Hall sensor has been wired correctly and that it does not signal an error. E15CURER Current control error Rectification of problem: Check that the correct motor type has been selected and that the correct KP has been set for the common gain and the current controller’s pro- portional gain.
-
Page 175: Warnings And Troubleshooting
Intermediate circuit E22BUS.E DC bus voltage abnormal voltage defect. Rectification of problem: Check the supply to the drive amplifier. E23NOET EtherCAT interface is not EtherCAT hardware not detected detected. Rectification of problem: Replace device. E24HOM.E CIA-402 homing error Error on executing the CIA-402 reference travel Rectification of problem: Check the function of reference, limit switch, and reference mark. - Page 176 Right HW Positive hardware limit switch active. W04HWRL limit Motor must not exceed this position. Rectification of problem: Check whether the hardware limit switch has actually triggered. Also check in the “I/O set/test” window whether the limit switch logic is set correctly.
- Page 177 For example, E01SHORT is shown as ERR E01, and W01SWLL as WRN W01. A list of error and warning descriptions can be found in the “Lightening” file C:\HIWIN\dce\tools\Errors_Warnings_EN.txt 177 / 183 Assembly and Commissioning Instructions Servo amplifier D1-N 15.10.2015...
-
Page 178: Other Errors And Troubleshooting
12 Repair and replacement In case the D1-N is defective or does not work correctly anymore, please contact HIWIN (see chapter 2.9). They will support you for repair or replacement of the D1-N. Assembly and Commissioning Instructions Servo amplifier D1-N 15.10.2015... -
Page 179: Parts Numbers And Accessories
13 Parts numbers and accessories 13.1 Item number for drive amplifier set Description Content Item no. D1-N-09-E0-2-0-00 1 × D1-N, 1 × Connector kit CK4 23.0001 D1-N-09-F0-2-0-00 1 × D1-N, 1 × Connector kit CK4 23.0005 D1-N-18-E0-2-0-00 1 × D1-N, 1 × Connector kit CK4 23.0002 D1-N-18-F0-2-0-00 1 ×... -
Page 180: Item Number For Connector Kit
13.2 Item number for connector kit Description Content Item no. 1 × connector for main voltage X1 1 × connector for brake resistor X2 1 × connector for motor connection X3 1 × connector for control voltage. X4 1 × connector for I/O connection X6 2 ×... -
Page 181: Motor Cables
13.3 Motor cables Description Length Item no. 8-10-0069 HIWIN motor cable for linear motors, suitable for 8-10-0070 drag chains, 1.5 mm², on motor side with M23 connect- 8-10-0071 or, on D1-N side with open ends 10 m 8-10-0072 8-10-0593 HIWIN motor cable for linear motors, suitable for 8-10-0594 drag chains, 2.5 mm², on motor side with M23 connect-... -
Page 182: Cables For Encoder Systems
13.4 Cables for encoder systems Description Length Item no. 8-10-0685 HIWIN encoder cable for analogue encoder systems, 8-10-0686 drag chains, on motor side with M17-connector, on 8-10-0687 D1-N side with Sub-D-connector for X11 10 m 8-10-0688 8-10-0690 HIWIN encoder cable for digital encoder systems,... -
Page 183: Declaration Of Conformity
14 Declaration of Conformity According to EC Directive 2006/42/EG (Annex II A) Manufacturer Authorised representative in EU HIWIN MIKROSYSTEM CORP., Ltd HIWIN GmbH No.6, Jingke Central Rd., Brücklesbünd 2 Taichung Precision Machinery Park, 77654 Offenburg, Germany Taichung City 40852, Taiwan...
Need help?
Do you have a question about the D1-N Series and is the answer not in the manual?
Questions and answers