
Related Manuals for FLASHFORGE 3D PRINTER CREATOR PRO 2


Summary of Contents for FLASHFORGE 3D PRINTER CREATOR PRO 2
- Page 1 CREATOR PRO 2 EN-A01 User Guide This guide is only applicable to FLASHFORGE Creator Pro 2 3D printer...
- Page 3 CONTENT PREFACE NOTICE Chapter 1: 3D Printing Technology Process Chapter 2: About Creator Pro 2 About Your Creator Pro 2 Unboxing and Installation The First Setting Touchscreen Interface Introduction Chapter 3: Slicing Software Installation Exploring FlashPrint How to create .g file?
- Page 4 FlashForge Creator Pro 2. Even if you are familiar with earlier FlashForge machines or 3D printing technology, we still recommend that please read this guide, as there is lots of important information about the Creator Pro 2 for you to get a better 3D printing experience.
- Page 5 Always use the Creator Pro 2 with a properly grounded outlet. Do not refit Creator Pro 2 plug. Do not use Creator Pro 2 in damp or wet locations. Do not expose Creator Pro 2 to burning sun. In case of device damage, please use the power supply provided by FlashForge.
- Page 6 ENVIRONMENT REQUIREMENTS Temperature: RT 15-30℃ Moisture: 20%-70% PLACE REQUIREMENTS The device must be placed in a dry and ventilated environment. The distances of the left, right and back side space should be at least 20cm, and the distance of the front side space should be at least 35cm.
- Page 7 files via SD card. 1.1.3 Build the 3D Model Once the output file has been transferred to your Creator Pro 2, it will start to turn the 3D model into a physical object by laying down layers of filament.
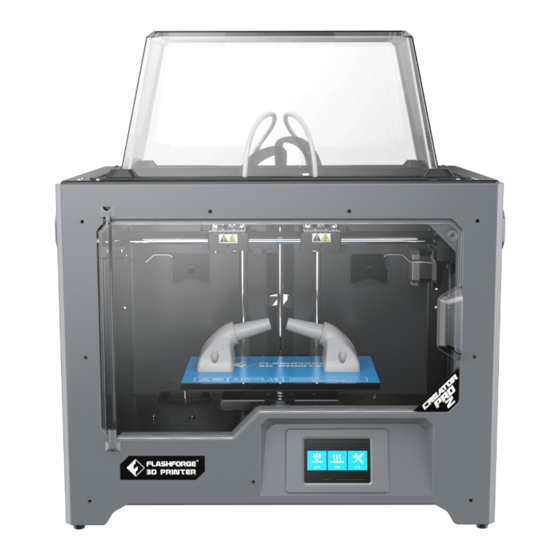
- Page 8 Chapter 2: About Creator Pro 2 About Your Creator Pro 2 2.1.1 Views 10 11 1. Platform 2. Platform support 3. Leveling nut 4. LCD panel 5. Z-axis guide rod 6. Extruder cable bunch 7. X-axis guide rod 8. Slot 9.
- Page 9 2.1.2 Accessories CREATOR PRO 2 金刚狼 PRO 2 Creator Pro 2 Filament Top cover After-sales Quick Start Service Card Guide Power Cable USB Cable SD Card Spool Holder Build Tape Screw Driver Stamping Allen Unclogging Scraper Wrench Wrench Pin Tool...
- Page 10 2.1.3 Terms Build Plate The surface on which the Creator Pro 2 builds an object. The blue tape that covers Creator Pro 2’s build plate so that Build Tape the object can stick to the build plate well. Please change it when the adhesion is not good.
- Page 11 Unboxing and Installation 2.2.1 Unboxing The Creator Pro 2 was carefully packaged at FlashForge manufacturing facility. Please follow the unpacking steps laid out below. CAUTION 1. Remove the package and take out accessories carefully. Do not use force. 2. Do not tear the yellow high temperature resistant adhesive tape around the nozzle, it has thermal insulation and high temperature resistance characteristics.
- Page 12 Take the extruder out and place the Take out the foam with accessories. extruder carefully. Avoid the nozzle to Shear two ties on the both sides of touch the desk, which prevent the nozzle X-axis guide rod. damage from scratch. 7.
- Page 13 2.2.2 Installation 1.Extruder Assembly Lower the platform first and place the dual extruder on the extruder seat. Take the M2.5 Allen Wrench from the tool bag and four M3 bolts from the accessory kit. Adjust the extruder location to align the bolt holes.
- Page 14 2.Filament Guide Tube and Filament Installation 1.To install a spool holder, level it and insert the end into the corresponding opening. 2.Turn down the spool holder to make the holder bottom cleave to the printer back. Please refer to the next page for the right method of filament mounting.
- Page 15 Tips The filament spool must be oriented Filament Guide correctly (see below). Tube Buckle After filament guide tube fixation completed, press the left spring presser limited seat of extruder, put filament vertically into the left filament intake from the other Lock the filament guide tube with R-shape end of filament guide tube.
- Page 16 The First Setting 2.3.1 Loading and Unloading Filament Level Home Manual Print Preheat Tools Setting Status About Tap [Tools]-[Filament] L Extruder R Extruder Heating... Load Load L Extruder 75℃ / 220℃ Unload Unload Tap [load], the extruder will start to heat up. After heating to the target temperature, please manually insert the filament into the filament feeding wheel.
- Page 17 2.3.2 Leveling Clearing the remaining materials on the nozzle first to avoid leveling fails. Filament Level Home Manual Please wait, device is homing. Setting Status About Next Tap [Tools]-[Level] to start leveling. The machine will finish homing first. Screw the three nuts tnder the platform counterclockwise until they are tight, then tap the [Next].
- Page 18 Status About Tap [Tools]-[Setting]-[Z calibration]. Creator Pro 2 uses a compensation layer mecha- nism. Instead of manually adjusting the installation positions of the left and right nozzles, a program is used to calculate the height difference between the two nozzles.
- Page 19 X Axis Calibration X-axis calibration: Used to adjust the consistency of the two extruders in the X-axis direction to prevent misalignment during printing. Calibration Calibration Calibration X Calibration Expert L: 152/200 Language FactoryReset Mode R: 164/200 B: 45/50 Tap [Setting]-[X Calibration], or continue the X-axis calibration after the Z-axis calibra- tion is completed.
- Page 20 Y Axis Calibration Y-axis calibration: Used to adjust the consistency of the two extruders in the Y-axis direction to prevent misalignment during printing. Calibration Calibration Calibration Y Calibration Expert L: 152/200 Language FactoryReset Mode R: 164/200 B: 45/50 1. Tap [Setting]-[Y Calibration], or continue the Y-axis calibration after the X-axis calibra- tion is completed.
- Page 21 2.3.4 First Print After installing, loading filament and calibrating, it start your first print. Insert the SD card to the side of machine. 25MB Print Preheat Tools 1519MB Test flashforge Tap [Print]-[SD card]; choose the test file to print.
- Page 22 2.3.5 Remove Models Warm!Drop the platform down first before removing the model. Please pay attention to the direction of shoveling to avoid scratches by using the scraper knife. Do not damage the build plate when removing models.The scratch on the build plate may cause print fails.
- Page 23 2.3.7 Material Compatibility Creator Pro 2 have two independent extruders and support PLA, ABS, HIPS and PVA. Combination mode: PVA+PLA HIPS+ABS PLA+PLA ABS+ABS Flashforge materials is the best recommended, even Creator pro2 support open materials brands. All Flashforge materials have been tested and the best printed parameters have been used in the FlashPrint.
- Page 24 1519MB Test flashforge Insert the SD card to the side of machine;SD card must be inserted the Creator Pro 2 when printing, whether get print file form SD card or connect with flashprint through USB cable. Tap [Print]-[SD card] and choose files to print.
- Page 25 flashforge_test--pla Filament Print Time 0:00 Stop Left L Extruder 24℃ / 205℃ R Extruder 24℃ / 205℃ Stop Right Platform 30℃ / 50℃ Cancel 3. Tap [More] to stop print or change filament in the process of printing. Preheat Interface L Extruder 240℃...
- Page 26 Tools Interface Filament Level Home Manual Print Preheat Tools Setting Status About Tools interface included filament, level, Home, Manual, Setting, Status and About. L Extruder R Extruder Heating... Load Load L Extruder 75℃ / 220℃ Unload Unload [Filament] Filament load and unload setting. Filament Level Home...
- Page 27 Screw the three nuts tnder the platform counterclockwise until they are tight, then tap the [Next]. Next After stop movement of extruder and platform, tighten the three nuts below the platform counterclockwise (To avoid scratch build plate by extruder and it is important action) Please adjust the front thumb screw under Platform when stop.
- Page 28 XR:0.00 XL:-135.00 Y:0.00 Z:20.00 [Manual] Tap the touchscreen to control XYZ axis movement. Calibration Calibration Calibration Expert Language FactoryReset Mode [Setting] Setting interface included X calibration, Y calibration, Z calibration, Expert mode, Language and FactoryReset. Calibration Calibration Calibration Expert Language FactoryReset Mode [X calibration], [Y calibration], [Z calibration]...
- Page 29 Manual fine calibration This assistant is for advanced users only. After a printer calibration. Fine-tune the calibration offsets of X or Y axis if needed. Next [Expert Mode] Simplified calibration for experienced users in the expert mode. According to the deviation value of the model printed by two extruders on the same axis, the users adjust the place of exrtuder on the X or Y axis.
- Page 30 Extruder and platform temperature, and XYZ axis coordinates show in the status. Click on the lamp status bar, the ambient light in the cavity of the device will change according to the settings. Machine Name:My 3D Printer Machine Type:Flashforge Creator Pro 2 Firmware Version:V1.2 20200420 Print Volume:200x148x150 Usage counter:58hours Tool Count:2...
- Page 31 [Firmware Upgrade] Method 1: Insert the SD card to the computer and build a folder called sys. Copy the firmware files into the sys folder. Then insert the SD Card to the machine. Start the machine and upgrade the firmware. After finishing the firmware, delete the sys folder. Method 2: Upgrade the firmware with FlashPrint via USB cable.
- Page 32 Start the software with the start menu shortcut by left double clicking. Exploring FlashPrint Note:Creator Pro 2 support printing by FlashPrint with USB cable. 3.2.1 Machine Type Selection Attention! After starting FlashPrint, you need to select the targeted machine type first.
- Page 33 Supports Print Tools View More Rotate Scale Build Platform Extruder FlashForge Creator Pro 2 Load: Support: Only load one file once Enter into the support edit mode Print: View: Print it directly with your Creator View FlashPrint home screen from...
- Page 34 3.2.3 Load You can load a model file or Gcode file into your FlashPrint by the following six methods: Method 1: Click the Load icon on the main interface. Then select the object file. Method 2: Select the file for loading and drag the file to the main interface of the software.
- Page 35 Plane Tube / Canister Seal Lamp 3.2.4 View 1.Changing Views Change model views by moving, rotating, scaling. Drag Click the [View] icon and then you can move the object by the following three methods: Method 1:Hold down the left mouse button and drag. Method 2:Hold down the mouse wheel and scroll up and down.
- Page 36 2.Set View Allow users to view the object on the build plate. Six views are under the view menu, that is, bottom view, top view, front view, back view, left view and right view. Method 1: Click the the [View] button, there are six views in the drop- down list. Method 2:...
- Page 37 3.2.6 Rotate Select the target object and rotate the object by the following two methods: lick the [Rotate] icon on the left and three mutually perpendicular rings Method 1: appear around the object Click one ring and rotate on the present axis, you will see the rotation angle and direction in the center of circle.
- Page 38 3.2.8 Cut Click on the model to select it and click on the Cut icon to set the cut plane. The direction and position are available for setting. There are two options that draw with mouse or cut by XYZ direction. Input the number on the position setting to cut the specified place of model.
- Page 39 3.2.10 Support After loading the model, click [Edit]--[Supports] or click the Supports icon directly, then you will enter the support edit mode (as shown in the picture below). Click [Back] to exit when you finish editing. Flashprint - untitle.fpp File(F) Edit(E) Print(P) View(V) Tools(T) Help(H) Undo...
- Page 40 files format and place, and click [Save]. Flashprint - untitle.fpp File(F) Edit(E) Print(P) View(V) Tools(T) Help(H) Load Supports Print Print I want to: Preview Print When Slice Done FlashForge Creator Pro 2 Machine Type: View Material Right: Material Left: More Enable Supports: Rotate Enable Raft:...
- Page 41 Preview: entering preview interface or not. If check the option, entering the preview interface automatically after slicing finished. Sliding model layer number slider on the left of interface up and down to show the model layer. The estimated model print time and filament showed on the top right corner. Click [Print] to connect machine;...
- Page 42 Shells Contains the outside shell value, capping layer value (under vase mode, top solid layer setting is invalid.) Perimeter Shells: Maximum is 10. Top Solid Layers: Maximum is 30, minimum is 1. Bottom Solid Layers: Maximum is 30, minimum is 1. Infill Fill Density: Fill rate.
- Page 43 2.Saving After finishing the model edit and adjustment, there are two ways below to save all models in the scene. Method 1: Click [File]-[Save Project] in the menu bar to save the file as a project file with the “.fpp” suffix, all models in the scene (include support) are independent. If reloading the files, extruder configuration information and model position will be the same as the configuration during saving.
- Page 44 3.2.13 Edit Menu 1.Undo Allows users to undo the recent edits by the following two methods: Click [Edit]-[Undo]. Method 1: Method 2: Press the shortcut key Ctrl+Z. 2.Redo Allows users to redo the most recent edit you have undone to your model file by the following two methods Method 1:...
- Page 45 3.2.14 Tools Update Firmware Open the FlashPrint (Now your computer and Creator Pro 2 are connecting with each other by USB cable). click [Tools] and [Update Firmware], then click [OK] and a dialog box will pop up. Click [Yes] to start firmware update.
- Page 46 FlashForge Creator Pro 2 FlashForge Creator Pro FlashForge Creator 3 FlashForge Dreamer FlashForge Finder FlashForge Guider FlashForge Guider II 1.Click [Print]-[Machine Type] to select FlashForge Creator Pro 2. Flashprint - untitle.fpp File(F) Edit(E) Print(P) View(V) Tools(T) Help(H) Load Supports Print 2.Click the [Load] icon to load a .stl model file and the object will display on the build...
- Page 47 Save Configuration 2.Click [Print] icon on the FlashPrint interface and parameter setting window appears. Choose materials, like Creator Pro 2 PLA; When print water soluble supports, click [General]-[Adapt Soluble Support Filament]-[PVA]-[Adapt], and click [Save Configuration]. Expert mode support choosing soluble materials, click it and set retraction for left extruder.
- Page 48 Print(Expert Mode) I wan to: Preview Print When Slice Done Save As New Remove Creator Pro 2 PLA Standard Select Profile: General Perimeter Infill Supports Raft Additions Cooling Advanced Others General Linear Enable Support: Speed: Select Extruder: Automatch Space to Model(X/Y):...
- Page 49 Use Right Extruder Rotate Use Left Extruder Scale Use Dual Extruder(Duplicate) Use Dual Extruder(Mirror) Reset Extruder FlashForge Creator Pro 2 1.Choose model and click [Extruder] to start extruder setting. Flashprint - untitle.fpp File(F) Edit(E) Print(P) View(V) Tools(T) Help(H) Load Supports Print...
- Page 50 Back Options Supports Supports Delete Model Celect FlashForge Creator Pro 2 1.Click [Supports] icon and start support setting. Auto support setting is available. Click [Delete] on the left and support delete supports by manual. Supports Options Supports Type: Treelike Linear Overhang Threshold:...
- Page 51 Positive value adjustments becomes larger size, and negative value adjust- ments becomes smaller size; Z axis height adjusts by percentage. Print(Expert Mode) I wan to: Preview Print When Slice Done Creator Pro 2 PLA Standard Save As New Remove Select Profile: General Perimeter Infill...
- Page 52 Send the extruder to the center. extruder’s exact location home position will recali- and is failing to build. brate Creator Pro 2. Cancel your object, clear build plate,send the extruder to the home position, and restart the object. PLA is not extruding or...
- Page 53 FlashForge team is on standby and ready to help you with any challenges you may have with your Creator Pro 2. If the issues or questions are not covered in this User Guide, you can seek for solutions on our official website or contact us via telephone.
- Page 54 FCC Warning This device complies with part 15 of the FCC rules. Operation is subject to the following two conditions:(1) this device may not cause harmful interference, and (2) this device must accept any interference received, including interference that may cause undesired operation.
- Page 56 Scan QR to Get More After-Sales Support Twitter Facebook O cial Website Zhejiang Flashforge 3D Technology Co,. Ltd. Tel: +86 579 82273989 Web: www.flashforge.com Add: 2/F, No.518, Xianyuan Road, Jinhua, Zhejiang, China...
Need help?
Do you have a question about the CREATOR PRO 2 and is the answer not in the manual?
Questions and answers