Table of Contents
Advertisement
Quick Links
Advertisement
Table of Contents

Related Manuals for FLASHFORGE 3D PRINTER Creator Max


Summary of Contents for FLASHFORGE 3D PRINTER Creator Max
- Page 1 Creator Max 3D Printer User's Manual...
-
Page 2: Table Of Contents
SAFETY WARNINGS AND GUIDELINES ....................2 PACKAGE CONTENTS ..........................3 PRODUCT OVERVIEW ...........................4 MAIN MENU SYSTEM ........................5 Top Menu ............................5 Print Menu ............................5 Print File Screen ...........................5 Print Progress Screen .........................5 Print Tools Menu ...........................6 Preheat Menu ..........................6 Preheat Temperature Screen ....................6 Preheating Screen ........................6 Tool Menu... -
Page 3: Safety Warnings And Guidelines
Safety Warnings & Guidelines Please read this entire manual before using this device, paying extra attention to these safety warnings and guidelines. Please keep this manual in a safe place for future reference. · Take care to avoid touching hot parts, including heat blocks, extruder nozzles, build plate, and the extruded filament. -
Page 4: Package Contents
Package Contents Please take an inventory of the package contents to ensure you have all the items listed below. If anything is missing or damaged, please contact Customer Service for a replacement. Creator Max 3D Printer User’s Manual User’s Manual... -
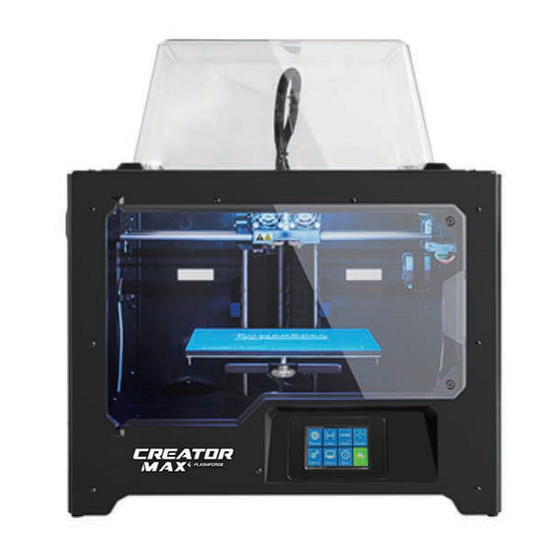
Page 5: Product Overview
Product Overview 1. Z-Axis Guide Rod 2. Extruder Cable Bunch 3. Slot 4. Y-Axis Guide Rod 5. Build Plate 6. Build Platform 7. Leveling Knob 8. Touch Screen 9. SD Card Slot 10. Cooling Fan 11. Spring Presser 12. Turbofan 13. -
Page 6: Main Menu System
Main Menu System Top Menu The Top Menu is displayed after the printer is powered on and initialized. · Touch the Print button to enter the Print Menu. · Touch the Preheat button to enter the Preheat Menu. Print Preheat Tool ·... -
Page 7: Print Tools Menu
Print Tools Menu TEST~1 The Print Tools Menu is displayed by touching the Tools button on the Print Progress Screen. 0:00 Print Time 24℃ / 220℃ Filament L Extruder · Touch the Filament button to change filament during 24℃ / 220℃ R Extruder printing. -
Page 8: Tool Menu
Tool Menu The Tool Menu is displayed by touching the Tool button on HOME the Top Menu. · Touch the Filament button to load or unload filament. Manual Filament Level Home · Touch the Level button to level the build plate. ·... -
Page 9: Language Menu
Language Menu The Language Menu is displayed by touching the Language button in the Setting Menu. · Touch the specific language name to set the OSD menu system to use that language. · Touch the Down button to display the next page of languages. -
Page 10: Status Screen
· Touch the Back button to return to the previous menu. About Screen The About Screen is displayed by touching the About Machine Name: Flashforge Creator Max button on the Tool Menu. It displays basic information Machine Type: Flashforge Creator Max about the printer. -
Page 11: Unpacking
1. Place the box on a flat, clean work surface. After opening the box, you can find two filament guide tubes, two Build Tape, a Leveling Card, and this User's Manual. 2. Firmly grasp the two side handles, lift it out from the carton and place it on a stable surface. - Page 12 6. Snip beltings on both sides of X-axis guide rod. 7. Remove lid. 8. Remove side protective foam sheets from inside the printer. 9. Elevate the build plate to its limit with care. 10. Take the bottom protective foam from the printer and then lower the build plate back.
-
Page 13: Hardware Assembly
The Flashforge Creator Max comes pre-assembled and is almost ready to print. All you need to do is to set the appropriate voltage, mount the extruder set, and install the filament. It will only take about 5-10 minutes to setup the Flashforge Creator Max and prepare for your first 3D print! 1. - Page 14 3. Use the M2.5 Allen wrench to unscrew the two turbofan bolts. 4. Take the turbofan baffle from the extruder's accessory kit and install it onto the turbofan.
- Page 15 5. Align the bump on the turbofan seat to the hole in the turbofan sub-assembly. Place the turbofan sub-assembly beside the turbofan seat. Insert the bump on the turbofan seat to the turbofan sub-assembly. Screw in the two bolts. 6. Take an M3x6 bolt from the extruder's accessory kit and complete the installation.
- Page 16 7. The next step goes to the installation of the spool holders. Install one on each side. To install a spool holder, level it and insert the end into one of the openings. 8. Turn down the spool holder to make the holder bottom cleave to the printer back.
- Page 17 9. To lock the filament guide tube with R-shape buckles and insert another end to the filament intake. To avoid filament jams, always ensure that any filament spool you mount on the p feeds from the bottom of the spool toward the top. Filament mounted on the right spool holder when viewed from the back should always unspool clockwise and filament loaded onto the left spool...
-
Page 18: Loading Filament
Loading Filament Perform the following steps to load filament into your 3D printer. 1. Remove the filament guide tube from the extruder. HOME Manual Filament Level Home Print Preheat Tool Setting Status About 2. If it is not already powered on, flip the power switch to the ON position. Wait for the system to stabilize, then touch the Tool button on the Top Menu. - Page 19 Print Preheat Tool 3. Touch the Filament button, then touch the Load Left button. Load begins,push filament vertically into extruder,and press [Done] when you see filament come out of extruder I’m Heating up... 100% ℃ ℃ ℃ ℃ L Extruder L Extruder Cancel Done...
-
Page 20: Unloading Filament
Unloading Filament 1. Remove the tube. Print Preheat Tool 2. If it is not already powered on, flip the power switch to the ON position. Wait for the system to stabilize, then touch the Tool button on the Top Menu. HOME Manual Filament... - Page 21 I’m Heating up... ℃ ℃ L Extruder Cancel 4. Wait for the extruder to heat up to the target temperature. The extruder will alert you when it is at the target temperature. 5. Unload the filament by gently guiding it out of the extruder, then touch the Done button to finish unloading.
-
Page 22: Build Plate Leveling
The Flashforge Creator Max uses a three-point leveling system for the build plate. At the bottom of the build plate, there is a spring-loaded knob in the front and two in the back. Tightening the knob will increase the gap between the build plate and the nozzle and loosening it will reduce the gap. - Page 23 3. Once the extruder and build plate stop moving, slide the Leveling Card continuously back and forth between the nozzles and the build plate, while simultaneously adjusting the knob just enough so that the card causes a slight friction. Touch the Next button and wait for the extruder to move to the second position. Slide the card back and forth again and adjust the knob to create the same amount of friction as the previous step.
-
Page 24: Flashprint Software
If this is the first time the program has been run, you will be presented with a dialog asking you to select the Machine Type. Choose the Flashforge Creator Max entry. You can also select the Machine Type from within the program by clicking Print > Machine Type >... -
Page 25: Main Interface Overview
Main Interface Overview The screenshot below shows the three main elements of the software - the Menus, the Icons, and the Build Plate. The icons have the functions listed in the table below. Load Loads a model or Gcode file. FlashPrint supports .STL, .OBJ, and .FPP model files. You can also load a .PNG, .JPG, .JPEG, or .BMP file and FlashPrint will generate a model from the image. -
Page 26: Loading A File
Move Moves the model around on the X/Y plane. Hold the SHIFT key then click to move the mode along the Z axis. Scale Scales the size of the model. Cuts the model into several parts. Extruder Selects the right or left extruder for printing. Loading a File FlashPrint supports six different ways to load a model or Gcode file, as outlined below. - Page 27 Plane Tube...
- Page 28 Canister Lamp Seal...
-
Page 29: Changing Views 29
Changing Views You can change the camera angle in relation to the model and build area using a variety of methods. Drag: Click the View icon, then drag the camera using one of the following methods. · Left click and hold, then move the mouse. ·... - Page 30 Cut: Click the model to select it, then double-click the Cut icon to set the cut plane in a variety of ways. · Left click and drag the cursor across the model to set the cut angle. · Select the X Plane option to cut the model vertically. ·...
-
Page 31: Extruder
Extruder Double-click the Extruder icon to select the left and/or right extruder for printing. Supports Because 3D printing is an additive process, each layer of filament needs a base to be built on. The printer can gradually increase the layer size, so long as the overhang angle is less than about 45 degrees. - Page 32 Support Options: Click the Support Options button to display the Support Options dialog. You can select Treelike or Linear supports. Treelike supports are built at angles, while Linear supports are linear, vertical supports for the overhanging elements. When you click the OK button, the software will generate the appropriate support structures.
-
Page 33: Printing A Model
Printing a Model Click the Print icon on the main interface to slice the model and print the resulting Gcode file, either directly from FlashPrint or by first exporting it to the SD™ card. Preview: Check the Preview box to preview the model before slicing and printing. Print When Slice Done: Check the Print When Slice Done box to start the print as soon as the slice is completed. -
Page 34: File Menu
Infill: Click the Infill tab to reveal the infill options. Infill is the structure that is printed inside the model. Infill directly affects the strength of the printed mode. · Fill Density: Sets the fill density in 5% increments. A 100% density results in a solid model, while a 0% density results in no infill. -
Page 35: Edit Menu
Save Project: Click File > Save Project or press CTRL+S to save the current project. Projects files have a .FPP suffix. Load File: Click File > Load File or press CTRL+O to load a model, Gcode, or project file. Save As: Click File > Save As to save the project or model file. Examples: Click File >... -
Page 36: Print Menu
Print: Click Print > Print or press CTRL+P to open the print dialog. Machine Type: Click Print > Machine Type. Allows you to select the specific model of 3D printer to use with FlashPrint. This printer is the Flashforge Creator Max 3D Printer. View Menu The View Menu contains the following options. -
Page 37: Tools Menu
Tools Menu The Tools Menu contains the following options. Control Panel: Click Tools > Control Panel to modify the printer's settings from within FlashPrint. Note that if you are not connected to the printer, you will be prompted to do so before the Control Panel can be displayed. -
Page 38: Help Menu
4. Set the Connection Mode to USB and set the Select Machine option to the printer. Flashforge Creator Max the printer does not appear in the Select Machine list, click the Rescan button. If it still does not appear, reinstall the driver software. -
Page 39: Wi-Fi Connection
0 days 00:09:06 Sys status module MAC D8:B0:4C:D0:38:4E WiFi Set module MID USR-C322 Trans Set Reload Reset module ver 1.14.13 About FF wifi Status wifi mode Access Point AP IP 10.10.100.254 AP channel AP ssid Flashforge Creator Max 3DPrinter AP secure Open... - Page 40 Wi-Fi AP, as normal. If you choose to use AP mode, you can set the network name (Flashforge Creator Max) and password of the hotspot. If you don't want to use a password, enter NONE. Click the Save button and restart it.
- Page 41 If you choose you use STA mode, input the SSID and password of your existing Wi-Fi® connection. If your Wi-Fi connection does not use a password, enter NONE into the password field. Then click the Save button and restart it. Restart the Flashforge Creator Max printer, then open the WIFI Screen. WiFi Mode Select...
-
Page 42: Updating The Firmware
Turn on the Flashforge Creator Max again and connect your computer to the network. Open FlashPrint, then click Print > Connect Machine. Select Wi-Fi as the Connect Mode and enter the IP Address, as shown on the Flashforge Creator Max's screen. Click Connect. -
Page 43: Printing
2. Double-click the FlashPrint shortcut to launch the software. 3. Click Print > Machine Type and select the Flashforge Creator Max 3D Printer entry. 4. Click the Load icon to load a .STL model file. The model will display within the build area. - Page 44 · Print When Slice Done: Because we are printing from the SD™ card, uncheck this box to save the Gcode file to the SD card. · Machine Type: Select Flashforge Creator Max 3D Printer. · Material Right: Select the type of filament you are using.
-
Page 45: Specifications
R Extruder 17℃ / 110℃ Platform Copy Print Delete SPECIFICATIONS Printer Name Flashforge Creator Max Number of Extruders Print Technology Fused Filament Fabrication (FFF) Screen Type 3.5" color IPS touch screen Build Area 227 x 148 x 150 mm Layer Resolution 0.05 - 0.4 mm...
Need help?
Do you have a question about the Creator Max and is the answer not in the manual?
Questions and answers