Table of Contents
Advertisement
Quick Links
Advertisement
Table of Contents

Subscribe to Our Youtube Channel
Related Manuals for Akuvox Smart Intercom R29 Series


Summary of Contents for Akuvox Smart Intercom R29 Series
- Page 1 R29 Series Door Phone Admin Guide...
- Page 2 About This Manual Thank you for choosing Akuvox’s R29 series door phone. This manual is intended for end users who need to properly configure the door phone. This manual is applicable to 29.31.1.7xx version, and it provides all functions’ configurations of R29 series door phone.
-
Page 3: Table Of Contents
Content 1. Product Overview....................................... 1 1.1. Instruction........................................1 1.2. Connector Introduction....................................2 2. Daily use..........................................3 2.1. Starting......................................... 3 2.2. Make a Call........................................4 2.2.1. Call From Digital Keypad.................................4 2.2.2. Call From Phonebook..................................5 2.2.3. Call From Speed Dial..................................6 2.2.3.1. Building theme..................................6 2.2.3.2. - Page 4 2.4.4. Unlock by DTMF codes................................... 9 3. Basic Features........................................9 3.1. Access the system setting..................................9 3.2. Access the website setting..................................10 3.2.1. Obtain IP Address..................................10 3.2.2. Access the Device Website................................10 3.3. Password Modification..................................... 11 3.3.1. Modify the Phone System Password............................11 3.3.2.
- Page 5 3.4.3.3. Local RTP....................................17 3.4.3.4. Connect Setting..................................17 3.4.4. Display......................................18 3.4.4.1. Await.......................................18 3.4.4.2. Upload ScreenSaver................................19 3.4.4.3. Theme selection................................... 20 3.4.4.4. Door Setting General................................20 3.4.4.5. Home View Visible Control (Villa theme)..........................21 3.4.4.6. Key In Homepage of The Building Theme........................22 3.4.5. Volume......................................23 3.4.5.1.
- Page 6 3.5.2. Phonebook in website................................... 27 3.5.3. Import/Export contacts...................................28 3.5.4. Contact list setting..................................28 3.6. Intercom call......................................30 3.6.1. IP Direct Call....................................30 3.6.2. SIP Call......................................31 3.6.2.1. Account....................................31 3.6.2.2. SIP Account...................................32 3.6.2.3. SIP Server..................................... 34 3.6.2.4. Outbound Proxy Server..............................34 3.6.2.5.
- Page 7 3.7. Security........................................41 3.7.1. Mjpeg Service....................................41 3.7.2. Live Stream..................................... 41 3.7.3. RTSP........................................ 42 3.7.4. ONVIF......................................43 3.8. Access Control......................................44 3.8.1. Relay........................................ 44 3.8.1.1. Unlock Options..................................45 3.8.2. Unlock via RFID Cards.................................. 46 3.8.2.1. RFID Cards in Devices................................46 3.8.2.2. RFID Cards in Website............................... 47 3.8.2.3.
- Page 8 3.8.4. Unlock via Face....................................52 3.8.4.1. Face in Device..................................52 3.8.4.2. Face in Website..................................53 3.8.5. Unlock via QR code..................................56 3.8.6. Unlock via Bluetooth(Optional)..............................56 3.8.7. Unlock via Fingerprint(Optional)..............................57 3.8.8. Unlock via HTTP Command................................. 58 3.8.9. Unlock via Exit Button..................................58 3.8.10. Unlock via Reception in Building Theme..........................59 3.9.
- Page 9 4.2. Intercom........................................65 4.2.1. Call Time Related................................... 65 4.2.1.1. RTP timeout..................................65 4.2.1.2. Max call time..................................66 4.2.1.3. Max dial time..................................66 4.2.1.4. Hang up after open door..............................66 4.2.2. Return Code When Refused................................ 67 4.2.3. SIP Call Related..................................... 67 4.2.4. Call Waiting..................................... 68 4.2.5.
- Page 10 4.3.1. Webrelay......................................76 4.3.2. Wiegand......................................77 4.4. Security........................................78 4.4.1. Antialarm of Door Phone................................78 4.4.1.1. Antialarm in device................................78 4.4.1.2. Antialarm in website................................79 4.4.2. Motion.......................................80 4.4.2.1. Motion in device................................... 80 4.4.2.2. Motion in website................................. 81 4.4.3. Action........................................81 4.4.3.1. Email Notification................................. 81 4.4.3.2. FTP Notification..................................82 4.4.3.3.
- Page 11 4.5.3. Backup Config File..................................86 4.6. Log..........................................87 4.6.1. Call Log......................................87 4.6.2. Door Log......................................88 4.6.3. System Log..................................... 88 4.6.4. PCAP........................................89...
-
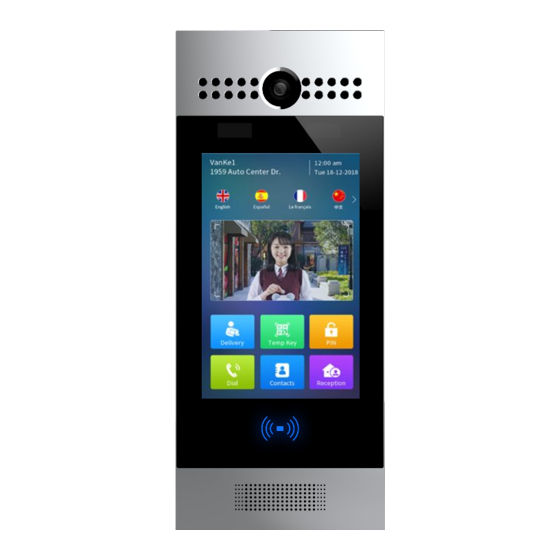
Page 12: Product Overview
R29X Admin Guide 1. Product Overview Built-in light Color camera sensor & infrared Microphone 1.1. Instruction Infrared LEDs R29 series is an Android-based IP video door phone with a touch screen. It incorporates audio and video communications, access Touch screen control and video surveillance. -
Page 13: Connector Introduction
R29X Admin Guide 1.2. Connector Introduction Ethernet (POE): Ethernet (POE) connector which can provide both power and network connection. 12V/GND: External power supply terminal if POE is not available. WG_D0/1: Wiegand terminal for wiegand access control. RS485A/B: RS485 terminal for automation system control (e.g. Figure 1.2-1 Connection introduction Elevator control). -
Page 14: Daily Use
R29X Admin Guide 2. Daily use 2.1. Starting When booting R29X first time, users need to choose a suitable display language for device. Tap Start to start the selection. R29X support 4 languages, including French, English, Spanish and Chinese. Then choosing the proper display theme according to specific application scenarios. -
Page 15: Make A Call
R29X Admin Guide 2.2. Make a Call There are three ways to make a call from the door phone to monitor units, which can be an indoor monitor or an intercom app. 2.2.1. Call From Digital Keypad Press Dial (Building theme) or Call (Villa theme or Office theme) to enter the dial interface. -
Page 16: Call From Phonebook
R29X Admin Guide 2.2.2. Call From Phonebook Tap Contacts to enter the phonebook. In the phonebook interface, to find a specific occupant, scroll up or down the pre-imported contact list, which is either a room number, an occupant’s name, or the combination of both. -
Page 17: Call From Speed Dial
R29X Admin Guide 2.2.3. Call From Speed Dial 2.2.3.1. Building theme Press Reception to make the call directly. 2.2.3.2. Villa theme or Office theme Press Call to enter the call interface, choose a speed dial number that users want to call directly. Figure 2.2.3.3 Speed dial 2.3. -
Page 18: Unlock
R29X Admin Guide 2.4. Unlock 2.4.1. Unlock by Pin Codes Unlock the door by using predefined public pin or private pin. Press PIN icon to enter the PIN code interface, enter the “pin code” and press Confirm icon to unlock, then you will hear “Welcome, please coming ”... -
Page 19: Unlock By Face
R29X Admin Guide 2.4.2. Unlock by Face Stand in front of the camera of R29X in 0.5-1m and look at the camera, the device will recognize the predefined face less than 0.6s in the main interface(Building theme) or enter the “Password”(Villa or office theme) interface and it will announce “Welcome, please come in”... -
Page 20: Unlock By Dtmf Codes
R29X Admin Guide succeeded”. If the card has not been registered, the phone will show “Invalid password”. 2.4.4. Unlock by DTMF codes During the calling, the president can press the predefined DTMF codes to remote unlock the door. Figure 3.1-1 Access the system setting Figure 3.1-2 Access the system setting (Building theme) 3. -
Page 21: Access The Website Setting
R29X Admin Guide 3.2. Access the website setting 3.2.1. Obtain IP Address R29 series use DHCP IP by default. Enter the phone interface and go to Info to check the IP address. 3.2.2. Access the Device Website Open a web browser, and access the corresponding IP address. Figure 3.2.1 Info Enter the default user name and password to login. -
Page 22: Password Modification
R29X Admin Guide 3.3. Password Modification 3.3.1. Modify the Phone System Password Users can configure project key with this function. The public key is a password used by all occupants in a building. Project key is used by administrators for some basic settings. There are two ways to change the system password, which can be done on the phone system and on the intercom website. -
Page 23: Modify The Web Password
In the phone interface, go to Language to configure. Now R29 series can support multiple phone language. Users can choose Figure 3.4.1.1-1 Configure phone Figure 3.4.1.1-2 Configure phone language manually. Akuvox uses English by default. language (Building theme) On the building theme, support users to select languages on the Figure 3.4.1.1-3 Configure phone language... -
Page 24: Modify The Web Language
Modify the web language Enter the intercom website and go to the path Phone - Time/lang - Web Language to configure. Now R29 series can support multiple web language. Users can choose manually. Akuvox uses English Figure 3.4.1.2 Configure Web Language by default. -
Page 25: Time
R29X Admin Guide 3.4.2. Time In the phone interface, go to Time to configure. Choose automatic date & time setting for automatic access of time, date and time zone. Or set the time, date and time zone manually. Users can also set the time zone configuration on the device portal Phone - Time/Lang. -
Page 26: Network
R29X Admin Guide 3.4.3. Network In the phone interface, go to Address or login to the website and go to the path Network - Basic, dynamically or statically to obtain address. 3.4.3.1. DHCP Mode R29 series uses DHCP mode by default which will get IP address, subnet mask, default gateway and DNS server address from DHCP Figure 3.4.3.1-1 DHCP mode server automatically. -
Page 27: Static Mode
R29X Admin Guide 3.4.3.2. Static Mode If select static IP, users should manually setup IP address, subnet mask, default gateway and DNS server address. The figure right shows static IP setting. Figure 3.4.3.2-1 Static mode Figure 3.4.3.2-2 Static mode... -
Page 28: Local Rtp
R29X Admin Guide 3.4.3.3. Local RTP Go to Network - Advanced to configure. Local RTP: To display and configure local RTP settings. Starting RTP Port: Determine the minimum port that RTP stream can use. Figure 3.4.3.3. Local RTP Max RTP Port: Determine the maximum port that RTP stream can use. -
Page 29: Display
R29X Admin Guide Device Location: Used to identify the device location, which will also serve as the device display name 3.4.4. Display 3.4.4.1. Await In the phone interface, go to Await or login to the website and go to the path Intercom - Advanced - StandBy, to set the standby mode, standby time and unlock mode. -
Page 30: Upload Screensaver
R29X Admin Guide the standby mode. 3.4.4.2. Upload ScreenSaver In the website and go to the path Phone - Import/Export - Upload screensaver to configure. To upload screen saver and set the corresponding interval time and the priority. It will be displayed on Figure 3.4.4.2-1 Upload ScreenSaver screen when R29 series stand by type as picture. -
Page 31: Theme Selection
R29X Admin Guide After uploading, the pictures will be in the list. Then users need to manually setup the Interval time which means how long the image will display then change to next screensaver. Interval range from 5s to 120s. Click the Submit to save each one. Click Delete to remove the picture. -
Page 32: Home View Visible Control (Villa Theme)
R29X Admin Guide 3.4.4.5. Home View Visible Control (Villa theme) In the website and go to the path Intercom - Key/Display - View Visible of The Villa Theme to configure. Figure 3.4.4.4.5-1 How view visible control Users can setup the home page’s default display interface, whether the home page-dial interface, contact interface, unlock interface is visible. -
Page 33: Key In Homepage Of The Building Theme
R29X Admin Guide 3.4.4.6. Key In Homepage of The Building Theme On the device homepage of the building theme, six icon are displayed. Users can configure their type on the website, go to Intercom - Key/Display. Users can customize the feature of the icon. -
Page 34: Volume
R29X Admin Guide 3.4.5. Volume 3.4.5.1. Volume related in device In the phone interface, go to Volume, to configure the call volume, AD volume and key volume. Call Volume: When R29 series dials out a call, it will prompt the ‘du’... -
Page 35: Mic Volume In Website
R29X Admin Guide interface. 3.4.5.3. Mic volume in website Figure 3.4.5.3 Mic volume Mic Volume: Login to the website and go to the path Phone - Voice, to configure Mic volume. 3.4.5.4. Open door tone Open Door Tone: Users can also go to the path Intercom - Door Setting General to configure the switch whether users will hear the Figure 3.4.5.4-1 Open door warning “Welcome! Please coming”... -
Page 36: Dnd
R29X Admin Guide yourself. 3.4.6. DND DND allows IP phones to ignore any incoming calls. Users can login to the website and go to Phone - Call Feature to configure. Return Code when DND: Determine what response code should be sent back to server when there is an incoming call if DND on. DND On Code: The code used to turn on DND on server’s side, if Figure 3.4.6 DND configured, IP phone will send a SIP message to server to turn on... -
Page 37: Phonebook
R29X Admin Guide 3.5. Phonebook 3.5.1. Phonebook in devices In the phone interface, go to Contact to configure the phonebook. Create a group: Choose group, click Add to enter the new group name. Press Save to save. Edit a group: Choose the existed group to modify or delete. Create a contact: Click Add to enter the contact’s information. -
Page 38: Phonebook In Website
R29X Admin Guide 3.5.2. Phonebook in website In the website, go to the path Phonebook - Local Book to configure the phonebook. Figure 3.5-5 Phonebook Contact: To display or edit all local contacts. Search: Enter the key word to search designated contacts from local phonebook. -
Page 39: Import/Export Contacts
R29X Admin Guide 3.5.3. Import/Export contacts Users can also login to the website and go to the path Phone - Import/Export - Import/Export Config&Contacts to upload or download the contact information. Figure 3.5-8 Import/Export contacts Contact: Click Export to export the existed contact. Choose the local file and click Import to import the new contact. - Page 40 R29X Admin Guide picture or not. Expend Contact List View Mode: With this enabled, the contact list will be displayed in view mode. Hide Group Label For Contact List: With this enabled, the contact list will be displayed directly and there will be no group. Login to the website and go to the path Phonebook - Phonebook - Contact List Setting.
-
Page 41: Intercom Call
R29X Admin Guide code” means that the contact list will be displayed in order of 0~9, a~z; “Room number” means that the contact list will be displayed in order of a~z, 0~9; “Import” means that the contact list will be displayed in the same order as in the import file. -
Page 42: Sip Call
R29X Admin Guide 3.6.2. SIP Call SIP call uses SIP number to call each other which should be supported by SIP server. Users need to register an account and fill some SIP feature parameters before using SIP call. Login to the website and go to the path Account - Basic to configure SIP account and SIP server for door phone first. -
Page 43: Sip Account
R29X Admin Guide SIP Account 3.6.2.2. In the phone interface, go to Account - Account setting - Account 1&2 to configure the SIP account. Enable Account: SIP account is only available if you enable this account. Register Name: To enter extension number you want and the number is allocated by SIP server. - Page 44 R29X Admin Guide Login to the website and go to the path Account - Basic - SIP Account to configure the SIP account. Status: To display register result. Account: Select the SIP account you need to configure. Account Active: SIP account is only available if users enable this account.
-
Page 45: Sip Server
R29X Admin Guide 3.6.2.3. SIP Server In the phone interface, go to Account - Account setting - Account 1&2 to configure the SIP server. Users can also go to the path Account - Basic - SIP Server 1&2 to configure. Figure 3.6.2.3-1 SIP server Server IP: To enter SIP server’s IP address or URL. -
Page 46: Transport Type
R29X Admin Guide 3.6.2.5. Transport Type To display and configure transport type for SIP message UDP: UDP is an unreliable but very efficient transport layer protocol. TCP: Reliable but less-efficient transport layer protocol. Figure 3.6.2.5 Transport type TLS: Secured and Reliable transport layer protocol. DNS-SRV: DNS record for specifying the location of services. - Page 47 R29X Admin Guide supports a prefix number replace 5 number at the same time, when the user press the prefix number, the 5 devices will ring at the same time. Users can edit or delete the exited replace rules. For example: Users can pre-configure 101 to replace 192.168.16.112 and Figure 3.6.3-2 Dial plan 192.168.16.158 in the doorphone.
-
Page 48: Quick Dial
R29X Admin Guide 3.6.4. Quick Dial Quick dial is to call predefined important number quickly in main interface. This number is often set as emergency number. In the phone interface, go to Quick Dial, switch the type as quick dial, enter the quick dial name and number, click Save to confirm. 3.6.5. - Page 49 R29X Admin Guide It will not displayed the contact list, only Standard display time and keypad. The dial interface will based on the number of speed dial contacts. Null displays the time Auto and keypad; 1~4 contacts will displays contacts and keypad; More then 4 contacts, only contacts will be displayed.
-
Page 50: Auto Answer
R29X Admin Guide 3.6.6. Auto Answer Login to the website and go to the path Account - Advanced - Call - Auto Answer to enable the auto answer. Figure 3.6.5 -1Auto answer Login to the website and go to the path Phone - Call Feature - Others to configure the auto answer related function. -
Page 51: Web Call
R29X Admin Guide Note: This feature should work with Akuvox Cloud. Please contact your administrator for more information. 3.6.8. Web Call Login to the website and go to the path Phonebook - Local Book - Dial to dial out from website. -
Page 52: Security
R29X Admin Guide 3.7. Security 3.7.1. Mjpeg Service Login to the website and go to the path Intercom - Advanced - Mjpeg Server to configure. Mjpeg Service Enable: Use to capture from the URL. It is Figure 3.7.1 Mjpeg service convenient to check the capture remotely. -
Page 53: Rtsp
R29X Admin Guide check the real-time picture via URL: http://IP_address:8080/video.cgi 3.7.3. RTSP RTSP Basic R29 series support RTSP stream, enter the phone system, go to RTSP or login to the website and go to the path Intercom - RTSP, to enable or disable RTSP server. -
Page 54: Onvif
R29X Admin Guide 3.7.4. ONVIF R29 series supports ONVIF protocol, which means R29 series camera can be searched by other devices, like NVR, which supports ONVIF protocol as well. Go to the path Intercom - ONVIF GUI, configure ONVIF mode Figure 3.7.4 ONVIF setting username/password. -
Page 55: Access Control
R29X Admin Guide 3.8. Access Control 3.8.1. Relay Login to the website and go to the path Intercom - Relay to configure. Relay ID: R29 series supports three relays. Users can configure them respectively. Trigger Delay: To configure the duration of the trigger relay. With the trigger condition, the relay will only be triggered if the value is reached. -
Page 56: Unlock Options
R29X Admin Guide Relay Status: While the relay is triggered, the statues will be switched. When COM connects to NC, the status is Low. Note: Relay operate a switch and does not deliver power, so users should prepare power adapter for external devices which connects to relay. -
Page 57: Unlock Via Rfid Cards
R29X Admin Guide 3.8.2. Unlock via RFID Cards 3.8.2.1. RFID Cards in Devices R29 series can be compatible with 13.56MHZ and 125KHZ RFID cards. Press “Add Card”, when you see “Please scan the RFCard to Add”, put the card near the card sensor. Then enter the device name , valid day and time in the modify prompt. -
Page 58: Rfid Cards In Website
R29X Admin Guide 3.8.2.2. RFID Cards in Website Go to the path Intercom - Card setting, to manage RFID cards access system. Import/Export Card Data: Export the existed RFID cards Figure 3.8.2-3 Import/Export card data information or import the new RFID cards information. It can only support .xml format. -
Page 59: Card Type Support
R29X Admin Guide Door Card Management: Valid card information will be shown in the list. Administrator could delete one card’s access permission or empty all the list. Note: Remember to set card status back to normal after adding the cards. Figure 3.8.2-6 Door card management 3.8.2.3. -
Page 60: Unlock Via Pin Codes
R29X Admin Guide 3.8.3. Unlock via Pin Codes 3.8.3.1. Private Pin Codes in Device In the phone interface, go to LockPasswd, enter the owner name, 8 digits private keys and Device (optional). Setup the valid day and time for the password. For example: Owner name is Eve, private key is 1995, and I set up the valid day from Mon to Sun, click Save to save. - Page 61 R29X Admin Guide Obtain and Add Code: (1)Enter the “PKey Name” and “PKey Code”; (2)Select the valid day and time; (3)Choose which door users want to open; (4)Click “Add” to add it into list. Private Key Management: Figure 3.8.3.2-2 Private key setting Valid private key information will be shown in the list.
-
Page 62: Public Pin Codes In Device
R29X Admin Guide 3.8.3.3. Public Pin Codes in device In the phone interface, go to Password - Public Key Passwd, enter the old public key, R29 series support 3 default public keys. Then enter the new password, after entering the new password Confirm, click save icon. - Page 63 Or the administrator can use FacePro to import a large number of face data. Please refer to FacePro user manual for more configurations. Note: Akuvox recommends to use the FacePro to manage the face Figure 3.8.4.1-1 Face recognition data. It is also convenient to maintenance when firmware...
- Page 64 R29X Admin Guide upgrading. Modify: Click Face database, choose the existed database to delete 3.8.4.2. Face in Website Go to the path Intercom - Face on the web GUI to configure the face parameters and information. Face Basic Face Recognition: Enable to use the face recognition feature. This option is enabled by default.
- Page 65 R29X Admin Guide Highest. The higher level, the lower error recognition rate without live detection. Antispoofing Option: It is divided into 4 levels -Low, Normal, High or Highest. The higher level, the lower error recognition rate with live detection. Facial recognition Interval: The interval between two face recognition.
- Page 66 R29X Admin Guide Face Setting Lift Floor Number: Combining face data with corresponding floor, face data should belong to an existing contact , so the name of face must be same with the corresponding contact. Figure 3.8.4.2-3 Face setting When someone scans face, the device will match the face with the floor number, then release the floor button.
- Page 67 3.8.5. Unlock via QR code On the portal Intercom - Relay - Open Relay via QR. Enable the QR function. Note: This function should be work with Akuvox cloud. For more Figure 3.8.5 Open relay via QR information, please contact with your administrators.
- Page 68 R29X Admin Guide 3.8.7. Unlock via Fingerprint(Optional) Go to the path Intercom - Fingerprint on the web GUI, to manage finger keys access system. Finger Key Setting: (1)Select the valid day and time; (2)Choose which door users want to open; (3)Enter the “Finger Name”.
- Page 69 R29X Admin Guide 3.8.8. Unlock via HTTP Command Login to the website and go to the path Intercom - Relay - Open Relay via HTTP to configure. Users can use a URL to remotely unlock the door. It is more convenient for users to open the door if users are not beside the devices.
- Page 70 R29X Admin Guide Input Service: To enable or disable input trigger service. Trigger Option: To choose open circuit trigger or closed circuit trigger. “Low” means that connection between door terminal and GND is closed, while “High” means the connection is opened. Door Status: To show the status of input signal.
- Page 71 R29X Admin Guide 3.9. Reboot In the phone interface, go to Reboot to click the Reboot, or go to the path Upgrade - Basic on the web GUI, click Submit, the device will restart. Figure 3.9-1 Reboot Figure 3.9-2 Reboot...
- Page 72 R29X Admin Guide 3.10. Reset In the phone interface, go to Restore. Click Restore, if users sure to restore to factory settings, please choose Confirm in the prompt window. Users can also login to the website and go to the path Upgrade - Basic, directly click Submit to reset R29 series.
- Page 73 R29X Admin Guide 4. Advanced Features 4.1. Phone Configuration 4.1.1. IR LED The setting is for night vision, when the surrounding of R29 series is very dark, infrared LED will turn on and R29 series will turn to night mode to let the users see video clearly from the R29. In the phone interface, go to LED or go to the path Intercom - Advanced - LED on web GUI, to configure the IR LED function.
- Page 74 R29X Admin Guide LED will be up. Min/Max photoresistor: Photoresistor value relates to light intensity and larger value mean that light intensity is smaller. When photoresistor value is greater than max value, LED will turn on. In contrast, when photoresistor value is less than min value, infrared LED will turn off and the device turns to normal mode.
- Page 75 R29X Admin Guide 4.1.2. LED of Display Login to the website and go to the path Intercom - LED Setting - LED Control to configure. Card LED Enable: To control the LED of the card reader area. Start Time (H): Setup the LED light up time. According to the system time.
- Page 76 R29X Admin Guide 4.1.4. RFID Card Code Display Related Login to the website and go to the path Intercom - Advanced - RFID to configure. Display Mode: To be compatible different card number formats in Figure 4.1.4 RFID different systems. The default 8HN means hexadecimal. 4.2.
- Page 77 R29X Admin Guide R29 series will hang up automatically. 4.2.1.2. Max call time Max Call Time: Login to the website and go to the path Intercom - Basic - Max Call Time to configure the max call time. Figure 4.2.1.2 Max call time 4.2.1.3.
- Page 78 R29X Admin Guide Time Out: When the callee press the DTMF code to open the door, this call will hang up automatically after the timeout. 4.2.2. Return Code When Refused Login to the website and go to Phone - Call Feature - Others to configure.
- Page 79 R29X Admin Guide Caller ID Header: To choose caller ID header format automatically. Anonymous Call: If enabled, R29 series will block its information when calling out. Anonymous Call Rejection: If enabled, calls who block their information will be screened out. Missed Call Log: If enabled, any missed call will be recorded into Figure 4.2.3 SIP call related call log.
- Page 80 R29X Admin Guide On Code: The code used to enable call waiting on server’s side, if configured, IP phone will send a SIP message to server to turn on call waiting on server side if user setup calls waiting is disabled. Off Code: The code used to disable call waiting on server’s side, if configured, IP phone will send a SIP message to disable call waiting on server side if user setup call waiting is enabled.
- Page 81 R29X Admin Guide 4.2.6. Codec Login to the website and go to the path Account - Advanced to Figure 4.2.6-1 SIP account configure the video codec and audio codec. Audio Codec Sip Account: To choose which account to configure. Audio Codec: R29 series supports four audio codec: PCMA, PCMU, G729, G722.
- Page 82 R29X Admin Guide Video Codec R29 series supports H264 standard, which provides better video quality at substantially lower bit rates than previous standards. Codec Resolution: R29 series supports four resolutions: QCIF, CIF, VGA, 4CIF and 720P. Codec Bitrate: To configure bit rates of video stream. Codec Payload: To configure RTP audio video profile Figure 4.2.6-3 Video codec 4.2.7.
- Page 83 R29X Admin Guide 4.2.8. Session Timer Go to the path Account - Advanced - Session Timer on the web GUI to configure. If enabled, the on going call will be disconnected Figure 4.2.8 Session timer automatically once the session expired unless it’s been refreshed by UAC or UAS.
- Page 84 PCAP. 4.2.11. HTTP API HTTP API configurations for Akuvox intercom are defined via web interface path: Intercom - HTTP API to disable/enable a service and select the user authentication method.
- Page 85 R29X Admin Guide Basic, Digets, Token. No authentication is required for http api, it is only used None by demo testing. Username/Password: Used in basic and digest auth Normal (reserved) mode. The default username/password is admin/httpapi. IP01~05: Configure the white list IP. The whitelist is suitable for operation in the LAN, by WhiteList judging the IP address of the visitor to confirm whether...
- Page 86 R29X Admin Guide 4.3. Access control 4.3.1. Webrelay R29 series supports extra web relay. This function is more safety to use DTMF code to remote unlock. Login to the website and go to the path Phone - Web Relay to configure. Figure 4.3.1-1 Web relay ...
- Page 87 R29X Admin Guide relay will be open with local relay. But if there are different, the web relay is invalid. Web Relay Extension: The webrelay can only receive the DTMF signal from the corresponding extension number. 4.3.2. Wiegand Login to the website and go to the path Intercom - Advanced - Wiegand to configure.
- Page 88 R29X Admin Guide Wiegand Input/Output Order: To make the data from wiegand devices to be normal order or reversed order. Wiegand Output CRC: To be compatible with the other three party wiegand access control which do not use the standard wiegand order, CRC can correct the order format.
- Page 89 R29X Admin Guide location. The detailed gravity sensor value can be adjusted in website. Tamper Proof Switch: Switch this feature. Tamper Proof Switch: The smaller the value, the more sensitive the gravity sensor is. Tamper Alarm Volume: To configure the tamper alarm volume. 4.4.1.2.
- Page 90 R29X Admin Guide 4.4.2. Motion 4.4.2.1. Motion in device In the phone interface, go to Motion to configure. By enabling the motion detection function, the door phone will detect and record any change in the surrounding, such as suspicious people loitering around, and send notification message to a monitor unit.
- Page 91 R29X Admin Guide 4.4.2.2. Motion in website Login to the website and go to the path Intercom - Motion - Motion Detection Options to configure. Enable: To enable or disable motion detection. Timing Interval: R29 series will take the picture in the interval time. Figure 4.4.2.2 Motion detection options Detection Accuracy: The smaller value, the capture picture is more accurate.
- Page 92 R29X Admin Guide path. It is useful for users to check the capture picture for security. Sender’s email address: To configure email address of sender. Receiver’s email address: To configure email address of receiver. SMTP server address: To configure SMTP server address of sender.
- Page 93 R29X Admin Guide FTP Path: Enter the folder name you created in FTP server. 4.4.3.3. Input Interface Triggered Action Go to the path Intercom - Input on the website to configure. Figure 4.4.3.3 Input interface triggered action Action Delay: To configure after how long to execute to send out notifications and trigger relay.
- Page 94 R29X Admin Guide 4.5. Upgrade 4.5.1. Web Update Login to the website and go to the path Upgrade - Basic, users can upgrade firmware. Figure 4.5.1 Web update Upgrade: Choose .zip/.rom firmware from your PC, then click Submit to start update. 4.5.2.
- Page 95 R29X Admin Guide Autop is a centralized and unified upgrade of IP telephone. It is a simple and time-saving configuration for IP phone. It is mainly used by the device to download corresponding configuration document from the server using TFTP / FTP / HTTP / HTTPS network protocol. To achieve the purpose of updating the device configuration, making the user to change the phone configuration more easily.
- Page 96 R29X Admin Guide 0c1105888888.cfg if IP phone’s MAC address is 0c1105888888). Note: AES is one of many encryption, it should be configured only when configure file is ciphered with AES, otherwise left blank. Automatic Autop To display and configure Auto Provisioning mode settings. This Auto Provisioning mode is actually self-explanatory.
- Page 97 R29X Admin Guide Note: The exported config here is encrypted. Users can also go to the path Phone - Import/Export - Import/Export Config&Contact to export or import the config. Click Export to export the config file. 4.6. Log 4.6.1. Call Log Login to the website and go to the path Phonebook - Call Log, users can see a list of call which have dialed, received or missed.
- Page 98 R29X Admin Guide 4.6.2. Door Log Login to the website and go to the path Phone - Door Log, users can see a list of door log which records card information and date. 4.6.3. System Log Figure 4.6.2 Door log Go to the path Upgrade - Advanced - System Log on web GUI.
- Page 99 R29X Admin Guide 4.6.4. PCAP Go to the path Upgrade - Advanced - PCAP on web GUI. To start, stop packets capturing or to export captured Packet file. Start: To start capturing all the packets file sent or received from IP Figure 4.6.4 PCAP phone.
- Page 100 R29X Admin Guide SIP: Session Initiation Protocol PCAP: Packet Capture SNMP: Simple Network Management Protocol PNP: Plug and Play STUN: Session Traversal Utilities for NAT RFID: Radio Frequency Identification SNMP: Simple Mail Transfer Protocol RTP: Real-time Transport Protocol SDMC: SIP Devices Management Center RTSP: Real Time Streaming Protocol TR069: Technical Report069 MPEG: Moving Picture Experts Group...
- Page 101 R29X Admin Guide Contact us For more information about the product, please visit us atwww.akuvox.com or feel free to contact us by Sales email: sales@akuvox.com Technical support email: techsupport@akuvox.com Telephone: +86-592-2133061 ext.7694/8162...
- Page 102 R29X Admin Guide We highly appreciate your feedback about our products.
Need help?
Do you have a question about the Smart Intercom R29 Series and is the answer not in the manual?
Questions and answers