Advertisement
Quick Links
Unpacking
Before using the device, check the device model and ensure that the shipped
box includes the following items:
S532
M3x5 crosshead screw
Rubber plug (medium)
T10 wrench
Plate removal key
1×
Wiring cover
4×
Flat-head screwdriver
1×
Rubber plug (small)
1×
8-PIN terminal block
1×
Quick Installation Guide
1×
1×
1×
2×
2×
Diode
1
S532
M3x9.5 torx head screw
Rubber plug (large)
Card reader touch plate
7-PIN terminal block
S532
2×
1×
1×
2×
Advertisement

Subscribe to Our Youtube Channel
Related Manuals for Akuvox S532


Summary of Contents for Akuvox S532
- Page 1 S532 S532 Quick Installation Guide Unpacking Before using the device, check the device model and ensure that the shipped box includes the following items: 1× 1× 2× Wiring cover S532 M3x9.5 torx head screw 4× 1× 1× M3x5 crosshead screw...
- Page 2 S532 Quick Installation Guide Optional Accessories: Wall-mounting Accessories (Please find in On-Wall Installation Kit box): 1× 1× 6× Wall-mounting box Wall-mounting template ST4x20 crosshead screw 6× 2× Plastic wall anchor M4x30 crosshead screw Flush-mounting Accessories (Please find in In-Wall Installation Kit box) 1×...
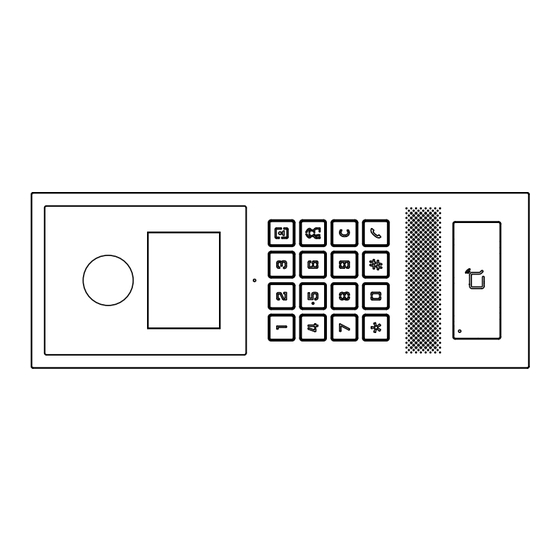
- Page 3 S532 Quick Installation Guide Product Overview Infrared LED Camera Photosensitive Sensor Microphone Numerical keypad Loudspeaker Card Reader...
- Page 4 S532 Quick Installation Guide Before You Start Tools needed (not included in shipped box) Cat Ethernet Cable Crosshead Screwdriver Electric Drill Voltage and Current Specifications It is suggested that use PoE+ or 12VDC 2A power adapter to power on device.
- Page 5 5.Use wet cloth clean device surface softly, and then wipe the surface with dry cloth for cleaning the device. 6.If there is abnormal situation of the device, including uncommon sound and smell, please power off the device and contact Akuvox Technical Team immedi ately.
- Page 6 S532 Quick Installation Guide Wiring Interface To protect the device from potential damage caused by over-voltage, it is recommended to wire a diode into the circuit. Connect the anode of the diode to Diode the negative cable of the lock, and connect the...
- Page 7 S532 Quick Installation Guide Installation Step1: Wall-mounting Box or Flush-mounting Box Installation 1.Wall Mounting According to the position of the cables on the wall, stick the wall-mounting template vertically. Make sure that the cables pass through the cable hole of template.
- Page 8 S532 Quick Installation Guide 2.Flush Mounting 2.1 Normal Installation According to the position of the cables on the wall, cut out a square hole on the wall with the dimension 289*98*52.5mm (height*width*depth). Route all cables outward or reserve a cable tube.
- Page 9 S532 Quick Installation Guide Use six M4x8 crosshead screws to fix the flush-mount- ing bracket on the box. 2.2 Simple Installation (with lower resistance of vandalism) According to the position of the cables on the wall, cut out a square hole on the wall with the dimension 289*98*52.5mm (height*width*depth).
- Page 10 S532 Quick Installation Guide Insert terminal blocks, Ethernet cable, and Micro SD Card to the corresponding interface of device. Select and press an appropriate rubber plug into the corresponding groove of device. Organize cables and use four M3x5 crosshead screws to secure wiring cover to the device.
- Page 11 S532 Quick Installation Guide Wall-mounting Flush-mounting Fix two M3x9.5 torx head screws into the holes. Wall-mounting Flush-mounting Press the card reader touch plate back into its original position. Note: Check the orientation of the card reader touch plate to avoid installing it in the wrong direction.
- Page 12 Do not attempt to modify, alternate, maintain, or repair device by yourself. Akuvox warranty does not apply to damages caused by anyone who is not representative of Akuvox or an Akuvox authorized service provider. Please contact Akuvox Technical Team if the device .
Need help?
Do you have a question about the S532 and is the answer not in the manual?
Questions and answers