Advertisement
Quick Links
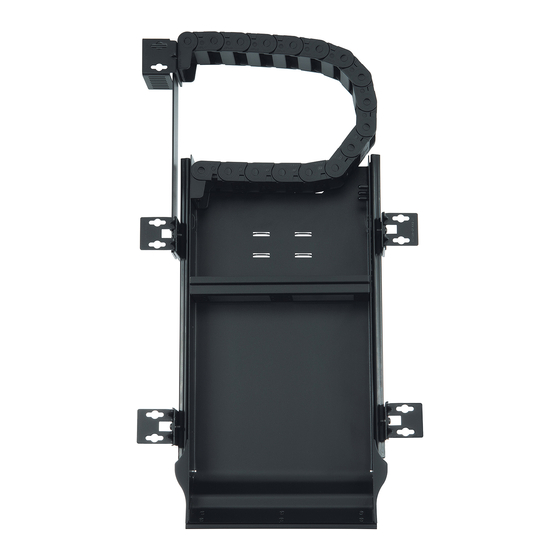
Cable Cubby Drawer CCD 220 and CCD 320 •
Installation Guide
This guide provides instructions for an experienced technician to
install and connect the Extron Cable Cubby Drawer CCD 220 and
CCD 320.
The Cable Cubby Drawers (CCD) are cable access sliding
products that mount underneath furniture for AV connectivity,
control, and power.
Planning
Check with local and state regulations before starting the installation
…
nsure that the planned installation complies with national and local building and electrical codes.
E
…
Ensure that the planned installation complies with the Americans with Disabilities Act or other accessibility
requirements.
Check all parts and equipment before installation
Ensure that all parts are present in each kit.
…
…
Ensure that necessary tools and equipment are available for the installation.
Kit Contents
CCD 220
#8 pan-head wood screws
Cable tie-wraps
Tweeker
1
CCD 220
CCD 320
CCD 320
10 #8 pan-head wood screws
6
Cable tie-wraps
1
Tweeker
U SB
D IO
AU
A
VG
M I
H D
R
GE
B CH
AR
US
10
10
1
Advertisement

Related Manuals for Extron electronics CCD 220


Summary of Contents for Extron electronics CCD 220
- Page 1 Cable Cubby Drawer CCD 220 and CCD 320 • Installation Guide This guide provides instructions for an experienced technician to install and connect the Extron Cable Cubby Drawer CCD 220 and CCD 320. The Cable Cubby Drawers (CCD) are cable access sliding...
-
Page 2: Application Diagram
• Cable Cubby Drawer CCD 220 and CCD 320 Installation Guide (Continued) Application Diagram DI O B CH Extron CCD 220... - Page 3 Cable Cubby Drawer CCD 220 and CCD 320 • Installation Guide (Continued) Preparing the Table Determine the best location to install the Cable Cubby Drawer … Ensure that the location where the Cable Cubby Drawer will be installed is convenient for the user.
- Page 4 • Cable Cubby Drawer CCD 220 and CCD 320 Installation Guide (Continued) Optional: Reposition Cable Track if Necessary The drawer’s cable track can be respositioned if space underneath the table is limited. There are two options to reposition the drawer: Option 1: Reposition the rear cable track by removing the fixed-length cable track bridge arm.
- Page 5 Portez des lunettes de sécurité lorsque vous utilisez l’équipement électrique. Ne pas respecter cela peut conduire à une blessure à l’oeil. The following instructions apply to both the CCD 220 and CCD 320. Align the included template (the dimensions can also be found on the next two pages) so the front edge of the template is flush with the edge of the mounting surface.
-
Page 6: Mounting Template
• Cable Cubby Drawer CCD 220 and CCD 320 Installation Guide (Continued) NOTE: The diagram below is not drawn to scale. Dimensions and templates are available online at www.extron.com Pilot drill 3/32" (2.38 mm) diameter holes, 1/2" (12.7 mm) inch deep (12 places). - Page 7 • Cable Cubby Drawer CCD 220 and CCD 320 Installation Guide (Continued) NOTE: The diagram below is not drawn to scale. CCD 320 Dimensions and templates are available online at Mounting Template www.extron.com. Instructions 1. Align the template so that the “Table Edge”of the template is ushed with the edge of the mounting surface.
- Page 8 Remove the bottom screws from underneath the drawer (3 screws for the CCD 220 and 5 for the CCD 320). Step 2 — Attach the AAP modules to the AAP frame AAP frames allow you to populate the Cable Cubby Drawer with a combination of AAP modules. Follow the steps below to assemble the connectivity modules of your choice.
- Page 9 • Cable Cubby Drawer CCD 220 and CCD 320 Installation Guide (Continued) Step 4: Mounting a Power Supply to the CCD 320 (Optional) Place one or two power supplies behind the AAP modules as seen in the image below. A power supply can be mounted in either location or orientation by lining up the mounting holes.
- Page 10 • Cable Cubby Drawer CCD 220 and CCD 320 Installation Guide (Continued) 0.20" (5.0 mm) R= 0.49" 2X 125° (1.3 mm) R= 0.49" (1.3 mm) 1.49" (37.8 mm) 8.16" (207.2 mm) R= 0.49" R= 0.59" (1.3 mm) (1.5 mm) CCD 220 Front View CCD 220 Side View 0.20"...
- Page 11 • Cable Cubby Drawer CCD 220 and CCD 320 Installation Guide (Continued) Strategically tie wrap the cables to the cable loops on the drawer. Ensure there is a suf cient bend radius for the cables. Move the slide forward and...
-
Page 12: Installation Checklist
• Cable Cubby Drawer CCD 220 and CCD 320 Installation Guide (Continued) D IO Installation Checklist Planning (page 1) … Check with local and state regulations before starting the installation … Check all parts and equipment before installation Preparing the Table (page 3) …...
Need help?
Do you have a question about the CCD 220 and is the answer not in the manual?
Questions and answers