Table of Contents
Advertisement
Making cooking as much fun as eating
Please read this instruction manual. This will ensure that you
make full use of all the technical benefits the combination
steam oven has to offer.
It will provide you with important safety information. You will
be familiarised with the individual components of your new
appliance. And we will show you how to make settings step
by step. It is quite simple.
The tables list the adjustment values and shelf levels for
numerous well known dishes. All these dishes are tested in
our cooking studio.
In the unlikely event of a malfunction, look here for
information on how to rectify minor faults yourself.
A detailed table of contents will help you to find your way
around quickly.
Enjoy your meal!
Instruction manual
HB34D552.
en
900331
All manuals and user guides at all-guides.com
9000 474 094
Advertisement
Table of Contents

Related Manuals for Siemens HB34D552 Series


Summary of Contents for Siemens HB34D552 Series
- Page 1 All manuals and user guides at all-guides.com Making cooking as much fun as eating Please read this instruction manual. This will ensure that you make full use of all the technical benefits the combination steam oven has to offer. It will provide you with important safety information. You will be familiarised with the individual components of your new appliance.
-
Page 2: Table Of Contents
All manuals and user guides at all-guides.com Table of contents Safety information ......Causes of damage . - Page 3 All manuals and user guides at all-guides.com Table of contents Basic settings ......Care and cleaning .
- Page 4 All manuals and user guides at all-guides.com Table of contents Reheating food ......Proving dough .
-
Page 5: Safety Information
All manuals and user guides at all-guides.com d Safety information Please read this instruction manual carefully. This appliance is intended only for domestic use. This appliance must only be used for food preparation. Neither adults nor children should operate the appliance without supervision: if they are physically or mentally incapable of doing so or... -
Page 6: Causes Of Damage
All manuals and user guides at all-guides.com Hot water Risk of scalding. Do not clean the appliance immediately after switching it off. The water in the evaporator dish is still hot. Wait until the appliance has cooled down. Incorrect repairs Danger of electric shock. - Page 7 All manuals and user guides at all-guides.com Steaming with a perforated When steaming in a perforated cooking container, cooking container always insert the baking tray underneath. Dripping liquid is caught. Moist food Do not store moist food in the closed cooking compartment for prolonged periods.
-
Page 8: Your New Appliance
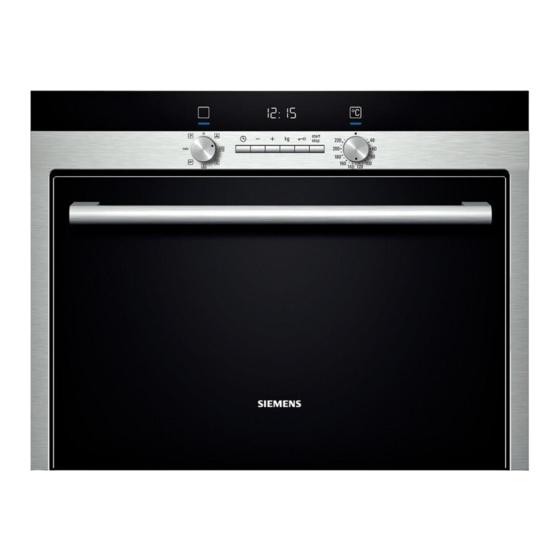
All manuals and user guides at all-guides.com Your new appliance In this section, you will find information on the control panel the operating modes the cooking compartment and accessories Control panel Display Operating mode selector Function buttons Start/Stop button Temperature selector Control element Operating mode selector "... -
Page 9: Operating Modes
All manuals and user guides at all-guides.com Pop out control knobs The operating mode selector and temperature selector are pop out switches. To pop the knob in and out, push the appropriate operating knob. Operating modes You can set the following operating modes using the operating modes selector. - Page 10 All manuals and user guides at all-guides.com Rails for the Evaporator dish Water tank accessories Use only the accessories supplied with the product Accessories or available from the after sales service. They are specially designed for your appliance. Your appliance is equipped with the following accessories: Cooking container, perforated,...
- Page 11 All manuals and user guides at all-guides.com Coking container, perforated, , 40 mm deep for steaming vegetables, juicing berries and defrosting Wire rack for ovenware, cakes and ovenproof dishes and for roasting You can obtain further accessories from specialist retailers: Accessories Ordering code...
-
Page 12: Water Tank
All manuals and user guides at all-guides.com Water tank When you open the appliance door, you will see the water tank on the right hand side. Only fill the water tank with fresh tap water or with still bottled water. If your water is very hard, we recommend that you use softened water. -
Page 13: Automatic Calibration
All manuals and user guides at all-guides.com ¯ Display If the water tank is empty, a signal sounds and the ¯ symbol appears. Operation is stopped. 1. Open the appliance door carefully. Steam will escape. 2. Remove the water tank, fill it with water and reinsert it. -
Page 14: Setting The Water Hardness Range
All manuals and user guides at all-guides.com Setting the water Descale your appliance regularly. This is the only way hardness range to prevent damage. Your appliance automatically displays when it needs descaling. It is preset to water hardness range II. Change the value if your water is softer or harder. -
Page 15: Operating The Appliance
All manuals and user guides at all-guides.com 4. Press the † button. The appliance heats up to 100 ºC and switches off automatically after 20 minutes. A signal sounds. 5. Turn the operating mode and temperature selectors back to the Û position to end the operation. -
Page 16: Switching Off The Appliance
All manuals and user guides at all-guides.com 3. Use the @ or A button to set the cooking time. 4. Press the † button. The appliance heats up. In the Steam operating mode, the cooking time does not start counting down until the heating up time has finished. -
Page 17: After Each Use
All manuals and user guides at all-guides.com After each use Emptying the water tank Empty the water tank. Thoroughly dry the seal in the tank cover and the tank shaft in the appliance. Do not dry the water tank in the hot cooking compartment. -
Page 18: Setting The Timer
All manuals and user guides at all-guides.com Setting the timer You can use the timer as a kitchen timer. It runs independently of the appliance. The timer has its own signal. In this way, you can tell whether it is the timer or a cooking time which has elapsed. - Page 19 All manuals and user guides at all-guides.com 1. Press the 0 button repeatedly until the N arrow is in front of x. The time symbols light up. 0:00 appears in the display. 2. Use the @ or A button to set the cooking time. @ button default value = 30 minutes A button default value = 10 minutes 3.
-
Page 20: Setting A Later End Time
All manuals and user guides at all-guides.com Cancelling the cooking Press the 0 button. Switch to Cooking time using the time ¿ or ¾ button and set the Cooking time to 0:00 using the rotary selector. The display changes to the selected operating mode and temperature settings. - Page 21 All manuals and user guides at all-guides.com 3. Press the 0 button The N arrow is in front of y. The time when the dish will be ready is displayed. 4. Use the @ or A button to delay the end time. After a few seconds the appliance accepts the settings and switches to standby.
-
Page 22: Setting The Clock
All manuals and user guides at all-guides.com Cancelling the end time Use the A button to set the end time back to the current time. After a few seconds, the change is adopted. The appliance starts. If the timer has been set, first press the 0 button repeatedly until the arrow is in front of the end time Nx. -
Page 23: Setting The Programme
All manuals and user guides at all-guides.com Setting the Select the correct programme from the programme programme table. Follow the instructions for the programmes. 1. Turn the operating mode selector to X. The first programme ˜ ‚ appears on the display panel. -
Page 24: Information Relating To The Programmes
All manuals and user guides at all-guides.com End of programme A signal sounds. The appliance switches off. Turn the operating mode selector back to the Û position. Risk of scalding. Hot steam can escape when the appliance door is opened. Only open the appliance door carefully after cooking. - Page 25 All manuals and user guides at all-guides.com Cook poultry Do not place chicken breasts or chicken portions on P 11 P 13 top of each other in the ovenware. The chicken portions can be marinated beforehand. Slow cook sirloin With sirloin, it is recommended that you use a thick P 15 piece of sirloin.
- Page 26 All manuals and user guides at all-guides.com Defrost When freezing, lay the food as flat as possible and P 35 P 37 in portion sized pieces at 18 ºC. Do not freeze excessively large quantities. Defrosted food will not keep for as long and spoils more quickly than fresh food.
-
Page 27: Programme Table
All manuals and user guides at all-guides.com Preserve The programme is suitable for fruits with a stone and P 39 core and for vegetables (except beans). Blanch pumpkin before preserving. The programme is designed for 1 litre jars. After the end of the programme, open the appliance door to prevent cooking from continuing. - Page 28 All manuals and user guides at all-guides.com Programme Notes Ovenware/accessories Level Long grain rice max. 0.75 kg solid cooking container Basmati rice max. 0.75 kg solid cooking container Fresh chicken total weight wire rack + baking tray 0.7 1.5 kg Fresh chicken portions weight per piece wire rack + baking tray...
- Page 29 All manuals and user guides at all-guides.com Programme Notes Ovenware/accessories Level Yogurt in glass jars glass jars + perforated cooking container P27* Bake multigrain bread 0.6 2 kg baking tray + greaseproof paper P28* Bake rye bread 0.6 2 kg baking tray + greaseproof paper P29* Bake fresh bread rolls...
-
Page 30: Childproof Lock
All manuals and user guides at all-guides.com Childproof lock The appliance has a childproof lock to prevent children switching it on accidentally or changing an operation which has started running. Activating the childproof Press the @ button and hold for approx. 4 seconds, lock until the symbol @ appears. - Page 31 All manuals and user guides at all-guides.com You can change the following basic settings: Basic setting Function Possible settings ™‹ƒ Display brightness ™‹‚ = dark ™‹ƒ = medium ™‹„ = bright ™‚ƒ Signal duration: sets the length of the acoustic ™‚‚...
-
Page 32: Care And Cleaning
All manuals and user guides at all-guides.com Care and cleaning In this section, you will find information on Care and cleaning of your appliance Cleaning agents and aids The Clean operating mode The Descale operating mode Risk of short circuiting. Do not use high pressure cleaners or steam jet cleaners to clean your appliance. -
Page 33: Cleaning Agents
All manuals and user guides at all-guides.com Wash the cleaning sponge thoroughly before using for the first time. You can wash the cleaning sponge in the washing machine (hot wash). Microfibre cloth The honeycomb microfibre cloth is particularly suited for cleaning delicate surfaces such as glass, glass ceramic, stainless steel or aluminium (product no. -
Page 34: Cleaning Aid
All manuals and user guides at all-guides.com Seal around the outside of the Hot soapy water cooking compartment Water tank Soapy water, do not clean in the dishwasher. Tank shaft Rub dry after every use. Seal in the lid Thoroughly dry after every use. Rails Use hot, soapy water, or clean in the dishwasher. - Page 35 All manuals and user guides at all-guides.com 1st rinse A signal sounds after approximately 30 minutes. The ® symbol (Empty evaporator dish) appears. 1. Take the shelves out of the cooking compartment and clean them (see Section: Detaching the shelves). 2.
-
Page 36: Descaling
All manuals and user guides at all-guides.com Descaling The appliance must be descaled at regular intervals in order for it to continue operating correctly. The "calc" indicator reminds you to do this. Descaling takes approx. 30 minutes. You can only dispense with descaling completely if you exclusively use softened water. - Page 37 All manuals and user guides at all-guides.com ® 2nd rinse After a short time, the symbol appears again. 1. Thoroughly rinse out the cleaning sponge. 2. Remove the remaining water from the evaporator dish using the cleaning sponge. 3. Press the † button. The appliance starts rinsing.
-
Page 38: Removing And Fitting The Appliance Door
All manuals and user guides at all-guides.com Removing and You can remove the appliance door for easier fitting the appliance cleaning. door Risk of injury. The hinges of the appliance door may snap shut with a lot of force. Always turn the two locking levers for fitting and removing the appliance door to their limit stops. -
Page 39: Cleaning The Rails
All manuals and user guides at all-guides.com Fitting the appliance door Refit the appliance door after cleaning. 1. Insert the door hinges straight into the openings on the left and right hand sides of the cooking compartment. The notch on the hinge must engage on both sides. -
Page 40: Cleaning The Door Panels
All manuals and user guides at all-guides.com Cleaning the door The inner glass panel on the appliance door can be panels removed for easier cleaning. Caution. The appliance must not be used again until the panels and appliance door have been correctly installed. 1. -
Page 41: Troubleshooting
All manuals and user guides at all-guides.com Troubleshooting Malfunctions often have simple explanations. Please read the following instructions before calling the after sales service. Repairs may only be carried out by fully trained after sales service technicians. Incorrect repairs may cause serious hazards for the user. - Page 42 All manuals and user guides at all-guides.com Problem Possible cause Notes/remedy A control knob was Press the Stop button The appliance is not in unintentionally pressed operation. A cooking time is shown in the display The Start button was not Press the Start button or delete pressed after the setting had the setting with the Stop button...
-
Page 43: Replacing The Cooking Compartment Bulb
All manuals and user guides at all-guides.com Problem Possible cause Notes/remedy When you cook with steam, a lot The appliance is being This is normal of steam is created automatically calibrated When cooking with steam, a lot The appliance is unable to Reset the appliance to factory of steam is created again calibrate itself automatically if... -
Page 44: Changing The Door Seal
All manuals and user guides at all-guides.com 3. Remove the bulb and replace with a bulb of the same type. 4. Slide the new seals and the clamping ring in the right order onto the glass cover. 5. Screw the glass cover with the seals back on again. -
Page 45: After Sales Service
All manuals and user guides at all-guides.com 1. Open the appliance door. 2. Pull off the old seal. 3. Push in the new door seal at one point and pull it in all the way round. The joint must be at the side. 4. -
Page 46: Energy And Environment Tips
All manuals and user guides at all-guides.com Energy and environment tips Here will be given tips on saving energy and disposing of your appliance properly. Saving energy Only preheat the appliance if this is specified in the recipe or in the operating instructions table. Open the appliance door as infrequently as possible while the food is cooking. -
Page 47: Tables And Tips
All manuals and user guides at all-guides.com Tables and tips The tables contain a selection of dishes which are particularly suitable for your combination steam oven. You can find out which operating mode, accessories and cooking time to select. Unless otherwise stated, the information given applies to inserting accessories when the appliance is cold. -
Page 48: Hot Air
All manuals and user guides at all-guides.com Distribute food evenly Always distribute the food evenly in the ovenware. It will not cook evenly if the layers are of different depths. Pressure sensitive food When layering delicate foods in the cooking container, do not pile them too high. -
Page 49: Vegetables
All manuals and user guides at all-guides.com Vegetables Place the vegetables in the perforated cooking container and insert at level 3. Insert the baking tray underneath at level 1. Dripping liquid is caught. Food Size Accessories Mode of Temperature Duration operation in ºC in min. - Page 50 All manuals and user guides at all-guides.com Food Size Accessories Mode of Temperature Duration operation in ºC in min. Green asparagus whole perforated steam 100* 7 12 + baking tray White asparagus whole perforated steam 100* 10 15 + baking tray Spinach perforated steam...
-
Page 51: Side Dishes And Pulses
All manuals and user guides at all-guides.com Side dishes and Add water or liquid in the proportion specified. pulses Example: 1 : 1.5 = add 150 ml liquid for every 100 g rice. You may select any shelf position you wish for the solid cooking container. -
Page 52: Meat, Poultry, Fish
All manuals and user guides at all-guides.com Meat, poultry, fish Insert the wire rack and baking tray together at the same level. When the roast is cooked, switch off the combination steam oven and allow the roast to stand in the oven for a further 10 minutes with the door closed. - Page 53 All manuals and user guides at all-guides.com Beef Food Amount/ Accessories Level Mode of Temperature Duration weight operation in ºC in min. Pot roasted beef* 1.5 kg wire rack + reheat 140 150 100 140 baking tray Fillet of beef, 1 kg wire rack + reheat...
- Page 54 All manuals and user guides at all-guides.com Pork Food Amount/ Accessories Level Mode of Temperature Duration weight operation in ºC in min. Joint without rind 1.5 kg wire rack + hot air + 170 180 70 80 (e. g. neck) baking tray steam steam...
- Page 55 All manuals and user guides at all-guides.com Food Amount/ Accessories Level Mode of Temperature Duration weight operation in ºC in min. Saddle of lamb 1.5 kg wire rack + hot air + 160 170 15 25 on the bone* baking tray steam Rabbit pieces 1.5 kg...
-
Page 56: Bakes, Soup Ingredients
All manuals and user guides at all-guides.com Roasting tips Using the roasting set. Using the roasting set will give you optimum results and the cooking compartment will stay as clean as possible. You can obtain the roasting set as an accessory in specialist retailers (see section: Cooking compartment and accessories). -
Page 57: Rice Pudding
All manuals and user guides at all-guides.com Rice pudding Weigh the rice and add 2.5 times the amount of milk. Do not fill the rice and milk more than 2.5 cm high in the accessories. Stir after cooking. The remaining milk is quickly absorbed. -
Page 58: Cakes And Pastries
All manuals and user guides at all-guides.com Cakes and pastries It is best to use dark coloured metal baking tins. The temperature and cooking time depend on the quantity and composition of the dough. For this reason, temperature ranges are quoted in the tables. First set the lower temperature. - Page 59 All manuals and user guides at all-guides.com Cakes on trays Food Accessories Level Operating Tempera Cooking mode ture in ºC time in min. Yeast cakewith dry baking tray Hot air + Steam 150 160 35 45 topping Yeast cakewith moist baking tray Hot air 150 160...
-
Page 60: Baking Tips
All manuals and user guides at all-guides.com Small baked items Food Accessories Level Operating Tempera Cooking mode ture in ºC time in min. Meringue baking tray Hot air 80 90 120 180 Macaroons baking tray Hot air 140 160 15 25 Puff pastry baking tray Hot air +... -
Page 61: Reheating Food
All manuals and user guides at all-guides.com The bread or the cake has a good Next time, use less liquid. Bake at a lower temperature for a little appearance but it is soggy inside longer. For cakes with a moist topping, bake the base first. (overmoist with wet streaks) Cover the base with almonds or bread crumbs first and then apply the topping. -
Page 62: Juicing
All manuals and user guides at all-guides.com Stand the dough bowl on the wire rack. Do not cover the dough. Food Amount Cookware Temperature Cooking time in in ºC min. Yeast dough 1 kg bowl + wire rack 20 30 Sourdough 1 kg bowl + wire rack... -
Page 63: Frozen Products
All manuals and user guides at all-guides.com Clean rubber rings and jars thoroughly with hot water. The "Sterilise bottles" programme is also suitable for cleaning glasses. Place the jars in the perforated cooking container. They must not be in contact with each other. After the specified cooking time, open the cooking compartment door. - Page 64 All manuals and user guides at all-guides.com Food Accessories Level Operating Tempera Cooking mode ture in ºC time in min. Pizza, thin base baking tray + Hot air 180 200 15 23 wire rack Pizza, deep pan baking tray + Hot air 180 200 18 25...
-
Page 65: Test Dishes
All manuals and user guides at all-guides.com Food Accessories Level Operating Tempera Cooking mode ture in ºC time in min. Beans perforated + Steam solid Peas perforated + Steam solid Carrots perforated + Steam solid Mixed vegetables perforated + Steam solid Brussels sprouts perforated +... - Page 66 All manuals and user guides at all-guides.com Notes...
- Page 67 All manuals and user guides at all-guides.com...
- Page 68 All manuals and user guides at all-guides.com...
- Page 69 All manuals and user guides at all-guides.com...
- Page 70 All manuals and user guides at all-guides.com...
- Page 71 All manuals and user guides at all-guides.com...
- Page 72 All manuals and user guides at all-guides.com...
Need help?
Do you have a question about the HB34D552 Series and is the answer not in the manual?
Questions and answers