Table of Contents
Advertisement
Quick Links
Advertisement
Table of Contents

Subscribe to Our Youtube Channel
Related Manuals for avertX HD438


Summary of Contents for avertX HD438
- Page 1 HD438 Night Vision HD Indoor/Outdoor IP Mini Bullet Camera User Manual...
- Page 2 The information in this publication is provided “as is” without warranty of any kind. The entire risk arising out of the use of this information remains with recipient. In no event shall AVERTX be liable for any direct, consequential, incidental, special, punitive, or other damages whatsoever (including without limitation,...
- Page 3 Before using, make sure power supply and others are properly connected. • While operating, if any abnormal condition or malfunction is observed, stop using the camera immediately and then contact AvertX Customer Support. Handling Do not disassemble or tamper with parts inside the camera.
- Page 4 REGULATION This device complies with Part 15 of the FCC Rules. Operation is subject to the following two conditions: (1) this device may not cause harmful interference, and (2) this device must accept any interference received, including interference that may cause undesired operation. This symbol on the product or on its packaging indicates that this product shall not be treated as household waste in accordance with Directive 2002/96/EC.
-
Page 5: Table Of Contents
Focusing the Camera Lens .................. 14 Cleaning the Lens Cover ..................14 CONNECTING ............................15 Bench Test..........................15 Connecting to an AvertX Recorder ..................15 Network Camera manager ...................... 15 Launch Network Camera Manager ..............15 Finding Network Devices ..................15 Changing the IP Address .................. - Page 6 Advanced Settings ....................32 Video/Audio ........................ 36 Video ........................36 Image .......................... 38 Display Settings ....................38 OSD Settings ....................... 42 Privacy Mask ......................43 Event ........................... 44 Motion Detection ....................44 Storage ........................47 Schedule Settings ....................47 37080AA...
-
Page 7: Introduction
INTRODUCTION OVERVIEW The AVX-HD438IR Night Vision HD Indoor/Outdoor IP camera is capable of streaming real time ultra HD 4K video. The dual streaming can be used in a variety of building surveillance installations. Power over Ethernet (PoE) eliminates the need for separate power cables and significantly reduces installation costs. -
Page 8: Getting Started
GETTING STARTED BOX CONTENTS Before proceeding, please check that the box contains the items listed here. If any item is missing or has defects, do not install or operate the product and contact your dealer for assistance. AVX-HD438IR Self-Tapping Plastic Anchors Camera Mounting Screws (includes extra) -
Page 9: Camera Overview
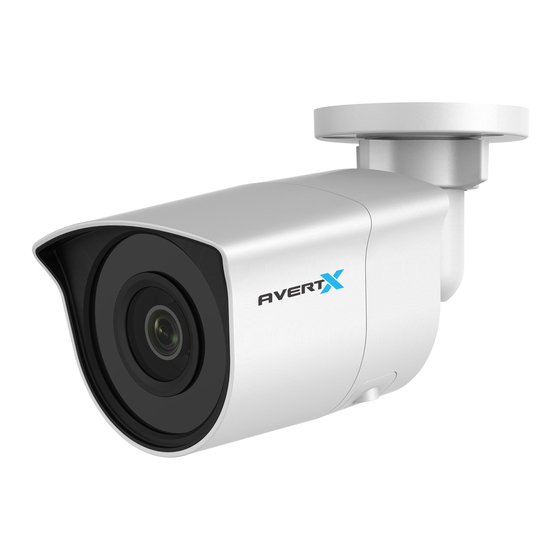
CAMERA OVERVIEW Before installing or connecting the bullet camera, please refer to this section and complete preparations for camera setup and all switch settings. Camera Diagram Mounting Bracket Rear Housing Front Housing Lens Glass Housing Decoration RJ-45 Connector Ground Screw Reset Button Hold for 20 seconds after power cycling the camera MicroSD card slot... -
Page 10: Dimensions
Dimensions Length – 6.14” (155.95 mm) Width – 2.95” (75.21 mm) Height – 2.52” (63.95 mm) 37080AA... -
Page 11: Connections
For outdoor installations, seal any holes in the wall or ceiling with silicone caulk to protect • against water intrusion. AvertX recommends using Cat5e cable to connect the camera to your network. For the best transmission quality, the cable length should not exceed 300 feet. Weather Resistant Cable Connector This camera features an IP66-rated weather resistant connector. - Page 12 To install the weather resistant cable connector: 1. Slide all pieces of the waterproof cable connector over the cable plug in this order: Thread Lock Cap • Flexible silicone seal ring. You will need to stretch the silicone seal over the RJ-45 plug. •...
-
Page 13: Installing The Camera
Tip: Use the AvertX Connect mobile app to view the camera while adjusting view. Note: AvertX recommends sealing the opening at the wall and at the base of the camera with silicone caulking. Considerations for Infrared (IR) Lights Environmental factors can limit the performance of night vision using IR illuminator lights. Infrared light behaves the same as visible light and will reflect off of bright or shiny objects and overexpose the image. -
Page 14: Resetting The Camera
Removing the lens cover or otherwise opening the camera may damage components and void the warranty. Focusing the Camera Lens The AVX-HD438IR is pre-focused at the factory and cannot be adjusted by the end user. Contact AvertX support if your camera is out of focus. Cleaning the Lens Cover The Lens Cover of the AVX-HD438IR is extremely durable, but can be damaged if cleaned improperly. -
Page 15: Connecting
Once the camera is connected to the recorder, test all functions to ensure proper operation. If the camera will not connect or is not functioning correctly, do not install and contact AvertX Support. CONNECTING TO AN AVERTX RECORDER This camera is set to be plug and play compatible with AvertX ProConnect recorders. -
Page 16: Changing The Ip Address
AvertX recorders will automatically apply a DHCP IP address. If you are not connecting the camera to an AvertX recorder or DHCP network, you must set a static IP address. NCM allows you to do this in the bottom left corner: 1. -
Page 17: Logging Into The Web Interface
LOGGING INTO THE WEB INTERFACE The default static IP address of the camera is 192.168.51.2, and the default subnet mask is 255.255.255.0. DHCP is turned on by default. If a DHCP server is used in the network, the IP address of your camera will be assigned dynamically. -
Page 18: Playback
Select which stream displays in Live View Click to select the third-party plug-in. Enable/Disable Pixel Counter. Select an area to see pixel quantity. Start/Stop Live View Capture live view image and save to selected location. Start/Stop Live View recording. Start/Stop Digital Zoom. Expand/Collapse PTZ Control / Presets panel. -
Page 19: Picture
The toolbar on the bottom of Playback interface can be used to control playing process. Note: Choose the file paths locally for downloaded playback video files and pictures in Local Configuration interface. You can also input the time and click to locate the playback point in the Set playback time field. -
Page 20: Advanced
To search for pictures: 1. Select the File Type from the dropdown list. 2. Select the Start Time and End Time. 3. Click Search to search the matched pictures. 4. Check the checkbox of the pictures and then click Download to download the selected pictures. Note: Up to 4000 pictures can be displayed at one time. - Page 21 HTTP: Allows the same quality as of TCP without setting specific ports for streaming under some network environments. Play Performance: Set the play performance to Shortest Delay, Balanced, Fluent or • Custom. Rules: It refers to the rules on your local browser, select enable or disable to display or not •...
-
Page 22: System
System System Settings Time Settings Configure the time synchronization and DST settings. Select the Time Zone of your location from the drop-down menu. To configure the NTP settings: Click to enable the NTP function. • Configure the following settings: • Server Address: IP address of NTP server. -
Page 23: Maintenance
DST (Daylight Savings Time) Configure daylight savings time, if needed. To configure DST: 1. Select the Start Time and the End Time. 2. Select the DST Bias. 3. Click Save to activate the settings. Maintenance Upgrade & Maintenance Process the operations, including reboot, partly restore, restore to default, export/import the configuration files, and upgrade the device. - Page 24 Note: The camera will need to reboot after importing configuration file. Upgrade: Upgrade the device firmware. Select firmware or firmware directory to locate the upgrade file. • Firmware: Locate the exact path of the upgrade file. Firmware Directory: Only the directory the upgrade file belongs to is required. Click Browse to select the local upgrade file and then click Upgrade to start remote upgrade.
-
Page 25: Security
Security Configure the parameters, including Authentication, IP Address Filter, and Security Service. Authentication 1. Set up authentication method for RTSP authentication and WEB authentication. CAUTION: Digest is the recommended authentication method for data security. Be aware of the risk if you adopt basic as the authentication method. 2. - Page 26 To configure IP Address Filtering: 1. Check the checkbox of Enable IP Address Filter. 2. Select the type of IP Address Filter in the drop-down list, Forbidden and Allowed are selectable. 3. Setup the IP Address Filter list. Add: Add an IP Address •...
- Page 27 Modifying a User: 1. Select the user from the list and click Modify. 2. Modify the User Name, Level and Password. 3. You can check or uncheck the permissions. 4. Click OK to finish the user modification. Deleting a User: 1.
-
Page 28: Network
Network Basic Settings TCP/IP Configure the basic network settings, including the NIC Type, IP Address, Subnet Mask, Gateway, MTU settings and Multicast Address. (Optional): 1. Check Enable Multicast Discovery, and then the online network camera can be automatically detected by client software via private multicast protocol in the LAN. 2. - Page 29 DDNS Note: Registration on the DDNS server is required before configuring the DDNS settings of the camera. 1. Check the Enable DDNS checkbox to enable this feature. 2. Select DDNS Type. Two DDNS types are selectable: DynDNS and NO-IP. DynDNS: 1.
- Page 30 PPPoE 1. Check Enable PPPoE. 2. Enter User Name, Password, and Confirm password. Note: The User Name and Password should be assigned by your ISP. 3. Click Save. Note: A reboot is required for the settings to take effect. Port HTTP Port: The default port number is 80, and it can be changed to any port No.
- Page 31 NAT interface allows you to configure the UPnP™ parameters. Universal Plug and Play (UPnP™) is a networking architecture that provides compatibility among networking equipment, software and other hardware devices. The UPnP protocol allows devices to connect seamlessly and to simplify the implementation of networks in the home and corporate environments.
-
Page 32: Advanced Settings
Advanced Settings SNMP 1. Check Enable SNMPv1 and/or Enable SNMP v2c. 2. Configure the SNMP settings. Note: The settings of the SNMP software should be the same as the settings you configure here. 3. Click Save. Note: A reboot is required for the settings to take effect. 37080AA... - Page 33 HTTPS HTTPS provides authentication of the web site and its associated web server, which protects against Man-in-the-middle attacks. Note: HTTPS is enabled by default. If HTTPS is enabled, the camera creates an unsigned certificate automatically. 1. Check Enable to access the camera via HTTP or HTTPS protocol. 2.
- Page 34 Notes: DSCP refers to the Differentiated Service Code Point; and the DSCP value is used in the IP header to indicate the priority of the data. The valid value range of the DSCP is 0 to 63. The bigger the DSCP value is, the higher the priority is.
- Page 35 Network Service In Network Service, you can control the use of the listed protocols and services the device offers. You are recommended to disable unused protocol or service for network safety concern. SDK Service and Enhanced SDK Service: If you want to add the device to the client software, you should Enable SDK Service or Enable Enhanced SDK Service.
-
Page 36: Video/Audio
Video/Audio Video Configure parameters for the main and sub video streams. Select the Stream Type: Supported stream types are listed in the drop-down: Main stream is used for recording motion events and live view with good bandwidth. • • Sub-stream is used for continuous recording and live view. Customize the following parameters for the selected stream type: Resolution: Select the resolution of the video output. - Page 37 Note: The camera will require a reboot to turn H.264+/H.265+ ON or OFF. IMPORTANT: AvertX ProConnect recorders do not currently support H.265/H.265+ video encoding. Notes: Upgrade your video player to the latest version if live view or playback does not work properly due to compatibility.
-
Page 38: Image
Image Display Settings Configure the image adjustment, exposure settings, day/night switch, backlight settings, white balance, image enhancement, video adjustment, and other parameters in display settings, OSD settings, and privacy mask. Scheduled Image Settings Scheduled image settings provide the ability to set the camera parameters for day and night separately, providing the ability for optimal image quality in day and night settings. - Page 39 Image Adjustment Brightness describes brightness of the image, which ranges from 1 to 100. Contrast describes the contrast of the image, which ranges from 1 to 100. Saturation describes the intensity of the image color, which ranges from 1 to 100. Sharpness describes the edge contrast of the image, which ranges from 1 to 100.
- Page 40 Exposure Settings Manual is the only available setting. Exposure Time refers to the electronic shutter time, which ranges from 1 to 1/100,000s. Adjust it according to the actual luminance condition. Day/Night Switch Select the Day/Night Switch mode according to different surveillance demand. •...
- Page 41 Backlight Settings BLC Area: An object against strong backlight will be too dark to be seen clearly. BLC adjusts light around the object to improve visibility. OFF, Up, Down, Left, Right, Center, Auto, and Custom are available options. Note: BLC Custom mode allows the user to draw a BLC area of interest. WDR: Wide Dynamic Range should be used when the scene contains a mix of bright and dark areas.
-
Page 42: Osd Settings
Video Adjustment Mirror: It mirrors the image so you can see it inversed. Left/Right, Up/Down, Center, and OFF are selectable. Scene Mode: Choose the scene as indoor or outdoor according to the real environment. Video Standard: 50 Hz and 60 Hz are the available options. NTSC (60HZ) is the default mode. Note: NTSC is the Video Standard in North and South America. -
Page 43: Privacy Mask
Note: The alignment adjustment is only applicable to Text Overlay items. Privacy Mask Privacy mask enables you to cover certain areas on the live video to prevent certain spots in the surveillance area from being viewed and recorded. Privacy mask areas are used to protect privacy, for example, covering the keypad of an ATM machine, or the entry to fitting rooms. -
Page 44: Event
Event Motion Detection Motion detection detects moving objects in the defined areas. In order to detect the moving objects accurately and reduce the false alarm rate, normal configuration and expert configuration are available for varied motion detection environments. To configure Normal motion detection: 1. - Page 45 3. Select the Area by number. 4. Adjust the sensitivity and percentage of an object in the motion detection area. 5. Set the arming schedule and linkage method as in the normal configuration mode. 6. Click Save to save the settings. Auto-Switch 1.
- Page 46 Set the Arming Schedule for Motion Detection: To configure the Motion Detection Schedule: 1. Click on the time bar and drag the mouse to select the time period. Note: Click on the selected time period, you can adjust the time period to the desired time by either moving the time bar or input the exact time period.
-
Page 47: Storage
To configure Linkage Method for Motion Detection: Check Upload to FTP/Memory Card/NAS to capture images and/or record video when • motion is detected and upload the output to the on-board storage. Requires microSD card installed in camera. (Not Included) Note: Refer to Storage >... - Page 48 Example: If motion is detected and triggers recording at 10:00, and the pre-record time is set • as 5 seconds, the camera starts to record at 9:59:55. Post-record: length of time set to record after the end of event. The Post-record time can be configured as 5s, 10s, 30s, 1 min, 2 min, 5 min or 10 min.
- Page 49 2. Move the mouse to the end of each day, a copy dialogue box pops up, and you can copy the current settings to other days. 3. Click Save to save the settings. Capture Parameters 1. Check Enable Timing Snapshot. 2.
- Page 50 Speed Class rating: Class 10 / UHS Class 3 • IMPORTANT: Video recorded to the microSD card cannot be accessed through AvertX software. Video recorded to the microSD card must be accessed and downloaded directly from the camera’s web interface.
- Page 51 All rights reserved. No part of this publication may be reproduced by any means without written permission from AvertX. The information in this publication is believed to be accurate in all respects. However, AvertX cannot assume responsibility for any consequences resulting from the use thereof. The information contained herein is subject to change without notice.
Need help?
Do you have a question about the HD438 and is the answer not in the manual?
Questions and answers