
Subscribe to Our Youtube Channel
Related Manuals for Kalor Paola 13-13D


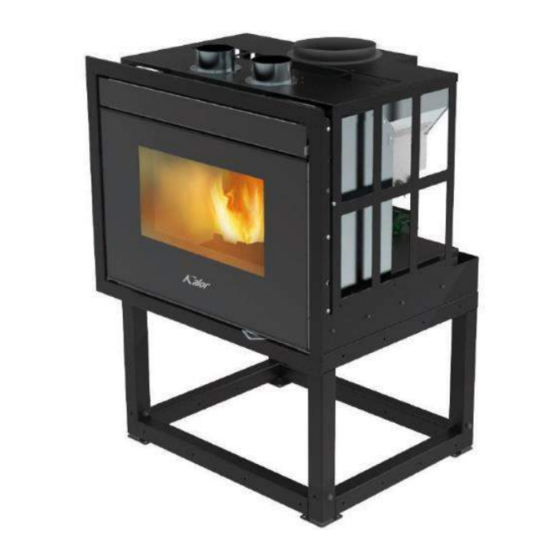
Summary of Contents for Kalor Paola 13-13D
- Page 1 USER MANUAL Paola 13-13D / Chiara 15-15D - Insert Stoves Instructions for the correct use and maintenance of your Kalor wood pellet stove Distribution and warranty in Ireland by:...
- Page 2 Please refer to the notes on the inner back cover of this manual for further details regarding the installation, commissioning and warranty for your stove/boiler. We wish you all the best with your new Kalor stove/boiler and hope it serves you well for many, many years.
- Page 3 Inserto Camino 13_15 / 13C_15C Dear Customer, Cod. 001112 We thank you for having chosen one of our products, the fruit of technological experience and of continual research for a superior quality product in terms of safety, dependability, and service. In this manual you will nd all the information and useful suggestions to use your product with the maximum safety and ef ciency.
- Page 4 This instruction booklet is an integral part of the product: make sure that it always accompanies the appliance, even in case of transfer to another owner or in the case of transfer to another place. In the event of damage or loss, request a copy from the area technician. These symbols indicate speci c messages in this booklet: ATTENTION: This warning sign indicates that the message to which it refers should be carefully read...
- Page 5 Responsibility • Use only wood pellets; • Keep / store the pellets in a cool With the delivery of the present manual, we de- dry place; cline all responsibility, both civil and penal, for •Never pour pellets directly on the accidents deriving from the partial or total lack hearth;...
- Page 6 Charge pellet Fuel is loaded from the upper part of the Insert Never remove the protection grille by opening a door. in the hopper. When lling, do not Pour the pellets in the hopper. let the sack of pellets touch any This is easier if performed in two steps: hot surfaces.
- Page 7 Instructions for safe and ef cient use • The device can be used by children that are not very hot. Do not touch them except with the less than 8 years old and people with reduced appropriate protection. physical, sensory or mental capabilities, or lack of experience or knowledge, provided being •...
- Page 8 Technical Speci cation Insert 13_15 / 13C_15C N.B. 1 - Measures with a tolerance of about 10 mm 2 - Measures and images are indicative and can vary depending on the aesthetic of the pellet Insert. 700 (internal dimensions) 700 (internal dimensions) TOLLERANZE GENERALI DI LAVORAZIONE DIMENSIONI LINEARI GRADO DI...
- Page 9 PARAMETRO UNITÀ DI MISURA ICP13_13C ICP15_15C Heat input 13,3 15,1 Nominal heat output 13,5 Reduced heat output CO concentration at nominal mg/m reference (13% O CO concentration at reduced mg/m reference (13% O Nominal ef ciency 90,6 89,5 Reduced ef ciency 94,3 94,3 Pellet consumption (min-max)
-
Page 10: Operating Area
Operating area It is not permissible to install the Insert in bedrooms, bathrooms, or in a room where another heating appliance installed (Insert, Insert etc.) which does not have its own independent air intake. Locating the Insert in a room with an explosive atmosphere is prohibited. - Page 11 Connection to the ue pipe The ue pipe must have internal dimensions not larger than 20x20 cm, or diameter 20 cm. In the event of larger dimensions, or of the ue pipe being in poor condition ( for example cracks, poor insulation, etc.), it is advisable to t a stainless steel pipe of suitable diameter inside the ue pipe throughout its length, right up to the top.
- Page 12 REMARKS: to the ue pipe, using pipes and connectors as recommended by us. You must ensure that a - the appliance must be installed by a quali ed windproof cowl should be tted which complies with the standards in force. technician in possession of the technical and professional requirements according to the Fireplace ue gas...
-
Page 13: Insert Assembly
Insert assembly Insert xing Pedestal xing (Optional) If you have purchased the replace insert If you have bought the replace insert pedestal, pedestal, rst you have to x it to the oor and rst you have to x it to the oor and choose the choose the height of the legs. -
Page 14: Remote Control
It is mandatory to have an opening in the Remember that it is forbidden to brick / plasterboard coating to guarantee an inhale the combustion air from adequate supply of air to the chimney. bedrooms, bathrooms, garages or It is recommended to replicate the same deposits that could have explosive opening made... - Page 15 Contra ow channel It is possible to connect two pipes with Ø 100mm and a maximum length of 3 linear meters each to allow the air to flow in other enviroments. For each 45° curve you have to calculate a 70cm loss of the linear section. (example.
- Page 16 Mandatory microswitch connection Only for not ducted Inserts If the Insert is not ducted it is mandatory to connect the microswitch located behind the air's front door. This operation must be done exclusively by a specialized technician. The microswitch is equipped with a shoulder strap that must be connected in series to the other safety devices as shown below: 1.
- Page 17 Insert ignition Remove any components which might burn from the rebox and from the glass (various instructions and adhesive labels) Charge pellet Fuel is loaded from the upper part of the Insert by opening a door. Pour the pellets in the hopper. When empty, this is easier if performed in two steps: •...
-
Page 18: Information On The Display
Preliminary checks Before switching on the pellet Insert, make sure that the pellet hopper is full, the combustion chamber is clean, the glass door is closed, the power supply plug is connected and the switch on the back is set to “1.” Information on the display TURNED OFF 21 : 10... -
Page 19: Alarm Signals
Alarm signals In the event of a working defect, the system informs the user about the type of failure occurred. The following table summarises the alarms, kind of problem and possible solution: Display Kind of problem Solution As soon as the power supply is back, the Insert ALAR 1 BLACK OUT There is no power supply... -
Page 20: Programming Menu
Programming menu Menu 02 SET CLOCK To access the set clock option, press the “SET” button (3), with the button - (5) scroll through the submenus until MENU 02 - SET CLOCK and with buttons 1 and 2 select the current day. Press the “SET” button (3) to con rm. - Page 21 level 1 level 2 level 3 level 4 value 03 - week program. 01 - week thermostat on/off 02 - start program. 1 hour 03 - stop program. 1 hour 04 - monday progr. 1 on/off 05 - tuesday progr. 1 on/off 06 - wednesday prog.
- Page 22 Menu 03 SET CHRONO input Menù level Submenu 03 - 01 - activate thermostat M-3-1-01 This allows you to activate and deactivate all of ENABLE the functions of the thermostat THERMOSTAT dialogue input Menù level Submenu 03 - 02 - daily programme This allows you to enable, disable, and set the M-3-2-02 daily functions of the thermostat.
- Page 23 PROGRAMME 1 PROGRAMME 2 menu level selection meaning possible values menu level selection meaning possible values 02-03-02 START PROGRAM 1 activation time time - OFF 03-03-11 START PROGRAM 2 activation time time - OFF 02-03-03 STOP PROGRAM 1 shut-off time time - OFF 03-03-12 STOP PROGRAM 2...
- Page 24 Stand-by mode This mode allows the automatic shutdown of the stove once it reaches the temperature set on SET. When this happens, the stove will wait a few minutes (factory setting), after which will turn off automatically if the temperature of the room in the meantime has always maintained above the set. Once turned off as a result of this condition, the stove will automatically turn on only when the ambient temperature will drop to 2 °C below the set temperature in the oven (example: SET=24 °C and ambient temperature = 21 °C).
- Page 25 Failure on electrical devices Ignition failure If the ame does not light up during the switching on or if the smokes temperature does not reach a suitable value in the foreseen time gap, the Insert switches off and you will read the words “N O ”.
-
Page 26: Safety Devices
Safety devices Pressure switch: Reduction motor: Flue gas temperature sensor: monitors depression in the smoke duct. if the motor stops, the Insert thermocouple that measures the It is designed to shut down the continues to function until the ame temperature of the fumes while pellet feed screw in the event of an goes out for lack of fuel, and until It keeping the operation or shuts the... -
Page 27: Maintenance And Cleaning
Maintenance and cleaning All cleaning of all parts must be carried out with the Insert completely cold and unplugged to avoid burns and thermal shock. The Insert does not need much maintenance if used with certi ed quality pellet. The need for maintenance varies depending on the conditions of use (switching on and off repeatedly) and depending on the performance required. - Page 28 Check every 2-3 days Cleaning of painted pats Cleaning the ash collection compartment Do not clean the painted parts with wet rags when Clean and empty the ash tray being careful with the unit is in operation or hot to prevent thermal hot ash.
- Page 29 Shutting the Insert down Clean ue In the period when the Thermostove is out of Clean the ue system especially near the ttings use it must be disconnected from the electricity to “T”, curves and any horizontal sections. Is mains. For greater safety, especially if there are necessary to check and remove any deposit children around, we recommend removing the of ash and soot before the same clogging the...
- Page 30 CLEANING BY THE TECHNICAL Check every year Cleaning of combustion chamber and lower compartment With cold and inactive insert proceed as follows: Open the door and remove Push the back plate up. Rotate the plate towards the the brazier. front of the insert. vacuum cleaner Once...
- Page 31 Follow carefully following For your safety, the frequency of cleaning instructions. Failure to cleaning the smoke discharge follow these instructions could system must be determined on create problems with the operation the basis of how the Insert is used. of the Insert. In case of failure or inadequate cleaning of the Any kind of tampering or unauthorized heater may have function problems such as:...
- Page 32 Con guration of the electric diagram of the Insert SCHEMA CONNESSIONI ELETTRICHE UNIVERSAL AIR CONNECTION DIAGRAM UNIVERSALE ARIA encoder coclea TABLE L023 +12V Cn11 JTAG SERIALE AUX IN Cn24 Cn15 DISPLAY Cn17 Cn21 CONSOLLE E ACCESSORI AGGIUNTIVI ONDE CONVOGLIATE GROUND Probe NTC room thermostat...
-
Page 33: Problems And Solutions
Problems and solutions All repairs must be carried out exclusively by a specialised technician, with the stove completely cold and the electric plug pulled out. Is prohibited from any unauthorized modi cation to the device and the replacement of parts with other non-original. - Page 34 1. Fill the tank with pellets 1. The tank is empty. 2. Check the electrical wiring and fuses, 2. The resistance does not replace if the resistance is broken reach the temperature 3. Replace the resistance 3. Resistance damaged 4. It is recommended to unplug the power 4.
- Page 35 1. Perform periodic cleaning. See paragraph stove installation in the user manual. Check chimney cleaning 2. Decrease in the parameters the charge level of the pellets 1. Flue with presence 3. Clean the brazier after waiting for the of stretches too long or total shutdown of the stove.
- Page 36 1. Fill the tank with pellets 2. Check plug and presence electricity 3. Fill the tank with pellets 4. Clean the brazier 5. Let the stove cool down completely, 1. The pellet tank is empty reset the manual reset and restart the stove. If the problem persists, contact your 2.
- Page 37 GENERAL GUARANTEE GUARANTEE LIMITATIONS All products are subject to accurate testing and are covered by Limited Warranty covers manufacturing defects, provided that warranty for 24 months from the date of purchase, documented the product has not been damaged by improper use, improper by invoice or purchase receipt that will be presented to handling, incorrect connection, tampering, and installation er- authorized technicians.
- Page 38 NOTES...
-
Page 39: Installation
Authorised Technicians. See below for further details. Your first point of contact for warranty issues is your Authorised Kalor Dealer (where you purchased your stove). They can assist you with any issue that you may have. - Page 40 Wood Pellet Stoves.ie Newport, Co. Mayo, Ireland Tel: 086 012 7744 Email: info@woodpelletstoves.ie Web: www.woodpelletstoves.ie...
Need help?
Do you have a question about the Paola 13-13D and is the answer not in the manual?
Questions and answers