
Summary of Contents for Philips EPIQ 7
- Page 1 EPIQ 7 Ultrasound System User Manual Release 1.0 4535 617 25341 Rev B August 2013 © 2013 Koninklijke Philips N.V. All rights reserved. Published in USA.
- Page 2 Philips Legal Department. This document is intended to be used either by customers, and is licensed to them as part of their Philips equipment purchase, or to meet regulatory commitments as required by the FDA under 21 CFR 1020.30 (and any amendments to it) and other local regulatory requirements.
- Page 3 7,648,461; 7,656,418; 7,704,208; 7,758,508; 7,771,354; 7,859,170; 8,030,824; 8,038,618; 8,096,947; 8,137,272; 8,161,817; 8,169,125; 8,177,718; 8,257,260; Re43,048; Re36,564. "Chroma," "Color Power Angio," "High Q," "PercuNav," "QLAB," "SonoCT," "xMATRIX," and "XRES" are trademarks of Koninklijke Philips N.V. Non-Philips product names may be trademarks of their respective owners. EPIQ 7 User Manual 4535 617 25341...
- Page 4 EPIQ 7 User Manual 4535 617 25341...
-
Page 5: Table Of Contents
FDA Medical Alert on Latex ..................49 ALARA Education Program ...................50 Output Display ......................54 Control Effects ......................58 Related Guidance Documents ..................60 Acoustic Output and Measurement ................60 Acoustic Output Tables ....................63 Acoustic Measurement Precision and Uncertainty .............63 Operator Safety ........................65 EPIQ 7 User Manual 4535 617 25341... - Page 6 Connectivity Capabilities .....................85 Clinical/Analysis Applications ..................86 QLAB Advanced Quantification Software Options ............86 Stress Echocardiography ....................87 Data Security ........................88 PercuNav Image Fusion and Interventional Navigation ..........88 System Components ......................88 Video Monitor ......................90 Control Module ......................90 EPIQ 7 User Manual 4535 617 25341...
- Page 7 Changing the Default Monitor Brightness ..............118 Automatic Display Dimming ..................119 System Controls ......................... 119 Control Panel ......................119 Control Panel Adjustments ..................121 Adjusting Control Panel Brightness ................121 Positioning the Control Panel ..................121 Setting the Depth Control ..................122 Touch Screen ......................122 EPIQ 7 User Manual 4535 617 25341...
- Page 8 DVD, CD, and USB Devices ....................143 Media Compatibility ....................143 DVD Drive ........................144 Loading and Ejecting a Disc ..................144 Erasing a DVD ......................144 USB Devices .......................145 DICOM Viewer ......................146 Customizing the System ....................147 EPIQ 7 User Manual 4535 617 25341...
- Page 9 Adding an Image Title ....................161 Displaying Body Markers ...................161 Recording ........................... 162 Using the DVD Recorder ....................162 Printing ..........................163 Printing in Live Imaging ....................163 Review ..........................164 Starting Review ......................164 Navigating Thumbnails and Images ................165 EPIQ 7 User Manual 4535 617 25341...
- Page 10 Patient Safety During Intraoperative Studies ..............188 Patient-Contact Parts ....................189 Preventing Intraoperative Transducer Problems ..............190 L15-7io Description ......................190 Preparing Transducers for Intraoperative Use ..............191 Disposable Drapes .....................192 Accessories for Intraoperative Transducers ..............192 Electrical Safety and Intraoperative Transducers ..............192 EPIQ 7 User Manual 4535 617 25341...
- Page 11 Patient Selection for TEE Transducer Use ..............224 Preparing Patients for TEE Studies ................225 TEE Study Guidelines ....................225 Tip Fold-Over ........................226 Recognizing Tip Fold-Over ..................226 Correcting Tip Fold-Over ....................227 Preventing Tip Fold-Over ..................227 TEE Temperature Sensing ....................228 EPIQ 7 User Manual 4535 617 25341...
- Page 12 Moving the Biopsy Depth Cursor ..................248 Biopsy Guide Alignment ....................249 Preparation for Alignment Verification ..............249 Verifying the Biopsy Guide Alignment ...............250 Performing a Biopsy Procedure ..................252 Biopsy Guide Maintenance ....................254 13 Transducer Care ......................255 EPIQ 7 User Manual 4535 617 25341...
- Page 13 Cleaning the Trackball ....................291 Cleaning the System Air Filter ..................291 Specifying and Resetting the Air Filter Maintenance Status ........293 Transducer Maintenance ....................293 Printer and DVD Recorder Maintenance ................294 Troubleshooting ......................... 295 Error Messages ........................296 EPIQ 7 User Manual 4535 617 25341...
- Page 14 Test Patterns ........................296 Transferring the Test Patterns ...................296 Using the Test Patterns ....................296 Testing the System ......................297 For Assistance ........................297 15 Specifications ......................299 Safety and Regulatory Requirements ................302 16 Index .......................... 303 EPIQ 7 User Manual 4535 617 25341...
-
Page 15: Read This First
Read This First Read This First This manual is intended to assist you with the safe and effective operation of your Philips product. Before attempting to operate the product, read this manual and strictly observe all warnings and cautions. Pay special attention to the information in the “Safety”... -
Page 16: Warnings
Do not remove the protective covers on the system; hazardous voltages are present inside. Cabinet panels must be in place while the system is in use. All internal adjustments and replacements must be made by a qualified Philips Ultrasound field service engineer. WARNING To avoid electrical shock, use only supplied power cords and connect only to properly grounded wall (wall/mains) outlets. -
Page 17: Warning Symbols
This manual also includes procedures for basic operation. For detailed operating instructions, see the Help. • Quick Guide: Provided with the product and included on the CD. The Quick Guide helps you perform an ultrasound exam step-by-step. EPIQ 7 User Manual 4535 617 25341... -
Page 18: Product Conventions
Product Conventions Your Philips product uses certain conventions throughout the interface to make it easy for you to learn and use: • Three unlabeled buttons near the trackball are used with the trackball. The two buttons on either side of the trackball are called the "left and right trackball buttons,"... -
Page 19: User Information Conventions
"radio button," to fill the object. Deselect means clicking the item to remove the highlight or fill. • Double-click means to quickly click twice to select an object or text. EPIQ 7 User Manual 4535 617 25341... - Page 20 Cautions highlight ways that you could damage the product and consequently void your warranty or service contract or ways that you could lose patient or system data. NOTE Notes bring your attention to important information that will help you operate the product more effectively. EPIQ 7 User Manual 4535 617 25341...
-
Page 21: Upgrades And Updates
Customer Comments If you have questions about the user information, or you discover an error in the user information, in the USA, please call Philips at 800-722-9377; outside the USA, please call your local customer service representative. Supplies and Accessories To order ECG trunk cables, lead sets, and electrodes;... -
Page 22: Customer Service
The European Union Directive on Waste Electrical and Electronic Equipment (WEEE) requires producers of electrical and electronic equipment to provide reuse and treatment information for each product. This information is provided in a Philips Healthcare Recycling Passport. Such recycling passports for Philips Ultrasound systems are available on this website:... - Page 23 If you are unable or unprepared to do this, inform Philips Healthcare about the new user, so that Philips Healthcare can provide the new user with safety-related information.
- Page 24 Philips Healthcare gives support for the following: • Recovery of useful parts • Recycling of useful materials by competent disposal companies • Safe and effective disposal of equipment For advice and information, contact your Philips service organization, or see the following website: www.healthcare.philips.com/us/about/sustainability/recycling Perchlorate Material In this system, perchlorate material is present in lithium coin cells or batteries.
- Page 25 Misuse or abuse could cause physical injury. NOTE Wash skin with large amounts of water in the event of electrolyte leakage to prevent skin irritation and inflammation. EPIQ 7 User Manual 4535 617 25341...
- Page 26 Read This First Recycling, Reuse, and Disposal EPIQ 7 User Manual 4535 617 25341...
-
Page 27: Safety
Do not use the system for any application until you have read, understood, and know all the safety information, safety procedures, and emergency procedures contained in this "Safety" section. Operating the system without a proper awareness of safe use could lead to fatal or other serious personal injury. EPIQ 7 User Manual 4535 617 25341... - Page 28 Use the system only for its intended purposes. Do not use the system with any product that Philips does not recognize as compatible with the system. Operation of the product for unintended purposes, or with incompatible products, could lead to fatal or other serious injury.
-
Page 29: Electrical Safety
Do not remove the protective covers on the system; hazardous voltages are present inside. Cabinet panels must be in place while the system is in use. All internal adjustments and replacements must be made by a qualified Philips Ultrasound field service engineer. WARNING Do not operate this system in the presence of flammable gases or anesthetics. - Page 30 It is your responsibility to comply with IEC 60601-1 and test the system to those requirements. If you have questions, contact your Philips representative. EPIQ 7 User Manual 4535 617 25341...
- Page 31 Do not use nonmedical peripherals, such as report printers, within 1.5 m (5 ft) of a patient, unless the nonmedical peripherals receive power from an isolated power outlet on the Philips ultrasound system, or from an isolation transformer that meets medical safety standards, as defined by standard IEC 60601-1.
- Page 32 Communication devices such as cellular phones and pagers can cause these emissions. The existence of radio, TV, or microwave transmission equipment located nearby can cause emissions. In cases where EMI is causing disturbances, it may be necessary to relocate your system. EPIQ 7 User Manual 4535 617 25341...
-
Page 33: Defibrillators
A small hole in the outer layer of the transducer opens a conductive path to grounded metal parts of the transducer. The secondary arcing that could occur during defibrillation could cause patient burns. The risk of burns is reduced, but not eliminated, by using an ungrounded defibrillator. EPIQ 7 User Manual 4535 617 25341... -
Page 34: Fire Safety
Use caution when going up or down ramps. WARNING When attempting to overcome an obstacle, do not push the system from either side with excessive force, which could cause the system to tip over. EPIQ 7 User Manual 4535 617 25341... - Page 35 WARNING If system operation is abnormal after you move or transport the system, contact Philips Ultrasound Customer Service immediately. System components are installed securely and can withstand considerable shock, but excessive shock can cause a system failure.
-
Page 36: Equipment Protection
Improper cleaning or sterilization of a patient-applied part may cause permanent damage. For cleaning and disinfection instructions, see the “Transducer Care” section. CAUTION Do not submerge the transducer connector in solution. The cables and transducer bodies are liquid‑tight, but the connectors are not. EPIQ 7 User Manual 4535 617 25341... -
Page 37: Product Compatibility
For information about such products and components, contact your Philips representative. Changes and additions to the system should be made only by Philips or by third parties expressly authorized by Philips to do so. Such changes and additions must comply with all applicable laws and regulations that have the force of law within the jurisdictions concerned, and best engineering practices. -
Page 38: Symbols
Of those symbols, the following may be used on your Philips product and its accessories and packaging. USA federal law restricts this device to sale by or on the order of a physician. - Page 39 Indicates conformance with European Council Directive 93/42/EEC. The radio component contained in this device is compliant to Council Directive 1999/5/EC (Radio Equipment and Telecommunications Terminal Equipment Directive). EPIQ 7 User Manual 4535 617 25341...
- Page 40 The backlight lamps in an LCD system monitor contain mercury. Do not throw away. Dispose of in accordance with local, state, or federal laws. Do not reuse. Use-by date. EPIQ 7 User Manual 4535 617 25341...
- Page 41 Indicates that a connector receives alternating current. Identifies fuse boxes or their locations. For continued protection from fire and shock, replace fuses only with fuses of the same type and rating. Identifies the date of manufacture. EPIQ 7 User Manual 4535 617 25341...
- Page 42 Warns of system over-balance due to external force. (Do not push on the monitor or the transducer holders to move the system.) Keep away from sunlight. Non-sterile. Sterilized using ethylene oxide. Catalog number. Batch code. EPIQ 7 User Manual 4535 617 25341...
- Page 43 Connection for a pencil probe Connection for a transducer Connection for ECG and physio leads Connection for ECG and physio leads Print remote output Input port for audio left/right, VHS/S-VHS, microphone, CD, or DVD EPIQ 7 User Manual 4535 617 25341...
- Page 44 VGA or parallel output port DVI video output receptacle USB input/output port FireWire (IEEE 1394) input/output port Ethernet connection RS-232 serial port System microphone Isolated auxiliary power provided for connection of Philips-approved remote accessories. Foot switch EPIQ 7 User Manual 4535 617 25341...
- Page 45 SVGA or DVI-I connection. Video Connection S-Video connection B/W Composite video output connection Color composite video output connection Video print trigger connection EU Authorized Representative Russian approval (GOST) Chinese Environmentally Friendly Use Period symbol. EPIQ 7 User Manual 4535 617 25341...
-
Page 46: Biological Safety
Note the error code, turn off power to the system, and call your customer service representative. WARNING Do not use a system that exhibits erratic or inconsistent image updating. Discontinuities in the scanning sequence indicate a hardware failure that must be corrected before use. EPIQ 7 User Manual 4535 617 25341... - Page 47 WARNING Perform ultrasound procedures prudently. Use the ALARA (as low as reasonably achievable) principle. WARNING Use only acoustic standoffs that have been approved by Philips Ultrasound. For information on ordering approved accessories, see “Supplies and Accessories” on page WARNING Verify the alignment of the biopsy guide before use. See the “Biopsy Guides”...
- Page 48 WARNING If the system becomes contaminated internally with bodily fluids carrying pathogens, you must immediately notify your Philips service representative. Components inside the system cannot be disinfected. In that case, the system must be disposed of as biohazardous material in accordance with local or federal laws.
-
Page 49: Fda Medical Alert On Latex
(Latex gloves labeled “Hypoallergenic” may not always prevent adverse reactions.) • Whenever latex-containing medical devices are used, especially when the latex comes in contact with mucous membranes, be alert to the possibility of an allergic reaction. EPIQ 7 User Manual 4535 617 25341... -
Page 50: Alara Education Program
The ultrasound system and transducers described in this document do not contain natural rubber latex that contacts humans. Natural rubber latex is not used on any Philips ultrasound transducer. It also is not used on Philips ECG cables for the products described in this document. - Page 51 There are several system controls that the operator can use to adjust the image quality and limit the acoustic intensity. These controls are related to the techniques that an operator might use to implement ALARA. These controls can be divided into three categories: direct, indirect, and receiver controls. EPIQ 7 User Manual 4535 617 25341...
- Page 52 Indirect Controls The indirect controls are those that have an indirect effect on acoustic intensity. These controls affect imaging mode, pulse repetition frequency, focus depth, pulse length, and transducer selection. EPIQ 7 User Manual 4535 617 25341...
- Page 53 TGC, dynamic range, and image processing. The important thing to remember, relative to output, is that receiver controls should be optimized before output is increased. For example, before increasing output, optimize gain to improve image quality. EPIQ 7 User Manual 4535 617 25341...
-
Page 54: Output Display
The system output display comprises two basic indices: a mechanical index and a thermal index. The mechanical index is continuously displayed over the range of 0.0 to 1.9, in increments of 0.1 for all applications except contrast, where the minimum increment is 0.01. EPIQ 7 User Manual 4535 617 25341... - Page 55 The higher the MI value, the greater the likelihood of mechanical bioeffects occurring. There is no specific MI value that means that a mechanical effect is actually occurring. The MI should be used as a guide for implementing the ALARA principle. EPIQ 7 User Manual 4535 617 25341...
- Page 56 American Institute of Ultrasound in Medicine (AIUM) measurement standard. The measurements are then put into algorithms for calculating the displayed output values. EPIQ 7 User Manual 4535 617 25341...
- Page 57 Display accuracy estimates are not based on errors in, or caused by measuring according to, the AIUM measurement standards, or the effects of nonlinear loss on the measured values. EPIQ 7 User Manual 4535 617 25341...
-
Page 58: Control Effects
• Flow Opt: Increasing the color sensitivity with the Flow Opt control may increase the TI. More time is spent scanning the color image. Color pulses are the dominant pulse type in this mode. EPIQ 7 User Manual 4535 617 25341... - Page 59 MI is the largest of the MI values associated with each mode and focal zone enabled. The system will return to the previously selected state if a mode is turned off and then reselected. EPIQ 7 User Manual 4535 617 25341...
-
Page 60: Related Guidance Documents
In October 1987, the American Institute of Ultrasound in Medicine (AIUM) ratified a report prepared by its Bioeffects Committee ("Bioeffects Considerations for the Safety of Diagnostic Ultrasound." Journal of EPIQ 7 User Manual 4535 617 25341... - Page 61 Water value intensity 2.7183 Attenuation factor Tissue a(dB/cm-MHz) Amniotic Fluid 0.006 Brain 0.53 Heart 0.66 Kidney 0.79 Liver 0.43 Muscle 0.55 Skin line to measurement depth (cm) Center frequency of the transducer/system/mode combination (MHz) EPIQ 7 User Manual 4535 617 25341...
- Page 62 0.3 dB/cm-MHz. When the path contains significant amounts of fluid, as in many first- and second-trimester pregnancies scanned transabdominally, this model may underestimate the in situ acoustical exposure. The amount of underestimation EPIQ 7 User Manual 4535 617 25341...
-
Page 63: Acoustic Output Tables
All table entries have been obtained at the same operating conditions that give rise to the maximum index value in the first column of the tables. Measurement precision and uncertainty for power, pressure, intensity, and center frequency are listed in the following tables. EPIQ 7 User Manual 4535 617 25341... - Page 64 Wo is the ultrasonic power in milliwatts (mW). ±10% is the center frequency in megahertz (MHz) ±4.7% (NEMA UD-2 definition). PII.3 is the derated spatial-peak pulse intensity PII.3: +18% to -23% integral in joules per square centimeter (J/cm EPIQ 7 User Manual 4535 617 25341...
-
Page 65: Operator Safety
Necas, M. "Musculoskeletal Symptomatology and Repetitive Strain Injuries in Diagnostic Medical Sonographer." Journal of Diagnostic Medical Sonographers, 266-227, November/ December 1996. Foot Switch Warning WARNING The foot switch is not intended for use in wet locations, such as emergency rooms and operating theaters. EPIQ 7 User Manual 4535 617 25341... -
Page 66: Philips Transducers
Safety Operator Safety Philips Transducers Use only transducers that are approved by Philips for use with your Philips ultrasound system. “Clinical Applications and Transducers” on page 174 for a list of the transducers that are compatible with your ultrasound system. - Page 67 287. Disposable Drape If you believe contamination of the system might occur during an exam, Philips recommends that you take universal precautions and cover the system with a disposable drape. Consult your facility's rules regarding equipment use in the presence of infectious disease.
-
Page 68: Electromagnetic Compatibility
CAUTION Medical equipment has special precautions regarding EMC and must be installed and put into service according to the EMC information provided in the system’s accompanying documents. EPIQ 7 User Manual 4535 617 25341... -
Page 69: Radio-Frequency Emissions
• This device must accept any interference received, including interference that may cause undesired operation. Any changes or modifications to this equipment not expressly approved by Philips may cause harmful radio frequency interference and void your authority to operate this equipment. -
Page 70: Ecg Signal
The following cautions can help to reduce ESD effect: CAUTION Do not touch transducer connector pins or the system’s transducer receptacle. CAUTION Handle the transducer by the metal connector shell. EPIQ 7 User Manual 4535 617 25341... -
Page 71: Electromagnetic Emissions
Electromagnetic Emissions The system is intended for use in the electromagnetic environment specified in the table. The customer or the user of the system should ensure that it is used in such an environment. EPIQ 7 User Manual 4535 617 25341... -
Page 72: Approved Cables For Electromagnetic Compliance
Approved Cables Cable Type Length Philips Part Number Adult and pediatric ECG three-lead – 2.7 m (9 ft) with patient trunk cable (for AAMI and IEC leadset leadsets) Adult ECG leadset (AAMI) – – 453561490131/M1671A EPIQ 7 User Manual 4535 617 25341... -
Page 73: Approved Transducers For Electromagnetic Compliance
Accessories used with the system may affect its emissions. The accessories listed here, when used with the system, have been tested to comply with the Group 1, Class B emissions as required by International Standard CISPR 11. Use only the accessories listed here. EPIQ 7 User Manual 4535 617 25341... -
Page 74: Electromagnetic Immunity
NOTE The guidelines specified here may not apply in all situations. Electromagnetic propagation is affected by absorption and reflection from structures, objects, and people. EPIQ 7 User Manual 4535 617 25341... - Page 75 IEC 61000-4-11 environment. If you require continued operation during power mains interruptions, Philips recommends that the system be powered from an uninterruptible power supply or a battery. EPIQ 7 User Manual 4535 617 25341...
- Page 76 Philips suggests that the installer or the user of such a system consult with experts in the field of electromagnetic compatibility and safety for guidance to ensure the safe and effective use of the created system.
-
Page 77: Electromagnetic Interference
It is also possible for the interference to degrade the imaging system's performance and not be visible in the image. If the diagnostic results are suspicious, other means should be used to confirm the diagnosis. EPIQ 7 User Manual 4535 617 25341... - Page 78 TV stations, and so on. 3. Conducted interference on power lines or connected cables caused by other equipment, such as switching power supplies, electrical controls, and natural phenomena such as lightning. EPIQ 7 User Manual 4535 617 25341...
-
Page 79: Recommended Separation Distance
P is the maximum output power rating of the transmitter in watts (W) according to the transmitter manufacturer. NOTE At 80 MHz and 800 MHz, the higher frequency range applies. EPIQ 7 User Manual 4535 617 25341... - Page 80 2D mode, 3D mode, M-mode, Color mode, PW Doppler mode, and CW Doppler mode. The system is more sensitive to interference in the CW Doppler or PW Doppler operating modes, but the EPIQ 7 User Manual 4535 617 25341...
-
Page 81: Avoiding Electromagnetic Interference
A medical device can either generate or receive electromagnetic interference. The EMC standards describe tests for both emitted and received interference. Emission tests deal with interference generated by the device being tested. Philips ultrasound systems do not generate interference based on the tests described in the referenced standards. - Page 82 Safety Electromagnetic Compatibility WARNING The physician must determine if tracking is accurate. Tracking in an untested environment or a location known to cause electromagnetic interference can contribute to inaccurate information and possible personal injury. EPIQ 7 User Manual 4535 617 25341...
-
Page 83: System Overview
Use this section to acquaint yourself with the ultrasound system and its components. System Capabilities The EPIQ 7 Ultrasound System is a high-resolution system intended for general imaging, interventional radiology, cardiology, vascular, and OB/GYN applications, and analysis. The cart is ergonomically designed to be both highly mobile and adjustable for a range of users and operating conditions. -
Page 84: Transducer Types
In addition to the standard features available in the system, other features are available as purchasable options. The types of options available include clinical applications, QLAB Advanced Quantification Software, protocols, imaging capabilities, and connectivity capabilities. A foot switch is available as an option. EPIQ 7 User Manual 4535 617 25341... -
Page 85: Imaging Options
Philips representative. Connectivity Capabilities The following features are standard: • Image and waveform export to removable media • Printing to DICOM printers • Printing to local printers • Printing report pages • Wireless DICOM transfer EPIQ 7 User Manual 4535 617 25341... -
Page 86: Clinical/Analysis Applications
• OB • Pediatric Echo • Pediatric GI • Small Parts • TCD • Urology • Vascular QLAB Advanced Quantification Software Options The following QLAB Q-Apps are supported for use on your ultrasound system: EPIQ 7 User Manual 4535 617 25341... -
Page 87: Stress Echocardiography
Stress Echocardiography (Stress Echo) is a protocol-driven study that allows a cardiologist to assess cardiac wall motion at various heart rates by acquiring views of the heart at different stages of the study. Stress Echo includes these Philips protocols: • Exercise 2-Stage •... -
Page 88: Data Security
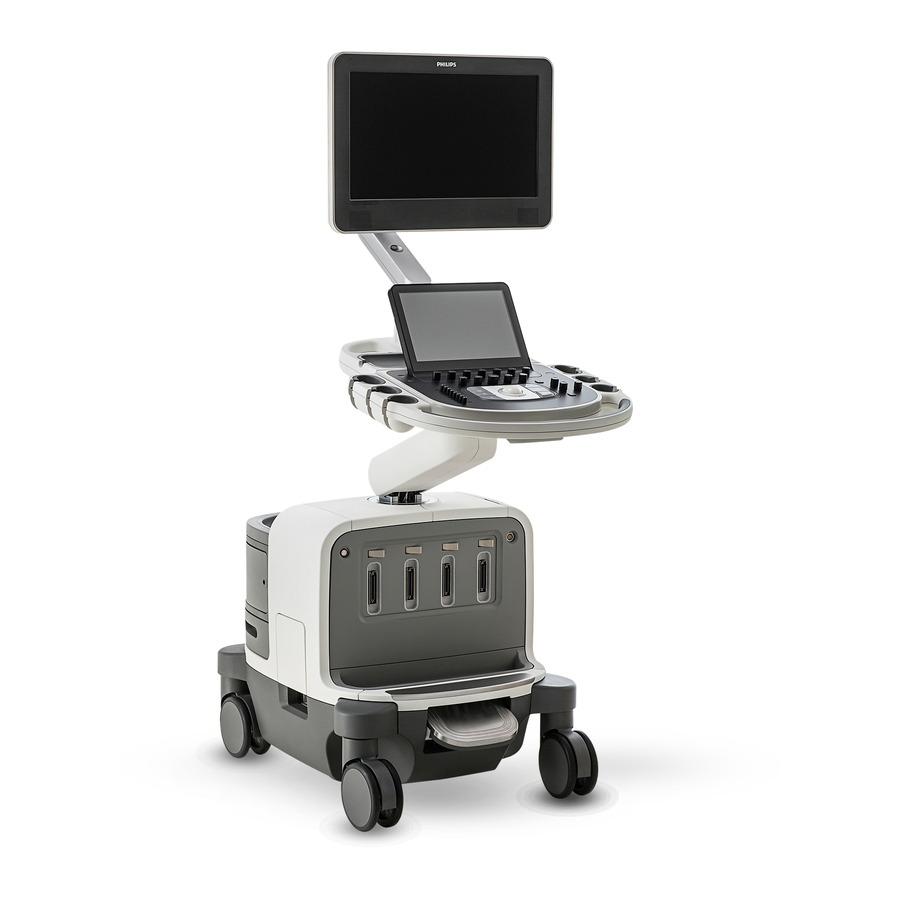
The major components include the monitor, control module, On/Off switch, DVD+RW drive, peripheral bay, transducer receptacles, ECG/physio receptacles, USB ports, brakes and steering locks, and foot switch receptacle. EPIQ 7 User Manual 4535 617 25341... - Page 89 System Components System Overview System Components Monitor On/Off switch Control module Transducer receptacle locks Transducer receptacles Side panel Brake/steering lock pedal Touch screen Peripheral bays EPIQ 7 User Manual 4535 617 25341...
-
Page 90: Video Monitor
The touch screen, located above the control panel, displays controls used to select applications and imaging modes, as well as controls that are specific to the current operating mode. Touch screen controls include buttons and knobs. EPIQ 7 User Manual 4535 617 25341... - Page 91 You can adjust the position of the control module vertically and side-to-side. You can also swivel the control module. Beneath the control panel is a retractable keyboard. The keyboard is used to enter patient data, comments, and text annotation on images. EPIQ 7 User Manual 4535 617 25341...
-
Page 92: On/Off (Power) Control
On/Off (Power) Control (On/Off) control is located on the control panel. When the system is off, pushing this control brings the system into a fully operational state. Pushing this control again turns off the system. EPIQ 7 User Manual 4535 617 25341... -
Page 93: Data Storage
You can store exam data and images onto removable media. Removable media includes USB storage devices and the DVDs and CDs. The DVD+RW drive is located on the right side of the control panel behind the transducer holders. EPIQ 7 User Manual 4535 617 25341... - Page 94 System Overview System Components DVD+RW Drive EPIQ 7 User Manual 4535 617 25341...
-
Page 95: Peripherals
The peripheral bays at the back of the system provide space for up to two peripheral devices. Those devices can be any combination of the following devices: a black-and-white printer, a color printer, and a DVD recorder. EPIQ 7 User Manual 4535 617 25341... -
Page 96: Transducer Receptacles And Cable Management
The system includes four receptacles for imaging transducers, one receptacle for a pulsed- or continuous-wave Doppler probe, and one receptacle for physio, if physio is included in your system's configuration. All receptacles can be occupied simultaneously, but only one transducer at a time can be active. EPIQ 7 User Manual 4535 617 25341... - Page 97 When a transducer is not in use, store it in one of the transducer holders on the system cart. Always loop transducer cables over the cable hangers to prevent cables from being stepped on or run over by the cart wheels. EPIQ 7 User Manual 4535 617 25341...
-
Page 98: Physio (Ecg) Receptacles
Physio (ECG) Receptacles For physio support, your system includes input receptacles for ECG (for the connector location, see the figure in “Transducer Receptacles and Cable Management” on page 140), pulse, phono, and auxiliary signals. EPIQ 7 User Manual 4535 617 25341... -
Page 99: Wheel Brakes And Steering Locks
When the pedal is fully pressed down, all brakes are engaged. To release all brakes, move the pedal to the middle position. To engage the steering locks, pull the pedal fully up. For more information, see “Using the Brakes and Steering Locks” on page 115. EPIQ 7 User Manual 4535 617 25341... - Page 100 System Overview System Components Brake/Steering Lock Pedal EPIQ 7 User Manual 4535 617 25341...
-
Page 101: Preparing The System
IEC 60601-1. WARNING Philips ultrasound systems are tested to the requirements of IEC 60601-1, with on-cart peripherals that are powered by the built-in system isolation. The system peripherals meet general electrical safety usage requirements. -
Page 102: External Printers
10°C (50°F), then the time required for the device to return to room temperature could be significantly less than 24 hours. NOTE Any device that is not purchased from Philips or a Philips-authorized agent is not covered under a Philips service agreement or warranty. External Printers You can connect different external printers to your system. -
Page 103: Connecting An External Printer
1. Turn off the system and unplug the power cord from the power source. 2. Connect a standard USB cable between the USB port on the printer and a USB port on the system. EPIQ 7 User Manual 4535 617 25341... -
Page 104: Configuring Local Printers
6. To assign a printer to a touch screen control, do the following: Under Select a Touch Screen Button, select the name of the control that you want to assign. In Destination(s) for the Button, select a printer. 7. To exit the setups, touch Close. EPIQ 7 User Manual 4535 617 25341... -
Page 105: Connecting The Foot Switch
The external DVD recorder record from the ultrasound system; it does not provide playback on the system monitor. The DVD recorder must be installed with the Philips DVD recorder installation kit. (For the kit, contact your Philips representative.) If you connect this DVD... -
Page 106: Connecting The System To A Network
Be aware of the wheels, especially when moving the system. The system could cause injury to you or others if it rolls over feet or into shins. Use caution when going up or down ramps. EPIQ 7 User Manual 4535 617 25341... - Page 107 When extended, the keyboard might be damaged if it hits another object, and the video monitor could swing out during transport, causing injury or equipment damage. WARNING To avoid injury, Philips recommends against lifting the system cart. EPIQ 7 User Manual 4535 617 25341...
-
Page 108: Preparing And Moving The System
2. Engage the wheel brakes by pressing the pedal fully down. 3. Squeeze the release button on the front handle and use the handle to center the control module and move it to a comfortable height for moving. EPIQ 7 User Manual 4535 617 25341... - Page 109 4. Disconnect all external cables, including those to power, network, and external devices. Secure all cables, transducers, and accessories so that they do not interfere with the wheels. 5. Retract the keyboard. 6. Lock the monitor arm by pressing the articulating sections of the arm together. EPIQ 7 User Manual 4535 617 25341...
- Page 110 To avoid system instability while moving it, engage the steering lock only after you have moved the system a short distance in the intended direction. This engages the steering locks with the wheels correctly aligned. EPIQ 7 User Manual 4535 617 25341...
-
Page 111: Positioning The System In Confined Spaces
1. Release the steering lock and wheel brakes by moving the pedal to its middle position. 2. Move the system in any direction using the front handle. 3. When the system is in position, set the wheel brakes by pushing the pedal down fully. EPIQ 7 User Manual 4535 617 25341... -
Page 112: Setting Up After Moving
Brake/Steering Lock Pedal Setting Up After Moving CAUTION If the system behaves abnormally after moving, contact your Philips representative immediately. The components are installed securely and can withstand considerable shock; however, excessive shock can cause a system failure. 1. With the system in position, set the brakes, connect the power, network, and other cables from the system to the appropriate wall receptacles. -
Page 113: Using The System
90 seconds (or 3 minutes if DICOM activity is occurring) before forcing the system to shut down. CAUTION The batteries are used to ensure quick system startup and easy movement of the system only. You cannot perform scans while in battery mode. EPIQ 7 User Manual 4535 617 25341... -
Page 114: Setting The System Time And Date
The system time and date cannot be set when a study is active. It is recommended that you check the system time and date periodically before a study, and set the correct time and date, if necessary. EPIQ 7 User Manual 4535 617 25341... -
Page 115: Using The Brakes And Steering Locks
Your system has a foot pedal at the lower front of the cart. Operate the brakes and the steering locks with the foot pedal using the appropriate procedure. EPIQ 7 User Manual 4535 617 25341... -
Page 116: Monitor Adjustments
Monitor Adjustments CAUTION To avoid damaging the flat-panel display in the monitor, do not operate it in direct sunlight. Also, do not operate or store the system where the ambient temperature exceeds 65°C (149°F). EPIQ 7 User Manual 4535 617 25341... -
Page 117: Positioning The Monitor
Three settings are available: • sRGB provides the maximum dynamic range and most-balanced tint. Use it to match the look of the system display to a review station display that is set to the sRGB standard. EPIQ 7 User Manual 4535 617 25341... -
Page 118: Changing The Default Monitor Brightness
1. Touch Utilities. 2. On the System tab, touch Setups. 3. Click System Settings, and then click the Display tab. 4. Select the appropriate Default Monitor Tint setting. Philips recommends the sRGB setting for routine use. 5. Click Close. NOTE Rendered 3D volumes are particularly susceptible to changes in display tint. -
Page 119: Automatic Display Dimming
The control panel contains the main imaging controls. These controls include buttons, knobs, TGC slide controls, and a trackball. The control module also allows you to select imaging modes, review and annotate images, perform measurements and calculations, and access Philips SupportConnect. - Page 120 Using the System System Controls Control Panel Touch screen Power and Sleep Mode controls TGC slide controls Trackball Soft key knobs and mode controls Philips SupportConnect EPIQ 7 User Manual 4535 617 25341...
-
Page 121: Control Panel Adjustments
You must engage the brakes to change the position of the control panel. If the brakes are not engaged, the release button on the front handle will light when pressed, but the control panel will not unlock. 3. Press the release button on the front handle. EPIQ 7 User Manual 4535 617 25341... -
Page 122: Setting The Depth Control
Select Increase Counter Clockwise to increase depth when the control is turned counter-clockwise. 5. Click Close. Touch Screen The touch screen above the control panel provides controls that change function according to the current mode or system function. EPIQ 7 User Manual 4535 617 25341... -
Page 123: Touch Screen Layout
Tabs: Contains mode-specific or application-specific controls in different tabs. Controls: The main area of the touch screen, which shows the controls for the currently selected tab in the current mode or application. Sub-mode controls EPIQ 7 User Manual 4535 617 25341... -
Page 124: Touch Screen Controls
Touch Next or Previous to display the next or previous page of controls associated with the current tab. Most tabs have two pages of buttons. You can also swipe the tip of your finger left or right across the touch screen to view additional pages. EPIQ 7 User Manual 4535 617 25341... -
Page 125: Utilities Touch Screen
(for a number of seconds). CP Brightness A control used to adjust the brightness of the control panel and the touch screen display. Export IQ Optimization A control used to start the Export IQ Wizard. EPIQ 7 User Manual 4535 617 25341... -
Page 126: Trackball
The tools and icons area of the imaging display includes a trackball icon that identifies the function assigned to each trackball button. The functions of the buttons change to match your current task. There are trackball assignments for each major system mode, protocols, labels, body markers, calculations, and measurements. EPIQ 7 User Manual 4535 617 25341... -
Page 127: Soft Key Controls
Each column of labels corresponds to the soft key below it on the control panel. The soft keys select imaging features and settings. The functions of the soft keys change depending on the mode, the application, the preset, and the transducer. EPIQ 7 User Manual 4535 617 25341... -
Page 128: Using The Keyboards
A retractable keyboard is located beneath the control panel. To use the retractable keyboard: 1. Pull out the keyboard. The keyboard lights after you pull it out completely. 2. When you are done typing, push in the keyboard in completely. EPIQ 7 User Manual 4535 617 25341... -
Page 129: Status Icons
• Red X: Remote session is disabled Indicates the status of a Network Packet Capture: • Green dot: Enabled and running • Red X: Enabled but not running Displayed when the microphone is on. EPIQ 7 User Manual 4535 617 25341... -
Page 130: Power Management
The system includes a power management feature that monitors the power level of the optional battery and notifies you when the battery is low on charge. Additionally, the power management feature can safely shut down the system before the battery loses power. EPIQ 7 User Manual 4535 617 25341... -
Page 131: Sleep Mode
(On/Off) control. When the system is in Sleep Mode, it freezes live imaging, pauses any open study, exits any QLAB study, and terminates any remote connection. Awaken the system to resume normal system operation. EPIQ 7 User Manual 4535 617 25341... -
Page 132: Battery Indicators
The batteries are used to ensure quick system startup and easy movement of the system only. You cannot perform scans while in battery mode. NOTE The system batteries are a purchasable option. If this option is not purchased, the battery icon is not displayed. EPIQ 7 User Manual 4535 617 25341... -
Page 133: System Security
Logging On to the System When data security is enabled, you must log on to the system before you are able to view or load patient files. 1. Click (Log On) at the bottom of the imaging display. EPIQ 7 User Manual 4535 617 25341... -
Page 134: Logging Off Of The System
The Auto Log Off time shown on the User Settings display indicates how long the system can be inactive before you are logged off automatically. Only the system administrator can change this setting. 1. Touch Utilities. EPIQ 7 User Manual 4535 617 25341... -
Page 135: Imaging Display
6. For New Password, type the new password you want to use, and then press the Tab key. 7. For Confirm Password, type your new password again. 8. Click OK. 9. To exit setups, click Close. Imaging Display The imaging display contains three, distinct regions: Imaging Display EPIQ 7 User Manual 4535 617 25341... -
Page 136: Patient Bar
Tabs at the top of the left pane enable you to switch among those lists. To hide the left pane, click , in the top right corner of the pane. EPIQ 7 User Manual 4535 617 25341... - Page 137 The marker always follows the orientation of the image. When you invert the image by using Left/Right or Top/Bottom, the marker position changes accordingly. Image Area Left pane Imaging area Image tabs Scan plane orientation marker EPIQ 7 User Manual 4535 617 25341...
-
Page 138: Tools And Icons Area
Trackball arbitration icon System management icons (interactive) Emergency Studies If the system administrator has enabled the data security feature on your system, it is important to understand how to start a study in an emergency situation. EPIQ 7 User Manual 4535 617 25341... -
Page 139: Temporary Id
Just click Use Temporary ID after you acquire an image. You can create a temporary ID when starting a protocol, printing, acquiring an image, or saving a volume. 1. Touch Patient and then click Use Temporary ID. 2. Click Done. EPIQ 7 User Manual 4535 617 25341... -
Page 140: Setting The Auto Freeze Function
The system includes four receptacles for imaging transducers, one receptacle for a pulsed- or continuous-wave Doppler probe, and one receptacle for physio, if physio is included in your system's configuration. All receptacles can be occupied simultaneously, but only one transducer at a time can be active. EPIQ 7 User Manual 4535 617 25341... - Page 141 When a transducer is not in use, store it in one of the transducer holders on the system cart. Always loop transducer cables over the cable hangers to prevent cables from being stepped on or run over by the cart wheels. EPIQ 7 User Manual 4535 617 25341...
-
Page 142: Selecting A Transducer
You can select or deselect a transducer during live imaging without damaging the transducer or the system. 1. Touch the transducer name to select it. 2. Touch the clinical application preset that you want to use. EPIQ 7 User Manual 4535 617 25341... -
Page 143: Selecting A Preset
CD media capacity is approximately 700 MB; single-layer DVD media capacity is approximately 4.7 GB. Rewritable media types (indicated by the RW suffix) can be erased and used again, but you cannot erase media that has the R suffix. Dual-layer DVD media is unsupported. EPIQ 7 User Manual 4535 617 25341... -
Page 144: Dvd Drive
RW disc, you must first reformat it. To record multiple studies to a disc, you must end the exam you just recorded before removing the disc. NOTE A single disc can be used between different EPIQ 7 systems, but only for writing logs and setup data. DVD Drive The system includes a DVD drive, located on the right side of the control module. -
Page 145: Usb Devices
If you connect such drives to the system, you must observe the electrical safety warnings in the “Safety” section. Philips recommends that you use only USB hard disk drives powered from the USB connector, or use USB flash memory devices. EPIQ 7 User Manual 4535 617 25341... -
Page 146: Dicom Viewer
USB storage devices before working with them. CAUTION Philips does not recommend that you use USB storage devices for long-term storage. Follow your IT department's recommended practices for intended use of USB storage devices. For more information about security on the ultrasound system, see Shared Roles for System and Data Security, included on your User Information CD. -
Page 147: Customizing The System
DVD or USB storage device and restore them when you need to use them. The available presets are determined by the selected transducer. NOTE Presets are available only if you purchased the corresponding application-package option. EPIQ 7 User Manual 4535 617 25341... -
Page 148: Setting The Default Transducer And Preset
You can delete existing Quick Save presets, copy them onto a DVD or USB storage device, and load them into another EPIQ 7 system. The number of Quick Save presets you can store for a transducer/application combination is limited only by the number of buttons available on the corresponding transducer touch screen. -
Page 149: Creating Quick Save Presets
You can copy Quick Save presets to a DVD or a USB storage device. This function is useful for archiving presets and for sharing presets among other EPIQ 7 systems. When you copy Quick Save presets, all available data is copied. -
Page 150: Loading Quick Save Presets From Removable Media
6. Deselect the data that you do not want to import. 7. After the import is complete, click OK. 8. To close the Philips SupportConnect display, click Close. A displayed message might prompt you to restart the system. System Setups Setups are system parameters that you can change. -
Page 151: Changing Setups
NOTE The institution name exported with DICOM data always reflects the name shown in the setups at the time the study ended. Philips recommends restarting the system after changing Institution Name in the setups. Procedures for using setup options and descriptions of settings are included throughout the Help. -
Page 152: System Options
QLAB Advanced Quantification Software Q-Apps, PercuNav Image Fusion and Interventional Navigation, and connectivity capabilities. To add licensed options to your system, you purchase them from your Philips representative. Once purchased, they are installed in your system by a Philips field service engineer. -
Page 153: Selecting A Custom Procedure
Procedure menu. 1. Touch Patient. 2. In the Clinical Procedure section of the Patient Data form, select the custom procedure from the Procedure menu. 3. Click Done. 4. Start the exam. EPIQ 7 User Manual 4535 617 25341... - Page 154 Customizing the System Custom Procedures EPIQ 7 User Manual 4535 617 25341...
-
Page 155: Performing An Exam
An accession number is an optional entry assigned to each patient file by an institution for internal information-management purposes. The exam date is set by the system when you first acquire an image during the exam. EPIQ 7 User Manual 4535 617 25341... -
Page 156: Entering Patient Data
2. On the Patient Data form, click the Worklist tab. 3. On the worklist, select the exam you want, and click Close. The system loads the patient information, and you are ready to begin an exam for that patient. EPIQ 7 User Manual 4535 617 25341... -
Page 157: Searching In The Worklist
If the intent of hiding the patient name and ID is patient privacy, be aware that if the original file name includes the patient name, you will need to rename the file when you export it. EPIQ 7 User Manual 4535 617 25341... -
Page 158: Imaging Modes
If you have set a default transducer and it is connected, then the system initializes that transducer. For information on setting a default transducer, see “Setting the Default Transducer and Preset” on page 148. EPIQ 7 User Manual 4535 617 25341... -
Page 159: Annotation
• Left or right trackball button: Highlight and move body marker and the transducer icon. • Middle trackball button: Set the position of the body marker and exit annotation mode. (To reenter annotation mode, touch the Label tab.) Adding Labels 1. Press ABC Label. EPIQ 7 User Manual 4535 617 25341... - Page 160 To exit annotation mode, press ABC Label again. • To use text replace, see Changing Labels Using Text Replace in the online help. NOTE Erase Last erases all arrows from the image display before it erases text labels. EPIQ 7 User Manual 4535 617 25341...
-
Page 161: Adding Labels Using The Keyboard
Layout. You cannot add body markers and system-provided labels to single frame images in Review, although you can add them to loops in Review. You can type text in single frame images in Review. 1. Press ABC Label. EPIQ 7 User Manual 4535 617 25341... -
Page 162: Recording
Use only DVD+RW media in the DVD recorder. NOTE Always format a new disc before using it with the DVD recorder. Also, Philips recommends reformatting a used disc before using it with the DVD recorder. 1. To turn on the DVD recorder, press on the front panel. -
Page 163: Printing
Printing in Live Imaging You can print live or frozen images during an exam. To print using the Acquire 1 or Acquire 2 controls, a printer must be assigned to those controls in the setups. EPIQ 7 User Manual 4535 617 25341... -
Page 164: Review
The display that appears depends on whether an exam is active on the system. NOTE If an exam is in progress, pressing Review opens the Image Review display. If no exam is in progress, pressing Review opens the Patient Directory display. EPIQ 7 User Manual 4535 617 25341... -
Page 165: Navigating Thumbnails And Images
You can capture and save a single frame or a cineloop sequence. The captured frame or cineloop sequence is saved in the patient study, and a thumbnail of it is available in the live imaging display and the Review display. Images are automatically exported across the network, EPIQ 7 User Manual 4535 617 25341... - Page 166 If you press Acquire 1 in a non-simultaneous mode while a live M-mode or Doppler trace is active, you capture a cineloop sequence. If you press Acquire 1 in a simultaneous mode, you capture a single image. EPIQ 7 User Manual 4535 617 25341...
-
Page 167: Measurement And Analysis
Measurements must be labeled for the results to appear in patient reports. Unlabeled measurements appear in the results but are not retained, unless they are associated with a labeled measurement. EPIQ 7 User Manual 4535 617 25341... -
Page 168: Performing A 2D Distance Measurement
5. Use the trackball to position the caliper for the first end point and click to anchor it. 6. Use the trackball to position the caliper for the second end point. The results update as the distance between the calipers changes. EPIQ 7 User Manual 4535 617 25341... -
Page 169: Measuring M-Mode Distance
1. Obtain the image you want to measure and press Freeze. 2. Press or touch Measure. 3. Do one or more of the following: • On the Calc Package tab of the touch screen, touch a collection and then a measurement label. EPIQ 7 User Manual 4535 617 25341... -
Page 170: Measuring Then Labeling
Each time you finish an exam, you must end the exam to save images, reports, and other exam data. You can end an exam in the current exam display or with the current exam open in the Review display. You cannot end a paused exam while in the Patient Directory. EPIQ 7 User Manual 4535 617 25341... - Page 171 If you turn off the system without ending the exam, the system pauses the exam before shutting down. When the exam is complete, do one of the following: • Touch End Exam. • Click End Exam in the Patient Data display. EPIQ 7 User Manual 4535 617 25341...
- Page 172 Performing an Exam Ending an Exam EPIQ 7 User Manual 4535 617 25341...
-
Page 173: Transducers
When the system is turned on, the system initializes the last active transducer. If that transducer is not connected, the system initializes the transducer that is connected to the leftmost connector, unless you have defined another transducer as the default transducer. If EPIQ 7 User Manual 4535 617 25341... -
Page 174: Setting The Default Transducer And Preset
A clinical application, available for one or more transducers, optimizes the system for a specific application. The clinical applications for each transducer available for the system are listed here. The following table lists the transducers that are compatible with your ultrasound system. EPIQ 7 User Manual 4535 617 25341... - Page 175 Adult Echo, Pediatric S8-3 Adult Echo, Pediatric S12-4 Adult Echo, Neonatal Head, Pediatric V6-2 Fetal Echo, OB X5-1 Abdomen Vascular, Adult Echo, Pediatric, TCD X6-1 Abdominal, Fetal Echo, GYN, Intervention, OB X7-2t Adult Echo EPIQ 7 User Manual 4535 617 25341...
-
Page 176: Indications For Use And Supporting Transducers
The following are the indications for use for this system and the transducers supporting each indication. Use only transducers that are approved by Philips for use with your Philips ultrasound system. In the United States, the FDA 510(k) regulatory clearance for use of the product is applicable only when Philips-manufactured transducers are connected to the system. -
Page 177: Xmatrix Array Transducers
• 3D imaging modes with 3D Zoom, Live 3D grayscale, Live 3D color, Live 3D LVO, Full Volume grayscale, Full Volume Color, and Full Volume LVO. (All 3D imaging modes available with one-beat and multi-beat acquisition.) EPIQ 7 User Manual 4535 617 25341... -
Page 178: X6-1 Description
Inspect the transducer cable, case, and lens before each use. Check for cracks or other damage that jeopardizes the integrity of the transducer. Report any damage to your Philips customer service representative, and discontinue use of the transducer. -
Page 179: Acoustic Artifacts
Doppler peaks going off the display, top or bottom, and then continuing on the other side of the baseline. On the Color display an immediate change in color from one Nyquist limit to the other is seen. EPIQ 7 User Manual 4535 617 25341... - Page 180 Reverberation is the continuing reception of a particular signal because of reverberation rather than reflection from a particular acoustic interface. This phenomenon is analogous to the effect created by mirrors positioned on opposite walls when an object, a head for instance, is placed EPIQ 7 User Manual 4535 617 25341...
-
Page 181: Acoustic Artifacts In 3D Imaging
Acquisition, rendering, and editing artifacts are specific to 3D volume images. Acquisition artifacts are related to patient motion, organ motion, or position-sensing errors. Rendering artifacts include elimination of structures by limiting the region of interest boundaries, EPIQ 7 User Manual 4535 617 25341... - Page 182 As with 2D imaging, it is important to verify putative physical defects by using additional images and other modalities. EPIQ 7 User Manual 4535 617 25341...
-
Page 183: Transducer Covers
Protective covers are recommended for transrectal, intravaginal, and transesophageal procedures; the protective covers are mandatory in China and Japan. Philips recommends the use of qualified covers. For procedures for using transducer covers, see the instructions provided with the covers. -
Page 184: Ultrasound Transmission Gels
For proper transmission of the acoustic beam, use the ultrasound transmission gel supplied by or recommended by Philips, or another glycol-, glycerol-, or water-based acoustic coupling medium. Products that do not contain mineral oil are acceptable for use. Never use lotion- based products. -
Page 185: Transducer Storage
• ECG Gel (Nicom) • Nemidon Gel • Scan For additional compatibility information, call Philips at 800-722-9377 (North America) or your local Philips Ultrasound representative (outside North America). Transducer Storage Use the appropriate guidelines for storing transducers for transport, and daily and long-term storage. -
Page 186: Daily And Long-Term Storage
• Before storing transducers, make sure they are thoroughly dry. • For TEE transducers, be sure the distal tip is straight and protected before storing the transducer. • Never store a TEE transducer in the carrying case, except to transport it. EPIQ 7 User Manual 4535 617 25341... -
Page 187: Intraoperative Transducers
Intraoperative transducers will be unavailable in the US and Canada until regulatory clearance is received. Operators of Intraoperative Transducers Philips intraoperative transducers are designed to be used under the guidance of physicians who are properly trained in intraoperative ultrasound imaging techniques according to currently approved relevant medical practices. Philips recommends that physicians operating any Philips intraoperative transducer have the following qualifications: •... -
Page 188: Intended Uses For Intraoperative Transducers
• Use mandatory protective equipment, including an approved sterile protective transducer cover, during intraoperative studies. For information about using transducer covers, see “Preparing Transducers for Intraoperative Use” on page 191. • Operate the transducer properly. EPIQ 7 User Manual 4535 617 25341... -
Page 189: Patient-Contact Parts
“FDA Medical Alert on Latex” on page NOTE The ultrasound system and transducers discussed here do not contain natural rubber latex that contacts humans. Natural rubber latex is not used on any Philips ultrasound transducers. EPIQ 7 User Manual 4535 617 25341... -
Page 190: Preventing Intraoperative Transducer Problems
• Damage caused by dropping the transducer on a hard surface To minimize the chance of damage, Philips strongly recommends that you clearly post stringent protocols for the care of intraoperative transducers, based on the information provided here. -
Page 191: Preparing Transducers For Intraoperative Use
L15-7io Transducer NOTE This transducer is available only in countries or regions where it is approved. For information specific to your region, contact your local Philips representative. L15-7io Transducer Features and Specifications Features Linear array designed for mid- to high-frequency superficial imaging and high-resolution intraoperative vascular applications. -
Page 192: Disposable Drapes
Sterile water is a good acoustic-coupling agent during surgery. Disposable Drapes During studies in which you believe contamination of the ultrasound system can occur, Philips recommends that you take universal precautions and cover the system with a disposable drape. -
Page 193: Leakage Current Testing For Intraoperative Transducers
Leakage Current Testing for Intraoperative Transducers Philips transducers approved for intraoperative use are labeled on the transducer connector as Type CF in accordance with the IEC 60601-1. Type CF classification indicates that the degree of protection from electrical shock afforded by the transducer is suitable for all patient applications, including direct cardiac and intraoperative applications. - Page 194 Z to the test electrode Line power source, either 110 Vac or 220 Vac Current caused by e and stray capacitance, and optionally Z Open earth lift ground switch Line polarity switch EPIQ 7 User Manual 4535 617 25341...
- Page 195 500 Ω with a hole in the layer) Microammeter to measure leakage current from a line supply to the transducer and back to earth ground through electrode Z and the equipment chassis Line power source, either 110 Vac or 220 Vac EPIQ 7 User Manual 4535 617 25341...
-
Page 196: Testing Intraoperative Transducer Leakage Current (Source)
10. Hold the safety analyzer Ground Open switch in the Open position (single fault condition), and note the leakage reading. 11. Repeat step 9 and step 10 with the Polarity switch in the Reverse position. These are the applicable limits: EPIQ 7 User Manual 4535 617 25341... -
Page 197: Testing Intraoperative Transducer Leakage Current (Sink)
10. Press and hold the Isolation Test button and take the leakage reading again. 11. Subtract the correction factor found in step 8 to get the accurate leakage measurement. The leakage must be less than 50 µA RMS. EPIQ 7 User Manual 4535 617 25341... - Page 198 Intraoperative Transducers Leakage Current Testing for Intraoperative Transducers EPIQ 7 User Manual 4535 617 25341...
-
Page 199: Transesophageal Transducers
Nevertheless, always remove the transducer from the patient before defibrillation. Operators of TEE Transducers Philips TEE transducers are designed for use under the guidance of physicians who are properly trained in esophagogastroscopic techniques, according to currently approved relevant medical practices. Philips recommends that physicians operating any Philips TEE transducer have the following qualifications: •... -
Page 200: Patient Safety During Tee Studies
Patient Safety During TEE Studies Patient Safety During TEE Studies Philips recommends that you practice using the TEE transducer controls before performing any procedure mentioned here. You must also be thoroughly familiar with the safe operation, care, and maintenance of the ultrasound imaging system used with the TEE transducer, as well as proficient at interpreting the images generated. - Page 201 WARNING To prevent tissue damage, Philips recommends that the tip of the TEE transducer be straightened and both detent brakes released before you reposition the transducer or withdraw the transducer from the patient. In the neutral position, the tip is straight when the indicators on the control wheels are aligned and point toward the center of the array rotation button.
- Page 202 WARNING If you encounter an irregularity not listed in the following table, do not use the transducer. Potentially serious consequences could result. Contact your Philips representative. Ensuring Patient Safety During TEE Studies Problem...
- Page 203 ESU is isolated. Unplug transducer from the system when you are not imaging. Defibrillation Electrical burns Remove the transducer from the patient “Electrical Safety and issues before defibrillation. TEE Transducers” on page 205 EPIQ 7 User Manual 4535 617 25341...
-
Page 204: Patient-Contact Parts
Review the following table to familiarize yourself with specific problems, to learn how to avoid them, and to identify the sections in this manual where details are provided. Philips also strongly recommends that you clearly post stringent protocols for TEE transducer care, based on the information in this manual, to minimize the chance of damage. -
Page 205: Electrical Safety And Tee Transducers
Electrical Safety and TEE Transducers Transesophageal Transducers WARNING For any other irregularity not listed in the following table, do not use the transducer. Potentially serious consequences could result. Contact your Philips representative. Preventing TEE Transducer Equipment Problems Problem Effect on Equipment... -
Page 206: Leakage Current And Tee Transducers
• Use electrosurgical units (ESUs) that have isolated outputs. Return fault/ground fault detection circuits provide additional protection. To determine if an ESU has an isolated output, read the label on the ESU, see the ESU service guide, or ask a biomedical engineer. EPIQ 7 User Manual 4535 617 25341... -
Page 207: Tee Deflection Control Basics
“TEE Transducer References” on page 238. WARNING Never apply excessive force when inserting or withdrawing a TEE transducer, or when operating the transducer deflection controls. WARNING Lock medial/lateral movement of the TEE transducer during insertion. EPIQ 7 User Manual 4535 617 25341... - Page 208 Do not allow the TEE transducer to remain at a maximum deflection for long periods of time. WARNING To prevent tissue damage, Philips recommends that the tip of the TEE transducer be straightened and both detent brakes released before you reposition the transducer or withdraw the transducer from the patient.
-
Page 209: X7-2T Tee Transducer Description
Shaft: 1.0 cm (0.4 in) wide, 1.0 m(3.3 ft) long NOTE Philips recommends that you use the X7-2t transducer only on patients weighing at least 30 kg (66 lb), to ensure that the esophagus can comfortably accommodate the transducer. EPIQ 7 User Manual 4535 617 25341... -
Page 210: Using The X7-2T Tee Transducer
Transesophageal Transducers Using the X7-2t TEE Transducer Using the X7-2t TEE Transducer Philips recommends familiarizing yourself with the controls and parts of the TEE transducer before using it in a study. TEE Transducer Components Component Description Distal tip Transducer connector... -
Page 211: X7-2T Deflection Controls
(as shown) both knobs are in the freewheeling mode. When the detent brake actuator is centered, the small knob (medial/lateral movement) is in the detent mode, and when the actuator is rotated to the left, both knobs are in the detent mode. EPIQ 7 User Manual 4535 617 25341... - Page 212 Transesophageal Transducers Using the X7-2t TEE Transducer X7-2t Transducer Controls Control Description Medial/lateral control Anterior/posterior control Detent brake actuator EPIQ 7 User Manual 4535 617 25341...
-
Page 213: Manipulating The X7-2T Tip
Turn the detent brake actuator fully toward the image plane rotation buttons to put both knobs in detent mode. • Center the detent brake actuator to put only the small knob (medial/lateral movement) in the detent mode. EPIQ 7 User Manual 4535 617 25341... - Page 214 Transesophageal Transducers Using the X7-2t TEE Transducer X7-2t Transducer Controls Control Description Medial/lateral control Anterior/posterior control Detent brake actuator EPIQ 7 User Manual 4535 617 25341...
-
Page 215: Rotating The X7-2T Image Plane
To rotate the imaging plane toward the 0-degree position, press the button that is proximal to the system. • To rotate the X7-2t transducer image plane using a system control, use the Seek Angle soft key. EPIQ 7 User Manual 4535 617 25341... -
Page 216: S7-3T Tee Transducer Description
Tip surface temperature is constantly monitored for patient safety. Specifications Tip: 10.9 mm x 8.3 mm, 27 mm long (0.43 in x 0.33 in, 1.1 in long) Shaft: 7.5 mm diameter, 70 cm long (0.3 in diameter, 27.5 in long) EPIQ 7 User Manual 4535 617 25341... -
Page 217: Using The S7-3T Tee Transducer
Using the S7-3t TEE Transducer Transesophageal Transducers Using the S7-3t TEE Transducer Philips recommends familiarizing yourself with the controls and parts of the TEE transducer before using it in an exam. For more information on transducer controls, see “S7-3t TEE Controls”... -
Page 218: S7-3T Tee Controls
Contact Philips to readjust the steering of the transducer. Ensuring proper deflection limits minimizes the risk of the tip folding over in the esophagus. - Page 219 Using the S7-3t TEE Transducer Transesophageal Transducers S7-3t Controls 90-degree rotation indicator Array control Deflection control Deflection lock Neutral position indicators (no deflection) Unlocked, freewheeling (white) Locked (red) EPIQ 7 User Manual 4535 617 25341...
-
Page 220: Manipulating The S7-3T Tee Tip
3. Once the tip is positioned properly, lock the deflection control knob by sliding the deflection lock so that the indicator is red. Manipulating the S7-3t Transducer Tip Deflection lock Deflection control EPIQ 7 User Manual 4535 617 25341... -
Page 221: S7-3T Tee Array Rotation
An icon shows the current degree of rotation. Depending on image orientation, the icon appears in the upper or lower part of the display. S7-3t Array Rotation Short axis Angle = 0° Long axis Angle = 90° Short axis Angle = 180° EPIQ 7 User Manual 4535 617 25341... -
Page 222: Rotating The S7-3T Tee Array
Rotating the S7-3t Imaging Array Array control Align settings on the control with the proximal end of the transducer handle (90° setting as shown). EPIQ 7 User Manual 4535 617 25341... -
Page 223: Checking The Tee Transducer
In addition, you should do the following: • Consider the patient’s size and ability to accommodate the transducer tip and shaft. EPIQ 7 User Manual 4535 617 25341... -
Page 224: Patient Selection For Tee Transducer Use
The following table lists the minimum patient weight recommendations when using TEE transducers. TEE Transducer Minimum Patient Weight Recommendations TEE Transducer Minimum Patient Weight S7-3t 3.5 kg (7.7 lb) X7-2t 30 kg (66 lb) EPIQ 7 User Manual 4535 617 25341... -
Page 225: Preparing Patients For Tee Studies
226. • Maintain a patent airway. For surgical patients, endotracheal intubation establishes a stable, patent airway before insertion of the transducer. For patients who are awake, carefully monitor the patient’s breathing at all times. EPIQ 7 User Manual 4535 617 25341... -
Page 226: Tip Fold-Over
• Prevent potential esophageal damage. Philips recommends that you stop TEE scanning and unplug the transducer from the system during periods of poor perfusion, circulatory arrest, or the hypothermic phase of open heart surgery. -
Page 227: Correcting Tip Fold-Over
Then straighten the tip and remove the transducer. If you cannot move the tip in any direction, Philips' consultants recommend that you X-ray the patient to evaluate the situation. You might also want to involve a gastroenterologist or anesthesiologist. -
Page 228: Tee Temperature Sensing
37°C (98.6°F) and the Patient Temp control is set above the actual patient temperature, then the system can underestimate the temperature of the distal tip. This can expose patients to excessive temperatures. EPIQ 7 User Manual 4535 617 25341... -
Page 229: Ensuring Safe Tee Temperatures
37°C (98.6°F). It resumes scanning when the temperature falls below 42°C (107.6°F) . If the patient temperature is higher than 37°C (98.6°F), the system shutdown temperature adjusts accordingly. You may need to restart the system by turning it EPIQ 7 User Manual 4535 617 25341... -
Page 230: Using The Temperature Display
1. Connect the transducer and select a preset. 2. Swipe to the second touch screen. 3. Touch Temp Display to display or hide the temperature display. 4. Touch Temp Units to switch the temperature scale between Fahrenheit and Celsius. EPIQ 7 User Manual 4535 617 25341... -
Page 231: Patient Temperature
Resuming Imaging After Auto-Cool If the distal tip temperature drops below 42.5°C (108.5°F), the system resumes imaging. If the Auto-Cool message persists longer than 1 minute or an error message appears, contact your Philips service representative. EPIQ 7 User Manual 4535 617 25341... -
Page 232: Patient Care After A Tee Study
It is especially important that the patient not ingest hot foods or fluids during this period. • Follow up with a call to the patient the day after the a study to make sure there are no complications. EPIQ 7 User Manual 4535 617 25341... -
Page 233: Tee Accessories And Supplies
Even anesthetized patients require bite guards to prevent damage to their teeth and to the transducer. Philips supplies disposable bite guards that are suitable for both awake and anesthetized patients. TEE Transducer Covers... -
Page 234: Tip Protectors
When not using a carrying case to transport a TEE transducer, use a tip protector on its distal tip. The tip protector helps prevent serious damage to the transducer lens. Philips supplies tip protectors designed for each of its TEE transducers. - Page 235 Microammeter to measure third-wire current, either directly from the chassis or through Z to the test electrode Line power source, either 110 Vac or 220 Vac Current caused by e and stray capacitance, and optionally Z EPIQ 7 User Manual 4535 617 25341...
- Page 236 You need the following equipment to perform the electrical safety check procedure: • Dempsey 432HD or 232D safety analyzer or equivalent • Philips 21110A Disinfection Basin or equivalent • Saline solution, 9 grams (0.3 oz) of salt to 1 liter (1 qt) of tap water, or one of the tested disinfectants listed in the “Transducer Care”...
-
Page 237: Testing Tee Transducer Leakage Current
A hole also allows invasion of organic material, making it difficult to completely disinfect all portions of the transducer. For these reasons, the transducer must be repaired before it is used. EPIQ 7 User Manual 4535 617 25341... -
Page 238: Tee Transducer References
Gussenhoven, Elma, et al. "Transesophageal Two-dimensional Echocardiography: Its Role in Solving Clinical Problems." Journal of the American College of Cardiology, 975-979, 1986. Radwin, Martin, et al. "Transesophageal Echocardiography: Intubation Techniques." Philips Application Note 5091-2804E, 1992. Urbanowitz, John H., et al. "Transesophageal Echocardiography and Its Potential for Esophageal Damage."... -
Page 239: Endocavity Transducers
60601-1. Nevertheless, always remove the transducer from the patient before defibrillation. Operators of Endocavity Transducers Philips endocavity transducers are designed for use under the guidance of physicians who are properly trained in endocavity ultrasound imaging techniques, according to currently approved relevant medical practices. -
Page 240: Preparing Transducers For Endocavity Use
To achieve good acoustic contact, make sure that the imaging surface is moist. NOTE Imaging improves with adequate coupling between the patient surface and the transducer- cover surface. Sterile water is a good acoustic-coupling agent during surgery. EPIQ 7 User Manual 4535 617 25341... -
Page 241: C10-3V Description
Length (handle to tip): 30 cm (12 in) • Radius of curvature: 11.5 mm (0.45 in) C10-4ec Description The C10-4ec transducer is described here. For more information on connecting, activating, caring for, and maintaining transducers, see the “Transducers” “Transducer Care” sections. EPIQ 7 User Manual 4535 617 25341... -
Page 242: Patient-Contact Parts
“FDA Medical Alert on Latex” on page NOTE The ultrasound system and transducers discussed here do not contain natural rubber latex that contacts humans. Natural rubber latex is not used on any Philips ultrasound transducers. EPIQ 7 User Manual 4535 617 25341... -
Page 243: Biopsy With Endocavity Transducers
For more information on the biopsy guide feature, see the “Biopsy Guides” section. NOTE CIVCO Medical Solutions supplies biopsy kits for Philips transducers that are biopsy capable. For information on proper attachment of a biopsy bracket, consult the manufacturer’s instructions. EPIQ 7 User Manual 4535 617 25341... - Page 244 Endocavity Transducers Biopsy with Endocavity Transducers EPIQ 7 User Manual 4535 617 25341...
-
Page 245: Biopsy Guides
You can use those guidelines to ensure that the needle or instrument is following the correct path. Starter kits, which include the biopsy guide or biopsy guide bracket and procedure kits, are available from Philips. Biopsy guides and supplies are available from CIVCO Medical Solutions (see “Supplies and Accessories” on page 21). -
Page 246: Biopsy Guideline Display
Biopsy Guideline Display WARNING Inspect all components and the transducer. Ensure that the biopsy guide you are using is the correct one for the transducer, the system, and system software. Your Philips representative can verify this information for you. WARNING Use only Philips-approved biopsy guides, transducers, covers, brackets, supplies, components, and accessories. -
Page 247: Displaying The Biopsy Guideline
NOTE The following procedure applies specifically to non-intervention applications. 1. Connect the transducer. 2. Touch a preset. 3. Touch the 2D tab. 4. Touch Biopsy. EPIQ 7 User Manual 4535 617 25341... -
Page 248: Moving The Biopsy Depth Cursor
Rotate the trackball to move the depth cursor along the guideline. The Bx measurement value changes to reflect the distance between the biopsy guide reference point origin and the depth cursor. Biopsy Depth EPIQ 7 User Manual 4535 617 25341... -
Page 249: Biopsy Guide Alignment
For the correct bracket, contact CIVCO Medical Solutions; see “Supplies and Accessories” on page 21.) • Needle guide (Contact CIVCO for the needle guide that fits your biopsy guide bracket.) • Sterile procedure kit (disposable) • New, straight, biopsy needle EPIQ 7 User Manual 4535 617 25341... -
Page 250: Verifying The Biopsy Guide Alignment
If the needle is still not following the expected path along the guideline, do not use the biopsy guide. Contact your Philips representative. 1. Attach the biopsy guide. Although some transducers require the use of a second transducer cover for biopsy procedures, a second transducer cover is unnecessary for this alignment verification. - Page 251 12. From the tip of the needle, measure a distance equal to the value noted in step 5. Mark this point on the needle. 13. Immerse the transducer no more than 6 mm (0.25 in) into the water bath. EPIQ 7 User Manual 4535 617 25341...
-
Page 252: Performing A Biopsy Procedure
The biopsy guideline is intended only to provide an indication of the expected path of the needle. Actual position must be verified by identifying the echoes from the needle. WARNING If the needle is not following the expected path, discontinue the procedure and contact your Philips representative. EPIQ 7 User Manual 4535 617 25341... - Page 253 When using a transducer with an infinite-angle biopsy guide, do not display a fixed-angle biopsy guideline. WARNING Philips does not recommend anatomical survey of the prostate with the biopsy guide attached. 1. Install the transducer cover and the biopsy guide according to the instructions provided with the biopsy guide.
-
Page 254: Biopsy Guide Maintenance
Biopsy Guide Maintenance WARNING The biopsy procedure kit components are disposable and must not be reused. For information and instructions on cleaning, disinfecting, and sterilizing the biopsy guide, see the instructions provided with the biopsy guide. EPIQ 7 User Manual 4535 617 25341... -
Page 255: Transducer Care
“Choosing the Correct Transducer-Care Method” on page 257. Also, see the disinfectant label instructions and the recommendations of the Association for Professionals in Infection Control, the U.S. Food and Drug Administration, and the U.S. Centers for Disease Control. EPIQ 7 User Manual 4535 617 25341... -
Page 256: Latex Product Alert
21). Latex Product Alert Philips ultrasound systems and transducers do not contain natural rubber latex that contacts humans. Natural rubber latex is not used on any ultrasound transducer, including transthoracic, intraoperative, and transesophageal echocardiography (TEE) transducers. It also is not used on Philips ECG cables for the products in this manual. -
Page 257: Transmissible Spongiform Encephalopathy
“Transducer, Cable, and Connector Cleaning” on page 258 “Transducer Disinfection” on page 263) Enters otherwise Intraoperative Critical Sterilization (see “Transducer, Cable, sterile tissue and Connector Cleaning” on page 258 “Transducer Sterilization” on page 273) EPIQ 7 User Manual 4535 617 25341... -
Page 258: Transducer, Cable, And Connector Cleaning
Attempting to disinfect a cable or connector by using a method other than the one included here can damage the device and voids the warranty. CAUTION Do not allow sharp objects, such as scalpels or cauterizing knives, to touch transducers or cables. EPIQ 7 User Manual 4535 617 25341... - Page 259 You can use an alcohol solution for disinfection on the connector only. Ensure the solution is only 70% alcohol or less. Solutions of more than 70% alcohol can cause product damage. CAUTION Do not use any alcohol or alcohol-based products on the cable or strain relief. EPIQ 7 User Manual 4535 617 25341...
-
Page 260: Cleaning A Transducer
Before cleaning a transducer, read the warnings and cautions in “Transducer, Cable, and Connector Cleaning” on page 258 “Transducer Care Safety” on page 255. 1. After every patient study, use a moist cloth to remove the ultrasound transmission gel from the transducer. EPIQ 7 User Manual 4535 617 25341... -
Page 261: Cleaning And Disinfecting Cables And Connectors
2. Push the connector cover, if available, onto the connector to protect against fluid splashing onto the contacts. 3. Orient the device and the connector so they are both facing up (strain reliefs on the bottom). EPIQ 7 User Manual 4535 617 25341... - Page 262 7. Air dry or towel dry with a sterile cloth according to the instructions on the disinfectant label. 8. Examine the device and cable for damage such as cracks, splitting, sharp edges, or projections. If damage is evident, discontinue use of the device and contact your Philips representative. EPIQ 7 User Manual 4535 617 25341...
-
Page 263: Transducer Disinfection
Transducer Disinfection To disinfect transducers, you can use either an immersion method or a wipe method with a disinfectant recommended by Philips Ultrasound. Use the method that is biologically appropriate, as described in “Choosing the Correct Transducer-Care Method” on page 257. -
Page 264: Isopropyl Alcohol Restrictions
Do not use isopropyl alcohol on TEE transducers, except for the handle. Isopropyl alcohol can cause damage to these parts of the transducer. This damage is not covered by the warranty or your service contract. EPIQ 7 User Manual 4535 617 25341... - Page 265 Connector Cleaning” on page 258. 2. After cleaning, wipe or spray the transducer and cable with a low-level disinfectant. Allow for the manufacturer’s recommended contact time. For a list of compatible disinfectants, “Disinfectants Compatibility” on page 276. EPIQ 7 User Manual 4535 617 25341...
-
Page 266: Transducer Disinfection By Immersion
If you use cleaning wipes, it may be unnecessary to rinse the transducer with water. Always follow your product label recommendations. 3. Examine the device and cable for damage such as cracks, splitting, sharp edges, or projections. If damage is evident, discontinue use of the device and contact your Philips representative. Transducer Disinfection by Immersion Methods for disinfecting transesophageal (TEE) and non-TEE transducers differ. -
Page 267: Minimizing The Effects Of Residual Disinfectant
Residual OPA on TEE transducers may cause temporary staining of the mouth and lip area and irritation or chemical burns of the mouth, throat, esophagus, and stomach. To minimize the effects from residual OPA, or any other disinfectant, Philips recommends the following: WARNING Follow the disinfectant manufacturer’s instructions very carefully. -
Page 268: Disinfecting Non-Tee Transducers By Immersion
5. Examine the transducer for damage, such as cracks, splitting, fluid leaks, or sharp edges or projections. If damage is evident, discontinue use of the transducer and contact your Philips representative. -
Page 269: Cautions For Tee Transducer Disinfection
CAUTION Do not bend the shaft into a circle with a diameter of less than 0.30 m (1 ft). CAUTION Do not use bleach on the transducer and shaft. EPIQ 7 User Manual 4535 617 25341... -
Page 270: Disinfecting Tee Transducers By Immersion
255, and “Minimizing the Effects of Residual Disinfectant” on page 267. Disinfection by immersion is the accepted method of infection control for transesophageal transducers. Philips recommends that a protective transducer cover be used during studies. EPIQ 7 User Manual 4535 617 25341... - Page 271 8. Lightly wipe only the steering mechanism and handle with a pad moistened with rubbing alcohol (70% isopropyl alcohol), or use approved cleaners as directed on the handle and steering mechanism. 9. Hang the transducer on a wall-mounted rack, and let it air dry. EPIQ 7 User Manual 4535 617 25341...
- Page 272 Immersing TEE Transducers Immerse this section only, up to 5.1 cm (2 in) from the handle’s strain relief. Maximum allowable immersion depth; you are not required to immerse to this depth if it is unnecessary. EPIQ 7 User Manual 4535 617 25341...
-
Page 273: Disinfecting Tee Transducers With An Aer
“Transducer Disinfection” on page 263. WARNING Always use protective eyewear and gloves when cleaning, disinfecting, or sterilizing any equipment. WARNING In intraoperative applications, sterilized transducers should be used with sterile gel and a sterile transducer cover. EPIQ 7 User Manual 4535 617 25341... - Page 274 CAUTION Use only liquid solutions to sterilize transducers. Using autoclave, gas (EtO), or other methods not approved by Philips will damage your transducer and void your warranty. CAUTION Do not allow sharp objects, such as scalpels and cauterizing knives, to touch transducers or cables.
-
Page 275: Sterilizing Transducers By Immersion
7. Examine the transducer for damage, such as cracks, splitting, fluid leaks, or sharp edges or projections. If damage is evident, discontinue use of the transducer, and contact your Philips representative. EPIQ 7 User Manual 4535 617 25341... -
Page 276: Disinfectants Compatibility
“Disinfectants and Cleaning Solutions Compatibility Table” on page for the chemical compatibility of disinfectants and cleaners with specific transducers. In addition, the table indicates if a device can be sprayed or wiped only, or if it can be soaked. EPIQ 7 User Manual 4535 617 25341... -
Page 277: Disinfectant Types
The level of disinfection required for a device is dictated by the type of tissue it will contact during use. Ensure the disinfectant type is appropriate for the type of transducer and the transducer application. For information on the levels of disinfection requirements, see EPIQ 7 User Manual 4535 617 25341... -
Page 278: Factors Affecting Disinfectant Efficiency
Disinfectants and Cleaning Solutions Compatibility Table The following table lists the disinfectants and cleaning solutions that are compatible with the transducers available for your ultrasound system. CAUTION Do not use hydrogen-peroxide products on Doppler transducers. EPIQ 7 User Manual 4535 617 25341... - Page 279 “Disinfecting TEE Transducers with an AER” on page 273. Based on material compatibility testing and product use profile and active ingredients, Philips has approved for use the following types of low-level disinfectants used as a spray or wipe for surface (skin contact) and transvaginal or transrectal probes: •...
- Page 280 Glutaraldehyde T,C Aidal Plus Soak Glutaraldehyde T,C Alkaspray Spray/ Alcohol, Wipe Alkylamine Ampholysine Spray/ Biguanide/ Basique Wipe Quat. Ammonia Aniosept Activ Soak Peracetic Acid Anioxyde 1000 FR Soak Peracetic Acid Antigermix AE1 FR UV-C System EPIQ 7 User Manual 4535 617 25341...
- Page 281 Glutaraldehyde T,C Dispatch Spray/ Sodium Wipe Hypochlorite Endo FC Soak Glutaraldehyde T,C Endosporine Soak Glutaraldehyde T,C Enzol Pre- Enzymes cleaner Epizyme Rapid Pre- Enzymes cleaner Gigasept FF Soak Succinic (neu) dialdehyde Gigasept PAA Soak Peracetic EPIQ 7 User Manual 4535 617 25341...
- Page 282 Glutaraldehyde T,C MedDis Soak Quat. Ammonia, Sulfamic Acid Medistel Soak Quat. Ammonia, Sulfamic Acid MetriCide Soak Glutaraldehyde T,C MetriCide 28 Soak Glutaraldehyde T,C MetriCide OPA Soak Ortho- Plus phthalaldehyde MetriCide Plus Soak Glutaraldehyde T,C EPIQ 7 User Manual 4535 617 25341...
- Page 283 Peracetic Acid Powder Perastel Soak Peracetic Acid (formerly Perascope) PerCept Wipes CA Wipe Hydrogen T,C,H T,C,H Peroxide Phagocide D Soak Glutaraldehyde T,C Phagozyme ND FR Pre- Enzymes, Quat. cleaner Ammonium Pro-Cide Soak Glutaraldehyde T,C EPIQ 7 User Manual 4535 617 25341...
- Page 284 Quat. T,C,H T,C,H Wipe Ammonia Salvanios pH Spray/ Quat. T,C,H T,C,H Wipe Ammonia Sani-Cloth Wipe Quat. T,C,H T,C,H Active Ammonia Sani-Cloth AF Wipe Quat. T,C,H T,C,H Ammonia Sani-Cloth AF3 Wipe Quat. T,C,H T,C,H Ammonia EPIQ 7 User Manual 4535 617 25341...
- Page 285 T-Spray II Spray/ Quat. T,C,H T,C,H Wipe Ammonia Tristel Duo Foam/ Chlorine Wipe Dioxide Tristel Fuse for Stella Chlorine Instruments System Dioxide Tristel Wipe Chlorine Sporicidal Dioxide Wipes Trophon EPR Trophon Hydrogen Peroxide Reproces EPIQ 7 User Manual 4535 617 25341...
- Page 286 C9-2 D5cwc L15-7io S12-4 C10-3v L18-5 C10-4ec Vaposeptol Spray/ Alcohol, Wipe Biguanide Vespore Soak Glutaraldehyde T,C Virox 5 RTU Wipe Hydrogen T,C,H T,C,H Peroxide Wavicide -01 Soak Glutaraldehyde T,C Wip'Anios Wipe Alohol, Quat. Ammonia EPIQ 7 User Manual 4535 617 25341...
-
Page 287: System Maintenance
Maintenance should be performed regularly and as needed. Because the system is a piece of medical equipment that contains several circuit boards, extensive service diagnostics, and complex operating software, Philips recommends that only trained personnel service the system. Cleaning and Maintaining the System It is important to clean and maintain the ultrasound system and peripherals. - Page 288 Do not use strong solvents, common cleaning products, or abrasive cleansers, which will damage the system surfaces. CAUTION Do not touch the displays with sharp objects or use paper towels to clean them, which may damage them. EPIQ 7 User Manual 4535 617 25341...
-
Page 289: Disinfectants For System Surfaces
• Sani-Cloth HB (quaternary ammonium-based) • Sani-Cloth Plus (quaternary ammonium/isopropyl alcohol-based) • 0.5% Accelerated hydrogen peroxide Other products that are based on quaternary ammonium compounds (QUAT) or QUAT/ isopropyl alcohol can also be used in disinfecting system surfaces. EPIQ 7 User Manual 4535 617 25341... -
Page 290: Disinfecting System Surfaces
4. Wipe system surfaces with the disinfectant, following disinfectant label instructions for wipe durations, solution strengths, and disinfectant contact duration. Ensure the solution strength and duration of contact are appropriate for the intended clinical application. EPIQ 7 User Manual 4535 617 25341... -
Page 291: System Control Panel Maintenance
5. Air dry or towel dry with a sterile cloth according to the instructions on the disinfectant label. 6. Because the system is a piece of medical equipment that contains several circuit boards, extensive service diagnostics, and complex operating software, Philips recommends that only trained personnel service the system. System Control Panel Maintenance The system control panel and other outer surfaces are most likely to be affected by liquid spills and other materials such as excessive amounts of gel. - Page 292 If the filter is worn out, or cannot be cleaned, replace it with a spare. 4. To reinstall the filter, slide the filter into place at the bottom of the left side of the system. EPIQ 7 User Manual 4535 617 25341...
-
Page 293: Specifying And Resetting The Air Filter Maintenance Status
5. To reset the interval after cleaning the filter, under Filter Cleaned, click Done. 6. To exit SupportConnect, touch Close. Transducer Maintenance Transducers require proper care, cleaning, and handling. Reasonable care includes inspection, cleaning, and disinfection or sterilization, as necessary. EPIQ 7 User Manual 4535 617 25341... -
Page 294: Printer And Dvd Recorder Maintenance
Printer and DVD Recorder Maintenance Inspect the transducer cable, case, and lens before each use. Check for cracks or other damage that jeopardizes the integrity of the transducer. Report any damage to your Philips customer service representative, and discontinue use of the transducer. -
Page 295: Troubleshooting
If you encounter difficulty in the operation of the system, use the information here to help correct the problem. If the problem is not covered here, contact your Philips representative. The troubleshooting table contains a list of symptoms and the actions to take to correct the problems. -
Page 296: Error Messages
The system displays error messages in response to operating or error conditions detected by the system. The error messages must be noted and reported to your Philips representative, who may ask you to run the system test (see “Testing the System” on page 297). -
Page 297: Testing The System
6. In the System Test area, click Run. The system displays a message when the test is complete, indicating whether the test passed or failed. 7. If the test fails, contact your Philips service representative for instructions about how to export the log files. - Page 298 System Maintenance For Assistance EPIQ 7 User Manual 4535 617 25341...
-
Page 299: Specifications
Specifications Specifications Philips reserves the right to change specifications contained herein or discontinue manufacture at any time without prior notice. Current specifications are supplied with each system purchased or are available from your Philips representative. Dimensions • Width: 59.2 cm (23.3 in) •... - Page 300 • Wireless network (IEEE 802.11 b/g) • USB 3.0 devices at USB 2.0 speeds • Digital Navigation Link (DNL) Modality Interface DICOM standard. DICOM conformance statements for Philips products are available at this website: www.healthcare.philips.com/us/about/connectivity/dicom_conformance_main.wpd Physio • ECG amplitude range between 0.15 mV and 5.0 mV •...
- Page 301 • Operating: 525 mmHg to 795 mmHg (700 hPa to 1,060 hPa) • Storage: 427 mmHg to 795 mmHg (570 hPa to 1,060 hPa) Humidity Limits • Operating: 15% to 80% • Storage: 15% to 95% EPIQ 7 User Manual 4535 617 25341...
-
Page 302: Safety And Regulatory Requirements
Compliance Philips products comply with relevant international and national standards and laws. Information on compliance will be supplied by your local Philips representative, or the manufacturer, on request. EPIQ 7 User Manual 4535 617 25341... -
Page 303: Index
243 applying, 50 guideline display, 247 education program, 50 maintaining guides, 254 example, 50 procedure, 252 related guidance documents, 60 safety precautions, 46, 245 Alcohol, restricted use on transducers, 264 Biopsy guides, 245 EPIQ 7 User Manual 4535 617 25341... - Page 304 34, 36, 106, disinfectants, 276 261, 287 gels, 184 Calculations, 167 media, 143 Capabilities, system, 83 product, 37 Capillary rupture, 46 Compliance, electromagnetic Capturing approved accessories, 73 images, 165 approved cables, 72 loops, 165 EPIQ 7 User Manual 4535 617 25341...
- Page 305 Default transducer and preset, 148, 174 trackball, 126 Defibrillation, electrical safety, 30, 33 X7-2t transducer, 211, 213 Deflection controls Controls affecting MI and TI S7-3t transducer, 220 direct controls, 50 TEE transducer, 207 indirect controls, 50 EPIQ 7 User Manual 4535 617 25341...
- Page 306 264 receptacles, 98, 143 Display dimming, 119 signal requirements, 70 Display, avoiding damage, 36 Ejecting a CD, 144 Disposable drape, 192, 234 Ejecting a DVD, 144 Disposal of system, 22 EPIQ 7 User Manual 4535 617 25341...
- Page 307 Explosion hazard, 16, 29 types, 77 External monitor port, 95 Electromagnetism, 32 External printers, 102, 103 Electrostatic discharge (ESD), 70 Electrosurgical units (ESUs), 32 False needle image, 252 Emergency studies Fire hazard, 31 about, 138 EPIQ 7 User Manual 4535 617 25341...
- Page 308 31 options, 85 IEC symbols, 38 Imaging display Help, 18 image area, 136 Hiding Doppler minus sign, 151 patient bar, 136 Hiding Doppler signs, 151 tools and icons, 138 Hiding, patient name/ID, 157 EPIQ 7 User Manual 4535 617 25341...
- Page 309 189, 204 intraoperative transducers, 193, 196, 197 preparing for imaging, 191 TEE transducers, 204, 206 transducer covers, 191 Live images iSCAN printing, 163 status, 129 Loading Isolation transformers, 31, 101 CDs, 144 EPIQ 7 User Manual 4535 617 25341...
- Page 310 Modality interface specification, 299 biopsy depth cursor, 248 Modality Worklist distance, 168 searching for exams, 157 Doppler distance (velocity), 169 selecting patient, 156 labeled, obtaining, 169 Monitor live Doppler velocity, 169 adjustments, 116 M-mode, 169 description, 90 EPIQ 7 User Manual 4535 617 25341...
- Page 311 On/Off control, system power, 39, 113 Patient ID, hiding, 157 Operating notes, 17 Patient name, hiding, 157 Operating temperature, 36, 299 Patient temperature Operator safety, 65 entering, 231 Options overview, 231 connectivity, 85 Perchlorate information, 22 imaging, 85 EPIQ 7 User Manual 4535 617 25341...
- Page 312 149 options, 86 deleting, 149 Quick Save presets, 148 loading, 150 overview, 147 Radio-frequency emissions, 69 Quick Save, 148 Receptacles selecting, 143 ECG, 98 setting default, 148, 174 physio, 98 Pressure limits, 299 EPIQ 7 User Manual 4535 617 25341...
- Page 313 34, 106 array rotation, 221, 222 operator, 65 deflection controls, 218 output display, 54 description, 216 pacemakers, 30 manipulating the tip, 220 patient, intraoperative transducers, 188 using, 217 symbols, 38 Safety, 27 TEE transducers, 200 EPIQ 7 User Manual 4535 617 25341...
- Page 314 Storage, data, 93, 143 Solutions, cleaning, 277 Storing transducers, 185 Solvents, 36 daily and long-term, 186 Specifications for transport, 185 data connections, 299 Stress Echocardiography, 87 dimensions, 299 Supplies, 21 electrical parameters, 299 Surfaces, disinfecting system, 289 EPIQ 7 User Manual 4535 617 25341...
- Page 315 225 patient safety, 200 patient care, 232 patient temperature, 231 patient selection, 224 patient-contact parts, 189, 204 preparing patients, 225 recognizing tip fold-over, 226 special considerations, 223 reducing risks, 206 TEE transducers references, 238 EPIQ 7 User Manual 4535 617 25341...
- Page 316 Thermal index (TI), 54 Transducers controls affecting, 58 affecting TI and MI values, 58 display precision and accuracy, 54 care, 178, 255, 293 displays, 54 cleaning, 255 modes of operation, 54 cleaning procedures, 258 EPIQ 7 User Manual 4535 617 25341...
- Page 317 Upgrades, system, 21 setting default, 148, 174 USB devices sterilizing, 255, 273 location, 145 storage, daily and long-term, 186 overview, 143 storage, for transport, 185 warnings and cautions, 145 storing, 185 USB ports, 95 transesophageal, 199 EPIQ 7 User Manual 4535 617 25341...
- Page 318 16, 27 Waste Electrical and Electronic Equipment, European Union Directive, 22 Website, Philips, 22 WEEE recycling information, 22 Wheel brakes, 34, 99 Wheels, 34, 106 Worklist searching for exams, 157 selecting patient, 156 EPIQ 7 User Manual 4535 617 25341...
Need help?
Do you have a question about the EPIQ 7 and is the answer not in the manual?
Questions and answers
In Philips Epiq7C , I couldn’t do end exam patient list when the user did appended. I would like to know how can I do end exam for the appended patient list.
How to identify RT3D TEE image size