Table of Contents
Advertisement
Quick Links
Advertisement
Table of Contents

Subscribe to Our Youtube Channel
Related Manuals for wtw photoLab 6100 VIS


Summary of Contents for wtw photoLab 6100 VIS
- Page 1 OPERATING MANUAL ba75847e06 06/2013 ® photoLab 6100 VIS SPECTROPHOTOMETER...
- Page 2 For the most recent version of the manual, please visit www.WTW.com. Copyright © Weilheim 2013, WTW GmbH Reproduction in whole - or even in part - is prohibited without the express written permission of WTW GmbH, Weilheim. Printed in Germany. ba75847e06 06/2013...
-
Page 3: Table Of Contents
® photoLab 6100 VIS Contents ® photoLab 6100 VIS - Contents Overview ........7 Overview of the instrument . - Page 4 ® Contents photoLab 6100 VIS Zero adjustment ....... 39 Measuring in Concentration mode ....44 4.5.1 Measuring cell tests with barcode .
- Page 5 ® photoLab 6100 VIS Contents 4.11.4 Saving measurement datasets manually ..122 4.11.5 Saving measurement datasets automatically . 124 4.11.6 Displaying measurement data memory ..125 4.11.7 Filtering measurement datasets ... 127 4.11.8 Inverting filters .
- Page 6 ® Contents photoLab 6100 VIS Maintenance and cleaning ..... 169 Replacing the lamp ......169 Exchanging the buffer batteries .
-
Page 7: Overview
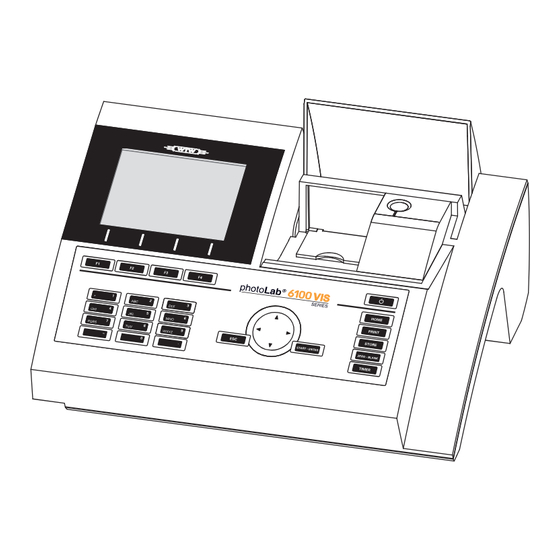
® photoLab 6100 VIS Overview Overview Overview of the instrument Front of the instrument 1 Display 2 Keypad 3 Shaft for rectangular cells 4 Turn-up lid 5 Shaft for round cells 6 Cell shaft cover Fig. 1-1 Front of the instrument with operating elements Socket field on the rear panel 7 Connection for power pack... -
Page 8: Keypad
® Overview photoLab 6100 VIS Keypad Overview 1 Function keys F1 to F4 (function menu-depending) 2 Alphanumeric keypad 3 Keys with dedicated function Fig. 1-3 Keypad Key functions The keys on the right side of the keypad have the following functions: Designation Functions <ON/OFF>... - Page 9 ® photoLab 6100 VIS Overview Designation Functions <TIMER> – Opens the menu, Timer. <ESC> – Cancels the running action. Entries that have not yet been accepted are discarded. – Switches to the next higher menu level. <START·ENTER> – Starts an action (e.g. measure- ment) –...
-
Page 10: Display
® Overview photoLab 6100 VIS Display Display elements Concentration 16.04.07 9:52 1.92 mg/l 18: 14752 10 mm 0.05 - 3.00 mg/l Setup Citation form Unit Method list 1 Status line (current state, date and time) 2 Display range for menus and measurement results 3 Function keys menu Fig. -
Page 11: Safety Instructions
® photoLab 6100 VIS Safety instructions Safety instructions This operating manual contains basic instructions that you must follow during the commissioning, operation and maintenance of the photometer. Conse- quently, all responsible personnel must read this operating manual carefully before working with the meter. Keep this operating manual in the vicinity of the meter. -
Page 12: Authorized Use
® Safety instructions photoLab 6100 VIS Authorized use The authorized use of the photometer consists exclusively of the carrying out of photometric measurements according to this operating manual. Follow the technical specifications of the cells in chapter 7 T . Any other ECHNICAL DATA use is considered to be unauthorized. -
Page 13: Handling Of Hazardous Substances
6100 VIS Safety instructions Handling of hazardous substances When developing test sets, WTW carefully sees that the tests can be carried out as safely as possible. Some hazards by dangerous substances, however, cannot always be avoided. WARNING Improper handling of certain reagents can cause damage to your health. - Page 14 ® Safety instructions photoLab 6100 VIS ba75847e06 06/2013...
-
Page 15: Commissioning
® photoLab 6100 VIS Commissioning Commissioning Scope of delivery ® Spectrophotometer photoLab 6100 VIS Power pack connection cable Buffer batteries 4 x AA alkaline manganese (Mignon) Zero cell (16 mm, round) Short instructions CD-ROM with –... -
Page 16: General Notes On Handling
® Commissioning photoLab 6100 VIS General notes on handling ® The photoLab 6100 VIS photometer is an optical precision meter. There- fore, it should always be handled with care, especially in mobile use. Always protect the meter from conditions that could damage the mechanical, optical and electronic components. -
Page 17: Initial Commissioning
® photoLab 6100 VIS Commissioning Initial commissioning Perform the following activities: Insert the buffer batteries (see section 3.3.1) Connect the power supply (see section 3.3.2) Switch on the photometer (see section 3.3.3) Set the language (see section 3.3.4) ... -
Page 18: Connecting The Power Supply
® Commissioning photoLab 6100 VIS 3.3.2 Connecting the power supply The power is supplied via the enclosed plug-in power pack. The power pack supplies the photometer with low voltage (12 VDC). CAUTION The line voltage of the usage location must fulfill the specifications stat- ed on the power pack (the specifications are also given in chapter 7 ). -
Page 19: Switching On The Photometer For The First Time
® photoLab 6100 VIS Commissioning 3.3.3 Switching on the photometer for the first time During the initial commissioning, the photometer automatically guides you through the setting of the meter language, date and time after switching on (see following sections). 1 Press <ON/OFF>. Language 16.04.07 9:52 Englisch ✓... -
Page 20: Setting The Date And Time
® Commissioning photoLab 6100 VIS 3.3.5 Setting the date and time During the initial commissioning, the instrument automatically guides you to the setting of the time and date after the setting of the language. The Date/Time menu is open. Date/Time 16.04.07 9:52 Date 16.04.2007... -
Page 21: Connecting Optional Accessories
® photoLab 6100 VIS Commissioning Connecting optional accessories 3.4.1 Communication interfaces Connections RS232 USB-A USB-B figure 3-1 Communication interfaces on the rear panel You can connect the following accessories to the photometer: PC (see section 3.4.2) Printer (see section 3.4.2) ... -
Page 22: Pc/Printer
® Commissioning photoLab 6100 VIS 3.4.2 PC/printer PC and printer can be connected to the photometer as follows: Interface Printer Functions RS232 The data is sent to the interface with <PRINT>. If a printer is connected, the data is printed out. -
Page 23: Usb Memory Device
® photoLab 6100 VIS Commissioning Operation at RS232 Connect the RS232 interface to the devices as follows: PC: with a commercially available zero modem cable Printer: with a commercially available RS232 printer cable The cables are available in specialized computer shops. Set up the following interface data at the PC/printer: Baud rate Selectable from 1200, 2400, 4800, 9600, 19200... -
Page 24: Pc Keyboard
® Commissioning photoLab 6100 VIS 3.4.4 PC keyboard With the PC keyboard it is possible to enter letters, e.g. to assign names for identification (ID). In addition, the following keys of the PC keyboard are assigned with the fol- lowing functions of the photometer: PC keyboard Photometer Enter... -
Page 25: Operation With The 12 V Adapter Ada 12V
® photoLab 6100 VIS Commissioning 3.4.6 Operation with the 12 V adapter ADA 12V ® With the ADA 12V you can operate the photoLab 6100 VIS spectrophotom- eter on the move and independent of the local power supply. To do so, a 12 V power supply such as a commercial 12 V portable power source or a 12 V car battery is required. - Page 26 ® Commissioning photoLab 6100 VIS ba75847e06 06/2013...
-
Page 27: Operation
® photoLab 6100 VIS Operation Operation Switching on or off the photometer Switching on 1 Switch the photometer on with <ON/OFF>. The display shows Self test 16.04.07 9:52 – the Self test dialog (if the user management is not active). Please make sure no cell is inserted and the cover is closed. - Page 28 ® Operation photoLab 6100 VIS The self-test includes: Self test 16.04.07 9:52 – the test of the memory, proces- Keep cover closed sor, internal interfaces, System test filter and lamp Filter test Lamp test – a calibration for each wave- Wavelength calibration length After the self-test is completed,...
- Page 29 ® photoLab 6100 VIS Operation AutoCheck With the AutoCheck function the photometer checks and calibrates the opti- cal measuring unit. The AutoCheck is automatically carried out if measure- ment settings were changed since the last measurement, e.g.: if a different wavelength was selected or ...
-
Page 30: General Operating Principles
® Operation photoLab 6100 VIS General operating principles 4.2.1 Navigating with function keys and menus Main menu Press < > twice Function key Moves the selection down menu by 2 positions Press the F1 Funktion key ("Settings") Current selection in reverse video Opens the "Settings"... - Page 31 ® photoLab 6100 VIS Operation Use of the function The function keys F1 to F4 are below the display. Their functions change keys depending on the operating situation and mode. The current functions are displayed in the function key menu at the bottom edge of the display. Apart from navigation, the function keys are also used for other operations: ...
-
Page 32: Display Of Navigation Paths In Short Form
® Operation photoLab 6100 VIS 4.2.2 Display of navigation paths in short form In this operating manual, the introductory navigation steps leading to individ- ual menus or dialogs are clearly shown in a gray box. The box indicates a section of the menu tree. Starting point of the description is always the main menu, which can be reached with the <HOME>... -
Page 33: Entry Of Numerals, Letters And Characters
® photoLab 6100 VIS Operation Note The complete menu tree is given in the appendix of this operating manual. 4.2.3 Entry of numerals, letters and characters Numerals, letters, punctuation marks and special characters are entered with the alphanumeric keypad of the meter or using an external keyboard. Entries are required in operating situations such as the following: ... - Page 34 ® Operation photoLab 6100 VIS Note During mere number entries (such as entering a wavelength), the keys of the alphanumeric keypad are assigned to the respective numeral only. Each key- pressing directly enters the numeral (like a pocket calculator). Special characters Special characters are entered with the <1/*>...
-
Page 35: Detailed Operating Example: Changing The Language
® photoLab 6100 VIS Operation 4.2.4 Detailed operating example: Changing the language 1 Call up the main menu with the <HOME> key. 2 Open the General setup menu with the F1 function key [Setup]. 3 Using <><> select the Lan- General setup 16.04.07 9:52 Language... -
Page 36: Photometer Settings And System Administration
® Operation photoLab 6100 VIS Photometer settings and system administration The general photometer settings are done in the <HOME> -> General setup menu. The general photometer settings comprise: Language (see section 4.3.1) Date/time (see section 4.3.2 and section 4.2.4) ... -
Page 37: Date/Time
® photoLab 6100 VIS Operation 4.3.2 Date/Time The date format is set automatically with the language setting. According to the locally usual version, the date format is displayed in the order, Day.Month.Year (DD.MM.YY) or Month/Day/Year (MM/DD/YY or MM.DD.YY). <HOME> [General setup] –... -
Page 38: Display Settings
® Operation photoLab 6100 VIS 4.3.3 Display settings Here you can adjust the display contrast to the lighting conditions. <HOME> [General setup] – Display settings 1 Select and confirm Contrast. Display settings 16.04.07 9:52 Contrast 50 % A slide control for the display con- trast appears. -
Page 39: Zero Adjustment
Kinetics. With a zero adjustment, the absorbance of a cell filled with distilled water ("zero cell") is measured and stored. Factory zero For all measurements with WTW test sets (Concentration mode), a factory adjustment for zero adjustment is available in the delivery condition. We recommend replac- concentration ing it with a zero adjustment of your own. - Page 40 8 A are especially adapted CCESSORIES AND OPTIONS to the WTW test set program. General requirements of the cells are given in chapter 7 T . Note that the spectral transparency of the cell ECHNICAL DATA must be suitable for the intended application (example, quartz cell for UV range).
- Page 41 ® photoLab 6100 VIS Operation Carrying out a zero The zero adjustment takes place similarly in the Concentration, Absorbance adjustment / % Transmission, Special / Multi wavelengths and Kinetics modes. 1 In the respective mode, press the <ZERO·BLANK> key. 2 In Concentration mode only: Concentration 16.04.07 9:52 Select and confirm Zero adjust-...
- Page 42 ® Operation photoLab 6100 VIS Rectangular cell: Open the inner turn-up lid. Zero cell (H O dist.) Insert the rectangular cell verti- cally so it touches the bottom and left edge of the cell shaft. The opaque sides of the rectangular cell must point to the front and back.
- Page 43 ® photoLab 6100 VIS Operation Validity of the zero The data of the zero adjustment is stored in the photometer separately for adjustment each cell type. As long as the data is valid, it is automatically used again after a temporary change to a different cell type. The validity depends on the respective mode: Mode Validity of the zero adjustment...
-
Page 44: Measuring In Concentration Mode
® Operation photoLab 6100 VIS Measuring in Concentration mode 4.5.1 Measuring cell tests with barcode <HOME> Concentration Inserting a cell with barcode starts Concentration 16.04.07 9:52 a measurement. Please select method for measuring or insert a barcoded cell or insert AutoSelector. Setup Method list Last method... -
Page 45: Measuring Reagent Tests With Autoselector
® photoLab 6100 VIS Operation 4.5.4). 4.5.2 Measuring reagent tests with AutoSelector <HOME> Concentration The method is selected by insert- Concentration 16.04.07 9:52 ing the AutoSelector. Please select method for measuring or insert a barcoded cell or insert AutoSelector. Setup Method list Last method New Method... -
Page 46: Measuring Reagent-Free Tests And User-Defined
® Operation photoLab 6100 VIS 3 Open the inner turn-up lid. 4 Insert the rectangular cell verti- cally so it touches the bottom and left edge of the cell shaft. The opaque sides of the rectangular cell must point to the front and back. - Page 47 ® photoLab 6100 VIS Operation 1 Select the method manually Concentration 16.04.07 9:52 (see section 4.5.5). Please select method for measuring or insert a barcoded cell or insert AutoSelector. Setup Method list Last method New Method The photometer is ready to mea- Concentration 16.04.07 9:52 sure.
- Page 48 ® Operation photoLab 6100 VIS Rectangular cell: Open the inner turn-up lid. Insert the rectangular cell verti- cally so it touches the bottom and left edge of the cell shaft. The opaque sides of the rectangular cell must point to the front and back.
-
Page 49: Exceeding The Upper Or Lower Limits Of The Measuring Range
® photoLab 6100 VIS Operation 4.5.4 Exceeding the upper or lower limits of the measuring range Measured value display if the measured value is outside the measuring range: Range Display Example: MR: 10 - 150 mg/l LL < MV < UL Measured value UL <... -
Page 50: Selecting A Method Manually
® Operation photoLab 6100 VIS 4.5.5 Selecting a method manually Selecting the The method last used is immedi- method last used <HOME> ately selected. Concentration – [Last method] Selecting a method from the Method list <HOME> Concentration – [Method list] The list of methods is displayed. -
Page 51: Settings For Concentration Mode
® photoLab 6100 VIS Operation Search function Search for a character string: Select method (last used) 16.04.07 9:52 Enter the character string to be searched for in the search window 14540 10 - 150 mg/l 14541 25 - 1500 mg/l with <A...9>. - Page 52 ® Operation photoLab 6100 VIS Overview of the Menu item Explanation settings Dilution Here you can set the dilution prior to measuring if you want to use a diluted sample. In the measured value display, the dilution is indi- cated in the form [1 + x] (parts sample + parts dis- tilled water).
-
Page 53: Measuring Diluted Samples
® photoLab 6100 VIS Operation 4.5.7 Measuring diluted samples If the concentration of a sample exceeds the measuring range of a method, you can specifically dilute the sample so that the concentration of the diluted sample is in the measuring range of the method. Thus a valid measurement is possible. - Page 54 ® Operation photoLab 6100 VIS 1 Open the setting menu with Concentration 16.04.07 9:52 [Setup]. 2 Select and confirm Dilution. The input field for the dilution pops Sample + distilled water 1 + _ 3 Enter and confirm the dilution (<0...9>).
-
Page 55: Sample Blank Value
® photoLab 6100 VIS Operation 4.5.8 Sample blank value By measuring and using a sample blank value, measurement errors due to coloring and turbidity of the sample matrix can be eliminated to a large extent. The sample blank value is a characteristic of the sample (coloration) to be currently determined. - Page 56 ® Operation photoLab 6100 VIS The photometer is ready to mea- Concentration 16.04.07 9:52 sure. 1 Open the setting menu with [Setup]. To start measurement, insert cell or press <START/ENTER> 2 Select and confirm Sample blank value. 3: A6/25 16 mm 0.20 - 8.00 mg/l Setup Citation form...
-
Page 57: Reagent Blank Value
Factory and user- With photometric concentration determination, the reagent blank value is a defined reagent constant. The method data for all measurements with WTW test sets (Con- blank values centration mode) include an exactly determined reagent blank value. This value is overwritten if you measure the reagent blank value yourself (setting, User-defined blank value, see section 4.5.6). - Page 58 ® Operation photoLab 6100 VIS User-defined For user-defined methods, you can activate the reagent blank value function methods as follows only: Entry type Function type Reagent blank value possible? Entry of a function Linear (with and without entering the ordi- Nonlinear nate intercept) Entry of value pairs or measure-...
- Page 59 ® photoLab 6100 VIS Operation Measuring the <HOME> reagent blank value Concentration Inserting a cell with barcode starts Concentration 16.04.07 9:52 a measurement. Please select method for measuring or insert If a cell without barcode is used: a barcoded cell or insert AutoSelector. Select the method manually (see section 4.5.5).
- Page 60 ® Operation photoLab 6100 VIS 3 Insert the cell with the blank sam- Blank value 16.04.07 9:52 ple. The first single measurement for the reagent blank value takes To start measurement, insert cell or press <START/ENTER> place. The following data is displayed as the result: 3: A6/25 16 mm...
-
Page 61: User Calibration (Standard Adjustment)
® photoLab 6100 VIS Operation 4.5.10 User calibration (standard adjustment) Some methods for concentration measurement provide the option to opti- mize the original calibration stored with the method by means of a user cali- bration. When creating a used-defined method you can also allow a user calibration (see section 4.5.12). - Page 62 ® Operation photoLab 6100 VIS Carrying out a user <HOME> calibration Concentration Select the method manually Concentration 16.01.12 9:52 (see section 4.5.5). If there are already data for the zero adjustment, reagent blank Please select method for measuring or insert value or a user calibration avail- a barcoded cell or insert AutoSelector.
- Page 63 ® photoLab 6100 VIS Operation 5 Insert the cell with the relevant Calibrate the method 16.01.12 9:52 standard or the reagent blank value (for E0). The first single measurement for To start measurement, insert cell or press <START/ENTER> the calibration is carried out. The following data is displayed as the result: 7302: Cu-1...
- Page 64 ® Operation photoLab 6100 VIS If necessary, display the list with Calibrate the method 16.01.12 9:52 the value pairs of nominal value and absorbance with Calibration The calibration has been successfully completed. data. Protocol ID: Date: 16.01.2012 If necessary, display the calibra- User: admin tion curve in the window of the...
- Page 65 ® photoLab 6100 VIS Operation The photometer is ready to mea- Calibrate the method 16.01.12 9:52 sure. [Cal][BV/Lot number][10.01.12 8:32] If the user calibration is used, the [Cal] indicator appears on the dis- To start measurement, insert cell or press <START/ENTER>...
- Page 66 ® Operation photoLab 6100 VIS Viewing the data of the user calibration <HOME> Concentration Select the method manually Concentration 16.01.12 9:52 (see section 4.5.5). If there are already data for the zero adjustment, reagent blank Please select method for measuring or insert value or a user calibration avail- a barcoded cell or insert AutoSelector.
- Page 67 ® photoLab 6100 VIS Operation Measuring with user calibration <HOME> Concentration Select the method manually Concentration 16.01.12 9:52 (see section 4.5.5). [Cal][BV/2c][ZERO 10.01.2012 11:08] If there are already data for the User calibration A calibration dated xxx is available for this zero adjustment, reagent blank To start measurement, insert cell or press method.
-
Page 68: Automatic Turbidity Correction
® Operation photoLab 6100 VIS 4.5.11 Automatic Turbidity correction The Turbidity correction function activates the automatic recognition and compensation of the light absorption caused by turbid substances. After activating the function remains permanently switched on. Measured val- ues that were measured with Turbidity correction are labeled with [TURB] (turbidity correction) on the display and in the documentation (printout and memory). - Page 69 ® photoLab 6100 VIS Operation Nominal value (e. g. concentration) figure 4-2 Example of a linear calibration function after a 10-point calibration In the case of a linear dependency, the calibration function is determined by means of linear regression. The slope and axis intercept (E0) are the charac- teristics of the calibration line.
- Page 70 ® Operation photoLab 6100 VIS Determining the You have the following options to create a method: calibration function Measure and store: Carry out a series of measurements with the following sample solutions while at the same the photometer takes over the values: –...
- Page 71 ® photoLab 6100 VIS Operation If the exact value for a0 is not known at the time the formula is entered, it is sufficient to enter the coefficient a1. In this case, the User-defined blank value function (in the Concentration / Setup menu) has to be activated to measure with this method.
- Page 72 ® Operation photoLab 6100 VIS Further method data Input field Possible entries Number* 1001 ... 1100 Designation Any name (max. 18 characters) Version Any version designation (max. 18 characters) Wavelength* Freely selectable (in nm) Cell* 16 (round), 10, 20 or 50 mm Citation form e.g.
- Page 73 ® photoLab 6100 VIS Operation How to program <HOME> user-defined Concentration methods – [Setup] – New method 1 Enter the general method data Edit method 16.04.07 9:52 here. The next available method number is already entered as the Number 1001 Designation Nitrite number.
- Page 74 ® Operation photoLab 6100 VIS Variant 1: 1 Select and confirm Measure stan- Edit method 16.04.07 9:52 Measure standard dard solutions. solutions Standard ID 2 Enter and confirm details of the Standard manufacturer standard solutions (optional). 3 Using [Next], accept all entries on the page and switch to the next page.
- Page 75 ® photoLab 6100 VIS Operation The measurement display Absorbance E0 16.04.07 9:52 appears. 7 Insert the cell with the respective standard. To start measurement, insert cell or press <START/ENTER> The absorbance is measured. The result of the first single measure- ment is displayed.
- Page 76 ® Operation photoLab 6100 VIS The related formula f(x) and corre- Edit method 16.04.07 9:52 lation coefficient R are displayed f(x)=0.73x Meas. range: 0.050 - 1.000 mg/l = 1.000 above the diagram. 12 If required, select a different line type for the line adjustment with [Curve type].
- Page 77 ® photoLab 6100 VIS Operation Variant 3: 1 Select and confirm Enter formula. Edit method 16.04.07 9:52 Enter formula Input fields for the coefficients (a0 c = a0 + a1·A + a2·A + a3·A + a4·A + a5·A ... a5) of the formula are displayed. 0.605 2 Enter and confirm the factors.
-
Page 78: The Iq-Lablink Procedure
® Operation photoLab 6100 VIS 5 If necessary, enter intervals for up Edit method 16.04.07 9:52 to 4 timers. Timer 0 00:00:00 Timer 1 00:00:00 6 If necessary, enter the AQA2 tar- Timer 2 00:00:00 Timer 3 00:00:00 get value and AQA2 tolerance. AQA2 target value 1.00 mg/l AQA2 tolerance... - Page 79 The detailed description of the cross instrument operating steps for the matrix adjustment with the IQ-LabLink procedure on theIQ S and the ENSOR photometer is given in an additional operating manual. This operating manual can be downloaded from the Internet under www.wtw.com. ba75847d06 06/2013...
-
Page 80: Measuring The Absorbance / % Transmission
® Operation photoLab 6100 VIS Measuring the Absorbance / % Transmission 4.6.1 General information The absorbance or transmission respectively is measured without the use of any methods or profiles. All settings are configured during measurement. Measuring against The absorbance or transmission can alternatively be measured against the the Reference absorbance of the zero adjustment or against a Reference absorbance deter- absorbance... - Page 81 ® photoLab 6100 VIS Operation Rectangular cell: Open the inner turn-up lid. Insert the rectangular cell verti- cally so it touches the bottom and left edge of the cell shaft. The opaque sides of the rectangular cell must point to the front and back.
-
Page 82: Measuring Against The Reference Absorbance
® Operation photoLab 6100 VIS 4.6.3 Measuring against the Reference absorbance Each time the photometer is switched on, the absorbance or transmission is measured against the absorbance of the zero adjustment as a basis. You can, however, also determine a Reference absorbance and use it as the basis. - Page 83 ® photoLab 6100 VIS Operation 2 Insert the cell with the reference Reference absorbance 16.04.07 9:52 sample. The first single measurement for the Reference absorbance is car- To start measurement, insert cell or press <START/ENTER> ried out. The following data is displayed as the result: 489 nm 10 mm...
-
Page 84: Special / Multi Wavelengths Methods
® Operation photoLab 6100 VIS Special / Multi wavelengths methods 4.7.1 Basic information on Special / Multi wavelengths measure- ments ® In the Special / Multi wavelengths mode of the photoLab 6100 VIS, you can carry out measurements with special methods and functions. You can use the following functions for these methods: ... -
Page 85: Programming / Modifying The Special / Multi Wavelengths Methods
® photoLab 6100 VIS Operation 4.7.2 Programming / modifying the Special / Multi wavelengths meth- Note For multi wavelength methods, you can use the method numbers 2001 to 2050. All special methods can also be selected in the method list of the con- centration mode. - Page 86 ® Operation photoLab 6100 VIS Example: The chlorophyll determination is based on two measurements (before and Determination of after adding an acid) of the optical density (= absorbance) of the extract of an chlorophyll a aqueous sample at 665 nm. according to Nusch Chlorophyll a (µg/l) = 29.6 * (A )*(V...
- Page 87 ® photoLab 6100 VIS Operation <HOME> Special / Multi wavelengths – [Setup] – Edit method 1 Enter the general method data Edit method 16.04.07 9:52 here. The next available method Number 2001 number is already entered as the Name Chlorophyll a Version number.
- Page 88 ® Operation photoLab 6100 VIS Create all required procedure vari- Procedure variables 16.04.07 9:52 ables. 5 Create a procedure variable Procedure variables are variables whose current numerical required for the formula with [Add] values have to be entered during the course of the and enter a designation, e.g.
- Page 89 ® photoLab 6100 VIS Operation 9 Select and confirm the variable. Formula entry 16.04.07 9:52 The current version of the formula is displayed. Variables A(665 nm) K1 (V extract (ml)) K2 (V sample Back Operators Variables Next Back 10 Add an operator. Formula entry 16.04.07 9:52 The current version of the formula...
- Page 90 ® Operation photoLab 6100 VIS 14 Using [Next], accept all entries on Formula entry 16.04.07 9:52 the page and switch to the next page. R = 29.6 * (A665nm - A665nm_2) If an error is in the formula, an error message appears. The formula editor is only exited once the error is eliminated.
- Page 91 ® photoLab 6100 VIS Operation If the formula includes several Edit method 16.04.07 9:52 measurements at the same wave- Sequence Designation length (measurement sequence), Measurement Measurement you can assign names to the indi- vidual measurements of the sequence. 18 Enter the names for the individual measurements of a sequence.
-
Page 92: Selecting A Special / Multi Wavelengths Method
® Operation photoLab 6100 VIS 4.7.3 Selecting a Special / Multi wavelengths method To select a method for Special / Multi wavelengths measurements, proceed as follows: <HOME> Special / Multi wavelengths – [Method list] The list of methods is displayed. 16.04.07 9:52 Select method (all) The methods are ordered accord-... -
Page 93: Carrying Out Special / Multi Wavelengths Measurements
® photoLab 6100 VIS Operation 4.7.4 Carrying out Special / Multi wavelengths measurements <HOME> Special / Multi wavelengths 1 Select the required method with Special / Multi wavelengths 16.04.07 9:52 [Method list] (see section 4.7.3). Please select method for measuring! Setup Citation form Unit... - Page 94 ® Operation photoLab 6100 VIS The photometer is ready to mea- Special / Multi wavelengths 16.04.07 9:52 sure. Measurement 1 To start measurement, insert cell or press <START/ENTER> 2001:Chl a Chlorophyll a 10 mm Setup Method list Citation form Unit 2 Depending on the type, insert the cell as follows: Round cell:...
- Page 95 ® photoLab 6100 VIS Operation An intermediary result is displayed Special / Multi wavelengths 16.04.07 9:52 if there are several measure- V extract (ml) 10 ml V sample (ml) 100 ml ments. Measurement 1 A(665 n) = 0.600 The photometer is ready for the Proceed with <START/ENTER>...
-
Page 96: Spectrum
® Operation photoLab 6100 VIS Spectrum 4.8.1 General information With the Spectrum function, the absorbance or Transmission in dependency of the wavelength is measured and recorded. The wavelength range can be freely selected within the measuring range of the photometer. The increment is 1 nm. -
Page 97: Recording The Spectrum
® photoLab 6100 VIS Operation 4.8.2 Recording the Spectrum <HOME> Spectrum Spectrum 16.04.07 9:52 A message containing operating instructions is displayed. Spectrum 1 Open the setting menu with You have to record a baseline first [Setup]. (<ZERO>). Adjustment of wavelength range under <General setup>. - Page 98 ® Operation photoLab 6100 VIS The photometer is ready to mea- Spectrum 16.04.07 9:52 sure after the baseline has been recorded. Spectrum Start measurement with <START/ENTER> Wavelength [nm] Setup Open Recording the spectrum: 6 Depending on the type, insert the cell as follows: Round cell: inner...
- Page 99 ® photoLab 6100 VIS Operation Cursor information The cursor appears at the abso- lute maximum of the spectrum. Spectrum 16.04.07 9:52 13 You have the following options: - Immediately edit the spectrum (see section 4.8.3) - With <PRINT>, you can output the spectrum to a connected printer as a graphic.
-
Page 100: Loading/Editing A Spectrum
® Operation photoLab 6100 VIS 4.8.3 Loading/editing a spectrum A spectrum can be edited immediately after measurement. Stored spectra can be loaded and edited as well. The following tools are available for editing: Cursor function for incremental moving along the curve with indication of the x and y values ... - Page 101 ® photoLab 6100 VIS Operation Zoom 1 Press [Zoom]. Spectrum 16.04.07 9:52 The zoom window appears. The bottom left corner of the zoom win- dow is marked by a small black square. – You can return to the original view of the spectrum with [Orig- inal] at any time.
- Page 102 ® Operation photoLab 6100 VIS Extreme values (zoomed area) Highlights the extreme values (minimum and maximum values) of the dis- played spectrum. Mark points Opens an edit mode where you can highlight individual points of the spec- trum. With the [Mark] function key you can highlight individual points.
-
Page 103: Saving / Exporting A Spectrum
® photoLab 6100 VIS Operation 4.8.4 Saving / exporting a spectrum The saving of a spectrum saves both the edited and the original spectrum. Consequently, the original spectrum can be restored from each stored spec- trum. Saving 1 Record a spectrum (see section Spectrum 16.04.07 9:52 4.8.2) -
Page 104: Kinetics
® Operation photoLab 6100 VIS Kinetics The Kinetics function enables the temporal tracing of the absorbance or transmission of a sample at a certain wavelength. The photometer automatically calculates the slope between two adjacent measuring points from the available measurement data. The catalytic activity can also be determined and displayed if required. - Page 105 ® photoLab 6100 VIS Operation Input field Possible entries Scaling: Auto** During measurement, the instrument adjusts the axis scaling (minimum and maximum value of the axis) to the measured values. The entire curve is always visible. Scaling:Manual The axis scaling (minimum and maximum value of the axis) is set manually.
- Page 106 ® Operation photoLab 6100 VIS Creating/editing a <HOME> profile Kinetics – [Setup] – Edit profile 1 Enter the data for the profile here. Edit profile (1 of 2) 16.04.07 9:52 The next available profile number Number 4001 is already entered as the number. Name NADH Mode...
-
Page 107: Loading A Profile For Kinetics Recording
® photoLab 6100 VIS Operation 4.9.2 Loading a profile for Kinetics recording To load a profile for Kinetics recording, proceed as follows: <HOME> Kinetics – [Profile list] The list of profiles is displayed. Select profile (all) 16.04.07 9:52 The profiles are ordered according to the profile number. -
Page 108: Recording The Kinetics
® Operation photoLab 6100 VIS 4.9.3 Recording the Kinetics Note During the recording, the photometer cannot carry out any regular self-test or self-calibration (AutoCheck), because the recording would have to be inter- rupted for this. A warm-up time of at least two hours is required for the pho- tometer to measure reliably during the recording. - Page 109 ® photoLab 6100 VIS Operation Rectangular cell: Open the inner turn-up lid. Insert the rectangular cell verti- cally so it touches the bottom and left edge of the cell shaft. The opaque sides of the rectangular cell must point to the front and back.
- Page 110 ® Operation photoLab 6100 VIS Cursor information 4 After the specified Duration has expired, the cursor appears. Kinetics 16.04.07 9:52 You have the following options: 4002 Number of measurements: 4 Duration: 00:00:24 Interval:00:00:06 - You can move the cursor along the curve and have the mea- surement data for each point displayed (see section 4.9.6)
-
Page 111: Saving / Exporting A Kinetics Record
® photoLab 6100 VIS Operation 4.9.4 Saving / exporting a Kinetics record Saving 1 Carry out the kinetic recording Kinetics 16.04.07 9:52 (see section 4.9.3) 4002 Number of measurements: 4 Duration: 00:00:24 Interval:00:00:06 Load a stored kinetic record (see section 4.9.4). 2 If necessary, connect a USB memory device to the USB-A interface. - Page 112 ® Operation photoLab 6100 VIS Example of a kinetic recording 6|4001|1|1|525|1280913092|59|5|1|0.000|0.301|0|1.000|µkat|2 (*.csv file) Device: Serial number:Software: User: photoLab 6100 VIS 09130512 1.30-WTW-1.60 Administrator Start time Wavelength [nm] 04.08.2010 11:11 Time [s] Absorbance 0,092 0,077 0,073 0,069 ..Line 1 - explanations:...
-
Page 113: Loading A Kinetics Record
® photoLab 6100 VIS Operation 4.9.5 Loading a Kinetics record You can load and view stored Kinetics records. Loading a stored <HOME> Kinetics record Kinetics – [Open] The list with the stored Kinetics 16.04.07 9:52 records is displayed (Internal DataB folder). 26.02.07 Enzyme kinetics.csv 24.02.07... - Page 114 ® Operation photoLab 6100 VIS Combined display of two kinetic records in one graphic Display of the difference of two kinetic records Cursor Cursor information The cursor consists of a horizontal and vertical line that cross each other on a point of the curve. A box Kinetics 16.04.07 9:52 names the x and y values of the...
- Page 115 ® photoLab 6100 VIS Operation Measurements/interval Slope 1/interval Slope, converted to the interval, "1 minute" Max/interval Slope of the straight line determined by linear regression in an interval, converted to the inter- val, "1 minute" Scaling of the Y-axis You can manually determine the scaling of the Y-axis with [Setup]/Scaling/ Manual.
-
Page 116: Timer
® Operation photoLab 6100 VIS 4.10 Timer You can use the timers to remind you by an acoustic signal of a time interval that has expired. The photometer has two types of timers: The User defined timer is a timer that can be freely assigned. The interval and name can be freely set. -
Page 117: User Defined Timer
® photoLab 6100 VIS Operation 4.10.1 User defined timer If you want to manually enter time intervals, use the User defined timer func- tion. <TIMER> The Timer menu is open. Timer 16.04.07 9:52 1 Highlight the User defined timer. Designation Time Status User defined timer... - Page 118 ® Operation photoLab 6100 VIS 1 Select the required method in the Concentration mode. Manual selection of the method (see section 4.5.5). 2 Open the Timer menu. <TIMER> The Timer menu is open. Timer 16.04.07 9:52 3 If necessary, add a new timer to Designation Time Status...
-
Page 119: Memory
® photoLab 6100 VIS Operation 4.11 Memory 4.11.1 Overview AQA records Methods Concentration Spectrum Absorbance / % Transmission Profiles Kinetics Multi wavelengths <STORE> <STORE> AutoStore <STORE> Measured value memory <STORE> (Filter optional) Open in source application *.csv Internal folder *.csv DataB SpectralTransfer Copy all... - Page 120 ® Operation photoLab 6100 VIS Measurement data Save, back up, export Concentration, Measurement datasets of these measuring modes are first stored in the measured value Absorbance / % Transmis- memory of the photometer (1000 memory sion locations) with <STORE> or AutoStore. Special / Multi wavelengths The measured value memory is available from the Measurement data memory menu.
-
Page 121: Instructions On Using Usb Memory Devices
® photoLab 6100 VIS Operation 4.11.2 Instructions on using USB memory devices The safety of data stored on USB memory devices depends on the quality of the memory device and the data transmission. Data is stored partly or not at all if for example: ... -
Page 122: Measurement Datasets
® Operation photoLab 6100 VIS 4.11.3 Measurement datasets Elements of a A complete measurement dataset consists of: measurement Consecutive number (is automatically assigned by the photometer) dataset Date/time Identification (e.g. ID or "AutoStore") User name Measured parameter, e.g. method number, dilution, wavelength (depend- ing on the measuring mode) ... - Page 123 ® photoLab 6100 VIS Operation automatically (see section 4.11.5) or manually (with the <STORE> key, see section 4.11.4): Concentration Multi wavelengths Absorbance / % Transmission The data stored in the measured value memory can be filtered with filter cri- teria and then exported to the PC-readable *.csv format.
-
Page 124: Saving Measurement Datasets Automatically
® Operation photoLab 6100 VIS 4.11.5 Saving measurement datasets automatically For the measuring modes, Concentration, Absorbance / % Transmission, and Special / Multi wavelengths you can record every measured value auto- matically (AutoStore). All automatically stored measurement datasets are given the ID "AutoStore". The "AutoStore"... -
Page 125: Displaying Measurement Data Memory
® photoLab 6100 VIS Operation 4.11.6 Displaying measurement data memory Depending on the operating situation, you can recall the measured value memory as follows: From the main menu <HOME> [Setup], – Measurement data memory In Concentration Concentration mode – [Setup] –... - Page 126 ® Operation photoLab 6100 VIS displayed in short form as a list or in details as individual values ([List] <–> [Single value]) filtered (see section 4.11.7 and section 4.11.8) deleted (see section 4.11.9). with <STORE>, you can store the entire displayed list as a *.csv file in the internal DataB folder or on a USB memory device connected to the USB- A connection.
-
Page 127: Filtering Measurement Datasets
® photoLab 6100 VIS Operation 4.11.7 Filtering measurement datasets The functions to display, delete and download stored measurement datasets refer to all stored measurement datasets that correspond to the specified fil- ter criteria. Filter criteria The following filter criteria can be set: ... -
Page 128: Inverting Filters
® Operation photoLab 6100 VIS Note Alternatively, you can hide measurement datasets that meet the specified fil- ter criteria with the Selected values: invert selection function (see section 4.11.8). 4.11.8 Inverting filters With the Selected values: invert selection function you can hide all measure- ment datasets that correspond to the specified criteria of the filter (see sec- tion 4.11.7). -
Page 129: Erasing Stored Measurement Datasets
® photoLab 6100 VIS Operation 4.11.9 Erasing stored measurement datasets If you no longer need any stored measurement datasets, you can erase them individually or altogether. <HOME> Concentration, Absorbance / % Transmission, or Special / Multi wavelengths – [Setup] – Measurement data memory The Measurement data memory Measurement data memory... -
Page 130: Saving Kinetic Recordings, Spectra And Aqa Files
® Operation photoLab 6100 VIS 4.11.10 Saving kinetic recordings, spectra and AQA files After the following measurements, the Save dialog opens and prompts you to save the data in a *.csv file: Kinetics Spectrum AQA3/MatrixCheck If the data are not saved in *.csv format, they are lost when the measuring mode is terminated. -
Page 131: Saving / Exporting Files
® photoLab 6100 VIS Operation 4.12 Saving / exporting files If you want to back up or process measurement data files outside the pho- tometer, you can copy them to external media. Note Please follow the instructions on using USB memory devices (see section 4.11.2). -
Page 132: Copying User-Defined Methods / Profiles To A Usb Memory Device
® Operation photoLab 6100 VIS 4.12.2 Copying user-defined methods / profiles to a USB memory device <HOME> [Setup] – Exchange methods/profiles /Store to USB memory device A list is displayed that includes all user-defined methods and profiles available on the photometer. All methods and profiles are checked off with a checkmark. -
Page 133: Copying Files To A Pc
® photoLab 6100 VIS Operation 4.12.3 Copying files to a PC You can copy from the photometer to a PC the following data: Measurement data Spectra Kinetic recordings AQA records User-defined methods Profiles After saving measurement data in *.csv or *.pdf format, you can copy them to a PC. -
Page 134: Importing Files
® Operation photoLab 6100 VIS 4.13 Importing files ® You can import to a pHotoLab 6xxx spectrophotometer the data that were ® created with the same or another pHotoLab 6xxx spectrophotometer, and the data that were saved to a USB memory device or a PC. You can import the following data: ... -
Page 135: Importing Files From A Pc
® photoLab 6100 VIS Operation 1 If necessary, select individual methods/profiles with <▲><▼> and remove the checkmark with<START·ENTER>. These methods / profiles are excluded from importing. 2 Start the import with [Import]. A confirmation prompt appears before any data on the photometer are overwritten. -
Page 136: Printing Data (Rs232, Usb)
® Operation photoLab 6100 VIS 4.14 Printing data (RS232, USB) 4.14.1 Printer and terminal programs Usable printers Data can be printed with the following printers: Matrix printer connected to the RS232 interface Standard printer (ink or laser) connected to the USB-A interface Note Suitable are all printers that can interpret the PCL-3 printer control language. -
Page 137: Settings For Data Transmission
® photoLab 6100 VIS Operation 4.14.2 Settings for data transmission Settings are possible for the data transmission to a printer or PC. Decimal separators For the output of CSV files you can select either a comma or a point as the for CSV files decimal separator. -
Page 138: Printing Measurement Datasets
® Operation photoLab 6100 VIS 4.14.3 Printing measurement datasets This section describes how to print measurement datasets of the measuring modes, Concentration, Absorbance / % Transmission, and Special / Multi wavelengths. By means of sample printouts, the printed information is described below: Concentration 21 05.06.07 14:05:41 C4/25 844 mg/l COD Inlet... -
Page 139: Printing Kinetics Records
® photoLab 6100 VIS Operation 4.14.4 Printing Kinetics records Sample printout photoLab 6100 VIS 09130512 1.30-WTW-1.60 Administrator 05.06.07 12:14:55 320 nm Time [s] Absorbance 0,092 0,077 0,073 0,077 ..(etc.) Structure of the 1st line: lines from left to... -
Page 140: Printing Spectra
® Operation photoLab 6100 VIS 4.14.5 Printing spectra Sample printout photoLab 6100 VIS 09130512 1.30-WTW-1.60 Administrator 07.06.07 09:47:00 Wavelength [nm] Absorbance 0,238 0,240 0,241 0,240 0,239 ..(etc.) Structure of the 1st line: lines from left to [Instrument type] [Series number] [Version of meter software and method... -
Page 141: Analytical Quality Assurance (Aqa)
® photoLab 6100 VIS Operation 4.15 Analytical quality assurance (AQA) 4.15.1 General information The target of the analytical quality assurance (AQA) is to secure correct and precise measurement results. Note Settings for AQA checks are only available for users of the user group, administrator. -
Page 142: Photometer Monitoring (Aqa1)
® Operation photoLab 6100 VIS 4.15.2 Photometer monitoring (AQA1) ® At least one set of test standards such as Spectroquant PhotoCheck or Cer- ® tiPUR is required for the photometer monitoring. The administrator specifies which test standard has to be used as the mini- mum requirement for the AQA1 monitoring. - Page 143 ® photoLab 6100 VIS Operation Activating AQA1 The AQA1 monitoring is activated in the Mode menu: <HOME> [AQA] – AQA1 setup – Mode Select and confirm Weeks. AQA1 setup 16.04.07 9:52 AQA1 is active. Mode Weeks Interval The Interval setting indicates Lock instrument Mode Weeks as the interval unit.
- Page 144 ® Operation photoLab 6100 VIS <HOME> [AQA] – AQA1 setup – Lock instrument 1 Select and confirm Yes. AQA1 setup 16.04.07 9:52 The photometer is locked against Mode Weeks Interval all measurements if the AQA1 Lock instrument Lock instrument check is invalid or the AQA1 inter- Should the instrument be locked for further Configuration of tests ...
- Page 145 ® photoLab 6100 VIS Operation Example, PhotoCheck: PhotoCheck 16.04.07 9:52 5 Using <▲><▼> and <><>, Lot number: HC616115 Use by 16.04.2008 select the Lot number, Target Target value Tolerance value or Tolerance entries and 445/1 0.196 ± 0.020 445/2 0.500 ±...
- Page 146 A test record is displayed after the check. It can be printed and stored as a file (in the internal DataB folder or USB memory device at the USB-A connec- tion, see section 4.11.1). Sample printout: photoLab 6100 VIS 09130512 1.30-WTW-1.60 Administrator AQA1 Protocol ID...
-
Page 147: Total System Monitoring (Aqa2)
The end concentration should be in the middle of the measuring range. Note The suitable CombiCheck standards and one parameter standards are listed in the WTW catalog or on the Internet. Overview of the total Total system monitoring (AQA2) consists of the following parts: system monitoring ... - Page 148 ® Operation photoLab 6100 VIS General AQA2 <HOME> settings [AQA] – AQA2 setup 1 Select and confirm Mode. AQA2 setup 16.04.07 9:52 The Mode selection field pops up. Mode Weeks Lock methods 2 Select and confirm Weeks or Mea- Method... surements.
- Page 149 ® photoLab 6100 VIS Operation Activating AQA2 <HOME> monitoring for a [AQA] method – AQA2 setup – Method 1 Select a method (see section AQA2 setup 16.04.07 9:52 Method 3: A6/25 4.5.3). AQA2 AQA2 active Interval 12 Weeks 2 Select and confirm AQA2. Target value 4.00 mg/l NH Tolerance...
- Page 150 A test record is displayed after the check. It can be printed and stored as a file (in the internal DataB folder or USB memory device at the USB-A connec- tion, see section 4.11.1). Sample printout: photoLab 6100 VIS 09130512 1.30-WTW-1.60 Administrator AQA2 Protocol ID...
-
Page 151: Aqa3/Matrixcheck
® photoLab 6100 VIS Operation 4.15.4 AQA3/MatrixCheck The MatrixCheck is used to check if the photometric determination is dis- turbed by other substances present in the sample (sample matrix). The MatrixCheck can be carried out by spiking or diluting: The photometer enables a simplified MatrixCheck with the aid of the Spectro- ®... - Page 152 ® Operation photoLab 6100 VIS After evaluating the measured value of the sample the photometer Practical instructions suggests for the MatrixCheck to spike or dilute the sample and standard with suitable volumes. You can change the suggested values of the volumes for the sample and standard.
- Page 153 ® photoLab 6100 VIS Operation 1 Enter and confirm a numerical AQA3/MatrixCheck setup 16.04.07 9:52 Maximum difference value. The setting is active. Maximum difference 2 Exit the menu with <ESC>. 10.0 Carrying out the 1 Measure the original sample with- MatrixCheck out spiking or diluting it (see sec- tion 4.5.1 to 4.5.3).
- Page 154 ® Operation photoLab 6100 VIS 7 In theStandard ID entry field, MatrixCheck (Spike) 16.04.07 9:52 select the simplified MatrixCheck Method 1: C3/25 with the CombiCheck standard Sample concentration 45 mg/lCOD Standard ID COD 1500 solution or enter a designation for Standard concentration 400 mg/lCOD another standard solution used.
- Page 155 ® photoLab 6100 VIS Operation The measurement display MatrixCheck 16.04.07 9:52 appears. Method 1: C3/25 Sample concentration 45 mg/lCOD 12 Insert the cell with the respective Sample 10 ml Standard 0.5 ml sample. The sample is measured. To start measurement, insert cell or press <START/ENTER>...
- Page 156 To save the file in the photometer, select the Internal DataB folder as the location. To save the file in an external USB memory device at the USB-A connection, select USB memory as the location (see section 4.11.1). Sample printout: photoLab 6100 VIS 09130512 1.30-WTW-1.60 Administrator MatrixCheck Protocol ID...
-
Page 157: User Management
® photoLab 6100 VIS Operation 4.16 User management The functions of the user management are only available for users of the user group, Administrator. An administrator can activate or deactivate the user management for the meter create, change or delete individual user accounts. 4.16.1 User levels and user rights ®... -
Page 158: Activating Or Deactivating The User Management Function
® Operation photoLab 6100 VIS To do so, you need administrator rights. If the user management is switched off, the user name and password do not have to be entered. Each user has full rights. 4.16.2 Activating or deactivating the User management function Each user can activate the user management function. -
Page 159: Creating, Changing Or Deleting A User Account
® photoLab 6100 VIS Operation 4.16.3 Creating, changing or deleting a user account When the user management function is active, a user with administrator rights can administrate user accounts. Creating a user During the creation of a user account, the Name, whether or not the user account belongs to a User group and the Password are defined. - Page 160 ® Operation photoLab 6100 VIS 1 Select a user account. User management 16.04.07 9:52 Name User group 2 Press [Change] to edit the user Administrator Administrator account. Admin2 Administrator User group The selection field for the user User Administrator group (Administrator / User) pops 3 If necessary, select and confirm another user group.
-
Page 161: Login With Active User Management
® photoLab 6100 VIS Operation 4.16.4 Login with active user management To be able to always assign measurement data to a user, the administrator can activate the user management function. After doing so, the photometer can only be operated after login with a user name. Depending on the autho- rization class (administrator, user, guest), important settings are released for changes or locked. - Page 162 ® Operation photoLab 6100 VIS The photometer is switched on. The Login dialog is displayed. 1 Enter the user name (<A...9>) and Login 16.04.07 9:52 confirm. The input field for the password pops up. Enter user name Administrator If the user name is not known (or incorrectly spelled) it is possible to log in without a password as a guest with restricted rights (see...
-
Page 163: Changing The Password
® photoLab 6100 VIS Operation 4.16.5 Changing the password The administrator sets up user accounts and assigns a password to each user account. As soon as any user has successfully logged in with the password, they can change the password for their user accounts themselves. <HOME>... -
Page 164: Reset
® Operation photoLab 6100 VIS 4.17 Reset You can reset (initialize) the measurement settings or all settings. Note The Reset function is available for users of the user group, Administrator only. You have the following options of resetting the photometer settings: ... -
Page 165: Photometer Information ([Info])
16.04.07 9:52 Model designation: ® of the self-test are displayed and photoLab 6100 VIS Serial number: 07440001 can be printed. Software/methods version: 1.30-WTW-1.60 Build: 04/03/09 11:57 Hardware version: Hardware status: FF 00000000 Lamp counter System test ✓ Filter test ✓... -
Page 166: Software And Methods Update
The current software version is available on the Internet under http://www.WTW.com. The software can be transmitted to the photometer as follows: by means of a USB memory device as a temporary storage (section 4.20.1). - Page 167 ® photoLab 6100 VIS Operation Note Make sure the folder structure of the files is retained during the unpacking process. If you use a program such as WinZip to unpack the files, the option, "Nutze Ordnernamen" or "Use Folder Names" must be set. Details are given in the documentation of your unpack program.
-
Page 168: Update Using A Pc
® Operation photoLab 6100 VIS 4.20.2 Update using a PC The SpectralTransfer PC software supports the software and method update to Version 1.1x. From version 1.20 this function is no longer supported. 4.20.3 Language update If you want to set some special languages on your photometer (e.g. Chinese or Thai), a character set extension is required to display the characters. -
Page 169: Maintenance And Cleaning
® photoLab 6100 VIS Maintenance and cleaning Maintenance and cleaning Replacing the lamp Service life of the The tungsten halogen lamp is a wear part with a certain average service life tungsten halogen (see chapter 7 T ). It has to be replaced if defective. The pho- ECHNICAL DATA lamp tometer has a service hour counter for the lamp module (see section 4.19). - Page 170 ® Maintenance and cleaning photoLab 6100 VIS 3 Disconnect the electrical plug con- nection (3). Disconnecting it might take a lot of effort. 4 Unscrew the two knurled-head screws (4) and remove the defec- tive lamp module (5). 5 Fix the new lamp module with the knurled-head screws.
-
Page 171: Exchanging The Buffer Batteries
® photoLab 6100 VIS Maintenance and cleaning Exchanging the buffer batteries CAUTION There is a risk of explosion if unsuitable batteries are used. Only use leakproof alkaline manganese batteries. Note If you leave the photometer switched on during the exchange or insert the new batteries within a minute after taking out the old ones, the date and time are retained in the photometer. -
Page 172: Cleaning
® Maintenance and cleaning photoLab 6100 VIS Cleaning Especially after a cell has broken or after a reagents accident, the photometer should immediately be cleaned (see also section 6.1 A CTIONS IN THE CASE OF A BROKEN CELL 5.3.1 Cleaning the enclosure CAUTION The housing components are made out of synthetic materials (ABS, PMMA and PC). -
Page 173: Cleaning The Detector Lens
® photoLab 6100 VIS Maintenance and cleaning 5.3.3 Cleaning the detector lens Normally, it is not required to clean the detector lens routinely. Cleaning the detector lens can be necessary in the following cases: If the lens is visibly smudged, e.g. after a cell has broken or after a reagent accident (see also section 6.1 A CTIONS IN THE CASE OF A BROKEN CELL ... - Page 174 ® Maintenance and cleaning photoLab 6100 VIS ba75847e06 06/2013...
-
Page 175: What To Do If
® photoLab 6100 VIS What to do if ... What to do if ... Actions in the case of a broken cell WARNING Cells can contain dangerous substances. If the contents are released, follow the safety instructions of the package insert. If necessary, take corresponding protective measures (protective goggles, protective gloves etc.). -
Page 176: Error Causes And Remedies
® What to do if ... photoLab 6100 VIS Cleaning the The detector lens is on the front left detector lens side of the rectangular cell shaft (pos. 1). 1 Switch off the photometer. 2 Cut off one end of a customary cotton swab (approx. - Page 177 ® photoLab 6100 VIS What to do if ... Self-test does not Cause Remedy start. – A cell is inserted in one of the cell – Remove the cell The instrument shafts displays – Then press the Please remove cell <START·ENTER>...
- Page 178 ® What to do if ... photoLab 6100 VIS Self test failed. Cause Remedy – System test: Instrument defective – Return instrument to service department – Filter test: Instrument defective – Return instrument to service department – Lamp test: – If no light leaks out at the rear –...
-
Page 179: Technical Data
® photoLab 6100 VIS Technical data Technical data Measurement characteristics Measuring principle Single-beam spectrophotometer Light source Lamp type Tungsten halogen lamp Average lifetime approx. 1000 h Monochromator Type Grating monochromator with step motor Wavelength range 320 - 1100 nm Max. scan speed approx. - Page 180 ® Technical data photoLab 6100 VIS Usable cells Round cells – Outer diameter: 16 mm – Inner diameter: 13.6 mm – Flat cell bottom Rectangular cells * – Path length: 10 mm, 20 mm and 50 mm – Maximum width: 12.6 mm Minimum filling level 20 mm Minimum filling volume...
- Page 181 Technical data Concentration Measuring modes – Measurement with permanently programmed methods, adjusted to the WTW-test set program – Automatic method selection if test sets with barcodes are used – Program support for the creation of additional user-defined methods (max. 100) –...
-
Page 182: Measured Value Documentation And Quality Assurance
® Technical data photoLab 6100 VIS Measured value documentation and quality assurance Memory for Memory capacity – 1000 single measured values from the measured values measuring modes, concentration, absor- bance / % transmission and multi wave- lengths – 4 MByte internal memory, sufficient for approx. -
Page 183: General Meter Data
® photoLab 6100 VIS Technical data General meter data Dimensions 404 x 197 x 314 mm (width x height x depth) Weight approx. 4.5 kg (without plug-in power supply) Housing type of IP 30 protection Electrical protective class Test mark CE, cETLus Allowed Temperature... - Page 184 ® Technical data photoLab 6100 VIS Communication RS232 1 x 9-pin D-sub interfaces – 1 x USB-A (for printer, USB memory devices, keyboard or bar code reader) – 1 x USB-B (for PC) Drain for spilled cell contents Other features ...
-
Page 185: Accessories And Options
® photoLab 6100 VIS Accessories and options Accessories and options Accessories Cells for the WTW Description Model Order no. test set program 25 empty round cells (16 mm) RK 14/25 250 621 Rectangular cell, 10 mm REK 10 250 605... -
Page 186: Test Equipment
PipeCheck 250 498 14692 Note Standard solutions for the WTW test set program are listed in the WTW cat- alog or on the Internet. Optional equipment The following optional extensions are available in specialist shops: USB barcode reader (hand scanner) ... -
Page 187: Connection Cable
® photoLab 6100 VIS Accessories and options Connection cable: ® You can connect a PC to the photoLab 6100 VIS in one of the following ways: Description Order no. – Cable with USB-B and USB-A plug Specialist shops – Zero modem cable 9-pin (D-sub socket) - 9-pin 820 070 (D-sub socket) ®... - Page 188 ® Accessories and options photoLab 6100 VIS ba75847e06 06/2013...
-
Page 189: Appendix
® photoLab 6100 VIS Appendix Appendix Menus Measuring (see section A.1.1) General settings and functions (see section A.1.2) A.1.1 Measuring Concentration (see section A.1.1.1) Absorbance / % Transmission (see section A.1.1.2) Special / Multi wavelengths Spectrum ... - Page 190 ® Appendix photoLab 6100 VIS Concentration – [Setup] – Edit method – [Next] – [Next] measure value pairs (Target value, Absorbance) – [Next] [Curve type] (Polygon line, Straight line, Parabola) [Meas. range] (Lower limit, Upper limit) – Enter formula – a5 ... a0, Meas. range (Lower limit, Upper limit) –...
- Page 191 ® photoLab 6100 VIS Appendix A.1.1.2 Absorbance / % Transmission Absorbance / % Transmission – [Setup] – AQA (see section A.1.2.2) – Measurement data memory (see section A.1.2.1) – [Wavelength] – Set new wavelength (nm) – [Transmission] <–> [Absorbance] – [Reference] –...
- Page 192 ® Appendix photoLab 6100 VIS A.1.1.4 Spectrum Spectrum – [Setup] – Wavelength start – Wavelength stop – Mode – Absorbance – Transmission – Smoothing – Yes – No – Scaling – Auto – Manual – Y-axis min – Y-axis max –...
-
Page 193: General Settings And Functions
® photoLab 6100 VIS Appendix A.1.1.5 Kinetics Kinetics – [Setup] – New profile – Edit profile – Scaling – Auto – Manual – Y-axis min – Y-axis max – [Profile list] – [All profiles] <–> [Last used] – [Edit] – Slope & catalytic activity –... - Page 194 ® Appendix photoLab 6100 VIS A.1.2.1 General setup [General setup] – Language – Date/Time – Date – Time – Display settings – Contrast [%] – User management – [Setup] – Deactivate user management – Change password – [Add] – [Delete] –...
- Page 195 ® photoLab 6100 VIS Appendix [General setup] – Software/methods update – USB memory device – PC – Cancel – Reset – Reset configuration – Delivery condition – Data transfer/Printer – Decimal separator for csv-Files – Point (12.34) – Comma (12,34) –...
- Page 196 ® Appendix photoLab 6100 VIS A.1.2.2 AQA [AQA] – AQA1 setup – Mode – AQA1 inactive – Weeks – Interval – Lock instrument (No/Yes) – Configuration of tests ... – PhotoCheck – CertiPUR UV-VIS 1 ... – AQA2 setup – Mode –...
-
Page 197: Glossary
® photoLab 6100 VIS Appendix Glossary Absorbance Logarithmic dimension for the absorption of the sample; negative decadal logarithm of the transmission. Analysis instructions The exact proceeding to carry out the detection procedure is described in the analysis instructions. Analytical Quality Assurance. AQA labeling In the documentation, measured values are given an AQA labeling (AQA1 or AQA2), depending on whether or not the measurement was... - Page 198 ® Appendix photoLab 6100 VIS Detection procedure The detection procedure designates the general principle of how a sample is brought into a form suitable for measurement. Different methods can be based on the same detection procedure. Kinetics Measurement over a period of time. MatrixCheck see AQA3.
-
Page 199: List Of Trademarks
® photoLab 6100 VIS Appendix Transmission Part of the light that goes through the sample. Turbidity Light attenuation caused by diffuse scattering at undissolved sub- stances. Zero adjustment Adjusting a photometer with a water-filled cell. List of trademarks Trademark Owner ®... - Page 200 ® Appendix photoLab 6100 VIS ba75847e06 06/2013...
-
Page 201: Index
® photoLab 6100 VIS Index Absorbance / % Transmission, measuring ..........80 Accessories .....................185 Analysis timer ..................117 Analytical quality assurance (AQA) ............141 AQA ......................141 Authorized use ..................12 AutoCheck ....................29 Barcode .....................44 Barcode reader ..................24 Blank value Reagent blank value ................57 Sample blank value ................55 Cell breakage ..................175 Cleaning ....................172 Commissioning ..................15... - Page 202 ® photoLab 6100 VIS Measurement dataset ................122 Menus ..................... 189 Meter information ..................165 Method ...................... 92 Methods update ..................166 Multi-wavelengths methods ..............84 Operating elements ..................7 Operating principles .................. 30 Operational safety ..................12 Overview ..................... 7 Print ......................
- Page 203 ® photoLab 6100 VIS Update ....................166 USB memory device .................23 User calibration ..................61 User-defined methods Concentration ..................68 Multi wavelengths ................85 Warm-up time ...................28 Zero adjustment ..................39 ba75847e06 06/2013...
- Page 204 ® photoLab 6100 VIS ba75847e06 06/2013...
- Page 206 For more information on how Xylem can help you, go to www.xyleminc.com Wissenschaftlich-Technische Werkstätten GmbH Dr.-Karl-Slevogt-Straße 1 D-82362 Weilheim Germany Tel: +49 881 183-0 Fax: +49 881 183-420 E-Mail: info@wtw.com Internet: www.wtw.com...
Need help?
Do you have a question about the photoLab 6100 VIS and is the answer not in the manual?
Questions and answers
How often does this device need to be taken to a calibration service?
The wtw photoLab 6100 VIS automatically calibrates the wavelength accuracy after switching on (with the self-test) and then repeatedly during operation after 15, 30, 60, 120, and 240 minutes.
This answer is automatically generated
How often do we need to make adjustments to the calibration service?
The calibration service for the WTW photoLab 6100 VIS should be adjusted when the difference compared to the original calibration is more than 30%, when a new user calibration is carried out, when the original calibration is selected for measurement, when the user calibration is manually erased, or when the photometer is reset to the default condition.
This answer is automatically generated