Table of Contents
Advertisement
Advertisement
Table of Contents

Subscribe to Our Youtube Channel
Related Manuals for wtw photoLab 7100 VIS


Summary of Contents for wtw photoLab 7100 VIS
- Page 1 OPERATING MANUAL ba77095e03 10/2017 ® photoLab 7100 VIS SPECTROPHOTOMETER...
- Page 2 ® photoLab 7100 VIS Copyright © 2017, Xylem Analytics Germany GmbH Printed in Germany. ba77095e03 10/2017...
-
Page 3: Table Of Contents
® photoLab 7100 VIS Contents Contents Overview ........5 Overview of the instrument . - Page 4 ® Contents photoLab 7100 VIS 4.5.1 General information ..... . .30 4.5.2 Measuring the absorbance or transmission . .30 Maintenance and cleaning ..... . .32 Replacing the lamp .
-
Page 5: Overview
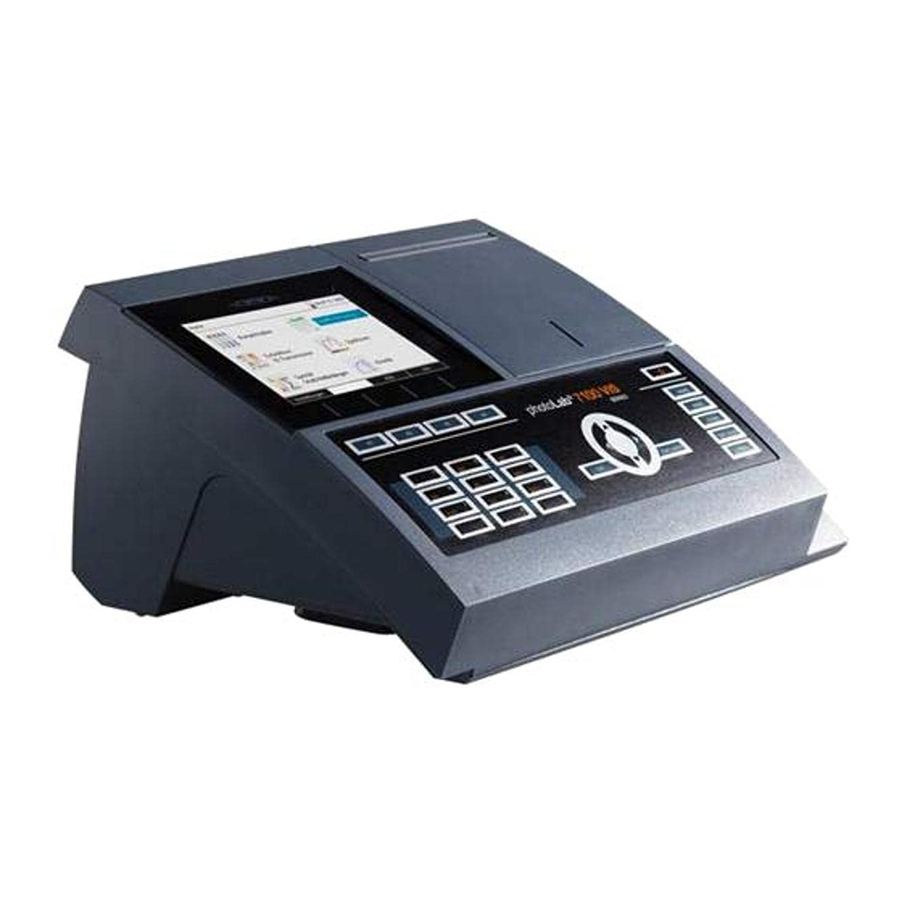
® photoLab 7100 VIS Overview Overview Overview of the instrument Front of the instrument 1 Display 2 Keypad 3 Shaft for rectangular cells 4 Turn-up lid 5 Shaft for round cells 6 Cell shaft cover Fig. 1-1 Front of the instrument with operating elements Socket field on the rear panel 7 Connection for power pack... -
Page 6: Keypad
® Overview photoLab 7100 VIS Keypad Overview 1 Function keys F1 to F4 (function menu-depending) 2 Alphanumeric keypad 3 Keys with dedicated function Fig. 1-3 Keypad Key functions The keys on the right side of the keypad have the following functions: Designation Functions <ON/OFF>... -
Page 7: Display
® photoLab 7100 VIS Overview Designation Functions <ESC> – Cancels the running action. Entries that have not yet been accepted are discarded. – Switches to the next higher menu level. <START·ENTER> – Starts an action (e.g. measure- ment) – Opens a selected menu –... - Page 8 ® Overview photoLab 7100 VIS Symbols in the Symbol Designation Function status line Save The <STORE> key is active. With <STORE>, you can save the displayed data. Printer The <PRINT> key is active. You can output to an interface the displayed data with <PRINT>.
-
Page 9: Safety
® photoLab 7100 VIS Safety Safety Safety information 2.1.1 Safety information in the operating manual This operating manual provides important information on the safe operation of the product. Read this operating manual thoroughly and make yourself familiar with the product before putting it into operation or working with it. The operating manual must be kept in the vicinity of the product so you can always find the information you need. -
Page 10: Safe Operation
® Safety photoLab 7100 VIS Safe operation 2.2.1 Authorized use The authorized use of the photometer consists exclusively of the carrying out of photometric measurements according to this operating manual. Follow the technical specifications of the cells in chapter 7 T . -
Page 11: Handling Of Hazardous Substances
7100 VIS Safety Handling of hazardous substances When developing test sets, WTW carefully sees that the tests can be carried out as safely as possible. Some hazards by dangerous substances, however, cannot always be avoided. If self-produced tests or solutions are used, the responsibility concerning any risks caused by those tests or solutions lies with the user (personal respon- sibility). -
Page 12: Commissioning
® Commissioning photoLab 7100 VIS Commissioning General notes on handling ® The photoLab 7100 VIS photometer is an optical precision meter. There- fore, it should always be handled with care, especially in mobile use. Always protect the meter from conditions that could damage the mechanical, optical and electronic components. -
Page 13: Inserting The Buffer Batteries
® photoLab 7100 VIS Commissioning The original packing is also required for the proper return of the instru- ment if it has to be repaired. Note that damage caused by improper transport voids all warranty claims. 3.2.1 Inserting the buffer batteries The buffer batteries supply the integrated clock while the photometer is switched off. -
Page 14: Switching On The Photometer And Setting The Language
® Commissioning photoLab 7100 VIS Connect the power 1 Connect the miniplug of the power pack pack to the socket (1) of the pho- tometer. 2 Connect the power pack to an easily accessible power socket. 3.2.3 Switching on the photometer and setting the language During the initial commissioning the photometer automatically guides you to the setting of the meter language after switching on (<ON/OFF>). -
Page 15: Setting The Date And Time
® photoLab 7100 VIS Commissioning 3.2.4 Setting the date and time During the initial commissioning, the instrument automatically guides you to the setting of the time and date after the setting of the language. The Date/Time menu is open. Date/Time 16.01.15 9:52 Using <><>, select a menu Date... -
Page 16: Operation
® Operation photoLab 7100 VIS Operation Switching on or off the photometer Switching on 1 Switch the photometer on with <ON/OFF>. The display shows Self test 16.01.15 9:52 – the Self test dialog (if the user management is not active). Please make sure no cell is inserted and the cover is closed. - Page 17 ® photoLab 7100 VIS Operation Self test During the self-test, all cells must be removed and the cell shaft cover closed. The self-test includes: Self test 16.01.15 9:52 – the test of the memory, proces- System test sor, internal interfaces, System test filter and lamp Filter test...
-
Page 18: General Operating Principles
® Operation photoLab 7100 VIS General operating principles 4.2.1 Navigating with function keys and menus Press the <><> <><> key. The menu selec- tion moves in the corresponding direction. <><> <><> <F1> Press the <START·ENTER> key. <START· This has confirmed the current ENTER>... -
Page 19: Display Of Navigation Paths In Short Form
® photoLab 7100 VIS Operation Use of the function The function keys F1 to F4 are below the display. Their functions change keys depending on the operating situation and mode. The current functions are displayed in the function key menu at the bottom edge of the display. Apart from navigation, the function keys are also used for other operations: ... - Page 20 ® Operation photoLab 7100 VIS Operating example: The following example shows the elements of the menu tree with the relevant Navigation to the operating steps: setting menu for the language Bold letters and angle brackets <HOME> indicate a key on the photometer [General setup] (except function keys).
-
Page 21: Entry Of Numerals, Letters And Characters
® photoLab 7100 VIS Operation 4.2.3 Entry of numerals, letters and characters Numerals, letters, punctuation marks and special characters are entered with the alphanumeric keypad of the meter or using an external keyboard. The numerals and characters (expect for the small letters) assigned to the keys of the alphanumeric keypad are printed on the keys. -
Page 22: Inserting A Cell
® Operation photoLab 7100 VIS 4.2.4 Inserting a cell Round cells (with Inserting a cell with barcode starts the measurement; with methods without and without bar- barcode you have to select the method manually. code) 1 Open the cell shaft cover. Line mark Barcode 2 Close the inner turn-up lid. -
Page 23: Usable Cells
® photoLab 7100 VIS Operation 1 Open the cell shaft cover. Line mark Barcode 2 Insert the AutoSelector in the round cell shaft so it touches the bottom. When doing so, align the line mark with the notch at the Inner front of the round cell shaft. -
Page 24: Zero Adjustment
Kinetics and OptRF. With a zero adjustment, the absorbance of a cell filled with distilled water ("zero cell") is measured and stored. Factory zero For all measurements with WTW test sets (Concentrationmode), a factory adjustment for zero adjustment is available in the delivery condition. We recommend replac- concentration ing it with a zero adjustment of your own. - Page 25 ® photoLab 7100 VIS Operation If no zero adjustment is available, the photometer will prompt you to carry out a zero adjustment. The cells must be absolutely clean and free of scratches. Always use a cell of the same type for zero adjustment and mea- surement of the sample.
- Page 26 ® Operation photoLab 7100 VIS 2 In Concentration mode only: Concentration 16.01.15 9:52 Select and confirm Zero adjust- ment. Adjust Zero adjustment Reagent blank value Calibrate the method 3: A6/25 16 mm 0.20 - 8.00 mg/l Setup Citation form Unit Method list The zero adjustment window pops Zero adjustment...
- Page 27 ® photoLab 7100 VIS Operation Mode Validity of the zero adjustment Till the next zero adjustment for the same Concentration (user- defined methods) method * andSpecial / Multi wave- lengths Till another kinetic profile is loaded Kinetics Till the Kinetics mode is exited or the photom- eter is switched off * After the wavelength or method respectively was temporarily exited the photometer displays that a zero adjustment is available and the time it was...
-
Page 28: Measuring In Concentration Mode
® Operation photoLab 7100 VIS Measuring in Concentration mode 4.4.1 Measuring cell tests with barcode <HOME> Concentration Inserting a cell with barcode starts Concentration 16.01.15 9:52 a measurement. Please select method for measuring or insert a barcoded cell or insert AutoSelector. Setup Method list Last method... -
Page 29: Measuring Reagent Tests With Autoselector
® photoLab 7100 VIS Operation 4.4.2 Measuring reagent tests with AutoSelector On one side, the AutoSelector has a bar code encoding a method number. When the AutoSelector is inserted in the round cell shaft, the bar code is automatically read and the relevant method selected by the photometer. <HOME>... -
Page 30: Measuring The Absorbance / % Transmission
® Operation photoLab 7100 VIS Measuring the Absorbance / % Transmission 4.5.1 General information The absorbance or transmission respectively is measured without the use of any methods or profiles. All settings are configured during measurement. Measuring against The absorbance or transmission can alternatively be measured against the the Reference absorbance of the zero adjustment or against a Reference absorbance deter- absorbance... - Page 31 ® photoLab 7100 VIS Operation 5 Using [Absorbance] <–> [Trans- Transmission 16.01.15 9:52 mission], switch over the display from Absorbance to Transmission or vice versa. 13.8 489 nm 10 mm Setup Wavelength Absorbance Reference ba77095e03 10/2017...
-
Page 32: Maintenance And Cleaning
® Maintenance and cleaning photoLab 7100 VIS Maintenance and cleaning Replacing the lamp Service life of the The tungsten halogen lamp is a wear part with a certain average service life tungsten halogen (see chapter 7 T ). It has to be replaced if defective. The pho- ECHNICAL DATA lamp tometer has a service hour counter for the lamp module. - Page 33 ® photoLab 7100 VIS Maintenance and cleaning 3 Disconnect the electrical plug con- nection (3). Disconnecting it may take a lot of effort. 4 Unscrew the two knurled-head screws (4) and remove the defec- tive lamp module (5). 5 Fix the new lamp module with the knurled-head screws.
-
Page 34: Exchanging The Buffer Battery
® Maintenance and cleaning photoLab 7100 VIS Exchanging the buffer battery CAUTION There is a risk of explosion if unsuitable batteries are used. Only use leakproof alkaline manganese batteries. If you leave the photometer switched on during the exchange or insert the new batteries within a minute after taking out the old ones, the date and time are retained in the photometer. -
Page 35: Cleaning The Enclosure
® photoLab 7100 VIS Maintenance and cleaning 5.3.1 Cleaning the enclosure NOTE The housing components are made out of synthetic materials (ABS, PMMA and PC). Thus, avoid contact with acetone, ethyl alcohol and similar deter- gents that contain solvents. Remove any splashes immediately. Clean the photometer enclosure as follows: ... -
Page 36: Cleaning The Detector Lens
® Maintenance and cleaning photoLab 7100 VIS 5.3.3 Cleaning the detector lens Normally, it is not required to clean the detector lens routinely. Cleaning the detector lens can be necessary in the following cases: If the lens is visibly smudged, e.g. after a cell has broken or after a reagent accident (see also section 6.1 A CTIONS IN THE CASE OF A BROKEN CELL ... -
Page 37: What To Do If
® photoLab 7100 VIS What to do if... What to do if... Actions in the case of a broken cell WARNING Cells can contain dangerous substances. If the contents are released, follow the safety instructions of the package insert. If necessary, take corresponding protective measures (protective goggles, protective gloves etc.). -
Page 38: Error Causes And Remedies
® What to do if... photoLab 7100 VIS described in section 5.3.3 C LEANING THE DETECTOR LENS Error causes and remedies Meter does not Cause Remedy react to keystroke – Operating condition undefined or – Processor reset: EMC load unallowed Press the <ON/OFF>... - Page 39 ® photoLab 7100 VIS What to do if... Cause Remedy – The cell shaft is contaminated – Clean the cell shaft (see section 5.3.2 and section 6.1) – Restart the instrument – If necessary, confirm the Please remove cell message with <START·ENTER>.
- Page 40 ® What to do if... photoLab 7100 VIS Cause Remedy – Lamp test: – If no light leaks out at the rear – Replace the lamp (see section side of the photometer: 5.1) Lamp defective – If light does leak out at the rear –...
-
Page 41: Technical Data
® photoLab 7100 VIS Technical data Technical data Measurement characteristics Measuring principle Spectrophotometer with reference beam technology Light source Lamp type Tungsten halogen lamp Average lifetime approx. 1000 h Monochromator Type Grating monochromator with step motor Wavelength range 320 - 1100 nm Max. - Page 42 Concentration Measuring modes – Measurement with permanently programmed methods, adapted to the WTW test set program – Automatic method selection if test sets with barcodes are used – Program support for the creation of additional user-defined methods (max. 100) –...
-
Page 43: Measured Value Documentation And Quality Assurance
® photoLab 7100 VIS Technical data Spectrum Measuring modes – Absorbance or % transmission mode – Limits freely selectable within the wavelength range – Increment: 1 nm – Recording duration for the complete wavelength range: < 7 min – Settings can be stored as profiles (max. 20) –... -
Page 44: General Meter Data
® Technical data photoLab 7100 VIS User management Can be switched off User accounts 3 hierarchical levels (administrator, user, guest) Password protection for administrators and users General meter data Dimensions 404 x 197 x 314 mm (width x height x depth) Weight approx. - Page 45 ® photoLab 7100 VIS Technical data Meter safety EC directive 2006/95/EC EN 61010-1 Climatic class VDI/VDE 3540 IP protection class EN 60529 Communication Ethernet RJ45 socket interfaces – 1 x USB-A (for printer, USB memory devices, keyboard or bar code reader) –...
- Page 46 ® Technical data photoLab 7100 VIS ba77095e03 10/2017...
- Page 48 For more information on how Xylem can help you, go to xyleminc.com. ® Service and Returns: Xylem Analytics Germany Sales GmbH & Co. KG Dr.-Karl-Slevogt-Str. 1 82362 Weilheim Germany Tel.: +49 881 183-325 Fax: +49 881 183-414 E-Mail wtw.rma@xyleminc.com Internet: www.WTW.com Xylem Analytics Germany GmbH Dr.-Karl-Slevogt-Str. 1 82362 Weilheim Germany...
Need help?
Do you have a question about the photoLab 7100 VIS and is the answer not in the manual?
Questions and answers