Tandem t:slim X2 User Manual
Insulin pump with basal-iq technology
Hide thumbs
Also See for t:slim X2:
- User manual (448 pages) ,
- Training manual (142 pages) ,
- Manual (11 pages)
Table of Contents
Advertisement
Quick Links
Download this manual
See also:
Training Manual
Advertisement
Table of Contents
Troubleshooting

Related Manuals for Tandem t:slim X2


Summary of Contents for Tandem t:slim X2
- Page 1 3:30 PM June 1, 2018 100% 235 u mg/dL INSULIN ON BOARD: 1.1 u 1:09 hrs with Basal-IQ Technology ™ User Guide...
- Page 3 X2 Insulin Pump with Basal-IQ Technology User Guide Software Version Carlsbad Congratulations on the purchase of ensure your safety. It also provides Need help? We are here for you 24 your new t:slim X2 Insulin Pump with step-by-step instructions on how to...
-
Page 4: Table Of Contents
Table of Contents Section 1 – Before You Begin Chapter 1 – Introduction Indications for Use ........... 18 Contraindications . - Page 5 Table of Contents Chapter 3 – Getting to Know Your System What your System Package Includes ........40 System Terminology .
- Page 6 Unlocking the t:slim X2 Pump Screen ........
- Page 7 Table of Contents Programming a New Personal Profile ........100 Editing or Reviewing an Existing Profile .
- Page 8 X2 Pump Volume ........
- Page 9 Table of Contents Chapter 13 – t:slim X2 Pump Reminders 13.1 Low BG Reminder ..........130 13.2...
- Page 10 Data Error Alert ........... . . 158 Chapter 16 – t:slim X2 Pump Alarms 16.1...
- Page 11 Receiver (t:slim X2 Pump) Overview ........
- Page 12 Other Reasons You May Need to Calibrate ....... 201 Chapter 23 – Viewing CGM Data on Your t:slim X2 Pump 23.1...
- Page 13 Table of Contents 23.5 CGM History ............211 23.6 Missed Readings .
- Page 14 Table of Contents 25.11 CGM Rise Alert ........... . . 229 25.12 CGM Rapid Rise Alert .
- Page 15 Turn Basal-IQ On and Off ..........250 Chapter 28 – Viewing Basal-IQ Status on Your t:slim X2 Pump 28.1...
- Page 16 X2 Pump Options and Settings ........
- Page 17 Table of Contents 32.9 Quality of Wireless Service ......... . . 291 32.10 FCC Notice Concerning Interference .
- Page 18 Section 1 Before You Begin...
- Page 19 Before You Begin Chapter 1 Introduction...
-
Page 20: Indications For Use
You must also have adequate vision patient use and requires a prescription. and/or hearing in order to recognize The t:slim X2 Insulin Pump with Basal- your System alerts. IQ Technology consists of the t:slim X2 The System is indicated for use with... -
Page 21: System Description
The t:slim X2 Insulin Pump is made up readings from a blood glucose meter. The Dexcom G6 Sensors and Transmit- of the t:slim X2 Insulin Pump and the... -
Page 22: Important User Information
Dexcom G6 CGM press or tap the pump, leading to unin- with your t:slim X2 Insulin Pump and If you are currently using the t:slim X2 tentional delivery of insulin. Section 7 covers how the Basal-IQ Pump without Dexcom G6 CGM, or if Technology functions. - Page 23 Chapter 1 – Introduction These features are detailed in Chapters be ON when the pump is not being used by a 10 Quick Bolus 11 t:slim X2 Pump caregiver. The Feature Lock function is intended Settings. to prevent inadvertent button presses that may...
-
Page 24: Conventions Of This Guide
A list of options on your touch screen that allow you to perform specific tasks. Icon An image on your touch screen that indicates an option or item of information, or a symbol on the back of your t:slim X2 Pump or its packaging. - Page 25 Before You Begin Chapter 2 Important Safety Information...
-
Page 26: System Warnings
DO NOT place your infusion set on any t:slim X2 Insulin Pump. Consult with help you adjust your Basal Rate(s), scars, lumps, moles, stretch marks or your healthcare provider for your indi- Carb Ratio(s), Correction Factor(s), Tar- tattoos. - Page 27 Screen and you could run out of insulin that these parts are stored in a secure by Tandem Diabetes Care, Inc. Use of before the pump detects an empty car- place when not in use.
- Page 28 • General Anesthesia – Depending about your diabetes and your t:slim X2 if you are going to have any of the on the equipment being used, you Insulin Pump. If you need to discontinue above procedures.
- Page 29 Sensor glucose WARNINGS: Using Dexcom readings may be inaccurate in these DO NOT expect CGM alerts until after G6 with your t:slim X2 Insulin populations and could result in you the 2-hour startup. You will NOT get Pump...
-
Page 30: System Precautions
You your infusion set if you notice leaks repaired only by Tandem Diabetes may store the sensor in the refrigerator around the site. Improperly placed sites Care. Modification could result in a if it is within this temperature range. - Page 31 Alarm and miss part of your basal pump and contact Tandem Diabetes the USB port and confirming that the insulin delivery. Care Customer Technical Support at display turns on, you hear audible (877) 801-6901.
- Page 32 Tandem Diabetes Care Cus- simulation (pressurized or not). Rapid Check your blood glucose before dis- tomer Technical Support at (877) 801-...
- Page 33 Dexcom G6 CGM with your Insertion in those areas might affect (low blood glucose) or hyperglycemia t:slim X2 Insulin Pump accuracy and could result in you miss- (high blood glucose) events. ing severe hypoglycemia (low blood...
-
Page 34: Potential Benefits From Using The System
(high AVOID separating the transmitter and blood glucose) events. • The t:slim X2 Insulin Pump provides pump by more than 20 feet. The trans- an automated way to deliver basal mission range from the transmitter to ENSURE that your transmitter ID is pro- and bolus insulin. - Page 35 Chapter 2 – Important Safety Information • From the bolus screen, the check your blood glucose or bolus therapy. In addition, the “calculator within a calculator” for meals. programmable alerts can help you feature allows you to enter multiple to spot potential low or high blood carbohydrate values and add them •...
-
Page 36: Possible Risks From Using The System
Care 2011; 34(4):795-800. 2010; 33(10):2175-2177. contact your healthcare provider and call Tandem Diabetes Care Customer The Diabetes Control and Complica- Possible Risks From Using Technical Support at (877) 801-6901. tions Research Group. The effect of... -
Page 37: Working With Your Healthcare Provider
Consult your healthcare provider before under your skin, contact your health- using the System to determine which care provider and call Tandem Diabetes features are most appropriate for you. Working with your Healthcare Care Customer Technical Support at Only your healthcare provider can Provider (877) 801-6901. -
Page 38: Emergency Kit
USB port. These features the USB port of your t:slim X2 Pump: are used to notify you about alerts, alarms, and • Fast-acting carbohydrate to treat other conditions that require your attention. -
Page 39: Wireless Co-Existence And Data Security
Chapter 2 – Important Safety Information Wireless Co-existence and Data Security The System is designed to work safely and effectively in the presence of wire- less devices typically found at home, work, retail stores, and places of leisure where daily activities occur. See Sec- tion 32.8 Distances Between the t:slim X2 Pump and RF Equipment... - Page 40 Chapter 2 – Important Safety Information THIS PAGE IS INTENTIONALLY LEFT BLANK Customer Technical Support: (877) 801-6901...
-
Page 41: Chapter 3 - Getting To Know Your System
Before You Begin Chapter 3 Getting to Know Your System... -
Page 42: What Your System Package Includes
7. Cartridge Removal Tool goal, an exact number, not a range. • USB rubber door When a BG is entered in the t:slim X2 If any of these items are missing, con- Pump, the calculated insulin bolus will tact Tandem Diabetes Care Customer •... - Page 43 Personal Profile through which insulin is delivered. t:slim X2 Pump, enter the DELIVER A personal profile is a personalized NOW portion to dose a percentage of group of settings that defines the deliv-...
- Page 44 X2 Pump’s micro USB When the Dexcom G6 CGM is used port. Glucose Data Gaps with the t:slim X2 Pump to display CGM Glucose data gaps occur when your readings, the insulin pump replaces the CGM Terminology System is unable to provide a sensor receiver for the therapeutic CGM.
- Page 45 Chapter 3 – Getting to Know Your System the transmitter out of the sensor pod sends glucose information to your after your sensor session ends. pump. Sensor Transmitter ID The sensor is the part that includes an The transmitter ID is a series of num- applicator and wire.
-
Page 46: Explanation Of System Symbols
Chapter 3 – Getting to Know Your System Explanation of System Symbols The following are symbols (and their descriptions), which you may find on your System and/or its packaging. These symbols tell you about the proper and safe use of the System. Some of these symbols may not have meaning in the United States, and are listed for informational purposes only. - Page 47 Chapter 3 – Getting to Know Your System Symbol Meaning Symbol Meaning For sale by or on the order of a physician only (U.S.) Date of Manufacture Direct Current (DC) voltage Class II Equipment Alternating Current Authorized Representative in the European Community Marking Certifies That the Device Meets the European Temporary Submersion Council Directive 93/42/EEC...
-
Page 48: Explanation Of System Icons
Chapter 3 – Getting to Know Your System Explanation of System Icons The following icons may appear on your t:slim X2 Pump screen: Symbol Meaning Symbol Meaning The amount of charge left in the pump battery. Amount of insulin remaining in the reservoir. - Page 49 Chapter 3 – Getting to Know Your System Symbol Meaning Symbol Meaning Wait 15 minutes calibration error. Sensor startup 61–90 minutes. Startup calibration is required (2 BG values). Sensor startup 91–119 minutes. Additional startup calibration is required. CGM calibration is required. Pump Icon Definitions (Part 2 of 2) If you have a CGM session active and are using the Basal-IQ Technology, you may see the following additional icons on your pump screen:...
-
Page 50: Explanation Of Pump Colors
Chapter 3 – Getting to Know Your System Explanation of Pump Colors Red LED 1 red blink every 30 seconds indicates a malfunction or alarm condition. Yellow LED 1 yellow blink every 30 seconds indicates an alert or reminder condition. Green LED •... - Page 51 Chapter 3 – Getting to Know Your System THIS PAGE IS INTENTIONALLY LEFT BLANK Customer Technical Support: (877) 801-6901...
-
Page 52: Screen Lock
8. Insulin Level: Displays the current Screen Lock amount of insulin in the cartridge. The screen lock appears anytime you 9. Tandem Logo: Returns to the turn on the screen. You must tap 1–2–3 Home Screen. in sequential order to unlock the pump. - Page 53 Chapter 3 – Getting to Know Your System 10:20 AM 100% June 1, 2018 235 u INSULIN ON BOARD (IOB) Units 1.1 u Time Remaining 1:09 hrs Customer Technical Support: (877) 801-6901...
-
Page 54: Cgm Screen Lock
Chapter 3 – Getting to Know Your System 9. Active Bolus Icon: Indicates a CGM Screen Lock bolus is active. The CGM screen lock appears anytime 10. Status: Displays current system you turn on the screen and you are settings and insulin delivery status. using your pump with a CGM. - Page 55 Chapter 3 – Getting to Know Your System 10:20 AM June 1, 2018 100% 235 u mg/dL INSULIN ON BOARD: 1.1 u 1:09 hrs Customer Technical Support: (877) 801-6901...
-
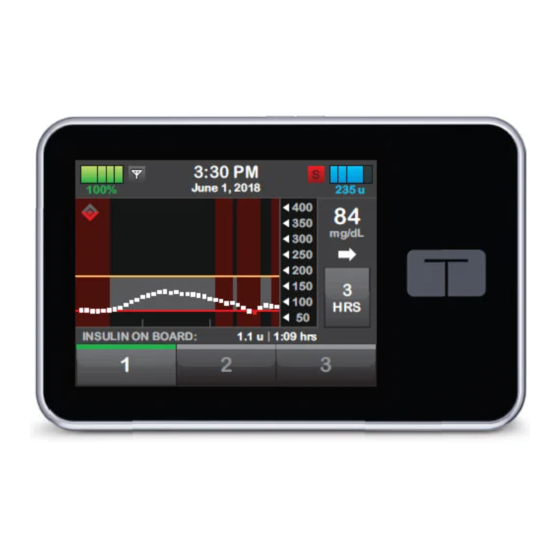
Page 56: Basal-Iq Screen Lock
Chapter 3 – Getting to Know Your System Basal-IQ Screen Lock The Basal-IQ screen lock appears any- time you turn on the screen and you are using your pump with a CGM and the Basal-IQ feature enabled. The Basal-IQ screen lock is the same as the CGM screen lock, with the following addi- tions. - Page 57 Chapter 3 – Getting to Know Your System 3:30 PM June 1, 2018 100% 235 u mg/dL INSULIN ON BOARD: 1.1 u 1:09 hrs Customer Technical Support: (877) 801-6901...
-
Page 58: Home Screen
2. USB Port: Port to charge your 11. Tubing Connector: Connects the t:slim X2 Pump battery. Close the cartridge tubing to the infusion set cover when not in use. tubing. 3. Bolus: Program and deliver a bolus. - Page 59 Chapter 3 – Getting to Know Your System 10:20 AM 100% June 1, 2018 235 u BOLUS OPTIONS INSULIN ON BOARD (IOB) Units 1.1 u Time Remaining 1:09 hrs Customer Technical Support: (877) 801-6901...
-
Page 60: Cgm Home Screen
Chapter 3 – Getting to Know Your System 10. Status: Displays current system To view CGM information on the full 3.10 CGM Home Screen settings and insulin delivery status. screen: From the Home Screen tap anywhere 1. Time and Date Display: Displays 11. -
Page 61: 100% June 1, 2018 235 U
Chapter 3 – Getting to Know Your System 10:20 AM June 1, 2018 100% 235 u mg/dL INSULIN ON BOARD: 1.1 u 1:09 hrs OPTIONS BOLUS Customer Technical Support: (877) 801-6901... -
Page 62: Basal-Iq Home Screen
Chapter 3 – Getting to Know Your System 3.11 Basal-IQ Home Screen The home screen with Basal-IQ Tech- nology enabled is identical to the CGM Home Screen, with the following addi- tions: 1. Basal-IQ Technology Status: Indicates the status of the Basal-IQ Technology. - Page 63 Chapter 3 – Getting to Know Your System 4:00 PM June 1, 2018 100% 235 u mg/dL INSULIN ON BOARD: 1.1 u 1:09 hrs OPTIONS BOLUS Customer Technical Support: (877) 801-6901...
-
Page 64: Status Screen
Chapter 3 – Getting to Know Your System 8. Target BG: Displays current BG 3.12 Status Screen target used to calculate a bolus. The status screen can be accessed 9. Insulin Duration: Displays current from the lock screen and the Home insulin duration setting used to Screen. - Page 65 Chapter 3 – Getting to Know Your System Current Status Current Status BACK BACK Correction 1u: 50 Weekday mg/dL Factor 0.75 1u: 10 g Basal Rate u/hr Carb Ratio 5.5 u Last Bolus Target BG mg/dL 06/01 - 12:00 PM Carbohydrates Insulin Duration hours...
-
Page 66: Bolus Screen
Chapter 3 – Getting to Know Your System 9. Units: Displays total units 3.13 Bolus Screen calculated. Tap to enter a bolus request or change (override) a 1. Back: Returns to the Home Screen. calculated bolus. 2. Carbs: Enter grams of carb. See 10. - Page 67 Chapter 3 – Getting to Know Your System Using Grams Using Units BACK NEXT NEXT BACK NEXT NEXT units units CARBS INSULIN Add BG Add BG grams units View Calculation View Calculation Customer Technical Support: (877) 801-6901...
-
Page 68: Options Screen
Chapter 3 – Getting to Know Your System 9. CGM History: Displays historical 3.14 Options Screen log of CGM events. 1. Back: Returns to the Home Screen. 10. Basal-IQ: Turn on/off Basal-IQ Technology, and Basal-IQ Alerts. 2. Stop Insulin: Stops insulin delivery. If insulin delivery is stopped, 11. - Page 69 Chapter 3 – Getting to Know Your System Options Options BACK BACK STOP INSULIN Load My Pump Pump History My CGM CGM History Temp Rate Basal-IQ Customer Technical Support: (877) 801-6901...
-
Page 70: My Pump Screen
Reminders and Alerts. 3. Pump Settings: Customize Quick Bolus, Pump Volume, Screen Options, and set Time and Date. 4. Pump Info: Displays t:slim X2 Pump serial number, Tandem Diabetes Care Customer Technical Support phone number, website, and other technical information. - Page 71 Chapter 3 – Getting to Know Your System My Pump BACK Personal Profiles Alert Settings Pump Settings Pump Info Customer Technical Support: (877) 801-6901...
-
Page 72: My Cgm Screen
Chapter 3 – Getting to Know Your System 3.16 My CGM Screen 1. Start Sensor: Starts a CGM session. If sensor is active, STOP SENSOR will be displayed. 2. Calibrate CGM: Enter a calibration blood glucose value. Only active when sensor session is active. 3. - Page 73 Chapter 3 – Getting to Know Your System My CGM BACK START SENSOR Calibrate CGM Calibrate CGM CGM Alerts CGM Settings Customer Technical Support: (877) 801-6901...
-
Page 74: Basal-Iq Screen
NOTE: Basal-IQ Technology On by Default If this is the first time using your t:slim X2 Insulin Pump with the Basal-IQ Technology, you must have an active sensor session before using the Basal-IQ Technology. The Basal-IQ Technology is turned on by default and will begin working once there is an active sensor session. - Page 75 Chapter 3 – Getting to Know Your System Basal-IQ BACK SAVE Basal-IQ Suspend Alert Resume Alert Customer Technical Support: (877) 801-6901...
-
Page 76: Number Keypad Screen
Chapter 3 – Getting to Know Your System 3.18 Number Keypad Screen 1. Value Entered. 2. Back: Returns to previous screen. 3. Keypad Numbers. 4. +/=: Allows numbers to be added on gram screen. If in units, this displays as a decimal point. 5. - Page 77 Chapter 3 – Getting to Know Your System BACK DONE grams + / = Customer Technical Support: (877) 801-6901...
-
Page 78: Letter Keypad Screen
Chapter 3 – Getting to Know Your System 3.19 Letter Keypad Screen 1. Name of Profile. 2. Back: Returns to previous screen. 3. Space: Enters a space. 4. 123: Changes keypad mode from letters (ABC) to numbers (123). 5. Save: Saves entered information. 6. - Page 79 Chapter 3 – Getting to Know Your System Weekday BACK SAVE name space Customer Technical Support: (877) 801-6901...
-
Page 80: Section 2 - Key Pump Features
Section 2 Key Pump Features... -
Page 81: Chapter 4 - Getting Started
Key Pump Features Chapter 4 Getting Started... -
Page 82: Charging The T:slim X2 Pump
System to charge your Car Power USB Adapter: MAKE SURE to not move further than the length t:slim X2 Pump. If you lose any of the of the USB cable when you are connected to the accessories, or need a replacement, 1. -
Page 83: Using The Touch Screen
2. Plug the other end of the cable into Using the Touch Screen the micro USB port on the pump. PRECAUTION To turn on your t:slim X2 Pump screen, Before using a Mac ® or PC to charge CONFIRM that the screen display turns on, you... -
Page 84: Turning On The T:slim X2 Pump Screen
Screen NOTE: Touch Screen Tips eling in a different time zone or adjust- When using the t:slim X2 Pump, tap the Tan- ing for Daylight Savings Time. The screen lock appears anytime you dem Logo to return to the Home Screen or tap turn on the screen, and after a bolus or BACK to return to the previous screen. -
Page 85: Edit Date
7. Verify the correct date is set and tap 9. Verify the correct time is set and tap SAVE. SAVE. 8. Tap Tandem Logo to return to the Any edits to Time or Date will not be Home Screen. saved until you tap SAVE. - Page 86 Chapter 4 – Getting Started THIS PAGE IS INTENTIONALLY LEFT BLANK Customer Technical Support: (877) 801-6901...
-
Page 87: Chapter 5 - Infusion Site Care And Loading Cartridge
Key Pump Features Chapter 5 Infusion Site Care and Loading Cartridge... -
Page 88: Infusion Site Selection And Care
Chapter 5 – Infusion Site Care and Loading Cartridge Areas 2 inches around your belly PRECAUTION Infusion Site Selection and button. CHECK your infusion site daily for proper place- Care ment and leaks. REPLACE your infusion set if Any scars, moles, stretch marks, you notice leaks around the site. -
Page 89: Cartridge Instructions For Use
Chapter 5 – Infusion Site Care and Loading Cartridge or lumps which can affect insulin absorption. Areas of Body for Infusion Set Insertion • Consult your healthcare provider to establish a rotation schedule that best fits your needs. Keep it Clean •... -
Page 90: Filling And Loading A T:slim Cartridge
• Vial of U-100 Humalog or U-100 cartridge with insulin and load the car- NovoLog insulin Insulin tridge into your t:slim X2 Pump. The Fill Port single-use disposable cartridge can • Alcohol prep swab hold up to 300 units (3.0 mL) of insulin. - Page 91 Chapter 5 – Infusion Site Care and Loading Cartridge Instructions for Drawing Insulin from 1. Inspect the needle and syringe syringe into vial. Maintain pressure Vial into Syringe package for any signs of damage. on syringe plunger. Discard any damaged product. PRECAUTION ALWAYS remove all air bubbles from the Sys- 2.
- Page 92 Chapter 5 – Infusion Site Care and Loading Cartridge 8. Slowly pull back the plunger to the 10. Check the syringe for air bubbles desired amount of insulin. and do one of the following: If there are air bubbles present, repeat step 9.
- Page 93 Chapter 5 – Infusion Site Care and Loading Cartridge 5. Make sure the needle is still in the fill back pressure as you slowly press port and release the plunger. on the plunger. Pressure will pull the plunger to its neutral position but it will NOT push any air back inside the cartridge.
- Page 94 3. Tap Load. 8. Place bottom of the cartridge at the During the load sequence, the end of the pump. Make sure Tandem Logo is disabled. 10. Tap NEXT to continue. cartridge is lined up to both guide tracks.
-
Page 95: Filling Tubing
Chapter 5 – Infusion Site Care and Loading Cartridge tridge. This can cause very high blood glucose, your infusion set from your body before filling damaged or opened, discard of or Diabetic Ketoacidosis (DKA). the tubing can result in over delivery of insulin. properly and use another tubing This can cause serious injury or death from very set. - Page 96 Chapter 5 – Infusion Site Care and Loading Cartridge 15–20 units for 23 inch tubing sion set tubing an extra quarter of a turn to b. If you want to fill the tubing with ensure a secure connection. A loose con- more than 30 units, tap FILL to ...
-
Page 97: Filling Cannula
Chapter 5 – Infusion Site Care and Loading Cartridge The amount of insulin remaining displayed 2. Insert a new infusion set and NOTE: Stopping Fill on the Home Screen will decrease 5 units connect filled tubing to site, then You can tap STOP at any time during the fill at a time (for example, you will see 140, tap NEXT. - Page 98 1. Tap SAVE if correct. Tap Edit NOTE: First Time Use Reminder if settings need to be If this is the first time using your t:slim X2 changed. Pump and a Personal Profile has not been defined, a screen will notify you that a pro- 2.
-
Page 99: Chapter 6 - Personal Profiles
Key Pump Features Chapter 6 Personal Profiles... -
Page 100: Personal Profiles Overview
Creating Personal Profiles WARNING DO NOT start to use your System before con- The t:slim X2 Pump uses the settings in You can create up to 6 Personal Pro- sulting with your healthcare provider to deter- your active profile to calculate the deliv- files;... - Page 101 When a BG is entered during bolus pro- • Correction Factor (range: 1 unit:1 • Carbs (default: off if no Carb Ratio is gramming, your t:slim X2 Pump will mg/dL to 1 unit:600 mg/dL) defined) consider any active IOB and calculate an adjusted bolus if necessary.
-
Page 102: Programming A New Personal Profile
Chapter 6 – Personal Profiles 6. Tap Press to Setup to begin setting that 1 unit of insulin will lower BG) PRECAUTION insulin delivery settings. and tap DONE. ALWAYS confirm that the decimal point place- ment is correct when entering your Personal 5. - Page 103 Chapter 6 – Personal Profiles Tap ADD to create additional time 3. On the Add Segment screen, tap Bolus Settings segments. Time of Day to select AM or PM. 1. Tap the Bolus Settings Panel. Once a time segment is set beyond Timed Settings BACK 12:00 PM, the default will change to...
-
Page 104: Editing Or Reviewing An Existing Profile
Chapter 6 – Personal Profiles 4. Tap Max Bolus. 9. Tap Tandem Logo to return to the 2. Tap My Pump. Home Screen. 5. Using the onscreen keypad, enter 3. Tap Personal Profiles. the desired amount for maximum Adding More Personal Profiles bolus (1–25 units) and tap DONE. -
Page 105: Duplicating An Existing Profile
Tap NO and make changes. activated. You cannot delete a 7. Using the onscreen keypad, enter profile until you have activated 15. Tap Tandem Logo to return to the the name (up to 16 characters) for another profile. Home Screen. -
Page 106: Renaming An Existing Profile
Chapter 6 – Personal Profiles If you have only 1 profile defined, 6. Using the onscreen keypad, 7. Tap the Tandem Logo to return to you do not need to activate it rename the profile name (up to 16 the Home Screen. -
Page 107: Chapter 7 - Bolus
Key Pump Features Chapter 7 Bolus... -
Page 108: Bolus Overview
Your t:slim X2 Pump offers you the abil- instructions of you healthcare pro- BG Entry and Correction ity to deliver different boluses to cover vider and then re-test your blood... - Page 109 Chapter 7 – Bolus BG Value Manual Entry rection bolus to any other bolus you correction bolus from any other bolus request. you request. 1. From the Home Screen tap Bolus. 2. Tap Add BG. Your BG is Above Target Your BG is Below Target Add Correction Bolus? Reduce Bolus Calculation?
-
Page 110: Bolus Override
Chapter 7 – Bolus 3. Using the onscreen keypad enter Bolus Override Food Bolus Using Grams units of insulin to be delivered, then tap DONE. You can override the calculated bolus 1. From the Home Screen, tap by tapping on the calculated units value BOLUS. -
Page 111: Extended Bolus
Chapter 7 – Bolus Tap YES if entered data is Tap NO to go back to make Only 1 extended bolus can be active at correct. any given time. However, if the changes or view calculations. DELIVER LATER portion of an extend- ... -
Page 112: Canceling Or Stopping A Bolus
Chapter 7 – Bolus The bolus button will remain inactive The DELIVER LATER portion of the NOTE: Extended Bolus During Extended Bolus also has minimum while the bolus is being canceled. Insulin Suspension and maximum rates. If you program If the Basal-IQ Technology is on and has sus- ... -
Page 113: Chapter 8 - Stop/Resume Insulin
Key Pump Features Chapter 8 Stop/Resume Insulin... -
Page 114: Stopping Insulin Delivery
When you stop all insulin delivery, On/Quick Bolus Button once to turn on any active bolus and any active temp your t:slim X2 Pump screen. rate are immediately stopped. No insu- lin delivery can take place while your 1. Tap 1–2–3 to access the Home pump is stopped. - Page 115 Chapter 8 – Stop/Resume Insulin THIS PAGE IS INTENTIONALLY LEFT BLANK Customer Technical Support: (877) 801-6901...
-
Page 116: Section 3 - Additional Pump Operations
Section 3 Additional Pump Operations... -
Page 117: Chapter 9 - Temporary Basal Rate
Additional Pump Operations Chapter 9 Temporary Basal Rate... -
Page 118: Setting A Temp Rate
Chapter 9 – Temporary Basal Rate selected rate is too high and that it will 6. Verify settings and tap START. Setting a Temp Rate be set to the maximum allowable rate The TEMP RATE STARTED screen for delivery. A Temp Rate is used to increase or is temporarily displayed. - Page 119 Chapter 9 – Temporary Basal Rate 2. On the Options screen, tap X (stop icon) on the right side of Temp Rate. 3. On the confirmation screen, tap STOP. The TEMP RATE STOPPED screen appears before returning to the Options screen.
- Page 120 Chapter 9 – Temporary Basal Rate THIS PAGE IS INTENTIONALLY LEFT BLANK Customer Technical Support: (877) 801-6901...
-
Page 121: Chapter 10 - Quick Bolus
Additional Pump Operations Chapter 10 Quick Bolus... -
Page 122: Setting Up Quick Bolus
It is a way to deliver to look at the t:slim X2 Pump’s screen. 7. Tap Increment Amount. a bolus by following beep/vibration... - Page 123 Chapter 10 – Quick Bolus 3. The pump will beep/vibrate once for to vibrate, the pump will stop vibrating in each increment pressed to confirm response to additional button presses to desired amount. notify you). Look at the screen to confirm the bolus amount.
- Page 124 Chapter 10 – Quick Bolus THIS PAGE IS INTENTIONALLY LEFT BLANK Customer Technical Support: (877) 801-6901...
-
Page 125: Chapter 11 - T:slim X2 Pump Settings
Additional Pump Operations Chapter 11 t:slim X2 Pump Settings... -
Page 126: T:slim X2 Pump Volume
Chapter 11 – t:slim X2 Pump Settings This chapter contains explanations and 4. Tap Pump Volume. You can always turn the screen off instructions for Pump Settings that are before it automatically times out by not covered in other chapters. - Page 127 Chapter 11 – t:slim X2 Pump Settings 3. Tap Tandem Logo to return to the Home Screen. 4. Tap Feature Lock to turn On or Off and tap SAVE. A screen to verify that you want to activate the Feature Lock will be displayed.
- Page 128 Chapter 11 – t:slim X2 Pump Settings THIS PAGE IS INTENTIONALLY LEFT BLANK Customer Technical Support: (877) 801-6901...
-
Page 129: Chapter 12 - T:slim X2 Pump Info And History
Additional Pump Operations Chapter 12 t:slim X2 Pump Info and History... -
Page 130: T:slim X2 Pump Info
Chapter 12 – t:slim X2 Pump Info and History maximum number of events is reached, declared. The letter “C” (C: Alert) indi- 12.1 t:slim X2 Pump Info the oldest events are removed from the cates the time it was cleared. -
Page 131: Chapter 13 - T:slim X2 Pump Reminders
Additional Pump Operations Chapter 13 t:slim X2 Pump Reminders... -
Page 132: Low Bg Reminder
Chapter 13 – t:slim X2 Pump Reminders Your t:slim X2 Pump lets you know every 10 minutes until acknowledged. 6. Low BG is set to on; to turn off, tap important information about the System Reminders do not escalate. LOW BG. -
Page 133: High Bg Reminder
Chapter 13 – t:slim X2 Pump Reminders a. Tap Remind Me Above and reminder on, you need to set how 13.2 High BG Reminder using the onscreen keypad, much time should pass before the enter a High BG value (from 150 reminder occurs. -
Page 134: Missed Meal Bolus Reminder
Chapter 13 – t:slim X2 Pump Reminders To Respond to the After Bolus BG (Reminder 1 to 4) and do the 7. Tap the Tandem Logo to return to Reminder following: the Home Screen. To clear the reminder tap CLOSE and a. -
Page 135: Chapter 14 - User Settable Alerts And Alarms
Additional Pump Operations Chapter 14 User Settable Alerts and Alarms... -
Page 136: Low Insulin Alert
DONE. has been no interaction with the pump in the specified number of hours and Your t:slim X2 Pump keeps track of 7. Tap SAVE when all changes are the pump will shut down after 30 sec- how much insulin remains in the car- complete. - Page 137 8. Tap DONE, then tap SAVE when all changes are complete. Auto-Off Alarm Screen Tap CLOSE. 9. Tap Tandem Logo to return to the Home Screen. AUTO-OFF ALARM To Respond to Auto-Off Warning ALL DELIVERIES STOPPED! Tap DO NOT SHUT DOWN.
-
Page 138: Section 4 - Pump Safety Alerts And Alarms
Section 4 Pump Safety Alerts and Alarms... -
Page 139: Chapter 15 - T:slim X2 Pump Alerts
Pump Safety Alerts and Alarms Chapter 15 t:slim X2 Pump Alerts... - Page 140 Chapter 15 – t:slim X2 Pump Alerts Your t:slim X2 Pump lets you know until acknowledged. Alerts do not esca- important information about the System late. with Reminders, Alerts, and Alarms. Reminders are displayed to notify you NOTE: CGM Alerts...
-
Page 141: Low Insulin Alert
Chapter 15 – t:slim X2 Pump Alerts 15.1 Low Insulin Alert What will I see on the screen? What does it mean? 5 units or less of insulin remain in the cartridge. LOW INSULIN ALERT Change cartridge or pump will stop How will the System notify me? all deliveries. -
Page 142: Low Power Alerts
Chapter 15 – t:slim X2 Pump Alerts 15.2 Low Power Alerts Low Power Alert 1 What will I see on the screen? What does it mean? Less than 25% of battery power remains. LOW POWER ALERT Power Level: How will the System notify me? Less than 25% remaining. - Page 143 Chapter 15 – t:slim X2 Pump Alerts Low Power Alert 2 What will I see on the screen? What does it mean? Less than 5% of battery power remains. Insulin delivery will continue for 30 minutes and LOW POWER ALERT then the pump will power off and insulin delivery will stop.
-
Page 144: Incomplete Bolus Alert
Chapter 15 – t:slim X2 Pump Alerts 15.3 Incomplete Bolus Alert What will I see on the screen? What does it mean? You started a bolus request but did not complete the request within 90 seconds. INCOMPLETE BOLUS ALERT This bolus has not been delivered. -
Page 145: Incomplete Temp Rate Alert
Chapter 15 – t:slim X2 Pump Alerts 15.4 Incomplete Temp Rate Alert What will I see on the screen? What does it mean? You started to set up a temp rate but did not complete the request within 90 seconds. -
Page 146: Incomplete Load Sequence Alerts
Chapter 15 – t:slim X2 Pump Alerts 15.5 Incomplete Load Sequence Alerts Incomplete Cartridge Change Alert What will I see on the screen? What does it mean? You selected Change Cartridge from the Load menu but did not complete the process within 3 minutes. - Page 147 Chapter 15 – t:slim X2 Pump Alerts Incomplete Fill Tubing Alert What will I see on the Screen? What does it mean? You selected Fill Tubing from the Load menu but did not complete the process within 3 FILL TUBING ALERT minutes.
- Page 148 Chapter 15 – t:slim X2 Pump Alerts Incomplete Fill Cannula Alert What will I see on the Screen? What does it mean? You selected Fill Cannula from the Load menu but did not complete the process within FILL CANNULA ALERT 3 minutes.
-
Page 149: Incomplete Setting Alert
Chapter 15 – t:slim X2 Pump Alerts 15.6 Incomplete Setting Alert What will I see on the screen? What does it mean? You started to set up a new Personal Profile but did not save or complete the program- INCOMPLETE SETTING ming within 5 minutes. -
Page 150: Basal Rate Required Alert
Chapter 15 – t:slim X2 Pump Alerts 15.7 Basal Rate Required Alert What will I see on the screen? What does it mean? You did not enter a basal rate in a time segment in Personal Profiles. A basal rate must Basal Rate Required be entered in each time segment (rate can be 0 u/hr). -
Page 151: Max Hourly Bolus Alert
Chapter 15 – t:slim X2 Pump Alerts 15.8 Max Hourly Bolus Alert What will I see on the screen? What does it mean? In the previous 60 minutes, you requested total bolus delivery that is more than 1.5 MAX HOURLY BOLUS ALERT times your Max Bolus setting. -
Page 152: Max Bolus Alerts
Chapter 15 – t:slim X2 Pump Alerts 15.9 Max Bolus Alerts Max Bolus Alert 1 What will I see on the screen? What does it mean? You requested a bolus larger than the Max Bolus setting in your active Personal Profile. - Page 153 Chapter 15 – t:slim X2 Pump Alerts Max Bolus Alert 2 The following applies only if you have Carbs turned on in your active Personal Profile and your Max Bolus amount is set to 25 units. What will I see on the screen? What does it mean? Your Max Bolus is set to 25 units and you requested a bolus larger than 25 units.
-
Page 154: Max Basal Alerts
Chapter 15 – t:slim X2 Pump Alerts 15.10 Max Basal Alerts Max Basal Alert 1 What will I see on the screen? What does it mean? When entering a basal rate or requesting a temp rate, you requested a basal rate more than 2 times the highest basal rate defined in your Personal Profile. - Page 155 Chapter 15 – t:slim X2 Pump Alerts Max Basal Alert 2 What will I see on the screen? What does it mean? An active temp rate exceeded 2 times your highest basal setting defined in your Per- MAX BASAL ALERT sonal Profile.
-
Page 156: Min Basal Alerts
Chapter 15 – t:slim X2 Pump Alerts 15.11 Min Basal Alerts Min Basal Alert 1 What will I see on the screen? What does it mean? When entering a basal rate or requesting a temp rate, you requested a basal rate less than half of the lowest basal rate defined in your Personal Profile. - Page 157 Chapter 15 – t:slim X2 Pump Alerts Min Basal Alert 2 What will I see on the screen? What does it mean? An active temp rate dropped below half of your lowest basal setting defined in your Per- MIN BASAL ALERT sonal Profile.
-
Page 158: Connection Error Alert
What will I see on the screen? What does it mean? You connected your t:slim X2 Pump to a computer with the USB cable to charge it or CONNECTION ERROR ALERT upload data to t:connect and a connection could not be made. -
Page 159: Power Source Alert
15.13 Power Source Alert What will I see on the screen? What does it mean? You connected your t:slim X2 Pump to a power source that does not have enough POWER SOURCE ALERT power to charge the pump. The pump cannot charge using the current power source. -
Page 160: Data Error Alert
Chapter 15 – t:slim X2 Pump Alerts 15.14 Data Error Alert What will I see on the screen? What does it mean? Your t:slim X2 Pump encountered a condition that could potentially result in a loss of DATA ERROR ALERT data. Please verify that your active... -
Page 161: Chapter 16 - T:slim X2 Pump Alarms
Pump Safety Alerts & Alarms Chapter 16 t:slim X2 Pump Alarms... - Page 162 Chapter 16 – t:slim X2 Pump Alarms Information in this section will help you PRECAUTION learn how to respond to Alarms. CHECK your System regularly for potential alarm conditions that may display. It is important to be Alarms notify you with 3 sequences of 3...
-
Page 163: Resume Pump Alarm
Chapter 16 – t:slim X2 Pump Alarms 16.1 Resume Pump Alarm What will I see on the screen? What does it mean? You tapped STOP INSULIN in the Options menu and insulin delivery has been stopped RESUME PUMP ALARM for more than 15 minutes. -
Page 164: Low Power Alarms
16.2 Low Power Alarms Low Power Alarm 1 What will I see on the screen? What does it mean? Your t:slim X2 Pump detected a power level of 1% or less remaining and all deliveries have stopped. LOW POWER ALARM ALL DELIVERIES STOPPED! How will the System notify me? Your pump is about to shut down. - Page 165 Low Power Alarm 2 What will I see on the screen? What does it mean? Your t:slim X2 Pump detected a voltage level too low to ensure normal performance LOW POWER ALARM and all deliveries have stopped. ALL DELIVERIES STOPPED! How will the System notify me? Your pump is about to shut down.
-
Page 166: Empty Cartridge Alarm
Chapter 16 – t:slim X2 Pump Alarms 16.3 Empty Cartridge Alarm What will I see on the screen? What does it mean? Your t:slim X2 Pump detected that the cartridge is empty and all deliveries have EMPTY CARTRIDGE ALARM stopped. ALL DELIVERIES STOPPED! -
Page 167: Cartridge Error Alarm
What will I see on the screen? What does it mean? Your t:slim X2 Pump detected that the cartridge could not be used and all deliveries CARTRIDGE ALARM have stopped. This can be caused by cartridge defect, not following the proper proce-... -
Page 168: Cartridge Removal Alarm
Chapter 16 – t:slim X2 Pump Alarms 16.5 Cartridge Removal Alarm What will I see on the screen? What does it mean? Your t:slim X2 Pump detected that the cartridge has been removed and all deliveries CARTRIDGE ALARM have stopped. ALL DELIVERIES STOPPED! How will the System notify me? The cartridge cannot be detected. -
Page 169: Temperature Alarm
Chapter 16 – t:slim X2 Pump Alarms 16.6 Temperature Alarm What will I see on the screen? What does it mean? Your t:slim X2 Pump detected an internal temperature below 35 º F (2 º C) or above 113 º... -
Page 170: Occlusion Alarm 1
16.7 Occlusion Alarm 1 What will I see on the screen? What does it mean? Your t:slim X2 Pump detected that insulin delivery is blocked and all deliveries have OCCLUSION ALARM stopped. See Section 30.4 t:slim X2 Pump Performance Characteristics for more infor- mation on how long it can take the system to detect an occlusion. -
Page 171: Occlusion Alarm 2
16.8 Occlusion Alarm 2 What will I see on the screen? What does it mean? Your t:slim X2 Pump detected a second occlusion alarm shortly after the first occlusion alarm and all deliveries have stopped. OCCLUSION ALARM ALL DELIVERIES STOPPED! How will the System notify me? Insulin delivery may be blocked. -
Page 172: Screen On/Quick Bolus Button Alarm
16.9 Screen On/Quick Bolus Button Alarm What will I see on the screen? What does it mean? The Screen On/Quick Bolus Button (on the top of your t:slim X2 Pump) is stuck or not BUTTON ALARM functioning properly and all deliveries have stopped. -
Page 173: Altitude Alarm
What will I see on the screen? What does it mean? Your t:slim X2 Pump detected a pressure difference between inside the cartridge and ALTITUDE ALARM the surrounding air within the validated operating range of -1,300 feet to 10,000 feet and all deliveries have stopped. -
Page 174: Reset Alarm
16.11 Reset Alarm What will I see on the screen? What does it mean? Your t:slim X2 Pump detected that one if its micro-processors experienced a reset and PUMP HAS BEEN RESET all deliveries have been stopped. All active deliveries have been... -
Page 175: Chapter 17 - T:slim X2 Pump Malfunction
Pump Safety Alerts and Alarms Chapter 17 t:slim X2 Pump Malfunction... -
Page 176: Malfunction
Chapter 17 – t:slim X2 Pump Malfunction 17.1 Malfunction If your t:slim X2 Pump detects a system error, the MALFUNCTION screen appears and all deliveries are stopped. Contact Tandem Diabetes Care Cus- tomer Technical Support. Malfunctions notify you with 3 sequences of 3 notes at highest volume and 3 vibrations. - Page 177 Chapter 17 – t:slim X2 Pump Malfunction What will I see on the screen? What does it mean? Your t:slim X2 Pump detected a system error and all deliveries have been stopped. MALFUNCTION This pump cannot operate. Call How will the System notify me? customer support immediately.
-
Page 178: Section 5 - Getting Started With Your Cgm System
Section 5 Getting Started with Your CGM System... -
Page 179: Chapter 18 - Cgm Overview
Getting Started with Your CGM System Chapter 18 CGM Overview... -
Page 180: Cgm System Overview
CGM with your To review the icons and controls dis- become 55 mg/dL or lower, the Urgent t:slim X2 Pump. Use of a CGM is played on the Home Screen with CGM Low Alert will sound. This alert is not... -
Page 181: Transmitter Overview
Chapter 18 – CGM Overview Minimize the Full-Screen CGM If you have a new transmitter, only open be able to communicate. If water is between Graph the package when you are ready to use your transmitter and the display device (for example, if you’re showering or swimming) keep Tap the minimize icon to return to the them closer to each other. - Page 182 Chapter 18 – CGM Overview tery may drain as quickly as 7 days after this alert occurs. LOW TRANSMITTER BATTERY Please replace your transmitter soon. CLOSE Customer Technical Support: (877) 801-6901...
-
Page 183: Chapter 19 - Cgm Settings
Getting Started with Your CGM System Chapter 19 CGM Settings... -
Page 184: About Bluetooth
Dexcom receiver prior to pairing to the Bluetooth Low Energy (BLE) is a type of t:slim X2 Pump. The receiver power must be wireless communication used in cell 2. From the Home Screen, tap completely off in order to avoid connection prob- phones and many other devices. -
Page 185: Setting Cgm Volume
8. To make sure that the correct To set your Pump Volume, see Section The CGM Volume setting that you transmitter ID is entered, you will be 11.1 t:slim X2 Pump Volume. choose applies to all CGM alerts, prompted to enter it a second time. - Page 186 Chapter 19 – CGM Settings CGM Volume Details CGM Volume Vibrate Soft Normal HypoRepeat High Alert 2 long vibrates 2 long vibrates + 2 long vibrates + 2 long vibrates + 2 low beeps 2 medium beeps 2 medium beeps Low Alert 3 short vibrates 3 short vibrates +...
-
Page 187: Cgm Info
Chapter 19 – CGM Settings To Select Your CGM Volume: You can view this information at any time. 1. From the Home Screen, tap OPTIONS. 1. From the Home Screen, tap OPTIONS. 2. Tap My CGM. 2. Tap My CGM. 3. - Page 188 Chapter 19 – CGM Settings THIS PAGE IS INTENTIONALLY LEFT BLANK Customer Technical Support: (877) 801-6901...
-
Page 189: Chapter 20 - Setting Cgm Alerts
Getting Started with Your CGM System Chapter 20 Setting CGM Alerts... -
Page 190: Setting Your High Glucose Alert And Repeat Feature
Chapter 20 – Setting CGM Alerts Setting Your CGM Alerts High and Low Glucose Alerts 6. Tap Alert Me Above. You can create personal settings for You can personalize the High and Low The default setting for the High Alert how and when you want the System to Alerts which tell you when your sensor is 200 mg/dL. -
Page 191: Setting Your Low Glucose Alert And Repeat Feature
Chapter 20 – Setting CGM Alerts To Set Up the Repeat Feature: 5. To Set the Low Alert, tap Low Alert. reading remains below the Low Alert value. 9. Tap Repeat. 6. Tap Alert Me Below. To Set Up the Repeat Feature: 10. -
Page 192: Setting Your Rise Alert
Chapter 20 – Setting CGM Alerts more per minute. The default value for up shows. The pump vibrates or beeps To change your selection, tap Rate. both the Fall Alert and the Rise Alert is according to your CGM Volume selec- off. -
Page 193: Setting Your Out Of Range Alert
Chapter 20 – Setting CGM Alerts of Range Alert screen (if turned on) hours and 20 minutes) then tap NOTE: Turning the Alert Off when the transmitter and pump are not DONE. To turn off the Fall Alert, tap OFF/ON. communicating. - Page 194 Chapter 20 – Setting CGM Alerts THIS PAGE IS INTENTIONALLY LEFT BLANK Customer Technical Support: (877) 801-6901...
-
Page 195: Chapter 21 - Starting A Cgm Sensor Session
Getting Started with Your CGM System Chapter 21 Starting a CGM Sensor Session... -
Page 196: Start The Sensor
If you don't enter a code feet of each other without replaced with STOP SENSOR. into either the t:slim X2 or a Mobile obstruction. Re-check in 10 App, you will be prompted to cali- minutes to see if the out of The following prompt displays brate your sensor every 24 hours. -
Page 197: Sensor Startup Period
G6 CGM sensor startup periods, refer to the manufacturer’s website for applicable user guides. During the startup period, the CGM Home Screen on your t:slim X2 Pump shows a 2-hour countdown symbol in the upper right portion of the screen. The countdown symbol fills in over time to show that you are getting closer to the end of the startup period. - Page 198 Chapter 21 – Starting a CGM Sensor Session Examples If you did not enter a sensor code, then 10:20 AM follow the instructions in the next sec- June 1, 2018 100% 235 u For example, if you started your sensor tion to calibrate your sensor.
-
Page 199: Chapter 22 - Calibrating Your Cgm System
Getting Started with Your CGM System Chapter 22 Calibrating Your CGM System... -
Page 200: Calibration Overview
Chapter 22 – Calibrating Your CGM System • When notified Follow these important instructions 22.1 Calibration Overview when obtaining blood glucose On the first day of your sensor session, values for calibration: The Dexcom G6 CGM does not require you must enter 4 blood glucose values that you calibrate following the sensor •... -
Page 201: Startup Calibration
Chapter 22 – Calibrating Your CGM System of a sensor session. Blood glucose sensor glucose readings until the pump 5. Tap My CGM. meter and strip accuracy vary accepts the blood glucose values. between blood glucose meter 6. Tap Calibrate CGM. brands. -
Page 202: Calibration Blood Glucose Value And Correction Bolus
DO use fingertips to calibrate from your 22.4 24 Hour Calibration Update meter. Blood from other places may be less Your t:slim X2 Pump uses the blood accurate and not as timely. glucose value entered for calibration to Calibrate your CGM System when determine if a correction bolus is prompted. -
Page 203: Other Reasons You May Need To Calibrate
Chapter 22 – Calibrating Your CGM System 5. Using the onscreen keypad, enter tion, or when the blood glucose value the blood glucose value from your you entered for calibration is very differ- meter. ent from the sensor glucose reading. When you see the CALIBRATE CGM PRECAUTION screen, calibrate using the instructions... - Page 204 Chapter 22 – Calibrating Your CGM System THIS PAGE IS INTENTIONALLY LEFT BLANK Customer Technical Support: (877) 801-6901...
-
Page 205: Chapter 23 - Viewing Cgm Data On Your T:slim X2 Pump
Getting Started with Your CGM System Chapter 23 Viewing CGM Data on Your t:slim X2 Pump... -
Page 206: Overview
Chapter 23 – Viewing CGM Data on Your t:slim X2 Pump Press the Screen On button to turn the • The grey zone highlights your target 23.1 Overview screen on. If a CGM session is active, glucose range, based on your High you will see the CGM Home Screen and Low Alert settings. -
Page 207: Cgm Trend Graphs
Chapter 23 – Viewing CGM Data on Your t:slim X2 Pump ing along with the last 3 hours of sensor last 12 hours of sensor glucose read- 23.2 CGM Trend Graphs glucose readings. ings. You can view your past sensor glucose... -
Page 208: Rate Of Change Arrows
Chapter 23 – Viewing CGM Data on Your t:slim X2 Pump 1 Hour Trend Graph shows you your HIGH shows when your most recent The trend arrows show below your cur- sensor glucose reading is greater than current glucose reading along with the rent sensor glucose reading. - Page 209 Chapter 23 – Viewing CGM Data on Your t:slim X2 Pump WARNING DO NOT ignore how you feel. If your glucose alerts and readings do not match what you're feeling, use your blood glucose meter to make diabetes treatment decisions or, if needed, seek immediate medical attention.
- Page 210 Chapter 23 – Viewing CGM Data on Your t:slim X2 Pump The table below shows the different trend arrows your receiver displays: Constant: Your glucose is steady (not increasing/decreasing Slowly falling: Your glucose is falling 1–2 mg/dL each more than 1 mg/dL each minute). Your glucose could minute.
-
Page 211: Additional Cgm Status Symbols
Chapter 23 – Viewing CGM Data on Your t:slim X2 Pump 23.4 Additional CGM Status Symbols The following symbols may also appear on your CGM Home Screen in the place where sensor glucose readings normally show. They let you know important information about the Sys- tem. - Page 212 Chapter 23 – Viewing CGM Data on Your t:slim X2 Pump Startup Calibration Needed Sensor Session Ended This symbol in the place where sensor glucose readings This symbol in the place where sensor glucose readings normally show means that you need to enter startup normally show means that your sensor session has ended.
-
Page 213: Cgm History
Chapter 23 – Viewing CGM Data on Your t:slim X2 Pump The Alerts and Errors section includes 23.5 CGM History 23.6 Missed Readings the date and time for all Alerts and Errors that occurred. The letter “D” (D: CGM History displays the historical log... - Page 214 Chapter 23 – Viewing CGM Data on Your t:slim X2 Pump THIS PAGE IS INTENTIONALLY LEFT BLANK Customer Technical Support: (877) 801-6901...
-
Page 215: Chapter 24 - Ending Your Cgm Sensor Session
Getting Started with Your CGM System Chapter 24 Ending Your CGM Sensor Session... -
Page 216: Automatic Sensor Shut-Off
New sensor glucose readings do not Your t:slim X2 Pump tells you how show on your t:slim X2 Pump after your much time you have left until your sen- New sensor glucose readings do not sensor session ends. You must remove sor session is complete. - Page 217 Chapter 24 – Ending Your CGM Sensor Session or pain — at the insertion site. If you experience a broken sensor, please report this to Tandem Diabetes Care Customer Technical Support at (877) 801-6901. For information about removing the Dexcom G6 Sensor and Dexcom G6 Transmitter, refer to the manufacturer’s...
-
Page 218: Section 6 - Cgm Alerts, Errors, And Troubleshooting
Section 6 CGM Alerts, Errors, and Troubleshooting... -
Page 219: Chapter 25 - Cgm Alerts And Errors
CGM Alerts, Errors, and Troubleshooting Chapter 25 CGM Alerts and Errors... - Page 220 NOTE: Alerts on the Phone and Pump You must customize the CGM alert settings on your t:slim X2 pump and the Dexcom mobile Customer Technical Support: (877) 801-6901...
-
Page 221: Startup Calibration Alert
Chapter 25 – CGM Alerts and Errors 25.1 Startup Calibration Alert What will I see on the screen? What does it mean? 2-hour CGM startup period is complete. This will only appear if you did not enter a sen- CALIBRATE CGM sor code. -
Page 222: Second Startup Calibration Alert
Chapter 25 – CGM Alerts and Errors 25.2 Second Startup Calibration Alert What will I see on the screen? What does it mean? The System needs an additional blood glucose value to complete startup calibration. CALIBRATE CGM This will only appear if you did not enter a sensor code. How will the System notify me? Enter 1 BG to calibrate CGM sensor. -
Page 223: Hour Calibration Alert
Chapter 25 – CGM Alerts and Errors 25.3 12 Hour Calibration Alert What will I see on the screen? What does it mean? The System needs a blood glucose value to calibrate. This will only appear if you did not CALIBRATE CGM enter a sensor code. -
Page 224: Incomplete Calibration
Chapter 25 – CGM Alerts and Errors 25.4 Incomplete Calibration What will I see on the screen? What does it mean? If you start to enter a calibration value using the keypad and do not complete the entry INCOMPLETE CALIBRATION within 90 seconds, this screen appears. -
Page 225: Calibration Timeout
Chapter 25 – CGM Alerts and Errors 25.5 Calibration Timeout What will I see on the screen? What does it mean? If you start to enter a calibration value using the keypad and do not complete the entry CALIBRATION TIMEOUT within 5 minutes, this screen appears. -
Page 226: Wait 15 Minute Calibration Error Alert
Chapter 25 – CGM Alerts and Errors 25.6 Wait 15 Minute Calibration Error Alert What will I see on the screen? What does it mean? The sensor cannot calibrate. CALIBRATION ERROR How will the System notify me? Enter a calibration 1 vibration, then vibration/beep every 5 minutes until confirmed. -
Page 227: Calibration Required Alert
Chapter 25 – CGM Alerts and Errors 25.7 Calibration Required Alert What will I see on the screen? What does it mean? The System needs a blood glucose value to calibrate. Sensor glucose readings will not CALIBRATE CGM be displayed at this time. How will the System notify me? Enter a BG to calibrate CGM sensor. -
Page 228: Cgm High Alert
Chapter 25 – CGM Alerts and Errors 25.8 CGM High Alert What will I see on the screen? What does it mean? Your most recent sensor glucose reading is at or above the High Alert setting. CGM HIGH ALERT How will the System notify me? Sensor reading 2 vibrations, then 2 vibrations/beeps every 5 minutes until confirmed or your glucose is 200 mg/dL. -
Page 229: Cgm Low Alert
Chapter 25 – CGM Alerts and Errors 25.9 CGM Low Alert What will I see on the screen? What does it mean? Your most recent sensor glucose reading is at or below the Low Alert setting. CGM LOW ALERT How will the System notify me? Sensor reading 3 vibrations, then 3 vibrations/beeps every 5 minutes until confirmed or your glucose is 70 mg/dL. -
Page 230: Cgm Fixed Low Alert
Chapter 25 – CGM Alerts and Errors 25.10 CGM Fixed Low Alert What will I see on the screen? What does it mean? Your most recent sensor glucose reading is at or below 55 mg/dL. CGM LOW ALERT How will the System notify me? Check BG and eat 4 Vibrations, then 4 vibrations/beeps every 5 minutes until confirmed or your glucose carbs if necessary. -
Page 231: Cgm Rise Alert
Chapter 25 – CGM Alerts and Errors 25.11 CGM Rise Alert What will I see on the screen? What does it mean? Your glucose levels are rising at 2 mg/dL per minute or faster (at least 30 mg/dL in 15 CGM RISE ALERT minutes). -
Page 232: Cgm Rapid Rise Alert
Chapter 25 – CGM Alerts and Errors 25.12 CGM Rapid Rise Alert What will I see on the screen? What does it mean? Your glucose levels are rising at 3 mg/dL per minute or faster (at least 45 mg/dL in 15 CGM RISE ALERT minutes). -
Page 233: Cgm Fall Alert
Chapter 25 – CGM Alerts and Errors 25.13 CGM Fall Alert What will I see on the screen? What does it mean? Your glucose levels are falling at 2 mg/dL per minute or faster (at least 30 mg/dL in 15 CGM FALL ALERT minutes). -
Page 234: Cgm Rapid Fall Alert
Chapter 25 – CGM Alerts and Errors 25.14 CGM Rapid Fall Alert What will I see on the screen? What does it mean? Your glucose levels are falling at 3 mg/dL per minute or faster (at least 45 mg/dL in 15 CGM FALL ALERT minutes). -
Page 235: Unknown Sensor Reading
Chapter 25 – CGM Alerts and Errors 25.15 Unknown Sensor Reading What will I see on the screen? What does it mean? The sensor is sending sensor glucose readings that the System does not understand. 10:20 AM June 1, 2018 100% 235 u You will not receive sensor glucose readings. -
Page 236: Out Of Range Alert
Chapter 25 – CGM Alerts and Errors 25.16 Out of Range Alert What will I see on the screen? What does it mean? The transmitter and pump are not communicating and you will not receive sensor glu- OUT OF RANGE ALERT cose readings. -
Page 237: Low Transmitter Battery Alert
Chapter 25 – CGM Alerts and Errors 25.17 Low Transmitter Battery Alert What will I see on the screen? What does it mean? Transmitter battery is low. LOW TRANSMITTER BATTERY How will the System notify me? Please replace your 1 vibration, then vibration/beep every 5 minutes until confirmed. transmitter soon. -
Page 238: Transmitter Error
Chapter 25 – CGM Alerts and Errors 25.18 Transmitter Error What will I see on the screen? What does it mean? The transmitter has failed and the CGM session has stopped. TRANSMITTER ERROR How will the System notify me? Please replace your 1 vibration, then vibration/beep every 5 minutes. -
Page 239: Failed Sensor Error
Chapter 25 – CGM Alerts and Errors 25.19 Failed Sensor Error What will I see on the screen? What does it mean? The sensor is not working properly and the CGM session has stopped. FAILED SENSOR How will the System notify me? Please replace your 1 vibration, then vibration/beep every 5 minutes. -
Page 240: Cgm Error
Chapter 25 – CGM Alerts and Errors 25.20 CGM Error What will I see on the screen? What does it mean? Your CGM System is not working properly and the CGM session has been stopped and CGM ERROR the CGM can no longer be used. A CGM Alert has occurred that caused the CGM session to stop. -
Page 241: Cgm System Error
MORE INFO How should I respond? Tap MORE INFO. A screen notifying you that your CGM System cannot operate but insulin delivery continues will appear. Call Tandem Diabetes Care Customer Technical Support at (877) 801-6901. Customer Technical Support: (877) 801-6901... - Page 242 Chapter 25 – CGM Alerts and Errors THIS PAGE IS INTENTIONALLY LEFT BLANK Customer Technical Support: (877) 801-6901...
- Page 243 CGM Alerts, Errors, and Troubleshooting Chapter 26 CGM Troubleshooting...
-
Page 244: Cgm Pairing Troubleshooting
Dexcom Mobile App Do not calibrate if your blood glucose instructions to help you fix issues you and your t:slim X2 Insulin Pump simul- value is below 40 mg/dL or above 400 may have while using the CGM portion taneously with the same transmitter ID. -
Page 245: Out Of Range/No Antenna Troubleshooting
If you are still having trouble getting sensor glucose reading normally insertion. sensor glucose readings, contact Tan- shows, then your t:slim X2 Pump is not dem Diabetes Care Customer Techni- communicating with your transmitter • Wipe the bottom of the transmitter cal Support at (877) 801-6901. -
Page 246: Failed Sensor Troubleshooting
“FAILED SENSOR” sensor only and not to your transmitter cose measurement. If the difference screen shows on your t:slim X2 Pump. or pump. Your sensor glucose readings between this second blood glucose If you see this screen, it means your... - Page 247 Chapter 26 – CGM Troubleshooting • Do not use alternative blood the test strip following the glucose site testing (blood from instructions provided with your your palm or forearm, etc.) for meter or test strips. calibration as alternative site readings may be different than •...
-
Page 248: Section 7 - Using Basal-Iq Plgs Technology
Section 7 Using Basal-IQ PLGS Technology... - Page 249 Using Basal-IQ PLGS Technology Chapter 27 Basal-IQ PLGS Technology Overview...
-
Page 250: Chapter 27 - Basal-Iq Plgs Technology Overview
The status of insulin delivery will be displayed on the t:slim X2 Pump screen. In order to use this feature you will need to utilize the CGM features as outlined in Section 5. - Page 251 Chapter 27 – Basal-IQ PLGS Technology Overview 3. Basal Insulin delivery is resumed once the current CGM sensor reading increases compared to the previous reading; also known as the nadir. Delivery Delivery at 0 u/hr Resumed CGM SENSOR READINGS INSULIN DELIVERY 5-minute Interval Personal Profile Basal Rate Basal-IQ Insulin Resume...
-
Page 252: Turn Basal-Iq On And Off
Chapter 27 – Basal-IQ PLGS Technology Overview 4. Basal insulin delivery is resumed if NOTE: Turning Basal-IQ Off 27.3 Turn Basal-IQ On and Off insulin delivery has been suspended During a Suspension for 2 hours in a 2.5 hour window. If the Basal-IQ Technology is active, and insulin Once you have a CGM sensor session delivery has been suspended, and you turn the... - Page 253 Using Basal-IQ PLGS Technology Chapter 28 Viewing Basal-IQ Status on Your t:slim X2 Pump...
-
Page 254: Overview
Chapter 28 – Viewing Basal-IQ Status on Your t:slim X2 Pump mally), the diamond icon will be gray as • The OPTIONS button will expand 28.1 Overview depicted below. and the text ALL DELIVERIES STOPPED will be displayed. Status indicators and additional infor-... - Page 255 Chapter 28 – Viewing Basal-IQ Status on Your t:slim X2 Pump The Basal-IQ history shows the histori- 5. Tap the day for which you want to cal log of the Basal-IQ Technology sta- view the history. The history detail is tus, including when the feature is displayed.
- Page 256 Chapter 28 – Viewing Basal-IQ Status on Your t:slim X2 Pump THIS PAGE IS INTENTIONALLY LEFT BLANK Customer Technical Support: (877) 801-6901...
- Page 257 Using Basal-IQ PLGS Technology Chapter 29 Basal-IQ Alerts...
-
Page 258: Chapter 29 - Basal-Iq Alerts
Chapter 29 – Basal-IQ Alerts This section describes the Basal-IQ Technology alerts that appear on your t:slim X2 Home Screen. It applies only to the Basal-IQ Technology within your System. The Basal-IQ Technology alerts follow the same pattern as other pump alerts according to your Pump Volume selection. -
Page 259: Suspend Alert
Chapter 29 – Basal-IQ Alerts 29.1 Suspend Alert What will I see on the screen? What does it mean? The Basal-IQ Technology has stopped all insulin delivery. INSULIN SUSPENDED All deliveries were automatically How will the System notify me? stopped. Insulin will resume when sensor readings start to rise. -
Page 260: Resume Alerts
Chapter 29 – Basal-IQ Alerts 29.2 Resume Alerts Resume Alert 1 What will I see on the screen? What does it mean? The pump has resumed basal insulin delivery. INSULIN RESUMED Insulin was automatically resumed. How will the System notify me? 2 sequences of 3 notes or 2 vibrations depending on the volume/vibrate setting selected in your Pump Volume setting. - Page 261 Chapter 29 – Basal-IQ Alerts Resume Alert 2 What will I see on the screen? What does it mean? This prompt will be displayed when insulin delivery is automatically resumed after being INSULIN RESUMED suspended for 2 hours in a 2.5 hour period. Your insulin was resumed after being suspended for the maximum How will the System notify me?
-
Page 262: Section 8 - Living With And Caring For Your System
Section 8 Living With and Caring for Your System... - Page 263 Living with and Caring for Your System Chapter 30 Lifestyle Issues and Travel...
-
Page 264: Chapter 30 - Lifestyle Issues And Travel
PRECAUTION 20-foot range without obstruction. nicate with the t:slim X2 pump, so the CONSULT your healthcare provider about life- range will be much less than during style changes such as weight gain or loss, and Aquatic Activities normal use. - Page 265 Agent that your System cannot be exposed to X- pump in case your pump malfunctions sure to order your pump supplies ray machines and request an alternate means of outside of Tandem’s replacement area. before your trip so that you have screening. Customer Technical Support: (877) 801-6901...
- Page 266 Chapter 30 – Lifestyle Issues and Travel THIS PAGE IS INTENTIONALLY LEFT BLANK Customer Technical Support: (877) 801-6901...
- Page 267 Living with and Caring for Your System Chapter 31 Taking Care of Your System...
-
Page 268: Chapter 31 - Taking Care Of Your System
Do not use vibrate, and see the green LED light blinking household or industrial cleaners, sol- If you need to stop using your t:slim X2 around the edge of the Screen On Button. If you vents, bleach, scouring pads, chemi-... - Page 269 Chapter 31 – Taking Care of Your System Disposing of System Components Consult your healthcare provider for instructions for disposal of devices con- taining electronic waste such as your pump and transmitter and for instruc- tions for disposal of potentially biohaz- ardous materials such as used cartridges, needles, syringes, infusion sets, and sensors.
-
Page 270: Section 9 - Technical Specifications And Warranty
Section 9 Technical Specifications and Warranty... - Page 271 Technical Specifications and Warranty Chapter 32 Technical Specifications...
-
Page 272: Chapter 32 - Technical Specifications
Chapter 32 – Technical Specifications 32.1 Overview This section provides tables of technical specifications, performance character- istics, options, settings, and electro- magnetic compliance information for the System. The specifications in this section meet the international stan- dards set forth in IEC 60601-1 and IEC 60601-2-24. -
Page 273: System Specifications
Chapter 32 – Technical Specifications 32.2 System Specifications System Specifications (including the t:slim X2 Pump, and Dexcom G6 Sensor and Transmitter) Specification Type Specification Details Operating Conditions Temperature: 41°F (5°C) to 98.6° F (37°C) Humidity: 20% to 90% RH non-condensing Storage Conditions Temperature: 36°... - Page 274 External PSU: Class II, Infusion Pump. Internally-powered equipment, Type BF applied part. The risk of ignition of flammable anesthetics and explosive gases by the pump is remote. While this risk is remote, it is not recommended to operate the t:slim X2 Pump in the presence of flammable anesthetics or explosive gases. Size 3.13”...
- Page 275 During normal use, the intermediate rate is 2 units/hr; battery charge can be reasonably expected to last up to 7 Operating at Intermediate Rate days (5 days if using CGM) from a fully charged state to a totally discharged state t:slim X2 Pump Specifications (Part 2 of 3) Customer Technical Support: (877) 801-6901...
- Page 276 Cartridge (unusable) Minimum Audible Alarm Volume 45 dBA at 1 meter t:slim X2 Pump Specifications (Part 3 of 3) Dexcom G6 CGM Product Specifications For information about Dexcom G6 CGM product specifications, refer to the manufacturer’s website for applicable user guides.
- Page 277 Chapter 32 – Technical Specifications USB Charging/Download Cable Specifications Specification Type Specification Detail Tandem P/N 004113 Length 6 feet Type USB A to USB Micro B Power Supply/Charger, AC, Wall Mount, USB Specifications Specification Type Specification Detail Tandem P/N 03933...
- Page 278 Chapter 32 – Technical Specifications Car Adapter (sold separately), Specifications Specification Type Specification Detail Tandem P/N 003934 Input 12 Volts DC Output Voltage 5 Volts DC Max Output Power 5 Watts minimum Output Connector USB type A PC, USB Connector, Specifications...
- Page 279 Chapter 32 – Technical Specifications PC, Requirements for Charging The t:slim X2 Insulin Pump is designed to be connected to a host PC for battery charging and data transfer to t:connect. The follow- ing minimum characteristics are required of the host PC: •...
-
Page 280: T:slim X2 Pump Options And Settings
1 time segment; 2 to 8 hours in 1-minute increments (default is 5 hrs) Bolus Increment 0.01 at volumes greater than 0.05 units Option/Setting Type Option/Setting Details t:slim X2 Pump Options and Settings (Part 1 of 3) Customer Technical Support: (877) 801-6901... - Page 281 High BG Reminder Prompts user to retest BG after a High BG has been entered. User selects High BG value and time for reminder. (default is Off). t:slim X2 Pump Options and Settings (Part 2 of 3) Customer Technical Support: (877) 801-6901...
- Page 282 Low BG Reminder Prompts user to retest BG after a Low BG has been entered. User selects Low BG value and time for reminder. (default is Off). t:slim X2 Pump Options and Settings (Part 3 of 3) Customer Technical Support: (877) 801-6901...
-
Page 283: T:slim X2 Pump Performance Characteristics
Chapter 32 – Technical Specifications 32.4 t:slim X2 Pump Performance Characteristics Rate of Delivery Characteristic Value 25 Unit Bolus Delivery Speed 2.97 Units/min Typical 2.5 Unit Bolus Delivery Speed 1.43 Units/min Typical 20 Unit Prime 9.88 Units/min Typical Bolus Duration... - Page 284 Chapter 32 – Technical Specifications Time to Occlusion Alarm* Operating Rate Typical Maximum Bolus (3 units or Greater) 1 minute 2 seconds 3 Minutes Basal (2 units/hr) 1 Hour 4 Minutes 2 Hours Basal (0.1 units/hr) 19 Hours 43 Minutes 36 Hours *The time to occlusion alarm is based on insulin volume not delivered.
-
Page 285: Electromagnetic Compatibility
Chapter 32 – Technical Specifications For IEC 60601-1 testing, Essential 32.5 Electromagnetic Performance for the System is Compatibility defined as follows: The information contained in this sec- • The System will not over deliver a tion is specific to the System. This infor- clinically significant amount of mation provides reasonable assurance insulin. -
Page 286: Electromagnetic Emissions
Chapter 32 – Technical Specifications 32.6 Electromagnetic Emissions The System is intended for use in the electromagnetic environment specified below. Always make sure that the System is used in such an environment. Guidance and Manufacturer’s Declaration – Electromagnetic Emissions Emissions Test Compliance Electromagnetic Environment –... -
Page 287: Electromagnetic Immunity
Chapter 32 – Technical Specifications 32.7 Electromagnetic Immunity The System is intended for use in the electromagnetic environment specified below. The System is intended for use in the electro- magnetic environment specified below. Always make sure that the System is used in such an environment. Guidance and Manufacturer’s Declaration –... - Page 288 Chapter 32 – Technical Specifications Electromagnetic Environment Immunity Test IEC 60601 Test Level Compliance Level – Guidance Voltage Dips, Short Interruptions, 70% UR (30% dip in Ur) for 25 cycles 70% UR (30% dip in Ur) for 25 cycles Mains power quality should be that of and Voltage Variations on Power 0% Ur (100% dip in Ur) for 1 cycle at 0% Ur (100% dip in Ur) for 1 cycle at...
- Page 289 Chapter 32 – Technical Specifications Electromagnetic Environment Immunity Test IEC 60601 Test Level Compliance Level – Guidance Conducted RF IEC 61000-4-6 3 Vrms 150 kHz to 80 MHz 10 Vrms Portable and mobile RF communications equipment should Radiated RF IEC 61000-4-3 10 V/m 30 V/m be used no closer to any part of the...
- Page 290 Chapter 32 – Technical Specifications Electromagnetic Environment Immunity Test IEC 60601 Test Level Compliance Level – Guidance NOTE 1: At 80 MHz and 800 MHz, the higher frequency range applies. NOTE 2: These guidelines may not apply in all situations. Electromagnetic propagation is affected by absorption and reflection from structures, objects, and people.
-
Page 291: Distances Between The T:slim X2 Pump And Rf Equipment
32.8 Distances Between the t:slim X2 Pump and RF Equipment The t:slim X2 Insulin Pump is intended for use in an electromagnetic environment typically found in the home, at work, retail stores, and places of leisure, where daily activities occur. The chart below can be used as a guideline for determining the recommended minimum distance to maintain between a radio frequency (RF) transmitter and the t:slim X2 Insulin Pump. - Page 292 Chapter 32 – Technical Specifications The table below provides a list of typical devices for various levels of transmitter power and frequency, and the recommended separation distances from the transmitter and the System. Rated Maximum Output Power Recommended Separation Distance Typical Devices of Transmitter in Watts in Inches (Meters)
-
Page 293: Quality Of Wireless Service
2.4 GHz the System will not discontinue report- band are around, the t:slim X2 Insulin ing data and/or information from the 2. This device must accept any Pump uses the built-in coexistence fea-... -
Page 294: Warranty Information
Chapter 32 – Technical Specifications tion against harmful interference in a This portable transmitter with its the defective t:slim X2 Pump is not residential installation. This equipment antenna complies with FCC/IC RF returned, then this warranty shall be generates uses and can radiate radio... - Page 295 Warranty accident beyond the control of t:slim X2 Pump covered by this war- t:slim Cartridges Tandem; or ranty to or by a user other than the orig- inal end use purchaser shall cause this Tandem Diabetes Care, Inc.
-
Page 296: Returned Goods Policy
X2 Insulin Pump. For more • damage results from changes or to immediately terminate. This warranty information about Dexcom’s warranty,... - Page 297 Customer Service Department. This returned materials authorization number must be clearly written on the outer box. If Tandem or the authorized distributor provides a label, the label must be attached or taped to the outer box. If no label is...
- Page 298 Chapter 32 – Technical Specifications THIS PAGE IS INTENTIONALLY LEFT BLANK Customer Technical Support: (877) 801-6901...
- Page 299 Technical Specifications and Warranty Chapter 33 Basal-IQ Technology Clinical Study Overview...
-
Page 300: Introduction
The goal of this study was to assess the below 70 mg/dL as the primary efficacy other resuscitative actions. There were safety and efficacy of the t:slim X2 Insu- endpoint, calculated separately by no severe hypoglycemic events in the lin Pump with Basal-IQ Technology treatment arm. -
Page 301: Demographics
Chapter 33 – Basal-IQ Technology Clinical Study Overview 33.3 Demographics Baseline demographics of the study cohort are provided below in Table 1. Table 1. Demographics at Enrollment (N=103) Basal-IQ First SAP First Characteristic Unit of Measure Overall (N=52) (N=51) Average age ±... -
Page 302: Intervention Compliance
Chapter 33 – Basal-IQ Technology Clinical Study Overview 33.4 Intervention Compliance Tables 2 and 3 below provide an outline of how often the t:slim X2 Insulin Pump with Basal-IQ Technology and CGM were used during the study period respectively. Table 2. Amount of t:slim X2 Insulin Pump with Basal-IQ Technology Use Over the 21-Day Period (N=102) - Page 303 Chapter 33 – Basal-IQ Technology Clinical Study Overview Table 3. Amount of CGM Use Over the 21-Day Period by Treatment Arm (N=102) Study Arm (Basal-IQ Enabled) Control Arm (SAP) Percentage of Time Using the CGM # participants % of population # participants % of population ≥...
-
Page 304: Primary Analysis
Chapter 33 – Basal-IQ Technology Clinical Study Overview 33.5 Primary Analysis The primary analysis of this study was to compare the CGM sensor values less than 70 md/dL between the Study Arm (Basal-IQ Enabled) and the Control Arm (SAP). The following data in Table 4 provides a breakdown of the CGM sensor values across both study arms and the number of participants whose sensor values were below 70 mg/dL for the given time period. - Page 305 Chapter 33 – Basal-IQ Technology Clinical Study Overview Table 5. Percent of Average CGM Sensor Values < 70 mg/dL (N=102) The average percent of CGM sensor values less than 70 mg/dL showed a relative reduction of 31% in the Study Arm (Basal-IQ Enabled) compared to the Control Arm (SAP).
-
Page 306: Secondary Analysis
Chapter 33 – Basal-IQ Technology Clinical Study Overview 33.6 Secondary Analysis The secondary outcomes measures of the clinical study represent characteristics of the glucose profile including time spent in the low (hypoglycemic) range, time spent high (hyperglycemic) range, and the time spent with glucose under control (between 70-180 mg/dL). - Page 307 Chapter 33 – Basal-IQ Technology Clinical Study Overview Table 8. Secondary Analysis by Time of Day (N=102) Table 8 provides details about the glucose levels during Daytime (6 AM to 10 PM) versus Nighttime (10 PM to 6 AM). The average glucose in the Study Arm during Daytime was 160 (±...
-
Page 308: Insulin Delivery Differences
Chapter 33 – Basal-IQ Technology Clinical Study Overview 33.7 Insulin Delivery Differences Table 9 provides an overview of the how much insulin was used on average across the Study Arm (Basal-IQ Enabled) and the Control Arm (SAP). The amount of basal insulin used in 24 hours was 1.2 units less in the Study Arm vs. - Page 309 Chapter 33 – Basal-IQ Technology Clinical Study Overview Table 9. Insulin Delivery Summary Statistics (N=102) Study Arm Control Arm Characteristic Unit of Measure (Basal-IQ Enabled) (SAP) 24-hour period average ± std deviation 44.6 ± 20 45.9 ± 20.2 Daytime (6am up to average ±...
-
Page 310: Plgs Algorithm Performance Accuracy
Chapter 33 – Basal-IQ Technology Clinical Study Overview in one of three categories; True, False, 33.8 PLGS Algorithm Performance or Missed relative to the corresponding Accuracy YSI values. True indicating that the sus- pension or resumption occurrence The following data tables characterize matched corresponding YSI values and the PLGS algorithm accuracy in suc- False or Missed indicating differing con-... - Page 311 Chapter 33 – Basal-IQ Technology Clinical Study Overview Table 10. Percent of CGM Sensor Values < 70 mg/dL The following table provides the accuracy of the PLGS Algorithm’s Suspend Actions relative to corresponding YSI values. Predicted Suspend Actions include when the PLGS Algorithm suspended insulin in response to a prediction of CGM readings falling below 80 mg/dL within the next 30 minutes.
- Page 312 Chapter 33 – Basal-IQ Technology Clinical Study Overview Table 11. Insulin Resumption Accuracy The following table provides the accuracy of the PLGS Algorithm’s Resume Actions relative to the corresponding YSI values. The Resume Actions were analyzed at the first opportunity to resume insulin based on the YSI data, then 5 minutes later and 10 minutes later.
- Page 313 Chapter 33 – Basal-IQ Technology Clinical Study Overview THIS PAGE IS INTENTIONALLY LEFT BLANK Customer Technical Support: (877) 801-6901...
-
Page 314: Index
Index Index Specifications 282 CGM, Startup Calibration Alert Alerts 133, 136, 137, 139 CGM, System Error 239 Alert Icon, Where to Find 50 CGM, Transmitter Error 236 Alerts & Reminders 68 Connection Error Alert 156 AC power adapter 80 Basal Rate Required Alert 148 Data Error Alert 158 Accessories 40, 80 Basal-IQ, Resume Alerts 258... - Page 315 Index Power Source Alert 157 Status Indicators 60, 62, 252 Extended Bolus 41, 109 Alternate Site BG Testing 42 Suspend Alert 72, 257 Food Bolus Using Grams 108 Turn On and Off 250 Food Bolus Using Units 108 Altitude 262 Turning On/Off 72 in Personal Profiles 101 Altitude Alarm 171, 172...
- Page 316 Index Carbs, in Personal Profiles 99 Calibration Overview 198 History, View 211 Food Bolus Using Grams 108 Calibration Prompts 210 Incomplete Calibration Alert 222 Food Bolus, on Bolus Screen 64 Calibration Timeout Alert 223 Low BG Repeat 189 turn on in Personal Profiles 102 CGM Alerts 187 Low Glucose Alert, Set 189 Carbs 41...
- Page 317 Index Status Symbols 210 Explanation of System Colors 48 High BG Reminder 131 System Overview 178 Computer Charging Specifications High Glucose Alert 188 Transmitter Error 236 Low BG Reminder 130 Connection Error Alert 156 Transmitter ID 182 Low Insulin Alert 134 Troubleshooting 241 Contents, of System 40 Quick Bolus 120...
- Page 318 Index Extended Bolus 41, 109 CGM History 211 Insulin Level Display 94 Pump History 128 Insulin On Board (IOB) 41, 50 Default 109 Home Screen 56 Insulin On Board (IOB) Display 50 Resume Insulin Delivery 112 Home Screen, CGM 58 Failed Sensor Error 237 Stop Insulin Delivery 112 Insulin Duration, in Personal Profiles...
- Page 319 Occlusion Alarms 168 Power Source Alert 157 Missed Meal Bolus 132 Occlusion Alarms, Specifications Precautions Site Reminder 132 Using t:slim X2 Insulin Pump 28 Resume Alert Options Screen 66 Pump History 128 Basal-IQ 72 Out of Range Alert 234 Pump History, Delivery Summary...
- Page 320 Index Options Screen 66 Set CGM Volume 183 Screen Lock 50 Settings, Pump Setting Safety Information 23 Specifications 278 Status Screen 62 Contraindications 18 Unlock 82 Site Reminder Emergency Kit 36 Second Startup Calibration Alert, Set Site Reminder 132 Indications for Use 18 CGM 220 Site Reminder, Set 95 Precautions 28...
- Page 321 USB Cable 40, 80 System Contents 40 Transmitter USB Port 56, 80 Safety Lock 42 Transmitter Error 236 Tandem Logo 56, 82 Verification of Proper Functionality Transmitter ID 182 Target BG 40 Travel 263 in Personal Profiles 100 View Calculation 64...
- Page 322 Index THIS PAGE IS INTENTIONALLY LEFT BLANK Customer Technical Support: (877) 801-6901...
- Page 324 © 2018 Tandem Diabetes Care, Inc. All rights reserved. Tandem Diabetes Care, t:connect, touch simplicity, and t:slim are registered trademarks, and t:slim X2 and Basal IQ are trademarks of Tandem Diabetes Care, Inc. For a list of patents, please see www.tandemdiabetes.com/legal/patents.
Need help?
Do you have a question about the t:slim X2 and is the answer not in the manual?
Questions and answers