Tandem t:slim X2 User Manual
Hide thumbs
Also See for t:slim X2:
- User manual (448 pages) ,
- Training manual (142 pages) ,
- Manual (11 pages)

Subscribe to Our Youtube Channel
Related Manuals for Tandem t:slim X2


Summary of Contents for Tandem t:slim X2
- Page 1 12:31 PM 100% October 16, 2016 235 u BOLUS OPTIONS INSULIN ON BOARD (IOB) Units 1.1 u Time Remaining 1:09 hrs...
- Page 3 Congratulations on the purchase of Changes in equipment, software, or ©2016 Tandem Diabetes Care, Inc. your new t:slim X2 Pump. Your deci- procedures occur periodically; informa- All rights reserved. t:slim, touch sim- sion to use insulin pump therapy is a...
-
Page 4: Table Of Contents
Table of Contents Section 1 – Before You Begin Chapter 1 – Introduction System Description .......................16 About this User Guide ....................16 Important User Information ...................17 Important Pediatric User Information ................17 Conventions of this Guide .....................18 Chapter 2 – Important Safety Information Indications for Use ......................20 Contraindications ......................20 Pump Warnings ......................20... - Page 5 Table of Contents Chapter 3 – Getting to Know Your t:slim X2 Pump What your t:slim X2 System Package Includes .............32 Pump Terminology ......................32 Explanation of Pump Symbols ..................34 Explanation of Pump Icons ...................35 Explanation of Pump Colors..................36 Screen Lock ........................38 Home Screen .........................40...
- Page 6 Section 2 – Key Pump Features Chapter 4 – Getting Started Charging the t:slim X2 Pump ..................56 Using the Touch Screen ....................58 Turning on the t:slim X2 Pump Screen ................58 Unlocking the t:slim X2 Pump Screen ................58 Edit Time ........................59 Edit Date ........................59 Chapter 5 –...
- Page 7 Table of Contents Chapter 6 – Personal Profiles Personal Profiles Overview ....................76 Creating a New Profile ....................76 Programming a New Personal Profile ................78 Editing or Reviewing an Existing Profile ................81 Duplicating an Existing Profile ..................82 Activating an Existing Profile ..................82 Renaming an Existing Profile ..................83 Deleting an Existing Profile ....................83 Chapter 7 –...
- Page 8 Stopping a Temp Rate ....................99 Chapter 10 – Quick Bolus 10.1 Setting Up Quick Bolus ....................102 10.2 Delivering Quick Bolus ....................102 Chapter 11 – t:slim X2 Pump Settings 11.1 t:slim X2 Pump Volume ....................106 11.2 Screen Options ......................106 Customer Technical Support: (877) 801-6901...
- Page 9 Table of Contents Chapter 12 – t:slim X2 Pump Info and History 12.1 t:slim X2 Pump Info .....................110 12.2 t:slim X2 Pump History ....................110 Chapter 13 – t:slim X2 Pump Reminders 13.1 Low BG Reminder .......................112 13.2 High BG Reminder ......................113 13.3...
- Page 10 Table of Contents Section 4 – t:slim X2 Pump Safety Alerts and Alarms Chapter 15 – t:slim X2 Pump Alerts 15.1 Low Insulin Alert ......................123 15.2 Low Power Alerts ......................124 15.3 Incomplete Bolus Alert ....................126 15.4 Incomplete Temp Rate Alert ..................127 15.5...
- Page 11 Table of Contents Chapter 16 – t:slim X2 Pump Alarms 16.1 Resume Pump Alarm ....................145 16.2 Low Power Alarms ......................146 16.3 Empty Cartridge Alarm ....................148 16.4 Cartridge Error Alarm ....................149 16.5 Cartridge Removal Alarm ....................150 16.6 Temperature Alarm ......................151 16.7 Occlusion Alarms ......................152...
- Page 12 Table of Contents Section 5 – Living With and Caring for Your t:slim X2 Pump Chapter 18 – Lifestyle Issues and Travel 18.1 Overview ........................162 Chapter 19 – Taking Care of Your t:slim X2 Pump 19.1 Overview ........................166 Customer Technical Support: (877) 801-6901...
- Page 13 X2 Pump Performance Characteristics .............178 20.5 Electromagnetic Compatibility ..................180 20.6 Electromagnetic Emissions ..................181 20.7 Electromagnetic Immunity ...................182 20.8 Distances Between the t:slim X2 Pump and RF Equipment ........184 20.9 FCC Notice Concerning Interference ................187 20.10 Warranty Information ....................188 20.11 Returned Goods Policy ....................190 Index...
- Page 14 Section 1 Before You Begin...
-
Page 15: Chapter 1 - Introduction
Chapter 1 Introduction... -
Page 16: System Description
System Description About this User Guide Product information, including electron- ic versions of the User Guide, a Guide The t:slim X2 System is made up of This User Guide covers important infor- to Successful Pumping, t:connect the t:slim X2 Insulin Pump and the... -
Page 17: Important User Information
If you still have questions after reading cables and tubing to minimize the risk this User Guide, contact Tandem Dia- We recommend reviewing the Quick of strangulation. ENSURE that these betes Care Customer Technical Sup-... -
Page 18: Conventions Of This Guide
A list of options on your touch screen that allow you to perform specific tasks. An image on your touch screen that indicates an option or item of information, Icon or a symbol on the back of your t:slim X2 Pump or its packaging. Customer Technical Support: (877) 801-6901... -
Page 19: Chapter 2 - Important Safety Information
Chapter 2 Important Safety Information... -
Page 20: Indications For Use
Pump Warnings Indications for Use Contraindications WARNINGS The t:slim X2 Pump is intended for the The t:slim X2 Pump is not intended subcutaneous delivery of insulin, at set for anyone unable or unwilling to: DO NOT start to use your t:slim X2 and variable rates, for the management Pump before reading the User Guide. - Page 21 Your attempt to remove it. Seek professional greater concentration can result in un- t:slim X2 Pump is designed to deliver medical help if you have symptoms of der delivery or over delivery of insulin. insulin reliably, but because it uses infection or inflammation—redness,...
- Page 22 Chapter 2 – Important Safety Information under delivery of insulin. This can cause DO NOT deliver a bolus until you have pump is not being used by a caregiver. very low or very high blood glucose. reviewed the calculated bolus amount The Feature Lock function is intended on the pump display.
- Page 23 In addition to the above, you must copies. If you have questions, contact Insulin Pump. If you need to discontin- take off your t:slim X2 Pump and leave Tandem Diabetes Care Customer Tech- ue use of the pump for medical proce- it outside the procedure room if you nical Support at (877) 801-6901.
-
Page 24: System Precautions
Improperly before going to bed. If you are sleep- only by Tandem Diabetes Care, Inc. placed sites or leaks around the infu- ing, you could fail to hear the Empty... - Page 25 USB port. These features are used to it might be damaged due to dropping and contact Tandem Diabetes Care notify you about alerts, alarms, and it or hitting it against a hard surface.
- Page 26 Chapter 2 – Important Safety Information Rapid changes in altitude or gravity can ALWAYS check with your healthcare ALWAYS dispose of used components affect insulin delivery and cause injury. provider for specific guidelines if you such as cartridges, syringes, needles, want or need to disconnect from the and infusion sets following the instruc- DISCONNECT your infusion set from...
-
Page 27: Potential Benefits From Using The Pump
IOB from hours. the recommended bolus if your BG is below the target set in your The t:slim X2 Pump gives you the active Personal Profile. This can • option of delivering a bolus all at... -
Page 28: Possible Risks From Using The Pump
Tandem Diabetes Care Customer Consult your healthcare provider before Technical Support at (877) 801-6901. using the pump to determine which features are most appropriate for you. -
Page 29: Emergency Kit
Chapter 2 – Important Safety Information Emergency Kit termine and help you adjust your basal Infusion site preparation products • rate(s), insulin-to-carbohydrate ratio(s), (antiseptic wipes, skin adhesive) correction factor(s), blood glucose (BG) Make sure that you always have an in- target, and duration of insulin action. -
Page 30: Verification Of Proper Functionality
USB port of your t:slim X2 Pump: attention. If these features are not working, discontinue use of the pump and contact... -
Page 31: Chapter 3 - Getting To Know Your T:slim X2 Pump
Chapter 3 Getting to Know Your t:slim X2 Pump... -
Page 32: What Your T:slim X2 System Package Includes
Chapter 3 – Getting to Know Your t:slim X2 Pump What your t:slim X2 Pump Terminology Your t:slim X2 Pump is shipped from System Package Includes Tandem Diabetes Care, Inc. with a clear screen protector. Do not remove Basal Your t:slim X2 System should the screen protector. - Page 33 Chapter 3 – Getting to Know Your t:slim X2 Pump takes longer to digest. When admin- group of settings that defines the de- Cannula The cannula is the part of the infusion istering an extended bolus with your livery of basal and bolus insulin within...
-
Page 34: Explanation Of Pump Symbols
Chapter 3 – Getting to Know Your t:slim X2 Pump Explanation of Pump Symbols The following are symbols (and their descriptions), which you may find on your t:slim X2 Pump and/or its packaging. These sym- bols tell you about the proper and safe use of the pump. -
Page 35: Explanation Of Pump Icons
Chapter 3 – Getting to Know Your t:slim X2 Pump Explanation of Pump Icons The following icons may appear in the status area (to the left or right of the time and date) on your t:slim X2 Pump Home Screen: Icon Meaning A Pump reminder, alert, error, or alarm is active. -
Page 36: Explanation Of Pump Colors
Chapter 3 – Getting to Know Your t:slim X2 Pump Explanation of Pump Colors Red LED » 1 red blink every 30 seconds indicates a malfunction or alarm condition. Yellow LED » 1 yellow blink every 30 seconds indicates an alert or reminder condition. - Page 37 Chapter 3 – Getting to Know Your t:slim X2 Pump THIS PAGE IS INTENTIONALLY LEFT BLANK Customer Technical Support: (877) 801-6901...
-
Page 38: Screen Lock
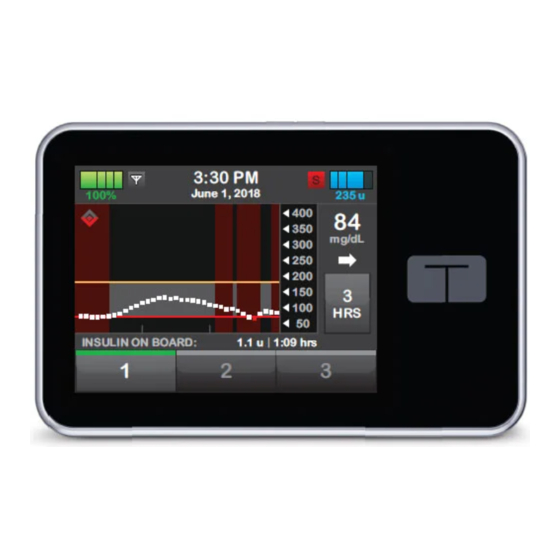
Chapter 3 – Getting to Know Your t:slim X2 Pump Screen Lock 1. Time and Date Display: Displays 8. Insulin Level: Displays the current the current time and date. amount of insulin in the cartridge. 2. Alert Icon: Indicates a reminder, 9. - Page 39 Chapter 3 – Getting to Know Your t:slim X2 Pump 12:31 PM 100% October 16, 2016 235 u INSULIN ON BOARD (IOB) Units 1.1 u Time Remaining 1:09 hrs Customer Technical Support: (877) 801-6901...
-
Page 40: Home Screen
Chapter 3 – Getting to Know Your t:slim X2 Pump Home Screen 1. Battery Level: Displays the level 8. Insulin Level: Displays the current of battery power remaining. amount of insulin in the cartridge. When connected for charging, the charging icon (lightning bolt) 9. - Page 41 Chapter 3 – Getting to Know Your t:slim X2 Pump 12:31 PM 100% October 16, 2016 235 u BOLUS OPTIONS INSULIN ON BOARD (IOB) Units 1.1 u Time Remaining 1:09 hrs Customer Technical Support: (877) 801-6901...
-
Page 42: Status Screen
Chapter 3 – Getting to Know Your t:slim X2 Pump Status Screen The status screen can be accessed 8. Target BG: Displays current BG from the lock screen and the Home target used to calculate a bolus. Screen. It is for display only, no chang- es can be made from this screen. - Page 43 Chapter 3 – Getting to Know Your t:slim X2 Pump Current Status Current Status BACK BACK Correction 1u: 50 Weekly mg/dL Factor 1u: 10 g Basal Rate 0.2 u/hr Carb Ratio Last Bolus Target BG mg/dL 12/23 - 10:45 PM...
-
Page 44: Bolus Screen
Chapter 3 – Getting to Know Your t:slim X2 Pump Bolus Screen 1. Back: Returns to the 10. View Calculation: Displays how Home Screen. the insulin dose was calculated using the current settings. 2. Carbs: Enter grams of carb. 11. Add BG: Enter blood 3. - Page 45 Chapter 3 – Getting to Know Your t:slim X2 Pump Using Grams Using Units BACK NEXT BACK NEXT units units CARBS INSULIN Add BG Add BG grams units View Calculation View Calculation Customer Technical Support: (877) 801-6901...
-
Page 46: Options Screen
Chapter 3 – Getting to Know Your t:slim X2 Pump 3.10 Options Screen 1. Back: Returns to the Home Screen. 2. Stop Insulin: Stops insulin delivery. If insulin delivery is stopped, RESUME INSULIN will be displayed. 3. My Pump: Personal Profiles, Alert Settings, Pump Settings, and Pump Info. - Page 47 Chapter 3 – Getting to Know Your t:slim X2 Pump Options Options BACK BACK STOP INSULIN History My Pump Load Temp Rate Customer Technical Support: (877) 801-6901...
-
Page 48: My Pump Screen
Chapter 3 – Getting to Know Your t:slim X2 Pump 3.11 My Pump Screen 1. Personal Profiles: A group of settings that defines basal and bolus delivery. 2. Alert Settings: Customize Pump Reminders and Alerts. 3. Pump Settings: Customize Quick Bolus, Pump Volume, Screen Options, and Time and Date. - Page 49 Chapter 3 – Getting to Know Your t:slim X2 Pump My Pump BACK Personal Profiles Alert Settings Pump Settings Pump Info Customer Technical Support: (877) 801-6901...
-
Page 50: Number Keypad Screen
Chapter 3 – Getting to Know Your t:slim X2 Pump 3.12 Number Keypad Screen 1. Value Entered. 2. Back: Returns to previous screen. 3. Keypad Numbers. 4. +/=: Allows numbers to be added on gram screen. If in units, this displays as a decimal point. - Page 51 Chapter 3 – Getting to Know Your t:slim X2 Pump BACK DONE grams + / = Customer Technical Support: (877) 801-6901...
-
Page 52: Letter Keypad Screen
Chapter 3 – Getting to Know Your t:slim X2 Pump 3.13 Letter Keypad Screen 1. Name of Profile. 2. Back: Returns to previous screen. 3. Space: Enters a space. 4. 123: Changes keypad mode from letters (ABC) to numbers (123). - Page 53 Chapter 3 – Getting to Know Your t:slim X2 Pump Weekday BACK SAVE name space Customer Technical Support: (877) 801-6901...
-
Page 54: Section 2 - Key Pump Features
Section 2 Key Pump Features... -
Page 55: Chapter 4 - Getting Started
Chapter 4 Getting Started... -
Page 56: Charging The T:slim X2 Pump
Power Outlet: Charge the pump until the battery level The t:slim X2 Pump is powered by an indicator on the upper left portion of 1. Plug the included USB cable into internal lithium polymer rechargeable the Home Screen reads 100% (initial the AC power adapter. - Page 57 (AC) source Charging Tips properly. is prohibited. To charge the pump using a When you charge the t:slim X2 Tandem Diabetes Care, Inc. recom- mends periodically checking the bat- standard auxiliary-to-USB car Pump, you will notice the following:...
-
Page 58: Using The Touch Screen
Turning on the t:slim X2 Unlocking the t:slim X2 Pump Screen Pump Screen To turn on your t:slim X2 Pump screen, first press the Screen On/Quick Bolus The screen lock screen appears any- 1. To turn on your t:slim X2 Pump... -
Page 59: Edit Time
Edit Time Edit Date 7. Using the onscreen keypad, enter the hour and minutes. Verify and After powering up your t:slim X2 Pump tap DONE. 1. From the Time and Date screen for the first time, set the current time tap Edit Date. - Page 60 Chapter 4 – Getting Started THIS PAGE IS INTENTIONALLY LEFT BLANK Customer Technical Support: (877) 801-6901...
-
Page 61: Chapter 5 - Infusion Site Care And Loading Cartridge
Chapter 5 Infusion Site Care and Loading Cartridge... -
Page 62: Infusion Site Selection And Care
With experience, you will find infusion set cannula, please report this to • Tandem Customer Technical Support at (877) The abdomen is the most popular areas that not only provide • site because of access to fatty better absorption, but are more 801-6901. - Page 63 Chapter 5 – Infusion Site Care and Loading Cartridge Keep it clean: Areas of Body for Infusion Set Insertion When changing your infusion set, • use clean techniques to avoid an infection. Wash your hands, use antiseptic • wipes or infusion site preparation products, and keep the area clean.
-
Page 64: Cartridge Instructions For Use
Vial of Humalog or NovoLog • ® ® cartridge into your t:slim X2 Pump. The insulin single-use disposable cartridge can hold up to 300 units (3.0 mL) of insulin. Alcohol prep swab • WARNING 1 new infusion set •... - Page 65 Chapter 5 – Infusion Site Care and Loading Cartridge Instructions for Drawing Insulin from Vial into Syringe PRECAUTION ALWAYS remove all air bubbles before beginning insulin delivery. Ensure there are no air bubbles when drawing insulin into the filling syringe, hold the pump with the white fill port pointed up when filling the tubing, and ensure that there are no air bubbles in the tubing when filling.
- Page 66 Chapter 5 – Infusion Site Care and Loading Cartridge 7. With needle still inserted into vial, turn vial and syringe upside down. Release syringe plunger. Insulin will begin to flow from the vial into the syringe. 8. Slowly pull back the plunger to the desired amount of insulin (see image C). 9.
- Page 67 Chapter 5 – Infusion Site Care and Loading Cartridge Instructions for Filling the Cartridge 1. Inspect the cartridge package for any signs of damage. Discard any damaged product. 2. Open the package and remove the cartridge. 3. Hold the cartridge upright and gently insert the needle into the white insulin fill port on the cartridge (see image E).
- Page 68 Chapter 5 – Infusion Site Care and Loading Cartridge 6. Withdraw the needle from the fill port. 7. Turn the syringe upright and pull down on the plunger (see image H). Flick the barrel to make sure that any air bubbles rise to the top. 8.
- Page 69 Chapter 5 – Infusion Site Care and Loading Cartridge Instructions on How to Install Push on the circular fill port next to 5. Disconnect the infusion set from a Cartridge your body and tap NEXT to the cartridge tubing to slide the continue.
-
Page 70: Filling Tubing
Chapter 5 – Infusion Site Care and Loading Cartridge Filling Tubing b. Remove the infusion set tubing air bubbles when drawing insulin into the filling syringe, hold the pump with the white fill port cap from the Luer connector. Be Filling the Infusion Set Tubing careful to keep the Luer connec- pointed up when filling the tubing, and ensure... - Page 71 Chapter 5 – Infusion Site Care and Loading Cartridge “Detecting Insulin” screen 3. Hold the pump vertically to screen. You will see one of the following on ensure any air in the cartridge will is displayed. the screen: be dispelled first. Tap START. The pump will beep and vibrate 5.
-
Page 72: Filling Cannula
Chapter 5 – Infusion Site Care and Loading Cartridge Filling Cannula The screen will return to the Load fill amount. Filling stops at this amount. menu if the Site Reminder is turned Filling the Infusion Set Cannula off. Tap DONE to resume insulin if with Insulin finished. -
Page 73: Setting Site Reminder
1. Tap SAVE if correct. Tap Edit NOTE: First Time Use Reminder if settings need to If this is the first time using your t:slim X2 be changed. Pump and a Personal Profile has not been defined, a screen will notify you that a 2. - Page 74 Chapter 5 – Infusion Site Care and Loading Cartridge THIS PAGE IS INTENTIONALLY LEFT BLANK Customer Technical Support: (877) 801-6901...
-
Page 75: Chapter 6 - Personal Profiles
Chapter 6 Personal Profiles... -
Page 76: Personal Profiles Overview
Chapter 6 – Personal Profiles Personal Profiles Creating a New Profile The t:slim X2 Pump uses the settings Overview in your active profile to calculate the delivery of basal insulin, food boluses Creating Personal Profiles and correction boluses based on your... - Page 77 Bolus Settings are as follows: delivery calculations when applicable. When a BG is entered during bolus Correction Factor (range: 1 unit:1 Carbs (default: off if no Carb Ratio programming, your t:slim X2 Pump will • • mg/dL to 1 unit:600 mg/dL) is defined) consider any active IOB and calculate an adjusted bolus if necessary.
-
Page 78: Programming A New Personal Profile
Chapter 6 – Personal Profiles Programming a New Timed Settings Tap once for first letter displayed, Personal Profile 2 quick taps for middle letter; and 12:00 AM BACK SAVE 3 quick taps for the third letter. Once the Personal Profile has been 6. - Page 79 Chapter 6 – Personal Profiles 6. Using the onscreen keypad, enter 11. Tap BACK to set the Bolus the time (hour and minutes) that your insulin-to-carbohydrate ratio Settings. you want the segment to begin, (the grams of carb to be covered and tap DONE.
- Page 80 3. Using the onscreen keypad, enter the desired time for the duration Tap NO to make changes. of insulin action (2–8 hrs) and tap DONE. 9. Tap Tandem Logo to return to the Home Screen. Customer Technical Support: (877) 801-6901...
-
Page 81: Editing Or Reviewing An Existing Profile
Tap YES if entered data is correct. the onscreen keypad to enter changes. Tap DONE. Tap NO and make changes. 9. View recent changes and 15. Tap Tandem Logo to return to the tap SAVE. Home Screen. Customer Technical Support: (877) 801-6901... -
Page 82: Duplicating An Existing Profile
Chapter 6 – Personal Profiles Duplicating an Existing Activating an Existing 8. Tap the Timed Settings or Bolus Profile Profile Settings Panel to make changes to the new profile. 1. From the Home Screen, 1. From the Home Screen, tap OPTIONS. tap OPTIONS. -
Page 83: Renaming An Existing Profile
5. Tap Delete. rename the profile name (up to 16 characters) and tap SAVE. 6. Tap YES. “Profile Deleted” screen 7. Tap Tandem Logo to return to the Home Screen. is displayed. 7. Tap Tandem Logo to return to the Home Screen. - Page 84 Chapter 6 – Personal Profiles THIS PAGE IS INTENTIONALLY LEFT BLANK Customer Technical Support: (877) 801-6901...
-
Page 85: Chapter 7 - Bolus
Chapter 7 Bolus... -
Page 86: Bolus Overview
4. Tap NEXT to confirm the units of Your t:slim X2 Pump offers you the insulin to be delivered. ability to deliver different boluses to cover carbohydrate intake (food bolus) 5. -
Page 87: Food Bolus Using Grams
Chapter 7 – Bolus Food Bolus Using Grams 6. Tap DELIVER. 6. Confirm Request. 7. The bolus initiated screen is 1. From the Home Screen, Tap YES if entered data is correct. temporarily displayed. tap BOLUS. Tap NO to go back to make 2. -
Page 88: Correction Bolus
Chapter 7 – Bolus Correction Bolus If BG is above the Target BG, a When your blood glucose is: message screen will indicate BG is 1. From the Home Screen, above Target. » Above Target BG: the insulin for the food bolus and the correction tap BOLUS. -
Page 89: Extended Bolus
Chapter 7 – Bolus Extended Bolus 4. Tap NEXT to confirm the units of 4. If desired, tap Add BG and using insulin to be delivered. the onscreen keypad enter BG The Extended Bolus feature allows you value. Tap DONE. to deliver part of the bolus now and You can always tap View Cal- culation to display the Delivery... -
Page 90: Canceling Or Stopping A Bolus
Chapter 7 – Bolus Canceling or Stopping 9. Use the onscreen keypad to enter 12. Tap NEXT. a Bolus the percentage of the bolus to DELIVER NOW and tap DONE. You can always tap View Units to display the breakdown of units to Canceling a Bolus If delivery For the DELIVER NOW portion, be delivered NOW versus LATER. - Page 91 Chapter 7 – Bolus Stopping a Bolus if delivery of the bolus Has Started: 1. Tap 1–2–3 to access the Home Screen. 2. Tap X (stop icon) to stop delivery. 3. Tap YES. The BOLUS STOPPED screen is displayed and the units delivered are calculated.
- Page 92 Chapter 7 – Bolus THIS PAGE IS INTENTIONALLY LEFT BLANK Customer Technical Support: (877) 801-6901...
-
Page 93: Chapter 8 - Stop/Resume Insulin
Chapter 8 Stop/Resume Insulin... -
Page 94: Stopping Insulin Delivery
When you stop all insulin delivery, Screen On/Quick Bolus Button any active bolus and any active temp once to turn on your t:slim X2 rate are immediately stopped. No in- Pump screen. sulin delivery can take place while your pump is stopped. - Page 95 Chapter 8 – Stop/Resume Insulin THIS PAGE IS INTENTIONALLY LEFT BLANK Customer Technical Support: (877) 801-6901...
-
Page 96: Section 3 - Additional Pump Operations
Section 3 Additional Pump Operations... -
Page 97: Chapter 9 - Temporary Basal Rate
Chapter 9 Temporary Basal Rate... -
Page 98: Setting A Temp Rate
Chapter 9 – Temporary Basal Rate Setting a Temp Rate be set to the maximum allowable rate 8. The Screen Lock screen will be for delivery. displayed with the icon indicating A Temp Rate is used to increase or a Temp Rate is active. decrease (by percentage) the current 1. -
Page 99: Stopping A Temp Rate
Chapter 9 – Temporary Basal Rate Stopping a Temp Rate To stop an active temp rate: 1. From the Home Screen, tap OPTIONS. 2. On the Options screen, tap X (stop icon) on the right side of Temp Rate. 3. On the confirmation screen, tap STOP. - Page 100 Chapter 9 – Temporary Basal Rate THIS PAGE IS INTENTIONALLY LEFT BLANK Customer Technical Support: (877) 801-6901...
-
Page 101: Chapter 10 - Quick Bolus
Chapter 10 Quick Bolus... -
Page 102: Setting Up Quick Bolus
7. Tap Increment Amount. pressing a button. It is a way to deliver to look at the t:slim X2 Pump’s screen. a bolus by following beep/vibration 8. Select the preferred increment Simply use the Quick Bolus Button to commands without navigating through amount. - Page 103 Chapter 10 – Quick Bolus 3. The pump will beep/vibrate once additional button presses to notify you). for each increment pressed to Look at the screen to confirm the bolus confirm desired amount. amount. » If you hear a different tone at any point 4.
- Page 104 Chapter 10 – Quick Bolus THIS PAGE IS INTENTIONALLY LEFT BLANK Customer Technical Support: (877) 801-6901...
-
Page 105: Chapter 11 - T:slim X2 Pump Settings
Chapter 11 t:slim X2 Pump Settings... -
Page 106: T:slim X2 Pump Volume
Chapter 11 – t:slim X2 Pump Settings 11.1 t:slim X2 Pump Volume 11.2 Screen Options 6. Select preferred volume. Pump Volume is pre-set to high. A 7. Continue to make changes for The Screen Options for your t:slim X2 change to the Pump Volume can be... - Page 107 Chapter 11 – t:slim X2 Pump Settings 5. Tap desired option. NOTE: Pump Volume When Feature Lock is turned on, Pump Volume will be set to high until the Feature For Screen Timeout Lock is turned off. 1. Tap Screen Timeout.
- Page 108 Chapter 11 – t:slim X2 Pump Settings THIS PAGE IS INTENTIONALLY LEFT BLANK Customer Technical Support: (877) 801-6901...
-
Page 109: Chapter 12 - T:slim X2 Pump Info And History
Chapter 12 t:slim X2 Pump Info and History... -
Page 110: T:slim X2 Pump Info
Chapter 12 – t:slim X2 Pump Info and History 12.1 t:slim X2 Pump Info 12.2 t:slim X2 Pump History by date. The event details in each report are listed by time. Your t:slim X2 Pump allows access to Pump History displays a historical log information about your pump. -
Page 111: Chapter 13 - T:slim X2 Pump Reminders
Chapter 13 t:slim X2 Pump Reminders... -
Page 112: Low Bg Reminder
Chapter 13 – t:slim X2 Pump Reminders 13.1 Low BG Reminder Your t:slim X2 Pump lets you know every 10 minutes until acknowledged. important information about the pump Reminders do not escalate. with Reminders, Alerts, and Alarms. Re- The Low BG Reminder prompts you... -
Page 113: High Bg Reminder
Chapter 13 – t:slim X2 Pump Reminders 13.2 High BG Reminder using the onscreen keypad, enter ing the onscreen keypad, enter a a Low BG value (from 70 to 120 High BG value (from 150 to 300 mg/dL) that you want to trigger... -
Page 114: After Bolus Bg Reminder
Chapter 13 – t:slim X2 Pump Reminders 13.3 After Bolus BG Reminder 13.4 Missed Meal Bolus 7. Tap SAVE when all changes Reminder are complete. The After Bolus BG Reminder prompts you to test your BG at a selected time The Missed Meal Bolus Reminder lets 8. -
Page 115: Site Reminder
Chapter 13 – t:slim X2 Pump Reminders 13.5 Site Reminder 6. On the Missed Meal Bolus screen, 7. Tap Tandem Logo to return to tap which reminder you want to the Home Screen. set (Reminder 1 to 4) and do the The Site Reminder prompts you to change your infusion set. - Page 116 Chapter 13 – t:slim X2 Pump Reminders THIS PAGE IS INTENTIONALLY LEFT BLANK Customer Technical Support: (877) 801-6901...
-
Page 117: Chapter 14 - User Settable Alerts And Alarms
Chapter 14 User Settable Alerts and Alarms... -
Page 118: Low Insulin Alert
(from 10 to Your t:slim X2 Pump keeps track 40 units) that you want the Low Your t:slim X2 Pump can stop insulin of how much insulin remains in the delivery and alert you (or whoever is Insulin Alert value to be set, and cartridge and alerts you when it is low. - Page 119 (refer to Chapter 8.2). If you do not clear the warning within 9. Tap Tandem Logo to return to the 30-second countdown period, the the Home Screen. AUTO-OFF ALARM occurs, accom- panied by an audible alarm.
-
Page 120: Section 4 - T:slim X2 Pump Safety Alerts And Alarms
Section 4 t:slim X2 Pump Safety Alerts and Alarms... -
Page 121: Chapter 15 - T:slim X2 Pump Alerts
Chapter 15 t:slim X2 Pump Alerts... - Page 122 Chapter 15 – t:slim X2 Pump Alerts Your t:slim X2 Pump lets you know important information about the pump with Reminders, Alerts, and Alarms. Re- minders are displayed to notify you of an option that you have set (for exam- ple, a reminder to check you BG after a bolus).
-
Page 123: Low Insulin Alert
Chapter 15 – t:slim X2 Pump Alerts 15.1 Low Insulin Alert What will I see on the Screen? What does it mean? 5 units or less of insulin remain in the cartridge. LOW INSULIN ALERT How will the pump notify me? Change cartridge or pump will stop all deliveries. -
Page 124: Low Power Alerts
Chapter 15 – t:slim X2 Pump Alerts 15.2 Low Power Alerts Low Power Alert 1 What does it mean? What will I see on the Screen? Less than 25% of battery power remains. How will the pump notify me? LOW POWER ALERT... - Page 125 Chapter 15 – t:slim X2 Pump Alerts Low Power Alert 2 What does it mean? What will I see on the Screen? Less than 5% of battery power remains. Insulin delivery will continue for 30 minutes and then the pump will power off and insulin delivery will stop.
-
Page 126: Incomplete Bolus Alert
Chapter 15 – t:slim X2 Pump Alerts 15.3 Incomplete Bolus Alert What will I see on the Screen? What does it mean? You started a bolus request but did not complete the request within 90 seconds. INCOMPLETE BOLUS ALERT How will the pump notify me? This bolus has not been delivered. -
Page 127: Incomplete Temp Rate Alert
Chapter 15 – t:slim X2 Pump Alerts 15.4 Incomplete Temp Rate Alert What will I see on the Screen? What does it mean? You started to set up a temp rate but did not complete the request within 90 seconds. -
Page 128: Incomplete Load Sequence Alerts
Chapter 15 – t:slim X2 Pump Alerts 15.5 Incomplete Load Sequence Alerts Incomplete Cartridge What does it mean? Change Alert You selected Change Cartridge from the Load menu but did not complete the process What will I see on the Screen? within 3 minutes. - Page 129 Chapter 15 – t:slim X2 Pump Alerts Incomplete Fill Tubing Alert What does it mean? What will I see on the Screen? You selected Fill Tubing from the Load menu but did not complete the process within 3 minutes. FILL TUBING ALERT...
- Page 130 Chapter 15 – t:slim X2 Pump Alerts Incomplete Fill Cannula Alert What does it mean? What will I see on the Screen? You selected Fill Cannula from the Load menu but did not complete the process within 3 minutes. FILL CANNULA ALERT...
-
Page 131: Incomplete Setting Alert
Chapter 15 – t:slim X2 Pump Alerts 15.6 Incomplete Setting Alert What will I see on the Screen? What does it mean? You started to set up a new Personal Profile but did not save or complete the programming within 5 minutes. -
Page 132: Basal Rate Required Alert
Chapter 15 – t:slim X2 Pump Alerts 15.7 Basal Rate Required Alert What will I see on the Screen? What does it mean? You did not enter a basal rate in a time segment in Personal Profiles. A basal rate must be entered in each time segment (rate can be 0 u/hr). -
Page 133: Max Hourly Bolus Alert
Chapter 15 – t:slim X2 Pump Alerts 15.8 Max Hourly Bolus Alert What will I see on the Screen? What does it mean? In the previous 60 minutes, you requested total bolus delivery that is more than 1.5 times your Max Bolus setting. -
Page 134: Max Bolus Alerts
Chapter 15 – t:slim X2 Pump Alerts 15.9 Max Bolus Alerts Max Bolus Alert 1 What does it mean? What will I see on the Screen? You requested a bolus larger than the Max Bolus setting in your active Personal Profile. - Page 135 Chapter 15 – t:slim X2 Pump Alerts The following applies only if you have Carbs turned on in your active Personal Profile and your Max Bolus amount is set to 25 units. Max Bolus Alert 2 What does it mean? What will I see on the Screen? Your Max Bolus is set to 25 units and you requested a bolus larger than 25 units.
-
Page 136: Max Basal Alerts
Chapter 15 – t:slim X2 Pump Alerts 15.10 Max Basal Alerts Max Basal Alert 1 What does it mean? What will I see on the Screen? When entering a basal rate or requesting a temp rate, you requested a basal rate more than 2 times the highest basal rate defined in your Personal Profile. - Page 137 Chapter 15 – t:slim X2 Pump Alerts Max Basal Alert 2 What does it mean? What will I see on the Screen? An active temp rate exceeded 2 times your highest basal setting defined in your Personal Profile. MAX BASAL ALERT...
-
Page 138: Min Basal Alerts
Chapter 15 – t:slim X2 Pump Alerts 15.11 Min Basal Alerts Min Basal Alert 1 What does it mean? What will I see on the Screen? When entering a basal rate or requesting a temp rate, you requested a basal rate less than half of the lowest basal rate defined in your Personal Profile. - Page 139 Chapter 15 – t:slim X2 Pump Alerts Min Basal Alert 2 What does it mean? What will I see on the Screen? An active temp rate dropped below half of your lowest basal setting defined in your Personal Profile. MIN BASAL ALERT...
-
Page 140: Connection Error Alert
What will I see on the Screen? What does it mean? You connected your t:slim X2 Pump to a computer with the USB cable to charge it or upload data to t:connect and a connection could not be made. CONNECTION ERROR ALERT Pump cannot connect with the computer. -
Page 141: Power Source Alert
15.13 Power Source Alert What will I see on the Screen? What does it mean? You connected your t:slim X2 Pump to a power source that does not have enough power to charge the pump. POWER SOURCE ALERT The pump cannot charge using the current power source. -
Page 142: Data Error Alert
Chapter 15 – t:slim X2 Pump Alerts 15.14 Data Error Alert What will I see on the Screen? What does it mean? Your t:slim X2 Pump encountered a condition that could potentially result in a loss of data. DATA ERROR ALERT Please verify that your active... -
Page 143: Chapter 16 - T:slim X2 Pump Alarms
Chapter 16 t:slim X2 Pump Alarms... - Page 144 Chapter 16 – t:slim X2 Pump Alarms Information in this section will help you PRECAUTION CHECK your pump regularly for potential alarm learn how to respond to Alarms. conditions that may display. It is important to Alarms notify you with 3 sequences of 3...
-
Page 145: Resume Pump Alarm
Chapter 16 – t:slim X2 Pump Alarms 16.1 Resume Pump Alarm What will I see on the Screen? What does it mean? You tapped STOP INSULIN in the Options menu and insulin delivery has been stopped for more than 15 minutes. -
Page 146: Low Power Alarms
Low Power Alarm 1 What does it mean? What will I see on the Screen? Your t:slim X2 Pump detected a power level of 1% or less remaining and all deliveries have stopped. LOW POWER ALARM How will the pump notify me? - Page 147 Low Power Alarm 2 What does it mean? What will I see on the Screen? Your t:slim X2 Pump detected a voltage level too low to ensure normal performance and all deliveries have stopped. LOW POWER ALARM How will the pump notify me?
-
Page 148: Empty Cartridge Alarm
Chapter 16 – t:slim X2 Pump Alarms 16.3 Empty Cartridge Alarm What will I see on the Screen? What does it mean? Your t:slim X2 Pump detected that the cartridge is empty and all deliveries have stopped. EMPTY CARTRIDGE ALARM ALL DELIVERIES STOPPED! -
Page 149: Cartridge Error Alarm
What will I see on the Screen? What does it mean? Your t:slim X2 Pump detected that the cartridge could not be used and all deliver- ies have stopped. This can be caused by cartridge defect, not following the proper... -
Page 150: Cartridge Removal Alarm
Chapter 16 – t:slim X2 Pump Alarms 16.5 Cartridge Removal Alarm What will I see on the Screen? What does it mean? Your t:slim X2 Pump detected that the cartridge has been removed and all deliveries have stopped. CARTRIDGE ALARM ALL DELIVERIES STOPPED! How will the pump notify me? The cartridge cannot be detected. -
Page 151: Temperature Alarm
What will I see on the Screen? What does it mean? Your t:slim X2 Pump detected an internal temperature below 35˚F (2˚C) or above 113˚F (45˚C) or a battery temperature below 35˚F (2˚C) or above 125˚F (52˚C) and all deliver- TEMPERATURE ALARM ies have stopped. -
Page 152: Occlusion Alarms
16.7 Occlusion Alarms Occlusion Alarm 1 What does it mean? What will I see on the Screen? Your t:slim X2 Pump detected that insulin delivery is blocked and all deliveries have stopped. OCCLUSION ALARM How will the pump notify me? - Page 153 Occlusion Alarm 2 What does it mean? What will I see on the Screen? Your t:slim X2 Pump detected a second occlusion alarm shortly after the first occlu- sion alarm and all deliveries have stopped. OCCLUSION ALARM How will the pump notify me?
-
Page 154: Screen On/Quick Bolus Button Alarm
16.8 Screen On/Quick Bolus Button Alarm What will I see on the Screen? What does it mean? The Screen On/Quick Bolus Button (on the top of your t:slim X2 Pump) is stuck or not functioning properly and all deliveries have stopped. BUTTON ALARM... -
Page 155: Altitude Alarm
What will I see on the Screen? What does it mean? Your t:slim X2 Pump detected a pressure difference between inside the cartridge and the surrounding air within the validated operating range of -1,300 feet to 10,000 feet ALTITUDE ALARM and all deliveries have stopped. -
Page 156: Reset Alarm
16.10 Reset Alarm What will I see on the Screen? What does it mean? Your t:slim X2 Pump detected that one if its micro-processors experienced a reset and all deliveries have been stopped. PUMP HAS BEEN RESET All active deliveries have been... -
Page 157: Chapter 17 - T:slim X2 Pump Malfunction
Chapter 17 t:slim X2 Pump Malfunction... -
Page 158: Malfunction
17.1 Malfunction What will I see on the Screen? What does it mean? Your t:slim X2 Pump detected a If your t:slim X2 Pump detects a Pump Pump error and all deliveries have error, the MALFUNCTION screen MALFUNCTION been stopped. - Page 159 Chapter 17 – t:slim X2 Pump Malfunction THIS PAGE IS INTENTIONALLY LEFT BLANK Customer Technical Support: (877) 801-6901...
-
Page 160: Section 5 - Living With And Caring For Your T:slim X2 Pump
Section 5 Living With and Caring for Your t:slim X2 Pump... -
Page 161: Chapter 18 - Lifestyle Issues And Travel
Chapter 18 Lifestyle Issues and Travel... -
Page 162: Overview
While the convenience and flexibility of nect from your pump, discuss a plan Extreme Altitudes the t:slim X2 Pump allow most users with your healthcare provider to com- to participate in a variety of activities, pensate for any basal insulin delivery... - Page 163 DO NOT expose your pump to X-ray If traveling internationally, contact Travel screening used for carry-on and Tandem Diabetes Care Customer checked luggage. Newer full body Support prior to your trip to obtain a The flexibility afforded by an insulin...
- Page 164 Chapter 18 – Lifestyle Issues and Travel THIS PAGE IS INTENTIONALLY LEFT BLANK Customer Technical Support: (877) 801-6901...
-
Page 165: Chapter 19 - Taking Care Of Your T:slim X2 Pump
Chapter 19 Taking Care of Your t:slim X2 Pump... -
Page 166: Overview
Chapter 19 – Taking Care of Your t:slim X2 Pump 19.1 Overview Inspecting Your Pump Storing Your Pump for Damage This section provides information on If you need to stop using your t:slim X2 caring for and maintaining your pump. - Page 167 Chapter 19 – Taking Care of Your t:slim X2 Pump Disposing of Pump Components Consult your healthcare provider for instructions for disposal of devices con- taining electronic waste such as your pump and for instructions for disposal of potentially bio-hazardous materials such as used cartridges, needles, syringes, and infusion sets.
- Page 168 Section 6 Technical Specifications and Warranty...
- Page 169 Chapter 20 Technical Specifications...
-
Page 170: Chapter 20 - Technical Specifications 20.1 Overview
20.1 Overview This section provides tables of technical specifications, performance characteristics, options, settings, and electromagnetic compli- ance information for the t:slim X2 Pump. The specifications in this section meet the international standards set forth in IEC 60601-1 and IEC 60601-2-24. -
Page 171: T:slim X2 Pump Specifications
External PSU: Class II, Infusion Pump. Internally-powered equipment, Type BF applied part. The risk of ignition of flammable anesthetics and explosive gases by the pump is remote. While this risk is remote, it is not recommended to operate the t:slim X2 Pump in the presence of flammable anesthetics or explosive gases. Size 3.13˝... - Page 172 Chapter 20 – Technical Specifications …table continued from previous page Specification Type Specification Details Basal Delivery Accuracy at all Flow ±5% Rates (tested per IEC 60601-2-24) The Pump is designed to vent automatically when there is a pressure difference between inside the cartridge and the surrounding air.
- Page 173 Chapter 20 – Technical Specifications …table continued from previous page Specification Type Specification Details Internal Pump Battery Life 4 years minimum under normal use conditions Typical Operating Time when Pump During normal use, the intermediate rate is 2 units/hr; battery charge can be reasonably expected to last up to is Operating at Intermediate Rate 7 days from a fully charged state to a totally discharged state Handling of Over-Infusion or...
- Page 174 Chapter 20 – Technical Specifications USB Charging/Download Cable Specifications Tandem P/N 004113 Length 6 feet Type USB A to USB Micro B Power Supply/Charger, AC, Wall Mount, USB Specifications Tandem P/N 03933 Input 100 to 240 Volts AC, 50/60 Hz...
- Page 175 Safety Standard Compliance 60950-1 or 60601-1 or equivalent The t:slim X2 Pump is designed to be connected to a host PC for battery charging and data transfer to t:connect. The following minimum characteristics are required of the host PC: USB 1.1 port (or later) •...
-
Page 176: T:slim X2 Pump Options And Settings
Chapter 20 – Technical Specifications 20.3 t:slim X2 Pump Options and Settings Option/Setting Type Option/Setting Details Time 12-hour clock Maximum Basal Rate 15 units/hr Insulin Delivery Profiles (Basal and Bolus) Basal Rate Segments 16 per delivery profile Basal Rate Increment 0.001 at programed rates equal to or greater than 0.1 units/hr... - Page 177 Chapter 20 – Technical Specifications …table continued from previous page Option/Setting Type Option/Setting Details Quick Bolus Increments When set to units: 0.5, 1, 2, 5 units (default is 0.5 units); or when set to grams/carbs: 2, 5, 10, 15 grams (default is 2 g) Maximum Extended Bolus Time 8 hours Maximum Bolus Size...
-
Page 178: T:slim X2 Pump Performance Characteristics
Chapter 20 – Technical Specifications 20.4 t:slim X2 Pump Performance Characteristics Rate of Delivery 25 Unit Bolus Delivery Speed 2.97 Units/min Typical 2.5 Unit Bolus Delivery Speed 1.43 Units/min Typical 20 Unit Prime 9.88 Units/min Typical Bolus Duration 25 Unit Bolus Duration 8 minutes 26 seconds Typical 2.5 Unit Bolus Duration... - Page 179 Chapter 20 – Technical Specifications THIS PAGE IS INTENTIONALLY LEFT BLANK Customer Technical Support: (877) 801-6901...
-
Page 180: Electromagnetic Compatibility
The information contained in this section is specific to the t:slim X2 Pump. This information provides reasonable assurance of normal operation, but does not guarantee such under all conditions. If the t:slim X2 Pump must be used in close proximity with other electrical equipment, the pump should be observed in this environment to verify normal operation. -
Page 181: Electromagnetic Emissions
Chapter 20 – Technical Specifications 20.6 Electromagnetic Emissions The t:slim X2 Pump is intended for use in the electromagnetic environment specified below. Always make sure that the pump is used in such an environment. Guidance and Manufacturer’s Declaration – Electromagnetic Emissions... -
Page 182: Electromagnetic Immunity
Chapter 20 – Technical Specifications 20.7 Electromagnetic Immunity The t:slim X2 Pump is intended for use in the electromagnetic environment specified below. Always make sure that the pump is used in such an environment. Guidance and Manufacturer’s Declaration – Electromagnetic Immunity Electromagnetic Environment –... - Page 183 Chapter 20 – Technical Specifications …table continued from previous page Guidance and Manufacturer’s Declaration – Electromagnetic Immunity Electromagnetic Environment – Immunity Test IEC 60601 Test Level Compliance Level Guidance Conducted RF 3 Vrms 10 V Portable and mobile RF communications equipment should IEC 61000-4-6 150 kHz to 80 MHz be used no closer to any part of the pump, including...
-
Page 184: Distances Between The T:slim X2 Pump And Rf Equipment
20.8 Distances Between the t:slim X2 Pump and RF Equipment The t:slim X2 Pump is intended for use in an electromagnetic environment typically found in the home, at work, retail stores, and places of leisure, where daily activities occur. The chart below can be used as a guideline for determining the recommended minimum distance to maintain between a radio frequency (RF) transmitter and the t:slim X2 Pump. - Page 185 RF Communications Equipment and the t:slim X2 Pump The t:slim X2 Pump is intended for use in an electromagnetic environment in which radiated RF disturbances are controlled. The customer or the user of the t:slim X2 Pump can help prevent electromagnetic interference by maintaining a minimum distance between portable and mobile RF communications equipment (transmitters) and the pump as recommended below, according to the maximum output power of the communications equipment.
- Page 186 Chapter 20 – Technical Specifications The table below provides a list of typical devices for various levels of transmitter power and frequency, and the recommended separation distances from the transmitter and the pump. Rated Maximum Recommended Output Power of Typical Devices Separation Distance Transmitter in Watts Inch (Meters)
-
Page 187: Fcc Notice Concerning Interference
There is no guarantee that in- FCC/IC RF exposure limits for general terference will not occur in a particular population/uncontrolled exposure. installation. If the t:slim X2 Pump does cause harmful interference to radio or t:slim X2 Pumps equipped with a Blue- television reception, the interference... -
Page 188: Warranty Information
• conditions and exclusions stated here- and wear to surfaces and other this Warranty. in. Repair or replacement of a t:slim X2 externally exposed parts due to Pump will not extend the original 4 year wear and tear; This warranty shall be personal to warranty, which will continue to apply. - Page 189 Chapter 20 – Technical Specifications employee of Tandem or any other party Warranty the sterile package is compromised • is authorized to make any warranty in while in the control of the user by t:slim Cartridges addition to those made in this Warranty.
-
Page 190: Returned Goods Policy
(RMA) number is valid only in the United States. No was originally purchased from Tan- from Tandem’s or its authorized distrib- employee of Tandem or any other party dem Diabetes Care , Inc. (“Tandem”) utor’s Customer Service Department. - Page 191 Chapter 20 – Technical Specifications lect. This policy is subject to applicable law. Customer Technical Support: (877) 801-6901...
- Page 192 Index Alert Icon 38 Arrows Alert Settings 48 Menu Arrows 46 Accessories 32, 56 Basal Rate Required Alert 132 Up/Down Arrows 46 AC Power Adapter 56 Connection Error Alert 140 Index Active Bolus 38 Data Error Alert 142 Additional Pump Operations 96 Incomplete Bolus Alert 126 After Bolus BG Reminder 114 Basal 32, 76, 78...
- Page 193 Index BG 32 Rate of Delivery 178 Cartridge Tubing 40 Stopping a Bolus 90 Change Cartridge 69 High BG Reminder - Setting Up 113 Filling the Cartridge 67 Low BG Reminder - Setting Up 112 Load Cartridge 33, 46, 64, 69 Target BG 32, 76 Charging 56 Target BG - Setting Up 79...
- Page 194 Index Filling Tubing 70 Fill Port 64, 67 Data Error Alert 142 Edit Fill Tubing 46 Date Edit Date 59 Food Bolus Using Grams 87 Editing an Existing Profile 81 Date Display 38 Food Bolus Using Units 86 Edit Site Reminder 73 Edit Date 59 Edit Time 59 Default...
- Page 195 Index Incomplete Max Hourly Bolus Alert 133 Incomplete Bolus Alert 126 Min Basal Alerts 138 Keypad 50 Incomplete Cartridge Change Alert Missed Meal Bolus Reminder 114 Letter Keypad 52 My Pump Screen 48 Number Keypad 50 Incomplete Fill Cannula Alert 130 Incomplete Fill Tubing Alert 129 Incomplete Load Sequence Alerts New Personal Profile...
- Page 196 Serial Number 34, 110 Contraindications 20 Settings 46 Emergency Kit 29 Indications for Use 20 Pump Settings 105, 176 Precautions - t:slim X2 Pump 24 Site Reminder 46 Quick Bolus 17, 33, 101 Verification of Proper Functionality Setting Up 73, 115 Delivering 102...
- Page 197 Warranty 188 Stopping a Temp Rate 99 Tubing Water Resistance 162 Stopping Insulin Delivery 94 Cartridge Tubing 40 t:slim X2 Pump 162, 171 Filling Tubing 70 Storing Your Pump 166 Fill Tubing 46 Supply Reordering 32 Symbols Explanation of Symbols 34...
- Page 198 © 2016 Tandem Diabetes Care, Inc. All rights reserved. Tandem Diabetes Care, t:slim, touch simplicity, t:connect are registered trademarks and t:slim X2 is a trademark of Tandem Diabetes Care, Inc. For a list of patents, please see www.tandemdiabetes.com/legal/patents. 1000124_B...
Need help?
Do you have a question about the t:slim X2 and is the answer not in the manual?
Questions and answers
I am trying to turn my mobile connection on, and I am unable to; the on/off button will not move. What do I do?
What is the diamond icon on the lock screen of a T slim X2?