Tandem t:slim x2 Training Manual
Insulin pump with control-iq technology
Hide thumbs
Also See for t:slim x2:
- User manual (448 pages) ,
- Training manual (120 pages) ,
- Manual (11 pages)

Related Manuals for Tandem t:slim x2


Summary of Contents for Tandem t:slim x2
- Page 1 Training Manual for Professional Educators SOFTWARE VERSION: MMOL/L CONTROL-IQ 7.6...
- Page 3 “System.” This training manual is for use by professional educators to train end users of the System. This training manual is not intended to be distributed to end users and is not meant to replace the t:slim X2 insulin pump with Control-IQ technology user guide. This training manual provides step-by-step illustrative instructions that you should follow sequentially when training an end user on how to properly operate, manage, and care for their System.
-
Page 4: Table Of Contents
Table of Contents Chapter 1: Getting Started Important Safety Information ......... 5 Pump Overview . - Page 5 Table of Contents Chapter 4: Load Fill and Load a Cartridge ......... . . 75 Chapter 5: Bolus Bolus Overview .
-
Page 6: Chapter 1: Getting Started
CHAPTER 1 Getting Started... -
Page 7: Important Safety Information
Getting Started Important Safety Information The t:slim X2 insulin pump with Control-IQ technology (the System) consists of the t:slim X2 insulin pump, which contains Control-IQ technology, and a compatible continuous glucose monitor (CGM, sold separately). The t:slim X2 insulin pump is intended for the subcutaneous delivery of insulin, at set and variable rates, for the management of diabetes mellitus in people requiring insulin. -
Page 8: Pump Terminology
Glucose target is a specific blood glucose goal; it’s an exact number, not a range. When a BG or CGM value is entered in the t:slim X2 pump bolus calculator, the calculated insulin bolus will be adjusted up or down as needed to attain this target. - Page 9 24-hour period. Quick Bolus A Quick Bolus is a way to deliver a bolus (using the Quick Bolus button) by follow- ing beep/vibration commands without navigating through or viewing the t:slim X2 insulin pump screen. Temporary Basal Rate (Temp Rate) Temp Rate is used to increase or decrease the current basal rate for a short period of time to accommodate special situations, such as exercise or illness.
-
Page 10: Control-Iq Screen Lock
INSULIN ON BOARD Alert Icon: Indicates a reminder, alert, or alarm is active behind the screen lock USB Port: Charge the t:slim X2 insulin pump battery. Close the cover when not in use. Control-IQ Technology Status: Indicates the status of Control-IQ technology... -
Page 11: Control-Iq Home Screen
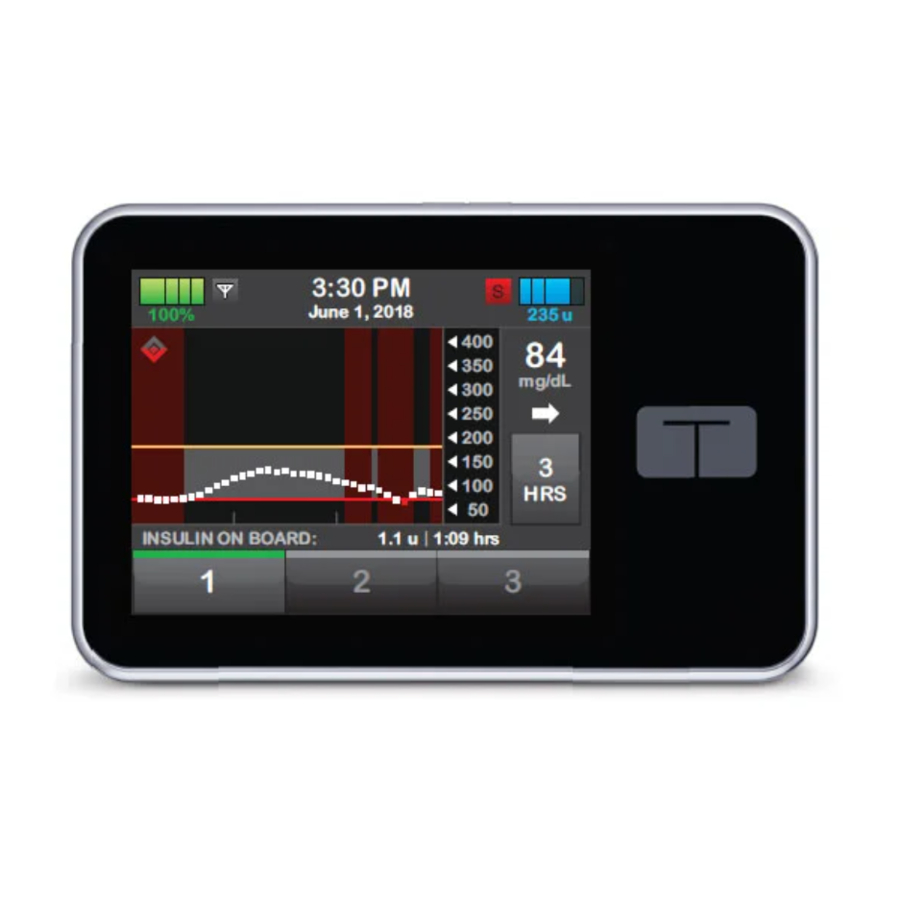
Bolus: Program and deliver a bolus Active Bolus Icon: Indicates an active bolus Status: Displays current pump settings and insulin delivery status Insulin Level: Displays the current amount of insulin in the cartridge 10. Tandem logo: Returns to the Home screen For Professional Use Only... - Page 12 14 Nov 100% Getting Started Bolus Icons 17:30 09:36 14 Nov 100% 235 u 14 Nov mmol/L 100% INSULIN ON BOARD 1.1 u INSULIN ON BOARD 1.1 u OPTIONS BOLUS OPTIONS 09:36 12:40 14 Nov 100% 235 u mmol/L 14 Nov 100% INSULIN ON BOARD 0.27 u...
- Page 13 Extended Bolus Control-IQ technology Automatic Correction Bolus Pump Back Side t:slim X2 Cartridge: A sinlge-use disposable cartridge can hold up to 300 units (3.0 mL) of insulin. Vent Holes: Vent holes help the pump function correctly. It is important that these vents remain uncovered.
-
Page 14: Status Screen
Getting Started Status Screen Current Status Weekday 0.75 Basal Rate u/hr 10 u Last Bolus 14 Nov - 12:40 Control-IQ Current Status Correction 1u: 2.8 mmol/L Factor 1u: 10 Carb Ratio Target BG mmol/L Insulin Duration hours Current Status 14 Nov Last Calibration 11:32 Time Sensor... - Page 15 Getting Started Note: The Current Status screen can be accessed from the Lock screen and the Home screen by ⚑ tapping the insulin level symbol. Note: No changes can be made from this screen. ⚑ Profile: Displays current active Personal Profile Basal Rate: Displays current basal rate or Temp Rate in units/hour Last Bolus: Displays the amount, date, and time of last bolus Control-IQ Status: Displays the Control-IQ technology status...
-
Page 16: Bolus Screen Using Grams
Getting Started Bolus Screen Using Grams units CARBS GLUCOSE Add BG grams View Calculation : Returns to the Home screen CARBS: Enter grams of carbohydrate Units: Displays total units calculated units View Calculation: Displays how the insulin dose was calculated using the current settings INSULIN GLUCOSE... -
Page 17: Bolus Screen Using Units
Getting Started Bolus Screen Using Units units INSULIN GLUCOSE Add BG units View Calculation : Returns to the Home screen INSULIN: Enter units of insulin Units: Displays total units calculated View Calculation: Displays how the insulin dose was calculated using the current settings GLUCOSE: Enter BG level : Moves to next step... -
Page 18: Options Screen
Getting Started Options Screen Options STOP INSULIN Load Activity My Pump Options My CGM Device Settings History For Professional Use Only... - Page 19 Sound Volume, and Security PIN History: Pump History (Displays historical log of pump events) and CGM History (Sessions and Calibrations, Alerts and Errors, and Complete) Note: Orange text relates to t:slim X2 insulin pump setup or delivery settings. ⚑ For Professional Use Only...
-
Page 20: Number Keypad
Getting Started Number Keypad grams Value Entered : Returns to previous screen Keypad Numbers : Allows numbers to be added on gram keypad screen (if in units, this displays as a decimal point) : Completes task and saves information entered Units/Grams: Value of what is entered : Deletes last number entered Quick Tip:... -
Page 21: Letter Keypad
Getting Started Letter Keypad Weekday name Name of Profile : Returns to previous screen 123: Changes keypad mode from letters (ABC) to numerals (123) : Enters a space : Saves entered information Letters: Tap once for first letter displayed, two quick taps for middle letter, and three quick taps for third letter : Deletes last letter or number entered Quick Tip:... -
Page 22: My Pump Screen
Personal Profiles: A group of settings that defines basal and bolus delivery Control-IQ: Turn on/off Control-IQ technology and enter required values Alerts & Reminders: Pump Reminders and Pump Alerts Pump Info: t:slim X2 pump serial number and other technical information For Professional Use Only... -
Page 23: Control-Iq Screen
Total Daily Insulin Press to Set Up : Returns to previous screen Note: If this is the first time using the t:slim X2 insulin pump with Control-IQ technology, ⚑ the user must first begin an active sensor session before using Control-IQ technology. -
Page 24: Charging The Pump
The t:slim X2 insulin pump with Control-IQ technology is powered by an internal lithium polymer rechargeable battery. Included with the System are accessories for charging from AC wall outlets. Upon receipt of the t:slim X2 insulin pump with Control-IQ technology, the user should charge it using the AC charger long enough to ensure a full charge, then plug in for a few minutes every day or two to keep the battery optimally charged. -
Page 25: Turning On Pump Screen
Getting Started Turning On Pump Screen Press Screen On/Quick Bolus button. The Lock screen is displayed. Once unlocked, the Home screen or the last screen that was viewed is displayed. Note: The Screen On/Quick Bolus button ⚑ can also be used to turn the screen off. Unlock Pump Screen Press Screen On/Quick Bolus button. -
Page 26: Selecting A Language
Getting Started 10:20 AM Tap 3. 100% 1 Jan 235 u The pump screen is now unlocked. The last screen that was viewed is displayed. Note: The user must tap 1-2-3 in sequen- ⚑ tial order, or they will have to begin again to INSULIN ON BOARD (IOB) unlock the pump screen. -
Page 27: Edit Time
Getting Started Edit Time 12:00 AM From the Home screen, tap OPTIONS. 100% 1 Jan 235 u BOLUS OPTIONS INSULIN ON BOARD (IOB) Units 1.1 u Time Remaining 1:09 hrs Options Tap Down Arrow. STOP INSULIN Load Activity My Pump Options Tap Device Settings. - Page 28 Getting Started Time and Date Tap Edit Time. 12:00 AM Edit Time 1 Jan Edit Date Edit Time Tap 24-Hour Time. 12:00 AM Time Time of Day 24-Hour Time Edit Time Tap Time. 00:00 Time Time of Day 24-Hour Time 7 : 40 Using the on-screen keypad, enter hour minute...
-
Page 29: Edit Date
Getting Started Edit Time Verify the correct time is set and tap 07:40 Time The SETTING SAVED screen Time of Day is displayed. 24-Hour Time Note: The orange highlighted area indi- ⚑ cates a recent change made to a setting. Edit Date Time and Date From the Time and Date screen, tap Edit Date. - Page 30 2020 Year Note: Setting the correct time and date ⚑ on the t:slim X2 insulin pump with Control-IQ technology is very important to ensure that the settings reflect the user’s insulin needs and generate accurate software reports. For Professional Use Only...
-
Page 31: Sound Volume And Display Settings
Getting Started Sound Volume and Display Settings Sound Volume can be personalized for button taps on the Keypad, Bolus, Quick Bolus, Fill Tubing, Reminders, Pump Alarms, Pump Alerts, and CGM Alerts. Options for Sound Volume include high, medium, low, and vibrate. Display Settings allow for personalization of the Screen Timeout. - Page 32 Getting Started For Screen Timeout Device Settings Tap Display Settings. Display Settings Bluetooth Settings Time and Date Sound Volume Display Settings Tap Screen Timeout and select desired option. 30 sec Screen Timeout Once a value is selected, the pump will return to the previous screen to complete setup.
- Page 33 Getting Started Notes For Professional Use Only...
-
Page 34: Chapter 2: My Cgm
CHAPTER 2 My CGM... -
Page 35: Entering The Transmitter Id
My CGM Entering the Transmitter ID 07:40 From the Home screen, tap OPTIONS. 100% 14 Nov 235 u BOLUS OPTIONS INSULIN ON BOARD (IOB) Units 1.1 u Time Remaining 1:09 hrs Options Tap Down Arrow. STOP INSULIN Load Activity My Pump Options Options Tap My CGM. - Page 36 My CGM Enter ID Enter the six-character transmitter ID Transmitter ID (found on the bottom of the transmitter). 8Y4H5A Transmitter ID Tap ENTER ID AGAIN to verify Verify Transmitter ID transmitter ID. Please verify your transmitter ID by entering it a second time. ENTER ID AGAIN 8Y4H5A Enter the six-character transmitter ID...
-
Page 37: Starting A Sensor Session
My CGM Starting a Sensor Session 07:40 From the Home screen, tap OPTIONS. 100% 14 Nov 235 u BOLUS OPTIONS INSULIN ON BOARD (IOB) Units 1.1 u Time Remaining 1:09 hrs Options Tap Down Arrow. STOP INSULIN Load Activity My Pump Options Tap My CGM. - Page 38 My CGM Tap CODE. If you have a Sensor Code, press CODE to enter it now. Note: If a sensor session is already in ⚑ If you do not have a Sensor Code, progress with a CGM smartphone app, tap or have already started your CGM SKIP instead of entering a code.
-
Page 39: Calibrating The Sensor
My CGM 07:40 The two-hour warm up period starts. 14 Nov 100% 235 u Note: A graph of the user’s CGM values ⚑ will appear on the pump screen. Tap the Trend Graph Time (HRS) to change the timeline of the graph. - Page 40 My CGM Options Tap Down Arrow. STOP INSULIN Load Activity My Pump Options Tap My CGM. My CGM Device Settings History My CGM Tap Calibrate CGM. STOP SENSOR Calibrate CGM CGM Alerts Transmitter ID 8Y4H5A Enter BG Enter BG reading from meter mmol/L into keypad.
- Page 41 7.2 mmol/L The CALIBRATION ACCEPTED screen is displayed. Date 14 Nov Note: Many functions of the t:slim X2 ⚑ Time 07:40 insulin pump with Control-IQ technology include confirmation screens. Confirmation screens are an important part of the safety feature of the System.
-
Page 42: Setting Up Cgm Alerts
My CGM Setting Up CGM Alerts 07:40 From the Home screen, tap OPTIONS. 14 Nov 100% 235 u INSULIN ON BOARD 1.1 u 1:09 hrs OPTIONS BOLUS Options Tap Down Arrow. STOP INSULIN Load Activity My Pump Options Tap My CGM. My CGM Device Settings History... - Page 43 My CGM CGM Alerts Tap High and Low. High and Low Rise and Fall 20 min Out of Range High and Low To set the High Alert, tap High Alert. 11.1 mmol/L High Alert Never 3.9 mmol/L Low Alert Never High Alert Tap Alert Me Above.
- Page 44 My CGM mmol/L High Alert 10. If the user wants the High Alert to repeat, tap Repeat. High Alert 10 mmol/L Alert Me Above Never Repeat Repeat 11. To select the repeat time, tap the time the user wants the Alert to sound Never again.
- Page 45 My CGM High and Low 13. To set the Low Alert, tap Low Alert. 11.1 mmol/L High Alert Never 3.9 mmol/L Low Alert Never Low Alert 14. Tap Alert Me Below. Low Alert 3.9 mmol/L Alert Me Below Never Repeat 15.
- Page 46 My CGM Low Alert 17. If the user wants the Low Alert to repeat, tap Repeat. Low Alert 4.2 mmol/L Alert Me Below Never Repeat Repeat 18. To select the repeat time, tap the time the user wants the Alert to sound Never again.
- Page 47 My CGM CGM Alerts 21. Tap Rise and Fall. High and Low Rise and Fall 20 min Out of Range Rise and Fall 22. Tap Rise Alert. Rise Alert Press to Turn On Fall Alert Press to Turn On Rise Alert 23.
- Page 48 My CGM Rise Alert 25. Tap RiseAlert The SETTING SAVED screen is displayed. Rate 0.11 mmol/L/min Rise and Fall 26. Tap Fall Alert. Rise Alert 0.11 mmol/L/min Fall Alert Press to Turn On Fall Alert 27. Tap Rate. Fall Alert Rate 0.17 mmol/L/min Rate 28.
- Page 49 My CGM Fall Alert 29. Tap Fall Alert The SETTING SAVED screen is displayed. Rate 0.11 mmol/L/min Rise and Fall 30. Tap to get to the CGM Alerts menu. Rise Alert 0.11 mmol/L/min Fall Alert 0.11 mmol/L/min CGM Alerts 31. Tap Out of Range. High and Low Rise and Fall 20 min...
- Page 50 My CGM 0 : 20 33. Using the on-screen keypad, enter hour minute the time after which the user wants to be Alerted. : 30 34. Tap hour minute Out of Range 35. Tap Out of Range The SETTING SAVED screen is displayed. 30 min Alert Me After For full detailed instructions on items in this chapter, please refer to the Getting...
- Page 51 My CGM Notes For Professional Use Only...
-
Page 52: Chapter 3: Insulin Delivery Settings
CHAPTER 3 Insulin Delivery Settings... -
Page 53: Basal Limit
Insulin Delivery Settings Basal Limit The Basal Limit setting allows the user to set a limit to the basal rate that is set in the Personal Profiles, as well as the amount of insulin that will be delivered when using a Temp Rate. The user may be unable to set any basal rates or temp basal rates that exceed the Basal Limit. - Page 54 Insulin Delivery Settings Personal Profiles Tap Pump Settings. Pump Settings Profile 1 Pump Settings Tap Basal Limit. Quick Bolus Press to Turn On Note: The default Basal Limit is 3 units per ⚑ hour. If the user is updating their pump from a 10 u Pump Volume Max Bolus...
- Page 55 The SETTING SAVED screen is displayed. Tap the Tandem logo on the face of the pump to return to the Home screen. For full detailed instructions on items in this chapter, please refer to the Getting Started chapter in the Control-IQ technology user guide.
-
Page 56: Personal Profile Overview
Insulin Delivery Settings Personal Profile Overview A Personal Profile is a group of settings that define the basal and bolus delivery within specific time segments throughout a 24-hour period. Each profile can be personalized with a name. Within a Personal Profile, the following can be set: •... - Page 57 Insulin Delivery Settings My Pump Tap Personal Profiles. Personal Profiles Control-IQ Alerts & Reminders Pump Info Personal Profiles to create a new profile. Pump Settings Profile 1 Profile 2 Using the on-screen keypad, enter a name profile name (up to 16 characters) and Note: Refer to the Getting Started section ⚑...
-
Page 58: Programming A New Profile
Press to Set Up Enter Rate Using the on-screen keypad, enter the u/hr desired basal rate and tap Note: The t:slim X2 insulin pump delivers ⚑ insulin at basal rates as low as 0.1 unit/hour. Note: Always confirm that the decimal ⚑... - Page 59 Insulin Delivery Settings 00:00 Tap Carb Ratio. 0.75 Basal u/hr 1u:2.8 Correction Factor mmol/L Carb Ratio Press to Set Up Target BG Press to Set Up Using the on-screen keypad, enter the units grams desired insulin-to-carbohydrate ratio and tap Note: Enter the grams of carbohydrate to ⚑...
- Page 60 Insulin Delivery Settings 00:00 Review entered values and tap 0.75 Basal u/hr 1u:2.8 Correction Factor mmol/L 1u:10 Carb Ratio Target BG mmol/L Confirm Settings? 10. Confirm settings. Basal 0.75 u/hr • Tap if entered data is correct. Correction Factor 1u: 2.8 mmol/L •...
- Page 61 Insulin Delivery Settings Weekday 12. Tap the Bolus Settings panel. Timed Settings 00:00 - 00:00 0.75 1:2.8 1:10 BASAL CORRECT CARB TARGET BG Bolus Settings 5 hrs DURATION CARBS Bolus Settings 13. Tap Insulin Duration. 5 hrs Insulin Duration Carbohydrates 6 : 30 14.
- Page 62 17. Confirm settings. • Tap if entered data is correct. Insulin Duration 6:30 hrs • Tap to make changes. Carbohydrates 18. Tap the Tandem logo on the face of the pump to return to the Home screen. For Professional Use Only...
-
Page 63: Edit An Existing Profile
Insulin Delivery Settings Edit an Existing Profile 16:45 From the Home screen, tap OPTIONS. 14 Nov 100% 235 u mmol/L INSULIN ON BOARD 1.1 u 1:09 hrs OPTIONS BOLUS Options Tap My Pump. STOP INSULIN Load Activity My Pump My Pump Tap Personal Profiles. - Page 64 Insulin Delivery Settings Profile 2 Tap Edit. Edit Activate Duplicate Delete Profile 2 Tap Timed Settings panel. Timed Settings 00:00 - 00:00 0.75 1:2.8 1:10 BASAL CORRECT CARB TARGET BG Bolus Settings 5 hrs DURATION CARBS Timed Settings Tap the desired time segment to be edited.
- Page 65 Insulin Delivery Settings 00:00 View recent changes and, if correct, 0.75 Basal u/hr 1u:2.8 Correction Factor mmol/L 1u:10 Carb Ratio Target BG mmol/L Confirm Settings? 10. Confirm settings. Basal 0.75 u/hr • Tap if entered data is correct. Correction Factor 1u: 2.8 mmol/L •...
- Page 66 13. Confirm settings. • Tap if entered data is correct. Insulin Duration 3 hrs • Tap to make changes. Carbohydrates 14. Tap the Tandem logo on the face of the pump to return to the Home screen. For Professional Use Only...
-
Page 67: Duplicate An Existing Profile
Insulin Delivery Settings Duplicate an Existing Profile 16:45 From the Home screen, tap OPTIONS. 14 Nov 100% 235 u mmol/L INSULIN ON BOARD 1.1 u 1:09 hrs OPTIONS BOLUS Options Tap My Pump. STOP INSULIN Load Activity My Pump My Pump Tap Personal Profiles. - Page 68 Insulin Delivery Settings Profile 2 Tap Duplicate. Edit Activate Duplicate Delete Confirm profile to duplicate by This copies all settings and saves tapping them as a new profile. Duplicate Profile 2? Work Using the on-screen keypad, enter name the name (up to 16 characters) for the new profile and tap The PROFILE DUPLICATED screen is displayed.
-
Page 69: Activate, Delete, Or Rename A Profile
Insulin Delivery Settings Activate, Delete, or Rename a Profile 16:45 From the Home screen, tap OPTIONS. 14 Nov 100% 235 u mmol/L INSULIN ON BOARD 1.1 u 1:09 hrs OPTIONS BOLUS Options Tap My Pump. STOP INSULIN Load Activity My Pump My Pump Tap Personal Profiles. - Page 70 Insulin Delivery Settings To Activate Profile Profile 2 Tap Activate. Edit Note: If the Activate option is disabled, ⚑ then the profile is already activated. If the Activate user has only one profile defined, they do not need to activate it (that profile is automatically Duplicate activated).
- Page 71 Profile 2 Tap Rename. Rename Work Using the on-screen keypad, rename name the profile name (up to 16 characters) and tap Tap the Tandem logo on the face of the pump to return to the Home screen. For Professional Use Only...
-
Page 72: Setting A Temp Rate
Insulin Delivery Settings Setting a Temp Rate 16:45 From the Home screen, tap OPTIONS. 14 Nov 100% 235 u mmol/L INSULIN ON BOARD 1.1 u 1:09 hrs OPTIONS BOLUS Options Tap Activity. STOP INSULIN Load Activity My Pump Activity Tap Temp Rate. START Exercise Note: Temp Rates are not available while... - Page 73 Insulin Delivery Settings Using the on-screen keypad enter desired percentage. Tap Quick Tip: Current rate is 100%. An increase is greater than 100%, and a decrease is less than 100%. Temp Rate Tap Duration. Temp Rate 15 min Duration View Units 7 : 40 Using the on-screen keypad, enter hour minute...
- Page 74 Insulin Delivery Settings 16:45 The Lock screen will be displayed 14 Nov 100% 235 u with the icon indicating a Temp Rate is active. mmol/L Note: If a Temp Rate is currently active, ⚑ the status of insulin delivery displays T in an orange square.
-
Page 75: Stop Insulin Delivery
Insulin Delivery Settings To change the Resume Pump Alarm This will stop all insulin deliveries. setting, tap the panel in the middle of Stop all deliveries now? the screen. Otherwise, skip to step 5 to accept the default setting. 15 min ALARM AFTER Alarm After Select the time you would like the... -
Page 76: Resume Insulin Delivery
Insulin Delivery Settings Resume Insulin Delivery Press the Screen On/Quick Bolus button once. 16:45 Tap 1-2-3 to unlock the screen. 14 Nov 100% 235 u mmol/L INSULIN ON BOARD 1.1 u 1:09 hrs Resume insulin now? This will resume all deliveries. The RESUMING INSULIN screen is displayed 16:45... - Page 77 Insulin Delivery Settings Options Tap RESUME INSULIN. RESUME INSULIN Load Activity My Pump Resume insulin now? This will resume all deliveries. The RESUMING INSULIN screen is displayed For Professional Use Only...
-
Page 78: Chapter 4: Load
CHAPTER 4 Load... -
Page 79: Fill And Load A Cartridge
Load Fill and Load a Cartridge Note: Before beginning, make sure the user has the following items: ⚑ ° One unopened, disposable, sterile, single-use cartridge ° One vial of room temperature, rapid-acting insulin ° 3.0 mL syringe and fill needle, filled with the desired amount of insulin °... - Page 80 Load Keeping the syringe and cartridge vertical and the needle inside the fill port, pull back on the plunger to remove air. Turn the syringe upright and pull down on the plunger. Flick the barrel to make sure that any air bubbles rise to the top.
- Page 81 Load Load the Cartridge 16:45 From the Home screen, tap OPTIONS. 14 Nov 100% 235 u mmol/L INSULIN ON BOARD 1.1 u 1:09 hrs OPTIONS BOLUS Options Tap Load. STOP INSULIN Load Activity My Pump Load Tap Change Cartridge. Change Cartridge Fill Tubing Fill Cannula Site Reminder...
- Page 82 Load Disconnect the infusion set from the Make sure the infusion set is disconnected from your body. body and tap to continue. Are you ready to continue? The PREPARING FOR CARTRIDGE screen is displayed. Remove the used cartridge and install the filled cartridge.
- Page 83 Load Tap OK. Make sure the set is disconnected from your body and securely connect the tubing to your cartridge. On the next screen you will fill your tubing with insulin. Fill Tubing Tap START. START Fill Tubing The STARTING FILL screen is displayed.
- Page 84 Load Load 12. Fill Tubing is complete. Ensure that there are no leaks from the tubing Change Cartridge connections. Tap Fill Cannula. Fill Tubing Fill Cannula Site Reminder Press to Turn On 13. Insert a new infusion set and connect Insert a new set and connect to the filled tubing.
- Page 85 Load Fill Cannula 16. Tap START. 0.3 u Edit Fill Amount The STARTING FILL screen is displayed. START Fill Cannula After fill is complete, the STOPPING Amount Filled FILL screen is displayed. Quick Tip: Avoid changing an infusion set before going to bed or the user will not be able to test their BG one to two hours after a new set is placed.
- Page 86 Load Edit Reminder 20. Tap Remind Me At. 2 days Remind Me In 17:00 Remind Me At 7 : 40 21. Use the on-screen keypad to enter hour minute time and tap Edit Reminder 22. Tap 2 days Remind Me In 07:40 Remind Me At Site Reminder...
- Page 87 Load Load 24. Tap Change Cartridge A reminder to test BG in one to two hours is displayed. Fill Tubing Fill Cannula Site Reminder 25. Tap Resume insulin now? This will resume all deliveries. The RESUMING INSULIN screen is displayed. Note: If this is the first time using the t:slim ⚑...
-
Page 88: Chapter 5: Bolus
CHAPTER 5 Bolus... -
Page 89: Bolus Overview
After entering grams of carb or units of insulin needed for food, and/or entering a BG value, tap View Calculation to see how the delivery amount was calculated. Note: The t:slim X2 pump with Control-IQ technology will deliver boluses between 0.05 and ⚑... - Page 90 Bolus Using the on-screen keypad, enter grams grams of carbohydrate and tap Note: ⚑ ° To add multiple carb values, enter the first value, tap plus and then enter the second value. Continue until done and tap equal. ° To clear the value entered and start over, to confirm the units of insulin units to be delivered.
-
Page 91: Food Bolus Using Units
Bolus Deliver 3.8 u Bolus? Correction The BOLUS INITIATED screen is temporarily displayed. EXTENDED Food After the bolus delivery is complete, an icon displays below the CGM graph (reference page 96). Note: If the Control-IQ feature suspends ⚑ insulin delivery during a Food Bolus, the remainder of the bolus WILL be delivered before all insulin delivery is stopped. - Page 92 Bolus Using the on-screen keypad enter units desired units of insulin. Tap ⚠ Alert: Always confirm that the decimal point placement is correct. 10.5 to confirm the units of insulin units to be delivered. INSULIN GLUCOSE Note: When administering a Food Bolus, ⚑...
-
Page 93: Correction Bolus
Bolus Correction Bolus 16:45 From the Home screen, tap BOLUS. 14 Nov 100% 235 u mmol/L INSULIN ON BOARD 1.1 u 1:09 hrs OPTIONS BOLUS Tap Add BG. units Note: If certain advanced features are CARBS GLUCOSE ⚑ being used, the current Dexcom G6 CGM reading may auto-populate to the bolus Add BG calculator. - Page 94 Bolus 0.48 to confirm the units of insulin units to be delivered. CARBS GLUCOSE Note: Tap the displayed units calculated to ⚑ override the amount. grams mmol/L View Calculation Confirm Request? Confirm settings. Insulin • Tap if entered data is correct. mmol/L •...
-
Page 95: Extended Bolus
Bolus Extended Bolus 16:45 From the Home screen, tap BOLUS. 14 Nov 100% 235 u mmol/L INSULIN ON BOARD 1.1 u 1:09 hrs OPTIONS BOLUS Tap 0 grams (or 0 units) on the left units side of the screen. CARBS GLUCOSE Add BG grams... - Page 96 Bolus to confirm the units of insulin units to be delivered. CARBS GLUCOSE grams mmol/L View Calculation Confirm Request? Confirm settings. 38 g Carbs • Tap if entered data is correct. 7.2 mmol/L • Tap to make changes. Units To Deliver Deliver 7.6 u Bolus? Tap EXTENDED to turn on the extended bolus, then tap...
- Page 97 Bolus Use the on-screen keypad to enter the percentage of the bolus to DELIVER NOW and tap 10. Tap 2 hrs under DURATION. units DELIVER NOW DELIVER LATER DURATION 2 hrs View Units 1 : 30 11. Use the on-screen keypad to adjust hour minute the length of time the bolus is to be delivered, then tap...
- Page 98 Bolus Confirm Request? 13. Confirm settings. Deliver Now • Tap if entered data is correct. Deliver Later • Tap to make changes. 1:30 hrs Duration Deliver 7.6 u Bolus? 14. Verify settings and tap 6.08 The BOLUS INITIATED screen is is temporarily displayed.
-
Page 99: Cancel Or Stop A Bolus
Bolus Cancel or Stop a Bolus If Delivery HAS NOT Started 12:40 Tap the to cancel the bolus. 14 Nov 100% 235 u 10.1 mmol/L INSULIN ON BOARD 2.2 u 2:18 hrs BOLUS Requesting 7 u Bolus ... 12:40 The BOLUS option will remain inactive 14 Nov 100% 235 u... - Page 100 Bolus Stopping the bolus will cancel the undelivered portion of the bolus. Stop bolus? Units requested and delivered are BOLUS STOPPED shown. Tap The CGM graph displays the amount Units requested: of bolus insulin actually delivered for the bolus event. A bolus icon displays Units delivered: 1.05 u below the CGM graph.
-
Page 101: Quick Bolus Setup
Bolus Quick Bolus Setup 16:45 From the Home screen, tap OPTIONS. 14 Nov 100% 235 u mmol/L INSULIN ON BOARD 1.1 u 1:09 hrs OPTIONS BOLUS Options Tap My Pump. STOP INSULIN Load Activity My Pump My Pump Tap Personal Profiles. Personal Profiles Control-IQ Alerts &... - Page 102 Bolus Pump Settings Tap Quick Bolus to turn on. Quick Bolus Press to Turn On 10 u Pump Volume Max Bolus 3 u/hr Basal Limit Quick Bolus Tap Increment Type. Quick Bolus units Increment Type 0.5 u Increment Amount Increment Type Tap units of insulin or grams of carbohydrate.
- Page 103 Increment Amount Max Bolus 10 u • Tap to make changes. Basal Limit 3 u/hr The SETTING SAVED screen is displayed. 13. Tap the Tandem logo on the face of the pump to return to the Home screen. For Professional Use Only...
-
Page 104: Quick Bolus
Bolus Quick Bolus ⚠ Precaution: When the Quick Bolus feature is first used, the user should always look at the screen to confirm correct programming until they are comfortable with this feature. Press and hold Quick Bolus button for about two seconds. The Quick Bolus screen will appear. - Page 105 ⚑ with no input, the Quick Bolus will be canceled and never delivered. Note: The t:slim X2 insulin pump will beep ⚑ and vibrate during a Quick Bolus if a button olume is set. It will only vibrate if the vibrate option is selected.
-
Page 106: Max Bolus
Bolus Max Bolus The Max Bolus setting allows the user to set a limit to the maximum insulin delivery amount for a single bolus. To adjust the Max Bolus setting, follow these steps. 16:45 From the Home screen, tap OPTIONS. 14 Nov 100% 235 u mmol/L... - Page 107 Bolus Pump Settings Tap Max Bolus. Quick Bolus Press to Turn On Note: The default setting is 10 units, but ⚑ can be set to any value between 1 to 25 units. 10 u Pump Volume Max Bolus 3 u/hr Basal Limit Using the on-screen keypad, enter the units...
- Page 108 0.5 g Max Bolus 25 u • Tap to make changes. Basal Limit 3 u/hr The SETTING SAVED screen is displayed. Tap the Tandem logo on the face of the pump to return to the Home screen. For Professional Use Only...
- Page 109 Bolus Notes For Professional Use Only...
-
Page 110: Chapter 6: Control-Iq Technology
CHAPTER 6 Control-IQ Technology... -
Page 111: Control-Iq Overview
Control-IQ Technology Control-IQ Overview Control-IQ technology is a feature of the t:slim X2 insulin pump that automatically adjusts insulin delivery rates and amounts in response to CGM readings. The t:slim X2 pump can be used with or without Control-IQ technology enabled. - Page 112 Control-IQ Technology Explanation of Icons If the user has a CGM session active and is using Control-IQ technology, they may see the following additional icons on the pump screen: Symbol Meaning Control-IQ technology is enabled but not actively increasing or decreasing basal insulin delivery.
-
Page 113: Control-Iq Technology On The Screen
Control-IQ Technology Delivers an automatic correction bolus if sensor glucose is predicted to be above 10.0 mmol/L 10.0 Increases basal insulin delivery if sensor glucose is predicted to be above 8.9 mmol/L Maintains active Personal Profile settings 6.25 Decreases basal insulin delivery if sensor glucose is predicted to be below 6.25 mmol/L mmol/L Stops basal insulin delivery if sensor glucose... - Page 114 Control-IQ Technology Exercise and Sleep Icons When Exercise or Sleep is turned on, the respective icon displays in the same place on the screen, since they can never be active at the same time. The following image shows the Exercise icon active on the CGM Trend Graph screen. 19:30 14 Nov 100%...
- Page 115 Control-IQ Technology Basal Status Icons There are several basal status icons that display in different Colors, each of which communicates information about how Control-IQ technology is operating. 22:24 23:24 14 Nov 100% 235 u 235 u mmol/L mmol/L INSULIN ON BOARD 1.1 u OPTIONS ALL DELIVERIES STOPPED...
-
Page 116: Activity Settings
Control-IQ Technology Activity Settings When Control-IQ technology is turned on the user can choose to activate the Sleep Activity or the Exercise Activity to help the System adjust the automated insulin dosing settings. Control-IQ Technology With No Activity Setting Enabled The CGM treatment range of Control-IQ technology with no Activity enabled is 6.25-8.9 mmol/L. - Page 117 Control-IQ Technology The Total Daily Insulin value is used by Control-IQ technology to calculate the maximum insulin delivery rate and to maintain a safe and effective increase in insulin dose. An estimate of the Total Daily Insulin should be entered. Include all types of insulin (basal and bolus) delivered in a 24-hour period.
-
Page 118: Setting Up Control-Iq Technology
Control-IQ Technology Setting Up Control-IQ Technology 16:45 From the Home screen, tap OPTIONS. 14 Nov 100% 235 u mmol/L INSULIN ON BOARD 1.1 u 1:09 hrs OPTIONS BOLUS Options Tap My Pump. STOP INSULIN Load Activity My Pump My Pump Tap Control-IQ. Personal Profiles Control-IQ Alerts &... - Page 119 Control-IQ Technology Control-IQ Tap Weight. Control-IQ Note: Control-IQ technology cannot be ⚑ enabled unless the user’s weight is entered. Weight Press to Set Up Total Daily Insulin Press to Set Up Weight Units Select the preferred unit of measure and tap Pounds Kilograms Use the on-screen keypad to enter the...
- Page 120 10. Review settings and tap Control-IQ The SETTING SAVED screen is displayed. 68 kg Weight 34 u Total Daily Insulin 11. Tap the Tandem logo on the face of the pump to return to the CGM Home screen. For Professional Use Only...
-
Page 121: Setting A Sleep Schedule
Control-IQ Technology Setting a Sleep Schedule Note: If the user manually starts Sleep before a Sleep Schedule begins, it does not impact the ⚑ scheduled wake time. Sleep will end as scheduled, unless manually stopped. Note: If Exercise is active at the time a Sleep Schedule begins, the Sleep Schedule will not ⚑... - Page 122 Control-IQ Technology Sleep Schedules Select which Sleep Schedule to configure. Sleep Schedule 1 Press to Turn On Sleep Schedule 2 Press to Turn On Sleep Schedule 1 Tap Selected Days. Sleep Schedule 1 Note: By default, only the current day of ⚑...
- Page 123 Control-IQ Technology Sleep Schedule 1 Tap Start Time. Sleep Schedule 1 M T W Th F Selected Days 23:00 Start Time 07:00 End Time Start Time Tap Time. 23:00 Time 21 : 00 10. Enter the time the user would like the hour minute Sleep Schedule to start by entering the number(s) for the hour followed by...
- Page 124 Control-IQ Technology Sleep Schedule 1 12. Tap End Time. Sleep Schedule 1 M T W Th F Selected Days 21:00 Start Time 07:00 End Time End Time 13. Tap Time. 07:00 Time 7 : 40 14. Enter the time the user would like the hour minute Sleep Schedule to end and tap End Time...
-
Page 125: Manually Start Or Stop Sleep
17. When done configuring sleep, tap to return to the Activity screen or tap M T W Th F Sleep Schedule 1 the Tandem logo to return to the 21:00 - 07:40 Home screen. Sleep Schedule 2 Press to Turn On Manually Start or Stop Sleep In addition to scheduling Sleep, Sleep can be manually started and/or stopped. - Page 126 Control-IQ Technology Options Tap Activity. STOP INSULIN Load Activity My Pump Activity Tap the START text next to Sleep. START Exercise A SLEEP STARTED screen is displayed and the Sleep icon is START Sleep displayed on the Home screen. Sleep Schedules Temp Rate Manually Stop Sleep 16:45...
-
Page 127: Manually Start Or Stop Exercise
Control-IQ Technology Activity Tap the STOP text next to Sleep. START Exercise A SLEEP STOPPED screen is displayed and the Sleep icon is STOP Sleep removed from the Home screen. Sleep Schedules Temp Rate Manually Start or Stop Exercise Start Exercise 16:45 From the Home screen, tap OPTIONS. - Page 128 Control-IQ Technology Manually Stop Exercise 16:45 From the Home screen, tap OPTIONS. 14 Nov 100% 235 u mmol/L INSULIN ON BOARD 1.1 u OPTIONS BOLUS Options Tap Activity. STOP INSULIN Load Activity My Pump Activity Tap the STOP text next to Exercise. STOP Exercise A EXERCISE STOPPED screen is...
- Page 129 Control-IQ Technology Notes For Professional Use Only...
-
Page 130: Chapter 7: Pump Features
CHAPTER 7 Pump Features... -
Page 131: Pump History
Pump Features Pump History 16:45 From the Home screen, tap OPTIONS. 14 Nov 100% 235 u mmol/L INSULIN ON BOARD 1.1 u OPTIONS BOLUS Options Tap the Down Arrow. STOP INSULIN Load Activity My Pump Options Tap History. My CGM Device Settings History History Tap Pump History. -
Page 132: Alerts And Reminders
The event details in each report are listed by time. Tap the Tandem logo on the face of the pump to return to the Home screen. Alerts and Reminders The t:slim X2 pump with Control-IQ technology has customizable reminders: •... - Page 133 Pump Features 16:45 From the Home screen, tap OPTIONS. 14 Nov 100% 235 u mmol/L INSULIN ON BOARD 1.1 u OPTIONS BOLUS Options Tap My Pump. STOP INSULIN Load Activity My Pump My Pump Tap Alerts & Reminders. Personal Profiles Control-IQ Alerts &...
- Page 134 For full detailed instructions on items in this chapter, please refer to the Start, Stop, or Resume Insulin, t:slim X2 Insulin Pump Information and History, t:slim X2 Insulin Pump Reminders, and User Settable Alerts and Alarms chapters in the Control-IQ technology user guide.
- Page 135 Pump Features Notes For Professional Use Only...
-
Page 136: Chapter 8: Alerts And Technical Support
CHAPTER 8 Alerts and Technical Support... -
Page 137: Alerts
Alerts and Technical Support Alerts The t:slim X2 insulin pump will sound or vibrate for some of the following reasons: • Control-IQ Technology: High, Low • Incomplete: Bolus, Cartridge Change, Fill Cannula, Fill Tubing, Temp Rate, Setting • Max: Basal, Bolus, Hourly Bolus, Insulin •... -
Page 138: Hazards
The Customer Technical Support phone number, pump serial number, and warranty information can be found on the back of the t:slim X2 insulin pump or in the pump info menu. For full detailed instructions on items in this chapter, please refer to the t:slim X2... - Page 139 Alerts and Technical Support Notes For Professional Use Only...
- Page 140 Alerts and Technical Support Notes...
- Page 142 CONTACT: tandemdiabetes.com/contact © 2022 Tandem Diabetes Care, Inc. All rights reserved. Tandem Diabetes Care, Control‑IQ, and t:slim X2 are either registered trademarks or trademarks of Tandem Diabetes Care, Inc. in the United States and/or other countries. Dexcom and Dexcom G6 are registered trademarks of Dexcom, Inc. in the United States and/or other countries. All third‑party marks are the property of their respective owners.
Need help?
Do you have a question about the t:slim x2 and is the answer not in the manual?
Questions and answers
My basal rates are half of what they were with my Medtronic pump what am I doing wrong as the tandem is keeping me to low and I am getting hypo