Sign In
Upload
Download
Table of Contents
Contents
Add to my manuals
Delete from my manuals
Share
URL of this page:
HTML Link:
Bookmark this page
Add
Manual will be automatically added to "My Manuals"
Print this page
×
Bookmark added
×
Added to my manuals
Manuals
Brands
LifeSpan Manuals
Exercise Bike
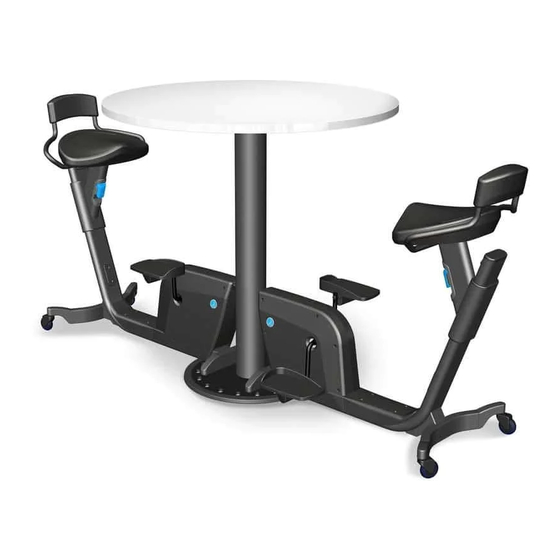
Duo
Owner's manual
LifeSpan Duo Owner's Manual
Office bike
Hide thumbs
1
2
Table Of Contents
3
4
5
6
7
8
9
10
11
12
13
14
15
16
17
18
19
20
21
22
page
of
22
Go
/
22
Contents
Table of Contents
Troubleshooting
Bookmarks
Table of Contents
Table of Contents
Welcome
Getting Started
Warranty
Safety
Children and Pets
Transportation
Storage
Specifications
Office Bike Assembly
Assembly Instructions
Office Bike Operations
Seat Adjustment
Final Inspection
Troubleshooting
Table Assembly
Assembly Instructions
Advertisement
Quick Links
Download this manual
Duo/Trio Office Bike
Owner's Manual
Table of
Contents
Previous
Page
Next
Page
1
2
3
4
5
Advertisement
Table of Contents
Need help?
Do you have a question about the Duo and is the answer not in the manual?
Ask a question
Questions and answers
Related Manuals for LifeSpan Duo
Exercise Bike LifeSpan Workplace DT3 Owner's Manual
Console desk bike (24 pages)
Exercise Bike LifeSpan DT-3C Owner's Manual
Desktop cycle (12 pages)
Exercise Bike LifeSpan Delta 2.0 User Manual
(20 pages)
Exercise Bike LifeSpan C2 Owner's Manual
Cycle trainer (24 pages)
Exercise Bike LifeSpan EXER-58 Owner's Manual
(16 pages)
Exercise Bike LifeSpan R3 Owner's Manual
Exercise bikes (29 pages)
Exercise Bike LifeSpan S2 Sport Series Owner's Manual
Indoor (16 pages)
Exercise Bike LifeSpan EXER-80 Owner's Manual
(27 pages)
Exercise Bike LifeSpan RC-81 Owner's Manual
(17 pages)
Exercise Bike LifeSpan RC-300 Owner's Manual
(26 pages)
Exercise Bike LifeSpan SM-800 User Manual
Spin bike (24 pages)
Exercise Bike LifeSpan E-1 Owner's Manual
(14 pages)
Exercise Bike LifeSpan SP-310 M2 User Manual
Spin bike (20 pages)
Exercise Bike LifeSpan EXER-80 User Manual
(24 pages)
Exercise Bike LifeSpan R7000i Owner's Manual
Interactive pro series (32 pages)
Exercise Bike LifeSpan SP750 Owner's Manual
(13 pages)
This manual is also suitable for:
Trio
Table of Contents
Print
Rename the bookmark
Delete bookmark?
Delete from my manuals?
Login
Sign In
OR
Sign in with Facebook
Sign in with Google
Upload manual
Upload from disk
Upload from URL


Need help?
Do you have a question about the Duo and is the answer not in the manual?
Questions and answers