LifeSpan Delta 2.0 User Manual
Hide thumbs
Also See for Delta 2.0:
- User manual (28 pages) ,
- User manual (20 pages) ,
- User manual (28 pages)
Table of Contents
Advertisement
Quick Links
Read all instructions carefully before using this product.
Retain this owner's manual for future reference.
IMPORTANT
All nuts and bolts are to be checked and tightened on a regular basis. This includes pedals and
other moving parts. Failure to do so may cause damage to your threads and void your warranty.
NOTE:
This manual should not be used to guide your purchasing decision. Your product, and the contents inside its carton, may vary
from what is listed in this manual. This manual may also be subject to updates or changes. Updated manuals are available
through our website at
www.lifespanfitness.com.au
Delta 2.0
Exercise Bike
USER MANUAL
Find the
Digital Manual
Online
Advertisement
Table of Contents

Related Manuals for LifeSpan Delta 2.0


Summary of Contents for LifeSpan Delta 2.0
- Page 1 Delta 2.0 Exercise Bike USER MANUAL Find the Digital Manual Online Read all instructions carefully before using this product. Retain this owner’s manual for future reference. IMPORTANT All nuts and bolts are to be checked and tightened on a regular basis. This includes pedals and other moving parts.
-
Page 2: Table Of Contents
TABLE OF CONTENTS Important Safety Instructions ....... 03 Care Instructions ..........04 III. -
Page 3: Important Safety Instructions
I. IMPORTANT SAFETY INSTRUCTIONS Note the following precaution before assembling and operating the machine. 1. Assemble the machine exactly as the descriptions in the instruction manual. 2. Check all the bolts, nuts, and other connections before using the machine for the first time to ensure the machine is in the safe condition. -
Page 4: Care Instructions
II. CARE INSTRUCTIONS • All nuts and bolts are to be checked and tightened on a regular basis. This includes pedals and other moving parts. Failure to do so may cause damage to your thread and void your warranty. • Lubricate moving joints with grease after periods of usage. •... -
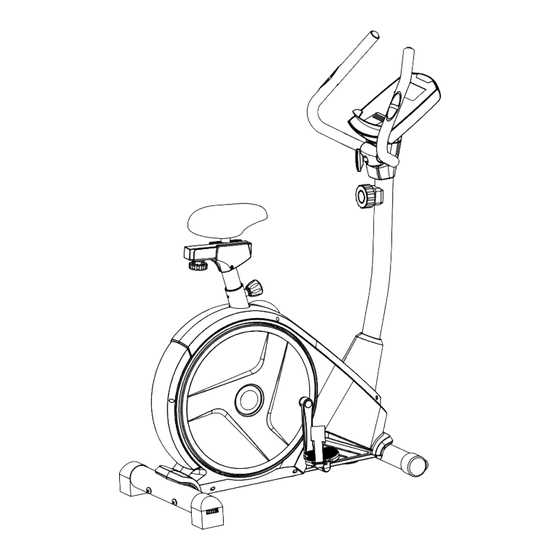
Page 5: Exploded Diagram
III. EXPLODED DIAGRAM 26R 15 EXPLODED DIAGRAM |... -
Page 6: Parts List
IV. PARTS LIST NOTE: Most of the listed assembly hardware has been packaged separately, but some hardware items have been preinstalled in the identified assembly parts. In these instances, simply remove and reinstall the hardware as assembly is required. Please reference the individual assembly steps and make note of all preinstalled hardware. -
Page 7: Assembly Instructions
V. ASSEMBLY INSTRUCTIONS STEP 1 1. Attached Front bottom tube (2) to the Main frame (1) with Hex bolt (8) and Arc washer (7). 2. Attached Rear bottom tube (3) to the Main frame (1) with Hex bolt (9) and Arc washer (7). STEP 2 Attach the Pedal (18L/R) to the Crank (17L/R) accordingly with the wrench. - Page 8 How to Connect Tension Cable: STEP 3 1. Put the Handlebar post cover (23) to the Handlebar post (4). Connect the Extension Sensor wire (22) with Sensor wire (21) properly, and connect the Tension cable (14) with Tension controller (13) properly as the pic A.
- Page 9 STEP 4 Insert the pulse wires (19) through the hole on the handlebar post (4) and pull them out from the top of the computer bracket. Attach the handlebar (5) to the handlebar post (4) with the Knob (38), bushing (40), Computer cover (25a) and flat washer (39).
- Page 10 STEP 6 1. Fix the upper bracket for saddle (43) to the Saddle (34) with nylon nut (41) and flat washer (42). Then install the Saddle (34) to the Saddle Slider (33) with cross wrench, ensure to tighten both nuts (on each side of 34) at the same time.
- Page 11 Adjusting Resistance Use the Tension Knob to increase resistance by turning it clockwise or counter clockwise for less resistance. Distance to Handlebars Height Adjusting the Seat Height & Distance Adjust the distance or height by using the two knobs located beneath the seat. Make sure to securely lock it after making adjustments.
- Page 12 Floor Levelers If your ground is uneven, stabilize the equipment by using the two rear feet floor levelers. Turn the wheel either clockwise or counterclockwise until it makes contact with the floor, ensuring that the equipment is no longer shaking. Transporting The front feet feature transportation wheels.
-
Page 13: Computer Operation
VI. COMPUTER OPERATION SPECIFICATIONS • TIME 00:00-99:59 • SPEED (SPD) 0.0-99.9KM/H (ML/H) • DISTANCE 0.00-9999KM (ML) • CALORIES 0.0-9999KCAL • ODOMETER(ODO) 0.0-9999KM (ML) • PULSE (PUL) 0 40~240BPM KEY FUNCTION ITEM DESCRIPTION • This key allows you to select and lock onto a particular function. MODE •... - Page 14 FUNCTIONS ITEM DESCRIPTION • Press the MODE key until the pointer locks onto TIME. The total working TIME time will be shown when starting exercise. • Press the MODE key until the pointer advances to SPEED. The current speed SPEED will be shown.
-
Page 15: Exercise Guide
VII. EXERCISE GUIDE PLEASE NOTE: Before beginning any exercise program, consult your physician. This is important especially if you are over the age of 45 or individuals with pre-existing health problems. The pulse sensors are not medical devices. Various factors, including the user’s movement, may affect the accuracy of heart rate readings. - Page 16 COOL DOWN Finish each workout with a light jog or walk for at least 1 minute. Then complete 5 to 10 minutes of stretching to cool down. This will increase the flexibility of your muscles and will help prevent post- exercise problems.
-
Page 17: Warranty
Any claim against this warranty must be made through your original place of purchase. Proof of purchase is required before a warranty claim may be processed. If you have purchased this product from the Official Lifespan Fitness website, please visit https://lifespanfitness.com.au/warranty-form For support outside of warranty, if you wish to purchase replacement parts or request a repair or service, please visit https://lifespanfitness.com.au/warranty-form and fill in our Repair/Service... -
Page 18: Hand Pulse Technology
IX. HAND PULSE TECHNOLOGY This product comes equipped with hand pulse sensors which are used to pick up tiny EKG/ECG signals that run through the body when your heart beats. These electrical EKG/ECG signals are very small and must be amplified 1000 times to make the signal viable for the computer to display your pulse. To ensure proper operation: •... - Page 20 WWW.LIFESPA NF ITN ES S.COM.AU...
Need help?
Do you have a question about the Delta 2.0 and is the answer not in the manual?
Questions and answers