
Related Manuals for Code MINI 1000


Summary of Contents for Code MINI 1000
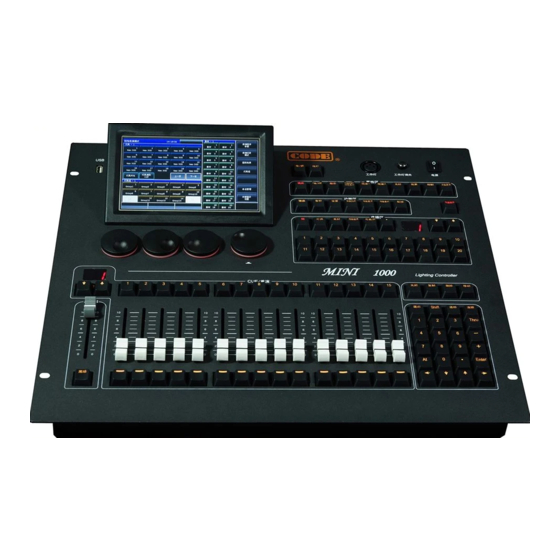
- Page 1 MINI 1000 Lighting Controller User Manual Ver. 5.4.1 CODE ELECTRONIC CO., LTD. http://www.codelight.com...
-
Page 3: Table Of Contents
1.1.7. Selection keys ......................4 1.1.8. Control Wheels ......................4 1.1.9. Touch Screen ......................4 1.1.10. USB Interface ......................5 1.1.11. Other Devices ......................5 1.2. The Rear Panel of MINI 1000 ..................5 1.2.1. DMX universes ......................5 1.2.2. MIDI Interface......................5 1.2.3. Audio Input........................5 1.2.4. Power Supply ......................5 1.3. - Page 4 Contents 5. Shape Effects ..........................22 5.1. How Effect Generator Works..................22 5.2. Using Effect..........................22 5.3. Effect Parameters ......................23 5.3.1. Effect Size, Speed and Spread..............23 5.3.2. Speed Group, Block Group and Width............23 5.3.3. Fade time and Start Offset ................24 5.3.4. Effect Direction......................24 5.3.5.
- Page 5 Contents 7.2. Copy Function........................40 7.3. Delete Function .........................40 7.4. Move Function ........................41 7.5. Lock the Console.......................41 7.6. Record Macro Show ......................41 7.6.1. External Midi......................42 7.6.2. Internal Clock......................43 7.6.3. Edit Macro show ....................44 7.7. Legend Manage........................47 8. Setup the Console ........................48 8.1.
- Page 6 Welcome to use MINI 1000 For your convenient usage, the manual divided into 10 chapters. Important contents are highlighted by shading and sample explanations are added when necessary for the sake of your better understanding. In the manual, a square symbolizes a key, such as Enter. While a square brackets symbolizes soft-keys on the touch screen, such as [Playback Parameters].
-
Page 7: Setting Up Mini 1000
1. Setting up MINI 1000 1.1. Front Panel of MINI 1000 MINI 1000 offers 3 kinds of colors (red, yellow and green) for the backlight on the keys. Users can set the combine of backlight and highlight color to different colors as needed. -
Page 8: Attribute Keys
1.1.5. Attribute keys There are 9 attribute and 1 Locate keys in this area. Press the same attribute key can turn to page 2 which display other channels. Each page can display 3 channels at most. Users can control fixtures by using the different attribute keys with corresponding Wheels A, B and C. Press Locate twice rapidly, or press Locate once and select [Locate Fixture] to turn on all selecting fixtures and set all channels to default value, such as set Pan and Tilt to 128. -
Page 9: Selection Keys
1.1.7. Selection keys part includes options of Group, Fixture, Preset, Effect and Macro together with page switch keys. Each kind of option has 20 pages, and 20 keys for each page. 1.1.8. Control Wheels Control wheels A, B and C are used for setting attributes of the fixtures or the parameters of movement effect. -
Page 10: Usb Interface
“DMX Output B” outputs signals of B001 - B512. 1.2.2. MIDI Interface MINI 1000 not only can be controlled by MIDI signals, but also can send MIDI signal to control another one. Please refer to the relevant chapter for further control instruction. -
Page 11: Clear All Data
1.3. Clear All Data We strongly recommend you to clear all data on the new console, so that you can avoid the unpredictable errors when programming. 1> Press Backup to entry “BACKUP MENU”; 2> Press [New Show]; ① ② 3> Press [Confirm] will clear all data and return to “LIVE SHOW” automatic. Note: All data created by users will be deleted (including the patched fixtures, presets and playbacks). -
Page 12: Backup And Load Show
We recommend that you save the backup in the internal SD card as well as USB driver. So that you can take with the backup files in USB driver, and use them in other MINI 1000. MINI_1000_en.pdf... -
Page 13: Patch
2.1. Assign fixture addresses First of all, you have to patch fixtures to tell the MINI 1000 what kind of fixtures you want to control. When you need to patch, the MINI 1000 will offer a free DMX address automatically. You can patch all your fixtures first and check over their patching addresses before assign on the fixtures. -
Page 14: Patch Intelligent Fixtures
2> User library If you can not find out your library in system, MINI 1000 offers you multi-way to create or edit your library. (We will introduce you how to create or edit the user library on chapter 8.3) - Page 15 ① When patch system library, you can use Wheel D or scroll bar to search the manufacture; or you can recall the soft-keyboard by Keyboard, and input the name of manufacture (You can input the first several words). Press [ENTER] on the soft-keyboard will select on the right option, press [Exit] to quit the soft-keyboard.
-
Page 16: Check And Setup The Patch
Press Wheel D can switch the cursor to option “Unit start number”. Input value “yyy” on the blank; Press Wheel D can switch the cursor to option “Quantity”. Input value “zzz” on the blank. Press [Confirm] to finish patching, the “PATCH SETUP” will be renewed automatically;... -
Page 17: Delete Patched Fixtures
2.3.1. Delete patched Fixtures On “PATCH SETUP” menu, users may select multiple patched fixtures and select [Unpatch] to delete all fixtures you do not need. 2.3.2. Setting moving light Users are allowed to swap or invert Pan and Tilt of the moving lights installed on the stage. So that users can control the moving lights to run as mirror movement more conveniently. -
Page 18: Manual Control Fixtures
3.1. Select Fixtures MINI 1000 offers several ways for users to select the fixtures: 1> Touch Screen --- users can select the fixtures on the touch screen directly. 2> Selection keys --- when the indicator led is on Fixture of “Select” area, press keys from 1 to 20 can select the needed fixtures. -
Page 19: Manual Control Fixtures
MINI 1000 can read the channels range data from R20 library files. For example, after users selected the fixtures and attribute key Colour, press the name on touch screen can call out a range table. You can select the range value by Wheel D or touch the options directly. -
Page 20: Seriatim Light Up Fixtures
3.2.4. Seriatim light up fixtures Users can select and control one of fixtures from a sequence selecting fixtures one by one. After located a group of fixtures, users can press → or ← to lamp on one of the fixtures one by one and change its attributes. -
Page 21: Clear Options
Expand M2 ----- Fixtures align base on the middle fixtures with much align in the middle; Left ----- Fixtures align base on the leftmost fixtures; Right ----- Fixtures align base on the rightmost fixtures. Set the fan effect by the Wheel A, B or C. 3.2.7. -
Page 22: Group Manage
3.3.2. Group manage Press [Group] to entry “Group Program”; Press [Group manage]; Select the group you want to edit. It will list all the fixtures in the selected group; You will find the fixture order as when you selected them. Fixture order 1 to 5 is not exactly the same as order 5 to 1. -
Page 23: Select Groups
(You can also rename the group by [Legend Manage] in “LIVE SHOW”) 3.3.3. Select groups MINI 1000 offers several ways for users to select the groups: 1> Touch Screen --- users can select the groups on the touch screen directly. -
Page 24: Preset
4. Preset Users always need to adjust different attributes, such as color, gobo and so on during programming or live show. In that case, users can entry one or more attributes of fixtures to the preset keys in advance. So that you can change attributes rapidly when you are programming or live show. -
Page 25: Preset Manage
If there is nothing on the soft-key, users can name the preset and set the fade in time. Press [Confirm] to save, the soft-key will turn to dark green. There will be a ‘G’ marks on the left top corner if the preset is saved by Global mode. -
Page 26: Use Preset
4.3. Use Preset MINI 1000 provides several ways for users to recall the presets. The soft-key of latest selected preset displays in gray green. 1> Select fixtures and recall: users can recall the preset after selected fixtures, those fixtures without selected will not be added in the preset. -
Page 27: Shape Effects
5. Shape Effects MINI 1000 offers an effect generator for users to quickly create exciting light shows with the minimum of programming. How Effect Generator Works 5.1. Effect is a series of sequenced repeated movement preprogram. The representative effects are circle, square, spiral and etc. They are the non repeat random effects. For example, lighting beams move in a round route on the stage. -
Page 28: Effect Parameters
The basic point of effect can be modulated. By changing its attribute, to set the size or speed to ‘0’ can get the basic position of effect. Each effect should work with its attribute. The type of effect can not be used if the ... -
Page 29: Fade Time And Start Offset
5.3.3. Fade time and Start Offset Press [Effect attribute 2] can switch to [Effect attribute 3], which offers ‘Start Offset’ and ‘Stop Offset’ for your setting. The ‘Start Offset’ allows users to set the origin of the effect. (Range from 0~360) ... -
Page 30: User Effect
5.4. User Effect After created a new shape effect you can save to “User Effects” so that you can use the same effect in other fixtures in future. 5.4.1. Save User Effects Select system Effects and adjust necessary parameters; Select [Save Running Effects]; Select a soft-key on “User Effects”;... -
Page 31: Playback
We will introduce how to save and edit Playbacks in this chapter. 6.1. Playbacks and Playback Pages Playbacks on MINI 1000 have two modes: Cue and Cue-lists. At the meanwhile, Cue-lists divide into 2 modes, Cue-lists and Cue-lists. MINI 1000 has 40 playback pages which have 15 playback faders for programming, thus totally 600 playbacks can be saved. -
Page 32: Run Mode Of Cue
Record Mode = Changed Attr. ----- Only the changed attributes of selecting fixtures will be saved. This function makes cues in different attributes can be run synchronously. 6.3.2. Run mode of Cue Mode=Time --- Enable both HTP and LTP times. If the times are set to 0,value of HTP ... - Page 33 ⑥ Press the twinkling playback key for saving step (or press [Save Step]); ⑦ Repeat steps from ③ to ⑥ till the end. Press Edit Playback to exit. Besides, users can create Cue-lists by cues ① Press Save to Cue in “LIVE SHOW”; ②...
-
Page 34: Edit Cue-Lists Playback
6.4.2. Edit Cue-lists playback 6.4.2.1. Edit Cue-lists playback step ① Press Edit Playback in “LIVE SHOW”; ② Select a Cue-lists you want to edit; ③ Select the fixtures and set a new scene; ④ Select the Cue-lists step needs to be edited; ⑤... - Page 35 ③ Press [Effect] and entry the effects menu; ④ Fade in the fader which corresponding to the step with effect; ⑤ Select the effect needs to be adjusted; ⑥ Press [Update] after adjusted the effect parameters; ⑦ Press Edit Playback to quit when finished. 6.4.2.3.
- Page 36 6.4.2.4. Fixture Overlap The [Fixture Overlap] allows you to run a series of fixtures with chasing effect in one step. The range of overlap is from 0%~100%. When overlap=100%, all fixtures will change together. If overlap=50%, the second fixture will not start until the first fixture is half way (50%) through fading. The fixtures running order follows to the setting of fixture order.
-
Page 37: Time For Playback
6.4.2.6. Delete a Cue-lists step ① Press Edit Playback in “LIVE SHOW”; ② Select a Cue-lists to be edited; ③ Select a step to be deleted; ④ Press [Remove Step]; ⑤ Press [Renumber] to realign the number; ⑥ Press Edit Playback to quit. 6.4.2.7. - Page 38 The times for cue-lists playbacks are run as following graphic. Start Fade in Delay in Time (s) Delay out Fade out Delay in and delay out times will start together. Fade in time starts after delay in finished, while fade out time starts after delay out finished. Fade out is only used on dimming channel.
-
Page 39: Set Individual Attribute Times
6.5.2. Set Individual Attribute Times The attributes times have only delay in and fade in times. Users can switch to other attributes by pressing attribute keys. After set the attribute times, those attributes will not use global times unless you press [Use Global] again. -
Page 40: Manually Control Speed Of Cue-Lists
6.5.5. Manually control Speed of Cue-lists Users can also set the speed when running the Cue-lists. When fade in a cue-lists, users can use the Wheel D to adjust the speed directly. If you need to adjust other Cue-lists speed, then you have to hold Shift and press the needed playback key to set the cue-lists at current: ①... -
Page 41: Senior Setting Of Playbacks
6.7. Senior setting of Playbacks There are many options for users to edit playback parameters for each playback in “Playback Edit Menu”. 6.7.1. Playback Priority [Playback Priority] option allows users to set the running priority level of different playbacks. The option can be set into options such as very low, low, normal, high and very high. -
Page 42: Set Effect Of Fader
6.7.5. Set effect of fader If there is a Cue saved with shape effects, users can set the fader trigger with 4 modes by option [Effect By Fader] as “Size By Fader”, “Speed By Fader” or “Size+Speed By Fader”. 6.7.6. Lock faders Users can lock the playback by option [Lock Page For Fader]. -
Page 43: Playback Parameters
6.9. Playback Parameters In “LIVE SHOW”, users can also edit the playback by option [Playback Parameters]. 6.9.1. Reload a Cue The console allows users to reload the attributes values of fixtures from one of the whole cues. Users may load in the needed attributes values from one of the cues by option [Load Cue to Program] after selected [Playback Parameters]. -
Page 44: Other Options
6.9.2. Other options After pressed [Playback Parameters] and select the playback. There are some other options can be setting. Most of functions are the same as “Playback Edit Menu” so that we will introduce other functions in this part. Cue-lists 6.9.2.1. -
Page 45: Senior Function
You can delete the data edited on MINI 1000. Press Delete to entry delete function. 1. Delete All Data --- It can delete all edited data on MINI 1000. The operation equal to system clearance. 2. Delete All Preset --- It can delete all presets you edited. -
Page 46: Move Function
When record the show, users can select different mode of time code as needed. MINI 1000 offers two kinds of time code modes for your choice. ① External MIDI ---- This mode needs a MIDI device to offer the time code to trigger the show record. -
Page 47: External Midi
In this mode, you should connect the controller with external MIDI equipment via the MIDI cable first. And the controller should be set to ‘Slave mode’. 1. Select [Time code Mode = External MIDI] and select a record key on Macro; 2. Press the soft-key , it will turns red what means start to record Play the music on external equipment. -
Page 48: Internal Clock
1. Select [Time code Mode = Internal Clock] and select a record key on Macro; 2. Press the soft-key , it will turns red means start to record The macro show begins to record once this soft-key turns red. The time code is based on the internal clock which shows as follow. MINI_1000_en.pdf... -
Page 49: Edit Macro Show
3. Put out the playbacks or presets follow the music as you need. If there is a Cue-lists playback, you may use the GOTO function to record. 4. Fade out all playbacks when the music finished. And press the soft-key to stop and save show record. - Page 50 ④ Fade out all playback or preset and press the record key again and select [Merge] on the call out window; ⑤ You will find the new playback or preset is added in and lists on the left bar. 2. Edit macro show details; ①...
- Page 51 3. If you may find one or several operations do not match to the rhythm when play the macro show again after created. At this time, you may entry the show record again and correct the time of operations. ① Entry the show record needs to be edited; ②...
-
Page 52: Legend Manage
7.7. Legend Manage Users can rename all the selection options on touch screen. Press [Legend Manage] and select the soft-key on “Fixtures”, “Groups” or “Presets” section on touch screen. Then entry the name and press ENTER. Rename MINI_1000_en.pdf http://www.codelight.com... -
Page 53: Setup The Console
8. Setup the Console Press Setup, users can entry the “SETUP MENU”. 8.1. User options 8.1.1. Console Manage You can setup the run mode by pressing [Console Manage]: Playback GO+/GO- --- The option defaults in [Enable]. When Cue-lists link mode is set as manual or ‘Link=Off’, the key under playback fader can be used as GOTO function (Go+ or Go- depends on the direction setting of cue-lists). -
Page 54: Select Language
Blackout Key for FLASH --- The option defaults in [Enable]. The key is use for flashing output when the master fader does not fade in. If the option is in [Disable], the key is used as blackout function for all outputs. Page for Touch Screen --- The option defaults in [Disable]. -
Page 55: Midi Setting
8.2.2. MIDI Setting ① MIDI Channel: setting range from 0-15. ② MIDI mode: You can set the console in [Master Mode], [Slave Mode] or [MIDI Disable]. Default setting is in disable. When in [Master Mode], the console is the master device which can control the slave one;... -
Page 56: System Manage
8.3. System Manage 8.3.1. Upgrade Manage The option provides users to upgrade the system or library. You can upgrade system or library via USB driver when you get the file. You can check up the system version and date of library here. 8.3.2. - Page 57 ③ The fixture information will list on the left. And will list all channels when you select the fixture name. The number of rows equal to your setting of DMX channels; ④ Select channel number on touch screen and press [Channels Attributes]; ⑤...
- Page 58 Note: All preset, range table and macro details will be delete after edited the library. 8.3.2.4. Export Library Users can export all the user libraries to USB driver. You can backup the user libraries which may use in another MINI 1000. Default name of backup file is ‘codeusrlib.bin’. MINI_1000_en.pdf http://www.codelight.com...
- Page 59 8.3.2.5. Import external library File Users can import the user library ‘codeusrlib.bin’ or R20 library file to the console. ① Put in the library file to USB driver; ② Press [Import From external File]; ③ System will read USB driver automatic and the window will list all files in your USB driver;...
-
Page 60: Touch Options
9. Touch Options There are three default options for users selecting on touch screen, which are Fixtures, Presets and Groups. Users can set other options on ‘Select’ part to touch screen for more convenient selecting. For example, we can hold the key Macro and select the name ‘Fixtures’ on blue bar on touch screen. -
Page 61: Technological Specification
Up to 400 Macro Shows can be saved which allow to be triggered by external MIDI time code or internal clock. Shortcut area provides a quick way for selecting Fixtures, Groups, Presets, Custom Effects and Macro Shows.
Need help?
Do you have a question about the MINI 1000 and is the answer not in the manual?
Questions and answers