Juniper JA2500 Junos Space Hardware Manual
Hide thumbs
Also See for JA2500 Junos Space:
- Hardware manual (180 pages) ,
- Hardware manual (206 pages) ,
- Quick start manual (29 pages)

Related Manuals for Juniper JA2500 Junos Space


Summary of Contents for Juniper JA2500 Junos Space
- Page 1 JA2500 Junos Space Appliance Hardware Guide Modified: 2018-11-21 Copyright © 2018, Juniper Networks, Inc.
- Page 2 END USER LICENSE AGREEMENT The Juniper Networks product that is the subject of this technical documentation consists of (or is intended for use with) Juniper Networks software. Use of such software is subject to the terms and conditions of the End User License Agreement (“EULA”) posted at https://support.juniper.net/support/eula/.
-
Page 3: Table Of Contents
Component Descriptions and Specifications ......13 Field-Replaceable Units on the JA2500 Junos Space Appliance ....13 AC Power Cord Specifications for Junos Space Appliances . - Page 4 Unpacking the JA2500 Junos Space Appliance ......33 Mounting the JA2500 Junos Space Appliance ......34 Front-and-Rear Mounting the JA2500 Junos Space Appliance Flush to a Rack .
- Page 5 Installing the Fan ..........134 Replacing the Hard Disk on a JA2500 Junos Space Appliance ....135 Removing the Hard Disk .
- Page 6 Space Appliances ..........144 Packing a JA2500 Junos Space Appliance or Component for Shipping ..145 Packing a JA2500 Appliance for Shipping .
- Page 7 Compliance Statements for Acoustic Noise for JA2500 ....194 Declaration of Conformity for JA2500 Junos Space Appliance ....195...
- Page 8 JA2500 Junos Space Appliance Hardware Guide viii Copyright © 2018, Juniper Networks, Inc.
-
Page 9: About The Documentation
® To obtain the most current version of all Juniper Networks technical documentation, see the product documentation page on the Juniper Networks website at https://www.juniper.net/documentation/ If the information in the latest release notes differs from the information in the documentation, follow the product Release Notes. - Page 10 JA2500 Junos Space Appliance Hardware Guide Table 1: Notice Icons Icon Meaning Description Informational note Indicates important features or instructions. Caution Indicates a situation that might result in loss of data or hardware damage. Warning Alerts you to the risk of personal injury or death.
-
Page 11: Documentation Feedback
You can provide feedback by using either of the following methods: Online feedback system—Click TechLibrary Feedback, on the lower right of any page on the site, and do one of the following: Juniper Networks TechLibrary Copyright © 2018, Juniper Networks, Inc. -
Page 12: Requesting Technical Support
7 days a week, 365 days a year. Self-Help Online Tools and Resources For quick and easy problem resolution, Juniper Networks has designed an online self-service portal called the Customer Support Center (CSC) that provides you with the following features: Find CSC offerings: https://www.juniper.net/customers/support/... -
Page 13: Opening A Case With Jtac
About the Documentation Join and participate in the Juniper Networks Community Forum: https://www.juniper.net/company/communities/ Open a case online in the CSC Case Management tool: https://www.juniper.net/cm/ To verify service entitlement by product serial number, use our Serial Number Entitlement (SNE) Tool: https://entitlementsearch.juniper.net/entitlementsearch/ Opening a Case with JTAC You can open a case with JTAC on the Web or by telephone. - Page 14 JA2500 Junos Space Appliance Hardware Guide Copyright © 2018, Juniper Networks, Inc.
-
Page 15: Appliance And Components Overview And Specifications
PART 1 Appliance and Components Overview and Specifications JA2500 Appliance Overview on page 3 Component Descriptions and Specifications on page 13 Copyright © 2018, Juniper Networks, Inc. - Page 16 JA2500 Junos Space Appliance Hardware Guide Copyright © 2018, Juniper Networks, Inc.
-
Page 17: Ja2500 Appliance Overview
(fabric) ability to manage up to 15,000 devices without the Network Monitoring functionality enabled. The JA2500 Junos Space Appliance has been tested with up to eight appliances (four Junos Space nodes and two database (DB) nodes and two fault monitoring and performance monitoring (FMPM) nodes, or six Junos Space nodes and two FMPM nodes) connected in a cluster (fabric) with the ability to manage up to 25,000 devices. -
Page 18: Ja1500 Appliance Hardware Overview
Rear Panel of a JA2500 Appliance on page 6 Junos Space Ethernet Interfaces Overview on page 7 Chassis Physical Specifications for the JA2500 Appliance The JA2500 Junos Space Appliance chassis is a rigid sheet-metal structure that houses the appliance hardware components. Table 3 on page 4 summarizes the physical specifications of the JA2500 appliance chassis. -
Page 19: Front Panel Of A Ja2500 Appliance
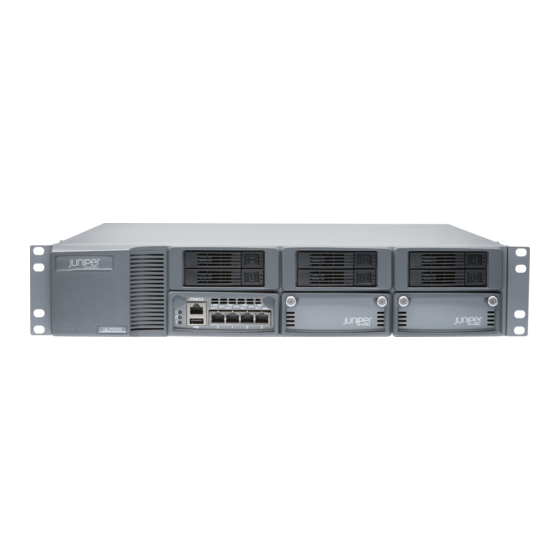
Junos Space Appliance Rack Requirements on page 27 Mounting the JA2500 Junos Space Appliance on page 34 Front Panel of a JA2500 Appliance The front panel of the JA2500 Junos Space Appliance, shown in Figure 1 on page consists of the components listed in... -
Page 20: Rear Panel Of A Ja2500 Appliance
Chassis Physical Specifications for the JA2500 Appliance on page 4 Junos Space Appliance Overview Rear Panel of a JA2500 Appliance The rear panel of the JA2500 Junos Space Appliance, shown in Figure 2 on page consists of the components listed in... -
Page 21: Junos Space Ethernet Interfaces Overview
ETH3 for the JA1500 Junos Space Appliance, and , and for the JA2500 Junos Space Appliance. The Ethernet interfaces eth0 and eth3 support both IPv4 and IPv6 addresses. As a separate IP address is available for each IP stack, for any connection initiated by Junos Space, the source IP address (that is, the IPv4 or IPv6 address) of the connection is bound by the IP address type of a managed device. - Page 22 JA2500 Junos Space Appliance Hardware Guide NOTE: From Junos Space Network Management Platform Release 14.1R2 onward, you can configure Junos Space Ethernet interfaces with only IPv4 addresses, or both IPv4 and IPv6 addresses. Junos Space supports managed devices based on the IP address type (that is, the IPv4 or IPv6 address) configured for the device management interface.
- Page 23 The managed devices can be reached through the eth0 interface if they are configured on the same subnet as the VIP address; on any other subnet, the managed devices can be reached through the eth3 interface. Copyright © 2018, Juniper Networks, Inc.
- Page 24 JA2500 Junos Space Appliance Hardware Guide NOTE: If the managed devices are not reachable through the default gateway configured for the eth3 interface, you must configure static routes for the eth3 interface. The eth3 interface refers to the devint routing table.
-
Page 25: Ntp Time Source For A Junos Space Appliance
Junos Space Appliance (JA2500) Overview Documentation Junos Space Appliance Overview on page 3 Junos Space Ethernet Interfaces Overview on page 7 Configuring a Junos Space Appliance as a Junos Space Node on page 48 Copyright © 2018, Juniper Networks, Inc. - Page 26 JA2500 Junos Space Appliance Hardware Guide Configuring a Junos Space Appliance as a Standalone or Primary FMPM Node on page 70 Changing Network and System Settings for a Junos Space Appliance on page 87 Copyright © 2018, Juniper Networks, Inc.
-
Page 27: Component Descriptions And Specifications
Field-Replaceable Units on the JA2500 Junos Space Appliance Field-replaceable units (FRUs) are components that you can replace at your site. The FRUs in the JA2500 Junos Space Appliance are of the following types: Hot-swappable FRUs: You can remove and replace these components without powering off the appliance. -
Page 28: Ac Power Cord Specifications For Junos Space Appliances
Related Unpacking the JA2500 Junos Space Appliance on page 33 Documentation Installing and Removing JA2500 Junos Space Appliance Hardware Components on page 123 Front Panel of a JA2500 Appliance on page 5 Rear Panel of a JA2500 Appliance on page 6 AC Power Cord Specifications for Junos Space Appliances This topic applies to the following Junos Space Appliances: JA1500 and JA2500. -
Page 29: Ac Power Supply In Junos Space Appliances
AC and DC power supply modules, we recommend that you do not provide redundancy in this manner. Instead, use two AC power supply modules or two DC power supply modules if you want to provide redundancy. Copyright © 2018, Juniper Networks, Inc. - Page 30 JA2500 Junos Space Appliance Hardware Guide Figure 4: AC Power Supply Module Table 10 on page 16 shows details of the AC power supply module for a Junos Space Appliance. Table 10: Details of an AC Power Supply Module Item...
-
Page 31: Dc Power Supply In Junos Space Appliances
Figure 5: DC Power Supply Module Table 11 on page 17 shows details of the DC power supply module for a Junos Space Appliance. Table 11: Details of a DC Power Supply Module Item Details Model number UNIV-560W-PS-DC Copyright © 2018, Juniper Networks, Inc. -
Page 32: Chassis Console Port Pinouts
JA2500 Junos Space Appliance Hardware Guide Table 11: Details of a DC Power Supply Module (continued) Item Details Field-Replaceable Unit type Cold-swappable, if the appliance has only one power supply module Hot-swappable, if the appliance has an additional redundant, functioning power supply module that is plugged into a... - Page 33 Connecting a Junos Space Appliance to a Management Console on page 43 Documentation Connecting a Junos Space Appliance to the Network on page 44 Front Panel of a JA1500 Appliance Front Panel of a JA2500 Appliance on page 5 Copyright © 2018, Juniper Networks, Inc.
- Page 34 JA2500 Junos Space Appliance Hardware Guide Copyright © 2018, Juniper Networks, Inc.
-
Page 35: Planning For Appliance Installation
PART 2 Planning for Appliance Installation Site Preparation on page 23 Mounting Requirements on page 27 Copyright © 2018, Juniper Networks, Inc. - Page 36 JA2500 Junos Space Appliance Hardware Guide Copyright © 2018, Juniper Networks, Inc.
-
Page 37: Site Preparation
Environmental Requirements and Specifications for Junos Space Appliances on page 24 Documentation General Electrical Safety Guidelines and Warnings on page 175 General Safety Guidelines and Warnings on page 151 Preventing Electrostatic Discharge Damage on page 176 Copyright © 2018, Juniper Networks, Inc. -
Page 38: Site Electrical Wiring Guidelines
JA2500 Junos Space Appliance Hardware Guide Site Electrical Wiring Guidelines This topic applies to the following Junos Space Appliances: JA1500 and JA2500. Table 13 on page 24 describes the factors you must consider while planning the electrical wiring at your site. - Page 39 The appliance can be stored safely in the temperature range of –40° F to 158° F (-40° C to 70° C) Related General Safety Guidelines and Warnings on page 151 Documentation General Site Guidelines for Junos Space Appliances on page 23 Copyright © 2018, Juniper Networks, Inc.
- Page 40 JA2500 Junos Space Appliance Hardware Guide Copyright © 2018, Juniper Networks, Inc.
-
Page 41: Mounting Requirements
Clearance The outer edges of the mounting brackets extend the width of either chassis to 19 in. (48.3 cm). The front of the chassis extends approximately 0.5 in. (1.27 cm) beyond the mounting ears. Copyright © 2018, Juniper Networks, Inc. -
Page 42: Tools And Parts Required To Install The Junos Space Appliance
For maximum stability, also secure the rack to ceiling brackets. Related Mounting the JA2500 Junos Space Appliance on page 34 Documentation Rack-Mounting Warnings on page 163 Tools and Parts Required to Install the Junos Space Appliance on page 28... - Page 43 Chapter 4: Mounting Requirements Mounting the JA2500 Junos Space Appliance on page 34 Copyright © 2018, Juniper Networks, Inc.
- Page 44 JA2500 Junos Space Appliance Hardware Guide Copyright © 2018, Juniper Networks, Inc.
- Page 45 PART 3 Installing and Connecting the JA2500 Appliance and Appliance Components Installing the Appliance on page 33 Connecting the Appliance on page 39 Performing Initial Configuration on page 47 Copyright © 2018, Juniper Networks, Inc.
- Page 46 JA2500 Junos Space Appliance Hardware Guide Copyright © 2018, Juniper Networks, Inc.
-
Page 47: Installing The Appliance
Rack on page 36 Midmounting the Junos Space Appliance in a Two-Post Rack on page 37 Unpacking the JA2500 Junos Space Appliance The JA2500 Junos Space Appliance is shipped in a cardboard carton along with the items listed in Table 18 on page... -
Page 48: Mounting The Ja2500 Junos Space Appliance
Tools and Parts Required to Install the Junos Space Appliance on page 28 Mounting the JA2500 Junos Space Appliance You can mount the JA2500 Junos Space Appliance in one of the following ways: Front and rear flush to a rack—Refer to the “Front-and-Rear Mounting the JA2500... -
Page 49: Rack
Verify that the mounting screws on one side of the rack are aligned with the mounting screws on the opposite side and that the appliance is level. Related Front-and-Rear Mounting the JA2500 Junos Space Appliance Recessed in a Rack on Documentation page 36... -
Page 50: Rack
JA2500 Junos Space Appliance Hardware Guide Front-and-Rear Mounting the JA2500 Junos Space Appliance Recessed in a Rack This mounting option provides additional front clearance in the equipment rack. It is used for a larger chassis that requires additional support when mounted on the rack-mount system. -
Page 51: Midmounting The Junos Space Appliance In A Two-Post Rack
Chapter 5: Installing the Appliance Related Front-and-Rear Mounting the JA2500 Junos Space Appliance Flush to a Rack on Documentation page 35 Junos Space Appliance Rack Requirements on page 27 Midmounting the Junos Space Appliance in a Two-Post Rack on page 37... - Page 52 JA2500 Junos Space Appliance Hardware Guide Front-and-Rear Mounting the JA2500 Junos Space Appliance Recessed in a Rack on page 36 Junos Space Appliance Rack Requirements on page 27 Tools and Parts Required to Install the Junos Space Appliance on page 28...
-
Page 53: Connecting The Appliance
Each power supply module must be connected to a dedicated power source outlet. Ensure that you have the following parts and tools available: (Optional) Electrostatic discharge (ESD) grounding strap A power cord appropriate for your geographical location Copyright © 2018, Juniper Networks, Inc. - Page 54 JA2500 Junos Space Appliance Hardware Guide To connect AC power to the Junos Space Appliance, do the following: (Optional) Attach an electrostatic discharge (ESD) grounding strap to your bare wrist and connect the strap to an external ESD point. Ensure that the power supply module is fully inserted into the chassis.
-
Page 55: Connecting Dc Power To The Junos Space Appliance
DC-powered Junos Space Appliances are intended for installation only in restricted access locations. WARNING: Before you perform the following procedure, ensure that power is removed from the DC circuit. To ensure that all power is off, locate the Copyright © 2018, Juniper Networks, Inc. - Page 56 JA2500 Junos Space Appliance Hardware Guide circuit breaker on the panel board that services the DC circuit, switch the circuit breaker to the OFF position, and tape the switch handle of the circuit breaker in the OFF position. To connect the DC source power to the Junos Space Appliance, do the following: (Optional) Attach an electrostatic discharge (ESD) grounding strap to your bare wrist and connect the strap to an external ESD point.
-
Page 57: Connecting A Junos Space Appliance To A Management Console
Every appliance has a console port with an RJ-45 connector. Use the console port to connect the appliance to the management console or to a console server. Ensure that you have an Ethernet cable with an RJ-45 connector available. An RJ-45 cable, as shown Copyright © 2018, Juniper Networks, Inc. -
Page 58: Connecting A Junos Space Appliance To The Network
JA2500 Junos Space Appliance Hardware Guide Figure 12 on page 44, and an RJ-45 to DB-9 serial port adapter are supplied with the appliance. Figure 12: Ethernet Cable Connector To connect the appliance to a management console, do the following: Connect the RJ-45 to DB-9 serial port adapter to the serial port of the management device (laptop or PC) that you will use to access the Junos Space CLI. - Page 59 Web UI clients and the other Junos Space nodes in the fabric. Related Connecting a Junos Space Appliance to a Management Console on page 43 Documentation Booting the Junos Space Appliance on page 47 Copyright © 2018, Juniper Networks, Inc.
- Page 60 JA2500 Junos Space Appliance Hardware Guide Copyright © 2018, Juniper Networks, Inc.
-
Page 61: Performing Initial Configuration
Data: 8 bits Flow control: None Parity: None Stop bits: 1 To boot the Junos Space Appliance, do the following: Power on the management device (PC or laptop) that is connected to the appliance’s console port. Copyright © 2018, Juniper Networks, Inc. -
Page 62: Configuring A Junos Space Appliance As A Junos Space Node
From Junos Space Network Management Platform Release 16.1R1 onward, you can configure access to Junos Space through a Network Address Translation (NAT) gateway. The disk space allocation for a JA2500 Junos Space Appliances is as follows: 1.2 TB for /var... - Page 63 If the IP address of the eth1 interface is not in the same subnet as the VIP address, ensure that you have the subnet mask and the default gateway for the eth1 interface. (Optional) IPv4 address for the NAT outbound SSH Copyright © 2018, Juniper Networks, Inc.
-
Page 64: Configuring A Junos Space Appliance As A Junos Space Node
JA2500 Junos Space Appliance Hardware Guide (Optional) IPv6 address for the NAT outbound SSH (Optional) IPv4 port number for the NAT outbound SSH (Optional) IPv6 port number for the NAT outbound SSH (Optional) IPv4 address for the NAT trap (Optional) IPv6 address for the NAT trap... - Page 65 For more information about the Junos Space fabric, refer to the Managing Nodes in the Junos Space Fabric chapter in the Junos Space Network Management Platform Workspaces Feature Guide (available at http:/ /www.juniper.net/techpubs/en_US/release-independent/junos-space/index.html Copyright © 2018, Juniper Networks, Inc.
- Page 66 JA2500 Junos Space Appliance Hardware Guide To configure the IPv4 address of the eth0 interface: Type 1. Type the IPv4 address for eth0 interface in dotted-decimal notation and press Enter. Please enter new IPv4 address for interface eth0: 192.0.2.50 Type the subnet mask for the IPv4 address and press Enter.
- Page 67 Type if you want to use a different Ethernet interface (eth3) to manage devices. Configuring device management interface eth3: 1> Configure IPv4 2> Configure IPv6 3> Configure Both IPv4 and IPv6 R> Redraw Menu Copyright © 2018, Juniper Networks, Inc.
- Page 68 JA2500 Junos Space Appliance Hardware Guide Choice [1-3,R]: To configure the IPv4 address of the eth3 interface: Type 1. Type the IPv4 address for eth3 interface in dotted-decimal notation and press Enter. Please enter new IPv4 address for interface eth3: 192.0.2.55...
- Page 69 You must provide an IPv6 address for the name server if you configure an IPv6 address for the eth3 interface. Type the IPv6 address of the default gateway for the eth3 interface and press Enter. Enter the default IPv6 gateway for this interface: 2001:db8:20:1:192:20:2:150 Copyright © 2018, Juniper Networks, Inc.
- Page 70 JA2500 Junos Space Appliance Hardware Guide Type the IPv4 address of the name server for the eth3 interface and press Enter. Please type the IPv4 nameserver address in dotted decimal notation: 192.0.2.105 Type the IPv6 address of the name server for the eth3 interface and press Enter.
- Page 71 Type y to synchronize the node with an external NTP server and press Enter. You are prompted to enter the new NTP server. b. Enter the IP address or the URI of the NTP server. Please type the new NTP server: device1.example.com Copyright © 2018, Juniper Networks, Inc.
- Page 72 JA2500 Junos Space Appliance Hardware Guide On successful addition of the NTP server, a message appears as shown in the following sample: Added device1.example.com You are prompted to enter a display name for the node. Type a display name for this node and press Enter.
- Page 73 Type A and press Enter to apply settings. You are prompted to specify the location from where you want to restore the backup. 1> Remote Server 2> USB 3> Local M> Return to Main Menu R> Redraw Menu Choice [1-3 MR]: Copyright © 2018, Juniper Networks, Inc.
- Page 74 JA2500 Junos Space Appliance Hardware Guide Select one of the following options depending on where the backup file is stored: To restore from a remote SCP server: Type 1 and press Enter. You are prompted to confirm if you want to proceed with the backup from the remote server.
- Page 75 Enter the tar file path to restore from local : Type the full path of the directory and press Enter. iii. The messages displayed on the console indicate whether the data is restored successfully to the Junos Space node. Copyright © 2018, Juniper Networks, Inc.
- Page 76 JA2500 Junos Space Appliance Hardware Guide When the data is restored successfully, JBoss services are started on the node and you can access the Junos Space Platform UI through a browser by using the virtual IP (VIP) address configured for Web access.
- Page 77 If you quit the configuration without applying the settings, then all the settings are discarded. (Optional) If you have applied the settings, then type Q to exit the Junos Space Settings menu. You are taken to the console login prompt. Copyright © 2018, Juniper Networks, Inc.
-
Page 78: Configuring Access To Junos Space Through A Nat Gateway
JA2500 Junos Space Appliance Hardware Guide NOTE: If you have specified that the Junos Space node is the first node in the fabric or a standalone node, you can access Junos Space Network Management Platform by typing the IP address configured for the Web GUI in a browser. - Page 79 Please enter the NAT Trap Port Number 4584 To configure the IPv6 address: Type 2 and press Enter. Type the IPv6 address of the NAT outbound SSH interface and press Enter. Configuring NAT : Copyright © 2018, Juniper Networks, Inc.
- Page 80 JA2500 Junos Space Appliance Hardware Guide Configuring IPV6 OutboundSSH for NAT: Please enter the NAT Outbound SSH IP Address 2001:db8:85a3::8a2e:130:0:2 Type the port number of the NAT outbound SSH interface and press Enter. The port number must be in the range 0-65535.
- Page 81 If you are configuring a node to be added to an existing cluster, the Settings Summary is displayed, as shown in the following example: Settings Summary > IPv4 Change: eth0 is 192.168.26.151 / 255.255.254.0 Copyright © 2018, Juniper Networks, Inc.
- Page 82 JA2500 Junos Space Appliance Hardware Guide > Default IPv4 Gateway = 192.168.27.10 on eth0 > IPV6 Change: eth0 is 2001:db8:30:0:0:26:0:97 / 120 > Default IPv6 Gateway = 2001:db8:30:0:0:26:0:95 on eth0 > IPv4 DNS add: 192.168.27.2 > DNS add: 2001:db8:30:0:0:26:0:97 > IPv4 Change: eth3 is 192.168.130.2 / 255.255.254.0 >...
-
Page 83: Configuring The Eth1 Interface
IP address displayed for eth1 is the same as the one that you configured. You can now access the Junos Space node through the eth1 interface to perform administrative tasks. Copyright © 2018, Juniper Networks, Inc. -
Page 84: Node
JA2500 Junos Space Appliance Hardware Guide To troubleshoot issues in configuring the eth1 interface, refer to the file. /var/log/changeEth1.log Related Junos Space Ethernet Interfaces Overview on page 7 Documentation Changing Network and System Settings for a Junos Space Appliance on page 87... -
Page 85: Configuring A Junos Space Appliance As The Primary Fmpm Node
) and press Enter. abc123 You are prompted to change your password. To change the default password, do the following: Type the default password and press Enter. Type your new password and press Enter. Copyright © 2018, Juniper Networks, Inc. - Page 86 JA2500 Junos Space Appliance Hardware Guide Retype your new password and press Enter. If the password has is changed successfully, the message passwd: all authentication is displayed. tokens updated successfully NOTE: All passwords are case-sensitive. You can choose a password that is at least eight characters long, and...
- Page 87 Please enter new IPv4 subnet mask for interface eth0: 255.255.0.0 Type the IPv4 address of the default gateway for the eth0 interface in dotted-decimal notation and press Enter. Enter the default IPv4 gateway as a dotted-decimal IP address: 192.0.2.155 Copyright © 2018, Juniper Networks, Inc.
- Page 88 JA2500 Junos Space Appliance Hardware Guide Type the IPv6 address and prefix for the eth0 interface and press Enter. Please enter new IPv6 address with prefix (IPv6 Address/prefix) for interface eth0: 2001:db8:10:1:192:10:2:50/64 Type the IPv6 address of the default gateway for the eth0 interface and press Enter.
- Page 89 You are prompted to configure NAT IP addresses. 1> Configure IPv4 2> Configure IPv6 3> Configure IPv4 and IPv6 R> Redraw Menu Choice [1-2, R]: To configure the IPv4 address: Type 1 and press Enter. Copyright © 2018, Juniper Networks, Inc.
- Page 90 JA2500 Junos Space Appliance Hardware Guide Type the IPv4 address of the NAT trap interface and press Enter. The IP address must be in the range 1.0.0.1 - 223.255.255.254 excluding 127.x.x.x. Configuring IPV4 Trap for NAT: Please enter the NAT Trap IP Address 192.168.27.1...
- Page 91 > Node display name will be set when it is added. > This node will be the primary FMPM specialized node. A> Apply settings C> Change settings Q> Quit and set up later R> Redraw Menu Copyright © 2018, Juniper Networks, Inc.
- Page 92 JA2500 Junos Space Appliance Hardware Guide Choice [ACQR]: Review the settings that you configured. You can change the settings, quit without applying the settings, or apply the settings. Do one of the following: To apply the settings, type . The settings that you configured are applied and a...
-
Page 93: Configuring The Eth1 Interface
IP address displayed for eth1 is the same as the one that you configured. You can now access the FMPM node through the eth1 interface to perform administrative tasks. Copyright © 2018, Juniper Networks, Inc. -
Page 94: Configuring A Junos Space Appliance As A Backup Or Secondary Fmpm Node For High Availability
JA2500 Junos Space Appliance Hardware Guide To troubleshoot issues in configuring the eth1 interface, refer to the file. /var/log/changeEth1.log Related Junos Space Ethernet Interfaces Overview on page 7 Documentation Configuring a Junos Space Appliance as a Backup or Secondary FMPM Node for High... -
Page 95: Configuring A Junos Space Appliance As The Secondary Fmpm Node
) and press Enter. abc123 You are prompted to change your password. To change the default password, do the following: Type the default password and press Enter. Type your new password and press Enter. Copyright © 2018, Juniper Networks, Inc. - Page 96 JA2500 Junos Space Appliance Hardware Guide Retype your new password and press Enter. If the password is changed successfully, the message passwd: all authentication tokens is displayed. updated successfully NOTE: All passwords are case-sensitive. You can choose a password that is at least eight characters long, and...
- Page 97 Please enter new IPv4 subnet mask for interface eth0: 255.255.0.0 Type the IPv4 address of the default gateway for the eth0 interface in dotted-decimal notation and press Enter. Enter the default IPv4 gateway as a dotted-decimal IP address: 192.0.2.155 Copyright © 2018, Juniper Networks, Inc.
- Page 98 JA2500 Junos Space Appliance Hardware Guide Type the IPv6 address and prefix for the eth0 interface and press Enter. Please enter new IPv6 address with prefix (IPv6 Address/prefix) for interface eth0: 2001:db8:0:1:192:0:2:51/64 Type the IPv6 address of the default gateway for the eth0 interface and press Enter.
-
Page 99: Configuring The Eth1 Interface
From Junos Space Network Management Platform Release 14.1R1 onward, you can configure the eth1 Ethernet interface as an administrative interface. For the FMPM node, configure the eth1 interface when the node reboots after the basic configuration is complete. Copyright © 2018, Juniper Networks, Inc. - Page 100 JA2500 Junos Space Appliance Hardware Guide NOTE: The eth1 interface must be configured separately for each node in a multinode fabric. If you configure the eth1 interface, SSH is disabled on the eth0 interface. You can access the CLI of the Junos Space appliance only through the eth1 interface.
-
Page 101: Changing Network And System Settings For A Junos Space Appliance
When you log in to the appliance, the Junos Space Settings Menu appears as follows: Junos Space Settings Menu 1> Change Password 2> Change Network Settings 3> Change Time Options 4> Retrieve Logs 5> Security 6> (Debug) run shell A> Apply changes Q> Quit R> Redraw Menu Copyright © 2018, Juniper Networks, Inc. -
Page 102: Changing The Password For The Default User
JA2500 Junos Space Appliance Hardware Guide Choice [1-6,QR]: NOTE: Password changes take effect immediately. Any other changes that you make to the settings do not take effect until you apply the changes. You can apply the changes from the Junos Space Settings Menu or any sub-menu by typing at the prompt. -
Page 103: Changing Network Settings
Changing Network Settings You can change the following network settings for your Junos Space Appliance: DNS servers Virtual IP address of the Junos Space node or FMPM node, Ethernet interface parameters, and NAT configuration Static routes Copyright © 2018, Juniper Networks, Inc. - Page 104 JA2500 Junos Space Appliance Hardware Guide NOTE: From Junos Space Network Management Platform Release 14.1R2 onward, you can configure Junos Space Ethernet interfaces with only IPv4 addresses, or both IPv4 and IPv6 addresses. On a multinode fabric, we recommend that you modify the network settings by using the Junos Space Network Management Platform GUI.
- Page 105 IPv6 address, then the IPv4 address is discarded and the IPv6 address is used for the NAT gateway. If both IPv4 and IPv6 are configured initially, then only the IP address that is modified is updated. Copyright © 2018, Juniper Networks, Inc.
-
Page 106: Modifying The Ip Address Of The Eth1 Interface
JA2500 Junos Space Appliance Hardware Guide (Optional) To add or delete a static route, type at the prompt on the Change Network Settings menu. On the subsequent menu, you can do the following: To add a static route, type and follow the prompts on the CLI. -
Page 107: Changing The Time Zone And Ntp Servers
You can retrieve system log files using Secure Copy Protocol (SCP) if the network is functional, or a USB device if the network is down. NOTE: To save the system log files to a USB device, the device must be connected to the Junos Space Appliance. Copyright © 2018, Juniper Networks, Inc. -
Page 108: Changing Firewall And Ssh Settings
JA2500 Junos Space Appliance Hardware Guide To retrieve system log files, do the following: On the Junos Space Settings Menu, type at the prompt. On the subsequent menu, you can do the following: To save the log files to a USB device, type and follow the prompts on the CLI. -
Page 109: Applying Or Cancelling Changes To Settings
Configuring a Junos Space Appliance as a Backup or Secondary FMPM Node for High Availability on page 80 Booting the Junos Space Appliance on page 47 Junos Space Ethernet Interfaces Overview on page 7 NTP Time Source for a Junos Space Appliance on page 11 Copyright © 2018, Juniper Networks, Inc. -
Page 110: Installing A Junos Space Image On A Junos Space Appliance By Using A Usb Drive
Management Platform already installed on it. You can install only Junos Space Network Management Platform Release 13.3 (or later) on the JA2500 Junos Space Appliance. For information about how to upgrade Junos Space Network Management Platform, refer to the Upgrading Junos Space Software Overview and... - Page 111 To install a software image on a Junos Space Appliance by using a USB drive: Plug the USB drive into the USB port of a laptop or PC that is connected to the Internet. Using a Web browser, navigate to the Juniper Networks software download site ), then click https://www.juniper.net/support/downloads/...
- Page 112 JA2500 Junos Space Appliance Hardware Guide NOTE: By default, the image for the latest version of the software is displayed on this page. To download previous versions of the software, select a release number from the list. Release Create a bootable USB drive by using one of the following procedures:...
- Page 113 USB is assigned; for example, disk/sdb. [user@host ~]$ disk For Junos Space Platform Release 16.1R1, type the following command and press Enter: [user@host ~]$ dd if=space-version.spinnumber-usb.iso of=/dev/sdb Copyright © 2018, Juniper Networks, Inc.
- Page 114 JA2500 Junos Space Appliance Hardware Guide where is the name of the downloaded Junos space-version.spin-number-usb.iso Space image file, and is the name of the device drive to which your USB /dev/sdb drive is mapped. NOTE: For releases prior to Junos Space Platform Release 16.1R1, type the following command to copy the image file to the USB drive and press Enter.
- Page 115 (Optional) Power on the appliance by toggling the power switch located at the rear panel of the appliance. The appliance boots with the version of the Junos Space Network Management Platform that you installed. Copyright © 2018, Juniper Networks, Inc.
-
Page 116: Powering Off The Junos Space Appliance
JA2500 Junos Space Appliance Hardware Guide You must configure the basic settings for your appliance before you can use it to manage devices. Refer to “Configuring a Junos Space Appliance as a Junos Space Node” on page 48 “Configuring a Junos Space Appliance as a Standalone or Primary FMPM Node”... -
Page 117: Powering Off Using The Appliance Power Switch
Power Supply Module LED turns amber. Related General Electrical Safety Guidelines and Warnings on page 175 Documentation General Safety Guidelines and Warnings on page 151 Installing and Removing JA2500 Junos Space Appliance Hardware Components on page 123 Copyright © 2018, Juniper Networks, Inc. - Page 118 JA2500 Junos Space Appliance Hardware Guide Copyright © 2018, Juniper Networks, Inc.
-
Page 119: Hardware Monitoring And Troubleshooting
PART 4 Hardware Monitoring and Troubleshooting Monitoring the Hardware on page 107 Troubleshooting the JA2500 Appliance on page 117 Copyright © 2018, Juniper Networks, Inc. - Page 120 JA2500 Junos Space Appliance Hardware Guide Copyright © 2018, Juniper Networks, Inc.
-
Page 121: Monitoring The Hardware
Monitoring the Cooling Fans in a Junos Space Appliance on page 107 Monitoring the Power Supply in a Junos Space Appliance on page 109 Monitoring the RAID Array for the JA2500 Junos Space Appliance on page 111 Monitoring the Cooling Fans in a Junos Space Appliance Purpose For optimal cooling of the Junos Space appliance, verify the condition of the fans. - Page 122 JA2500 Junos Space Appliance Hardware Guide Sample Output nct6776-isa-0a30 Adapter: ISA adapter Vcore: +0.66 V (min = +0.00 V, max = +1.74 V) in1: +1.51 V (min = +0.00 V, max = +0.00 V) ALARM AVCC: +3.41 V (min = +2.98 V, max =...
-
Page 123: Monitoring The Power Supply In A Junos Space Appliance
Maintaining the Junos Space Appliance on page 121 Documentation Monitoring the Power Supply in a Junos Space Appliance on page 109 Monitoring the RAID Array for the JA2500 Junos Space Appliance on page 111 Monitoring the Power Supply in a Junos Space Appliance Purpose For optimal performance of the Junos Space appliance, verify the condition of the power supply module or modules installed in the appliance. - Page 124 Maintaining the Junos Space Appliance on page 121 Documentation Monitoring the Cooling Fans in a Junos Space Appliance on page 107 Monitoring the RAID Array for the JA2500 Junos Space Appliance on page 111 Copyright © 2018, Juniper Networks, Inc.
-
Page 125: Monitoring The Raid Array For The Ja2500 Junos Space Appliance
Chapter 8: Monitoring the Hardware Monitoring the RAID Array for the JA2500 Junos Space Appliance Purpose For optimal performance of the JA2500 appliance, monitor the status of the RAID volume installed in the appliance. Action Monitor the RAID controller for RAID failure events: Do the following: Log in to the appliance as the admin user. - Page 126 JA2500 Junos Space Appliance Hardware Guide LSI Corporation SAS2 IR Configuration Utility. Version 16.00.00.00 (2013.03.01) Copyright (c) 2009-2013 LSI Corporation. All rights reserved. Read configuration has been initiated for controller 0 ------------------------------------------------------------------------ Controller information ------------------------------------------------------------------------ Controller type : SAS2308_1 BIOS version : 7.25.00.00...
- Page 127 : 5000c50034c272c7 Protocol : SAS Drive Type : SAS_HDD Device is a Hard disk Enclosure # Slot # SAS Address : 5000c50-0-33e5-cbf1 State : Optimal (OPT) Size (in MB)/(in sectors) : 953869/1953525167 Manufacturer : SEAGATE Copyright © 2018, Juniper Networks, Inc.
- Page 128 JA2500 Junos Space Appliance Hardware Guide Model Number : ST91000640SS Firmware Revision : 0003 Serial No : 9XG05KP800009119LZRZ GUID : 5000c50033e5cbf3 Protocol : SAS Drive Type : SAS_HDD ------------------------------------------------------------------------ Enclosure information ------------------------------------------------------------------------ Enclosure# Logical ID : 50010f30:00002de0 Numslots StartSlot ------------------------------------------------------------------------ SAS2IRCU: Command DISPLAY Completed Successfully.
- Page 129 Related Maintaining the Junos Space Appliance on page 121 Documentation Monitoring the Cooling Fans in a Junos Space Appliance on page 107 Monitoring the Power Supply in a Junos Space Appliance on page 109 Copyright © 2018, Juniper Networks, Inc.
- Page 130 JA2500 Junos Space Appliance Hardware Guide Copyright © 2018, Juniper Networks, Inc.
-
Page 131: Troubleshooting The Ja2500 Appliance
Refer to the Changing Network Settings section in the “Changing Network and System Settings for a Junos Space Appliance” on page 87 for information about changing the default gateway for device management traffic. Copyright © 2018, Juniper Networks, Inc. - Page 132 JA2500 Junos Space Appliance Hardware Guide Check the physical connectivity of Ethernet interface eth3. Related Junos Space Ethernet Interfaces Overview on page 7 Documentation Copyright © 2018, Juniper Networks, Inc.
- Page 133 PART 5 Hardware Maintenance and Replacement Maintaining the Hardware on page 121 Replacing Hardware Components on page 123 Copyright © 2018, Juniper Networks, Inc.
- Page 134 JA2500 Junos Space Appliance Hardware Guide Copyright © 2018, Juniper Networks, Inc.
-
Page 135: Maintaining The Hardware
Monitoring the Cooling Fans in a Junos Space Appliance on page 107 Documentation Monitoring the Power Supply in a Junos Space Appliance on page 109 Monitoring the RAID Array for the JA2500 Junos Space Appliance on page 111 Copyright © 2018, Juniper Networks, Inc. - Page 136 JA2500 Junos Space Appliance Hardware Guide Copyright © 2018, Juniper Networks, Inc.
-
Page 137: Replacing Hardware Components
Replacing the DC Power Supply Module on a Junos Space Appliance on page 130 Replacing the Fan on a Junos Space Appliance on page 133 Replacing the Hard Disk on a JA2500 Junos Space Appliance on page 135 Installing and Removing JA2500 Junos Space Appliance Hardware Components The JA2500 Junos Space Appliance chassis is a rigid sheet-metal structure that houses the hardware components. -
Page 138: Replacing The Ac Power Supply Cord On A Junos Space Appliance
JA2500 Junos Space Appliance Hardware Guide Replacing the Fan on a Junos Space Appliance on page 133 Replacing the Hard Disk on a JA2500 Junos Space Appliance on page 135 Related AC Power Supply in Junos Space Appliances on page 15... - Page 139 Documentation AC Power Supply in Junos Space Appliances on page 15 Field-Replaceable Units on the JA2500 Junos Space Appliance on page 13 Replacing the AC Power Supply Module on a Junos Space Appliance on page 126 Copyright © 2018, Juniper Networks, Inc.
-
Page 140: Replacing The Ac Power Supply Module On A Junos Space Appliance
JA2500 Junos Space Appliance Hardware Guide Replacing the AC Power Supply Module on a Junos Space Appliance Ensure that you have the following parts and tools available to remove the power supply module from the appliance chassis: (Optional) Electrostatic discharge (ESD) grounding strap... -
Page 141: Installing The Ac Power Supply Module
Save the cover panel for later use. Insert and push the new power supply module into the slot, as shown in Figure 16 on page 128, until the ejector lever locks. Copyright © 2018, Juniper Networks, Inc. -
Page 142: Replacing The Dc Power Supply Cable On A Junos Space Appliance
Documentation AC Power Supply in Junos Space Appliances on page 15 Field-Replaceable Units on the JA2500 Junos Space Appliance on page 13 Replacing the DC Power Supply Cable on a Junos Space Appliance Ensure that you have the following parts and tools available to remove the power supply... -
Page 143: Removing The Dc Power Supply Cable
Make sure that the voltage across the DC power source cable leads is 0 V and that there is no chance that the cables might become active during the removal process. Copyright © 2018, Juniper Networks, Inc. -
Page 144: Replacing The Dc Power Supply Module On A Junos Space Appliance
DC Power Supply in Junos Space Appliances on page 17 Documentation Field-Replaceable Units on the JA2500 Junos Space Appliance on page 13 Replacing the DC Power Supply Module on a Junos Space Appliance on page 130 Replacing the DC Power Supply Module on a Junos Space Appliance... -
Page 145: Removing The Dc Power Supply Module
Slide the ejector lever to the right, as shown in Figure 17 on page 131, until it is in its furthest position. Figure 17: Removing a DC Power Supply Module 1— Power supply ejector lever Copyright © 2018, Juniper Networks, Inc. -
Page 146: Installing A Dc Power Supply Module
DC Power Supply in Junos Space Appliances on page 17 Documentation Field-Replaceable Units on the JA2500 Junos Space Appliance on page 13 Replacing the DC Power Supply Cable on a Junos Space Appliance on page 128 Copyright © 2018, Juniper Networks, Inc. -
Page 147: Replacing The Fan On A Junos Space Appliance
(Optional) Attach an ESD grounding strap to your bare wrist, and connect the strap to an external ESD point. Press the latch at the side of the fan, as shown Figure 20 on page 134 to release the fan. Copyright © 2018, Juniper Networks, Inc. -
Page 148: Installing The Fan
JA2500 Junos Space Appliance Hardware Guide Figure 20: Removing a Fan Pull the fan module out of the chassis. (Optional) Place the fan module in the antistatic bag or on the antistatic mat placed on a flat, stable surface. Installing the Fan... -
Page 149: Replacing The Hard Disk On A Ja2500 Junos Space Appliance
When you install a replacement fan, the cooling load is distributed back evenly across both the fans, and the Hardware Fault LED stops blinking and the alarm turns off. Related Field-Replaceable Units on the JA2500 Junos Space Appliance on page 13 Documentation Installing and Removing JA2500 Junos Space Appliance Hardware Components on... -
Page 150: Removing The Hard Disk
JA2500 Junos Space Appliance Hardware Guide An antistatic bag or an antistatic mat Removing the Hard Disk on page 136 Installing the Hard Disk on page 137 Removing the Hard Disk To remove a hard disk from the JA2500 appliance, do the following: Place the antistatic bag or antistatic mat on a flat, stable surface. -
Page 151: Installing The Hard Disk
When the drive is rebuilt, the red LED goes out. Related Field-Replaceable Units on the JA2500 Junos Space Appliance on page 13 Documentation Installing and Removing JA2500 Junos Space Appliance Hardware Components on page 123 Copyright ©... - Page 152 JA2500 Junos Space Appliance Hardware Guide Copyright © 2018, Juniper Networks, Inc.
-
Page 153: Returning Hardware
PART 6 Returning Hardware Returning the Appliance or Appliance Components on page 141 Copyright © 2018, Juniper Networks, Inc. - Page 154 JA2500 Junos Space Appliance Hardware Guide Copyright © 2018, Juniper Networks, Inc.
-
Page 155: Returning The Appliance Or Appliance Components
Contacting Customer Support to Obtain Return Materials Authorization for Junos Space Appliances on page 144 Packing a JA2500 Junos Space Appliance or Component for Shipping on page 145 Returning a JA2500 Junos Space Appliance or Component for Repair or Replacement... -
Page 156: Listing The Ja2500 Appliance Details Using The Junos Space Cli
Locating the Serial Number on a JA2500 Junos Space Appliance or Component If you are returning a JA2500 Junos Space Appliance or hardware component to Juniper Networks for repair or replacement, you need to provide the serial number of the appliance or component to the Juniper Networks Technical Assistance Center (JTAC) when you contact them to obtain Return Materials Authorization (RMA) number. -
Page 157: Locating The Chassis Serial Number Id Label On A Ja2500 Appliance
DC Power Supply Module—The serial number ID label is on the top of the DC power supply module. Hard Disks—The serial number ID label is on the top of the hard disk. Related Contacting Customer Support to Obtain Return Materials Authorization for Junos Space Documentation Appliances on page 144 Copyright © 2018, Juniper Networks, Inc. -
Page 158: Contacting Customer Support To Obtain Return Materials Authorization For Junos Space Appliances
JA2500 Junos Space Appliance Hardware Guide Packing a JA2500 Junos Space Appliance or Component for Shipping on page 145 Contacting Customer Support to Obtain Return Materials Authorization for Junos Space Appliances If you are returning a Junos Space Appliance or hardware component to Juniper Networks for repair or replacement, obtain a Return Materials Authorization (RMA) number from Juniper Networks Technical Assistance Center (JTAC). -
Page 159: Packing A Ja2500 Junos Space Appliance Or Component For Shipping
Packing a JA2500 Junos Space Appliance or Component for Shipping If you are returning a JA2500 Junos Space Appliance or component (field-replaceable unit [FRU]) to Juniper Networks for repair or replacement, pack the item as described in this topic. Before you begin packing the appliance or component, do the following: Obtain a Return Materials Authorization (RMA) number for the appliance or the component. -
Page 160: Packing Components Of The Ja2500 Appliance For Shipping
JA2500 Junos Space Appliance Hardware Guide Use the screwdriver to remove the rack-mounting brackets from the appliance chassis. Place the appliance in an antistatic bag. Place the appliance inside the shipping carton. Place packaging foam or a cardboard tray on top of and around the appliance to ensure adequate padding. - Page 161 Chapter 12: Returning the Appliance or Appliance Components Related Contacting Customer Support to Obtain Return Materials Authorization for Junos Space Documentation Appliances on page 144 Locating the Serial Number on a JA2500 Junos Space Appliance or Component on page 142 Copyright © 2018, Juniper Networks, Inc.
- Page 162 JA2500 Junos Space Appliance Hardware Guide Copyright © 2018, Juniper Networks, Inc.
- Page 163 PART 7 Safety Information General Safety Information on page 151 Radiation and Laser Warnings on page 157 Installation and Maintenance Safety Information on page 161 Power and Electrical Safety Information on page 175 Copyright © 2018, Juniper Networks, Inc.
- Page 164 JA2500 Junos Space Appliance Hardware Guide Copyright © 2018, Juniper Networks, Inc.
-
Page 165: General Safety Information
Never attempt to lift an object that is too heavy for one person to handle. Never install or manipulate wiring during electrical storms. Never install electrical jacks in wet locations unless the jacks are specifically designed for wet environments. Operate the appliance only when it is properly grounded. Copyright © 2018, Juniper Networks, Inc. -
Page 166: Definitions Of Safety Warning Levels
JA2500 Junos Space Appliance Hardware Guide Ensure that the separate protective earthing terminal provided on this product is permanently connected to earth. Replace fuses only with fuses of the same type and rating. Do not open or remove chassis covers or sheet-metal parts unless instructions are provided in the hardware documentation for this product. - Page 167 ¡Atención! Este símbolo de aviso significa peligro. Existe riesgo para su integridad física. Antes de manipular cualquier equipo, considerar los riesgos que entraña la corriente eléctrica y familiarizarse con los procedimientos estándar de prevención de accidentes. Copyright © 2018, Juniper Networks, Inc.
-
Page 168: Fire Safety Requirements
In addition, you should establish procedures to protect your equipment in the event of a fire emergency. Juniper Networks products should be installed in an environment suitable for electronic equipment. We recommend that fire suppression equipment be available in the event of a fire in the vicinity of the equipment and that all local fire, safety, and electrical codes and ordinances be observed when you install and operate your equipment. -
Page 169: Qualified Personnel Warning
To keep warranties effective, do not use a dry chemical fire extinguisher to control a fire at or near a Junos Space appliance or other network device provided by Juniper Networks. If a dry chemical fire extinguisher is used, the unit is no longer eligible for coverage under a service agreement. -
Page 170: Warning Statement For Norway And Sweden
JA2500 Junos Space Appliance Hardware Guide Related AC Power Electrical Safety Guidelines on page 178 Documentation DC Power Electrical Safety Guidelines on page 180 General Electrical Safety Guidelines and Warnings on page 175 General Safety Guidelines and Warnings on page 151... -
Page 171: Radiation And Laser Warnings
Class 1 Laser Product Warning WARNING: Class 1 laser product. Waarschuwing Klasse-1 laser produkt. Varoitus Luokan 1 lasertuote. Copyright © 2018, Juniper Networks, Inc. -
Page 172: Class 1 Led Product Warning
JA2500 Junos Space Appliance Hardware Guide Attention Produit laser de classe I. Warnung Laserprodukt der Klasse 1. WARNING: Avvertenza Prodotto laser di Classe 1. Advarsel Laserprodukt av klasse 1. Aviso Produto laser de classe 1. ¡Atención! Producto láser Clase I. - Page 173 Related General Safety Guidelines and Warnings on page 151 Documentation Grounded Equipment Warning on page 167 Installation Instructions Warning on page 161 Radiation from Open Port Apertures Warning on page 160 Copyright © 2018, Juniper Networks, Inc.
-
Page 174: Radiation From Open Port Apertures Warning
JA2500 Junos Space Appliance Hardware Guide Radiation from Open Port Apertures Warning WARNING: Because invisible radiation might be emitted from the aperture of the port when no fiber cable is connected, avoid exposure to radiation and do not stare into open apertures. -
Page 175: Installation And Maintenance Safety Information
Advarsel Les installasjonsinstruksjonene før systemet kobles til strømkilden. Aviso Leia as instruções de instalação antes de ligar o sistema à sua fonte de energia. ¡Atención! Ver las instrucciones de instalación antes de conectar el sistema a la red de alimentación. Copyright © 2018, Juniper Networks, Inc. -
Page 176: Chassis Lifting Guidelines For Junos Space Appliances
Related General Safety Guidelines and Warnings on page 151 Documentation Installation Instructions Warning on page 161 Mounting the JA2500 Junos Space Appliance on page 34 Ramp Warning WARNING: When installing the device, do not use a ramp inclined at more than 10 degrees. -
Page 177: Rack-Mounting Warnings
Waarschuwing Om lichamelijk letsel te voorkomen wanneer u dit toestel in een rek monteert of het daar een servicebeurt geeft, moet u speciale voorzorgsmaatregelen nemen om ervoor te zorgen dat het toestel stabiel blijft. De onderstaande richtlijnen worden verstrekt om uw veiligheid te verzekeren: Copyright © 2018, Juniper Networks, Inc. - Page 178 Les directives ci-dessous sont destinées à assurer la protection du personnel: Le rack sur lequel est monté le Juniper Networks device doit être fixé à la structure du bâtiment. Si cette unité constitue la seule unité montée en casier, elle doit être placée dans le bas.
- Page 179 Le seguenti direttive vengono fornite per garantire la sicurezza personale: Il Juniper Networks device deve essere installato in un telaio, il quale deve essere fissato alla struttura dell'edificio. Questa unità deve venire montata sul fondo del supporto, se si tratta dell'unica unità...
- Page 180 Para garantizar su seguridad, proceda según las siguientes instrucciones: El Juniper Networks device debe instalarse en un bastidor fijado a la estructura del edificio. Colocar el equipo en la parte inferior del bastidor, cuando sea la única unidad en el mismo.
-
Page 181: Grounded Equipment Warning
Chapter 15: Installation and Maintenance Safety Information Grounded Equipment Warning on page 167 Installation Instructions Warning on page 161 Mounting the JA2500 Junos Space Appliance on page 34 Grounded Equipment Warning WARNING: The device is intended to be grounded. During normal use, ensure that you have connected earth ground to the chassis. -
Page 182: Maintenance And Operational Safety Guidelines And Warnings
JA2500 Junos Space Appliance Hardware Guide Maintenance and Operational Safety Guidelines and Warnings While performing the maintenance activities for devices, observe the following guidelines and warnings: Battery Handling Warning on page 168 Jewelry Removal Warning on page 169 Lightning Activity Warning on page 170... -
Page 183: Jewelry Removal Warning
(inclusi anelli, collane, braccialetti ed orologi). Gli oggetti metallici si riscaldano quando sono collegati tra punti di alimentazione e massa: possono causare ustioni gravi oppure il metallo può saldarsi ai terminali. Copyright © 2018, Juniper Networks, Inc. -
Page 184: Lightning Activity Warning
JA2500 Junos Space Appliance Hardware Guide Advarsel Fjern alle smykker (inkludert ringer, halskjeder og klokker) før du skal arbeide på utstyr som er koblet til kraftledninger. Metallgjenstander som er koblet til kraftledninger og jord blir svært varme og kan forårsake alvorlige brannskader eller smelte fast til polene. -
Page 185: Operating Temperature Warning
To prevent the device from overheating, do not operate it in an area that exceeds the maximum recommended ambient temperature of 104° F (40° C) for network devices of Juniper Networks. To prevent airflow restriction, allow at least 6 in. (15.2 cm) of clearance around the ventilation openings. -
Page 186: Product Disposal Warning
15,2 cm à volta das aberturas de ventilação. ¡Atención! Para impedir que un encaminador de la serie Juniper Networks device se recaliente, no lo haga funcionar en un área en la que se supere la temperatura ambiente máxima recomendada de 40°... - Page 187 General Safety Guidelines and Warnings on page 151 Grounded Equipment Warning on page 167 Installation Instructions Warning on page 161 Laser and LED Safety Guidelines and Warnings for Junos Space Appliances on page 157 Copyright © 2018, Juniper Networks, Inc.
- Page 188 JA2500 Junos Space Appliance Hardware Guide Copyright © 2018, Juniper Networks, Inc.
-
Page 189: Power And Electrical Safety Information
(ESD) grounding strap to an ESD point and place the other end of the strap around your bare wrist. Failure to use an ESD grounding strap could result in damage to the device. Copyright © 2018, Juniper Networks, Inc. -
Page 190: Preventing Electrostatic Discharge Damage
JA2500 Junos Space Appliance Hardware Guide Install the device in compliance with the following local, national, and international electrical codes: United States—National Fire Protection Association (NFPA 70), United States National Electrical Code. Other countries—International Electromechanical Commission (IEC) 60364, Part 1 through Part 7. - Page 191 ANSI/TIA/EIA-568 cables such as Category 5e and Category 6 can get electrostatically charged. To dissipate this charge, always ground the cables to a suitable and safe earth ground before connecting them to the system. Copyright © 2018, Juniper Networks, Inc.
-
Page 192: Ac Power Electrical Safety Guidelines
JA2500 Junos Space Appliance Hardware Guide Related General Electrical Safety Guidelines and Warnings on page 175 Documentation General Safety Guidelines and Warnings on page 151 AC Power Electrical Safety Guidelines CAUTION: For devices with AC power supplies, an external surge protective device (SPD) must be used at the AC power source. -
Page 193: Ac Power Disconnection Warning
Related AC Power Electrical Safety Guidelines on page 178 Documentation General Electrical Safety Guidelines and Warnings on page 175 General Safety Guidelines and Warnings on page 151 Copyright © 2018, Juniper Networks, Inc. -
Page 194: Dc Power Electrical Safety Guidelines
JA2500 Junos Space Appliance Hardware Guide DC Power Electrical Safety Guidelines A DC-powered device is equipped with a DC terminal block that is rated for the power requirements of a maximally configured device. NOTE: To supply sufficient power, terminate the DC input wiring on a facility... -
Page 195: Dc Power Disconnection Warning
CC, mettere l'interruttore in posizione OFF e fissarlo con nastro adesivo in tale posizione. Advarsel Før noen av disse prosedyrene utføres, kontroller at strømmen er frakoblet likestrømkretsen. Sørg for at all strøm er slått AV. Dette gjøres ved Copyright © 2018, Juniper Networks, Inc. -
Page 196: Dc Power Grounding Requirements And Warning
JA2500 Junos Space Appliance Hardware Guide å lokalisere strømbryteren på brytertavlen som betjener likestrømkretsen, slå strømbryteren AV og teipe bryterhåndtaket på strømbryteren i AV-stilling. Aviso Antes de executar um dos seguintes procedimentos, certifique-se que desligou a fonte de alimentação de energia do circuito de corrente contínua. -
Page 197: Dc Power Wiring Sequence Warning
Waarschuwing De juiste bedradingsvolgorde verbonden is aarde naar aarde, +RTN naar +RTN, en –45 V naar – 60 V. De juiste bedradingsvolgorde losgemaakt is en –45 naar –60 V, +RTN naar +RTN, aarde naar aarde. Copyright © 2018, Juniper Networks, Inc. - Page 198 JA2500 Junos Space Appliance Hardware Guide Varoitus Oikea yhdistettava kytkentajarjestys on maajohto maajohtoon, +RTN varten +RTN, –45 V varten –60 V. Oikea irrotettava kytkentajarjestys on –45 V varten –60 V, +RTN varten +RTN, maajohto maajohtoon. Attention Câblez l'approvisionnement d'alimentation CC En utilisant les crochets appropriés à...
-
Page 199: Dc Power Wiring Terminations Warning
Advarsel Hvis det er nødvendig med flertrådede ledninger, brukes godkjente ledningsavslutninger, som for eksempel lukket sløyfe eller spadetype med oppoverbøyde kabelsko. Disse avslutningene skal ha riktig størrelse i forhold til ledningene, og skal klemme sammen både isolasjonen og lederen. Copyright © 2018, Juniper Networks, Inc. -
Page 200: Multiple Power Supplies Disconnection Warning
JA2500 Junos Space Appliance Hardware Guide Aviso Quando forem requeridas montagens de instalação eléctrica de cabo torcido, use terminações de cabo aprovadas, tais como, terminações de cabo em circuito fechado e planas com terminais de orelha voltados para cima. Estas terminações de cabo deverão ser do tamanho apropriado para os respectivos cabos, e deverão prender simultaneamente o isolamento e o fio... -
Page 201: Tn Power Warning
Use caution. Be aware of potentially hazardous conditions that could cause further injury. Disconnect power from the device. If possible, send another person to get medical aid. Otherwise, assess the condition of the victim, then call for help. Copyright © 2018, Juniper Networks, Inc. - Page 202 JA2500 Junos Space Appliance Hardware Guide Related AC Power Electrical Safety Guidelines on page 178 Documentation DC Power Electrical Safety Guidelines on page 180 General Electrical Safety Guidelines and Warnings on page 175 General Safety Guidelines and Warnings on page 151...
-
Page 203: Part 8 Compliance Information
PART 8 Compliance Information Compliance Information on page 191 Copyright © 2018, Juniper Networks, Inc. - Page 204 JA2500 Junos Space Appliance Hardware Guide Copyright © 2018, Juniper Networks, Inc.
-
Page 205: Chapter 17 Compliance Information
Compliance Statements for EMC Requirements for JA2500 on page 192 Compliance Statements for Acoustic Noise for JA2500 on page 194 Declaration of Conformity for JA2500 Junos Space Appliance on page 195 Agency Approvals for JA2500 The Junos Space JA2500 appliance complies with the following standards: Safety CAN/CSA-C22.2 No. -
Page 206: Compliance Statements For Emc Requirements For Ja2500
JA2500 Junos Space Appliance Hardware Guide EN 61000-4-3 Radiated Immunity EN 61000-4-4 EFT EN 61000-4-5 Surge EN 61000-4-6 Low Frequency Common Immunity EN 61000-4-11 Voltage Dips and Sags Related Compliance Statements for EMC Requirements for JA2500 on page 192 Documentation... -
Page 207: European Community
This equipment generates, uses, and can radiate radio frequency energy and, if not installed and used in accordance with the instruction manual, Copyright © 2018, Juniper Networks, Inc. -
Page 208: Fcc Part 15 Statement
JA2500 Junos Space Appliance Hardware Guide might cause harmful interference to radio communications. Operation of this equipment in a residential area is likely to cause harmful interference, in which case users need to correct the interference at their own expense. -
Page 209: Declaration Of Conformity For Ja2500 Junos Space Appliance
Chapter 17: Compliance Information Declaration of Conformity for JA2500 Junos Space Appliance Related Agency Approvals for JA2500 on page 191 Documentation Compliance Statements for Acoustic Noise for JA2500 on page 194 Compliance Statements for EMC Requirements for JA2500 on page 192... - Page 210 JA2500 Junos Space Appliance Hardware Guide Copyright © 2018, Juniper Networks, Inc.