Juniper Junos Space JA2500 Quick Start Manual
Hide thumbs
Also See for Junos Space JA2500:
- Hardware manual (180 pages) ,
- Hardware manual (206 pages) ,
- Hardware manual (210 pages)
Table of Contents
Advertisement
Quick Links
JA2500 Junos Space Appliance Quick
Start
November 2018
Revision 06
Contents
Copyright © 2018, Juniper Networks, Inc.
This document describes how to install the Juniper Networks JA2500 Junos Space
Appliance.
JA2500 Appliance Quick Start Description . . . . . . . . . . . . . . . . . . . . . . . . . . . . . . . . 3
Step 1: Prepare the Site for JA2500 Appliance Installation . . . . . . . . . . . . . . . . . . . 5
Rack Requirements . . . . . . . . . . . . . . . . . . . . . . . . . . . . . . . . . . . . . . . . . . . . . . . 5
Tools Required to Install the Appliance in a Rack . . . . . . . . . . . . . . . . . . . . . . . 6
Step 2: Install the JA2500 Appliance . . . . . . . . . . . . . . . . . . . . . . . . . . . . . . . . . . . . 6
Unpack the JA2500 Appliance . . . . . . . . . . . . . . . . . . . . . . . . . . . . . . . . . . . . . . 6
Mount the JA2500 Appliance . . . . . . . . . . . . . . . . . . . . . . . . . . . . . . . . . . . . . . . 7
Rack . . . . . . . . . . . . . . . . . . . . . . . . . . . . . . . . . . . . . . . . . . . . . . . . . . . 8
Midmounting the JA2500 Appliance in a Two-Post Rack . . . . . . . . . . . . . 9
Step 3: Connect Power to the JA2500 Appliance . . . . . . . . . . . . . . . . . . . . . . . . . . 10
Connecting AC Power to the JA2500 Appliance . . . . . . . . . . . . . . . . . . . . . . . 10
Connecting DC Power to the JA2500 Appliance . . . . . . . . . . . . . . . . . . . . . . . 12
Step 4: Connect External Devices and Cables . . . . . . . . . . . . . . . . . . . . . . . . . . . . . 14
Connecting the JA2500 Appliance to a Management Console . . . . . . . . . . . . 14
Connecting the JA2500 Appliance to the Network . . . . . . . . . . . . . . . . . . . . . 15
Step 5: Boot the JA2500 Appliance . . . . . . . . . . . . . . . . . . . . . . . . . . . . . . . . . . . . . 15
Step 6: Configure the JA2500 Appliance . . . . . . . . . . . . . . . . . . . . . . . . . . . . . . . . . 17
Step 7 (Optional): Configuring the eth1 Interface . . . . . . . . . . . . . . . . . . . . . . . . . . 25
Safety Warnings . . . . . . . . . . . . . . . . . . . . . . . . . . . . . . . . . . . . . . . . . . . . . . . . . . . . 26
Compliance Statements for EMC Requirements for JA2500 . . . . . . . . . . . . . . . . . 27
Canada . . . . . . . . . . . . . . . . . . . . . . . . . . . . . . . . . . . . . . . . . . . . . . . . . . . . . . . 27
European Community . . . . . . . . . . . . . . . . . . . . . . . . . . . . . . . . . . . . . . . . . . . . 27
Japan . . . . . . . . . . . . . . . . . . . . . . . . . . . . . . . . . . . . . . . . . . . . . . . . . . . . . . . . . 27
United States . . . . . . . . . . . . . . . . . . . . . . . . . . . . . . . . . . . . . . . . . . . . . . . . . . 28
Requesting Technical Support . . . . . . . . . . . . . . . . . . . . . . . . . . . . . . . . . . . . . . . . 28
Self-Help Online Tools and Resources . . . . . . . . . . . . . . . . . . . . . . . . . . . . . . 28
Opening a Case with JTAC . . . . . . . . . . . . . . . . . . . . . . . . . . . . . . . . . . . . . . . . 29
1
Advertisement
Table of Contents

Related Manuals for Juniper Junos Space JA2500


Summary of Contents for Juniper Junos Space JA2500
-
Page 1: Table Of Contents
Start November 2018 Revision 06 This document describes how to install the Juniper Networks JA2500 Junos Space Appliance. Contents JA2500 Appliance Quick Start Description ....... . 3 Step 1: Prepare the Site for JA2500 Appliance Installation . - Page 2 Revision History ........... . 29 Copyright © 2018, Juniper Networks, Inc.
-
Page 3: Ja2500 Appliance Quick Start Description
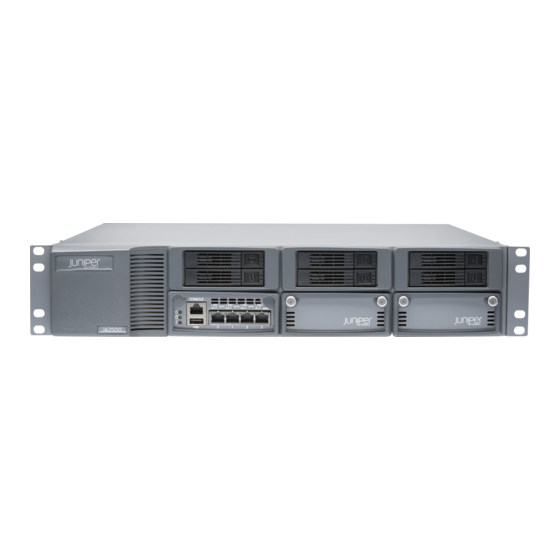
Figure 1: Front Panel of the JA2500 Appliance 1— Hard drive 5— Console port 2— IOC expansion slot (currently not 6— Hardware Fault LED supported) 3— Network (Ethernet) ports 7— Hard Disk Activity LED 4— USB port 8— Power LED Copyright © 2018, Juniper Networks, Inc. - Page 4 JA2500 Junos Space Appliance Quick Start Figure 2: Rear Panel of the JA2500 Appliance 1— Cooling fans 3— Redundant power supply module slot 2— Power switch 4— Power supply module Copyright © 2018, Juniper Networks, Inc.
-
Page 5: Step 1: Prepare The Site For Ja2500 Appliance Installation
Always secure the rack in which you are installing the appliance to the structure of the building. If your geographical area is subject to earthquakes, bolt the rack to the floor. For maximum stability, also secure the rack to ceiling brackets. Copyright © 2018, Juniper Networks, Inc. -
Page 6: Tools Required To Install The Appliance In A Rack
Move the shipping carton to a staging area as close to the installation site as possible, ensuring that you have enough room to remove the system components. Position the carton so that the arrows are pointing up. Copyright © 2018, Juniper Networks, Inc. -
Page 7: Mount The Ja2500 Appliance
Save the shipping carton and packing materials in case you need to move or ship the appliance later. Table 1: Items in the JA2500 Appliance Shipping Carton Component Quantity Junos Space JA2500 appliance chassis Power cable Mounting kits RJ–45 to DB–9F cable with adapter, 7 ft console cable 7-ft, blue, Category 5e cable... -
Page 8: Front-And-Rear Mounting The Ja2500 Appliance Recessed In A
Slide the rear-mount rail brackets into the backs of the front rails on either side of the chassis and align with your rear equipment rack posts. Secure the rear-mount rail brackets to your equipment rack with two rack mount screws each, as shown in Figure 4 on page Copyright © 2018, Juniper Networks, Inc. -
Page 9: Midmounting The Ja2500 Appliance In A Two-Post Rack
Attach the chassis to the equipment rack and insert the other two midmount brackets on either side of the appliance to secure the chassis to the backs of the post, as shown Figure 5 on page Copyright © 2018, Juniper Networks, Inc. -
Page 10: Step 3: Connect Power To The Ja2500 Appliance
(See the AC Power Cord Specifications for Junos Space Appliances in the JA2500 Junos Space Appliance Hardware Guide). NOTE: If you have installed an additional power supply module, then each power supply module must be connected to a dedicated power source outlet. Copyright © 2018, Juniper Networks, Inc. - Page 11 When the power supply module is correctly installed and functioning normally, the LED on the power supply module displays green when the power supply module is powering the appliance, and amber when the power supply module is in standby mode (not powering the appliance). Copyright © 2018, Juniper Networks, Inc.
-
Page 12: Connecting Dc Power To The Ja2500 Appliance
Ensure that the input circuit breaker is open so that the voltage across the DC power source cable leads is 0 V and that the cable leads will not become active when you connect the DC power. Remove the clear plastic cover protecting the terminal on the faceplate. Copyright © 2018, Juniper Networks, Inc. - Page 13 The grounding terminal is located to the right and above the terminals, as shown in Figure 8 on page Figure 8: DC Power Supply Grounding Connect the grounding lug to the earthing terminal using the screw, as shown in Figure 8 on page Copyright © 2018, Juniper Networks, Inc.
-
Page 14: Step 4: Connect External Devices And Cables
Connect one end of the Ethernet cable into the console port (labeled CONSOLE ) on the front panel of the appliance. Connect the other end of the Ethernet cable into the RJ-45 to DB-9 serial port adapter. Copyright © 2018, Juniper Networks, Inc. -
Page 15: Connecting The Ja2500 Appliance To The Network
Before you begin booting the Junos Space Appliance, ensure that you have configured a console terminal or terminal emulation utility to use the following serial connection parameters: Baud rate: 9600 bits per second Data: 8 bits Flow control: None Parity: None Stop bits: 1 Copyright © 2018, Juniper Networks, Inc. - Page 16 Platform software installed. When the appliance is powered on, the serial console displays diagnostic information before booting. When booting is complete, the serial console displays the login prompt. You are now ready to configure the appliance. Copyright © 2018, Juniper Networks, Inc.
-
Page 17: Step 6: Configure The Ja2500 Appliance
Web browser. Space nodes and FMPM nodes. This VIP address must be different from the VIP address used to access the Web GUI. NTP server settings with which the Junos Space Appliance synchronizes its time. Copyright © 2018, Juniper Networks, Inc. - Page 18 NOTE: If you are configuring the appliance as part of a cluster (fabric), then all nodes in that fabric must be in the same subnet. To configure the IPv4 address for the eth0 interface: Copyright © 2018, Juniper Networks, Inc.
- Page 19 Junos Space node, then you must also configure the eth3 interface as the device management interface on all the other Junos Space nodes in that fabric. Copyright © 2018, Juniper Networks, Inc.
- Page 20 Enter. Type the IPv4 address of the default gateway for the eth3 interface in dotted-decimal notation and press Enter. Type the IPv6 address and prefix for the eth3 interface and press Enter. Copyright © 2018, Juniper Networks, Inc.
- Page 21 To add an NTP server, type , enter the hostname of the NTP server when prompted, and press Enter. To specify the current time (UTC), type , enter the time, and press Enter. Copyright © 2018, Juniper Networks, Inc.
- Page 22 > Default IPv6 Gateway = 2001:db8:20:1:192:0:2:155 on eth3 > IPv4 DNS add: 192.0.2.12 > DNS add: 2001:db8:20:1:192:0:2:12 > Create as first node or standalone > Web IPv4 address 192.0.2.60 > Web IPv6 address is 2001:db8:0:1:192:0:2:60/64 > NTP add: device1.example.com Copyright © 2018, Juniper Networks, Inc.
- Page 23 (Optional) To configure both IPv4 and IPv6 address for the eth0 interface: Type Type the IPv4 address for eth0 interface in dotted-decimal notation and press Enter. Type the subnet mask for the IPv4 address and press Enter. iii. Copyright © 2018, Juniper Networks, Inc.
- Page 24 If you quit the configuration without applying the settings, then all the settings are discarded. (Optional) If you have applied the settings, then type to quit. You are taken to the console login prompt. Copyright © 2018, Juniper Networks, Inc.
-
Page 25: Step 7 (Optional): Configuring The Eth1 Interface
The IP address can be in the same subnet as the virtual IP (VIP) address or in a different subnet. If the IP address is not in the same subnet as the VIP address, you are prompted to enter the subnet mask and then the default gateway for the eth1 interface. Copyright © 2018, Juniper Networks, Inc. -
Page 26: Safety Warnings
Before working on equipment that is connected to power lines, remove jewelry, including rings, necklaces, and watches. Metal objects heat up when connected to power and ground and can cause serious burns or become welded to the terminals. Copyright © 2018, Juniper Networks, Inc. -
Page 27: Compliance Statements For Emc Requirements For Ja2500
European Community This is a Class A device. In a domestic environment this device might cause radio interference, in which case the user needs to take adequate measures. Japan The preceding translates as follows: Copyright © 2018, Juniper Networks, Inc. -
Page 28: United States
7 days a week, 365 days a year. Self-Help Online Tools and Resources For quick and easy problem resolution, Juniper Networks has designed an online self-service portal called the Customer Support Center (CSC) that provides you with the following features: Find CSC offerings: https://www.juniper.net/customers/support/... -
Page 29: Opening A Case With Jtac
Copyright © 2018 Juniper Networks, Inc. All rights reserved. Juniper Networks, the Juniper Networks logo, Juniper, and Junos are registered trademarks of Juniper Networks, Inc. and/or its affiliates in the United States and other countries. All other trademarks may be property of their respective owners.