Juniper Junos Space JA1500 Appliance Installation Manual
Hide thumbs
Also See for Junos Space JA1500:
- Installation manual (58 pages) ,
- Unpacking manual (2 pages) ,
- Hardware manual (210 pages)

Related Manuals for Juniper Junos Space JA1500


Summary of Contents for Juniper Junos Space JA1500
- Page 1 ® Junos Space JA1500 Appliance Installation Guide Release Published: 2010-08-24 Revision 1 Copyright © 2010, Juniper Networks, Inc.
- Page 2 Products made or sold by Juniper Networks or components thereof might be covered by one or more of the following patents that are owned by or licensed to Juniper Networks: U.S. Patent Nos. 5,473,599, 5,905,725, 5,909,440, 6,192,051, 6,333,650, 6,359,479, 6,406,312, 6,429,706, 6,459,579, 6,493,347, 6,538,518, 6,538,899, 6,552,918, 6,567,902, 6,578,186, and 6,590,785.
- Page 3 Juniper, even if such feature, function, service, application, operation, or capability is enabled without a key; (g) distribute any key for the Software provided by Juniper to any third party; (h) use the...
- Page 4 Customer did not originally purchase from Juniper or an authorized Juniper reseller; (k) disclose the results of testing or benchmarking of the Software to any third party without the prior written consent of Juniper; or (l) use the Software in any manner other than as expressly provided herein.
- Page 5 (or services are accessed by) the Software shall be a third party beneficiary with respect to this Agreement, and such licensor or vendor shall have the right to enforce this Agreement in its own name as if it were Juniper. In addition, certain third party software may be provided with the Software and is subject to the accompanying license(s), if any, of its respective owner(s).
- Page 6 Copyright © 2010, Juniper Networks, Inc.
-
Page 7: Table Of Contents
Overview ............3 Junos Space JA1500 Appliance Overview ....... . . 3 Junos Space Application Overview . - Page 8 Installing the Junos Space JA1500 Appliance ......29 Unpacking the Junos Space JA1500 Appliance ......29 Attaching Mounting Brackets to a Junos Space JA1500 Appliance .
- Page 9 Chapter 7 Troubleshooting the Junos Space JA1500 Appliance Hardware ..57 Removing and Installing a Hard Disk ........57 Removing and Installing a Fan .
- Page 10 Junos Space JA1500 Appliance Installation Guide Copyright © 2010, Juniper Networks, Inc.
- Page 11 Figure 1: Junos Space JA1500 Appliance ........
- Page 12 Junos Space JA1500 Appliance Installation Guide Copyright © 2010, Juniper Networks, Inc.
- Page 13 Chapter 4 Installing the Junos Space JA1500 Appliance ......29 Table 7: Items in the JA1500 Appliance Shipping Container ....29...
- Page 14 Junos Space JA1500 Appliance Installation Guide Copyright © 2010, Juniper Networks, Inc.
-
Page 15: About The Documentation
If the information in the latest release notes differs from the information in the documentation, follow the Junos Space Release Notes. To obtain the most current version of all Juniper Networks technical documentation, see the technical documentation page at the Juniper Networks website at http://www.juniper.net/techpubs/ . -
Page 16: Documentation Feedback
Software release version (if applicable) Requesting Technical Support Technical product support is available through the Juniper Networks Technical Assistance Center (JTAC). If you are a customer with an active J-Care or JNASC support contract, or are covered under warranty, and need post-sales technical support, you can access our tools and resources online or open a case with JTAC. -
Page 17: Self-Help Online Tools And Resources
About The Documentation Self-Help Online Tools and Resources For quick and easy problem resolution, Juniper Networks has designed an online self-service portal called the Customer Support Center (CSC) that provides you with the following features: Find CSC offerings: http://www.juniper.net/customers/support/ Search for known bugs: http://www2.juniper.net/kb/... - Page 18 Junos Space JA1500 Appliance Installation Guide xviii Copyright © 2010, Juniper Networks, Inc.
-
Page 19: Overview
PART 1 Overview Overview on page 3 Copyright © 2010, Juniper Networks, Inc. - Page 20 Junos Space JA1500 Appliance Installation Guide Copyright © 2010, Juniper Networks, Inc.
-
Page 21: Overview
Fabric Management Overview on page 9 Junos Space JA1500 Appliance Overview The Junos Space JA1500 appliance is a Juniper Networks, dedicated, physical, hardware device that is engineered to provide the computing power and specific requirements needed to install and run the Junos Space application. The JA1500 appliance all-in-one design makes the Junos Space application deployment simpler by giving administrators a turnkey solution. -
Page 22: Junos Space Application Overview
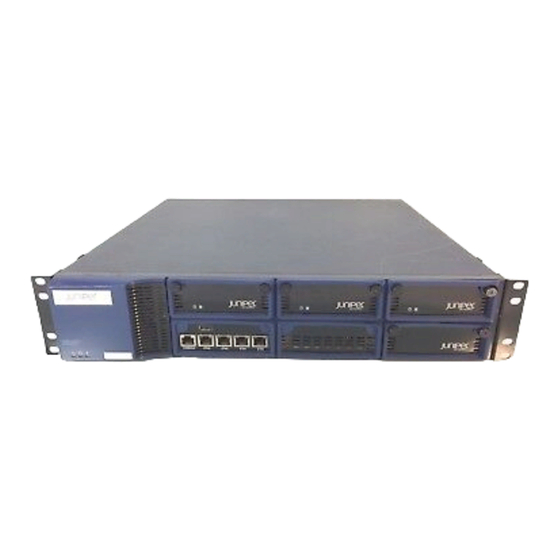
Related Topics Parts of the Junos Space JA1500 Appliance on page 4 Parts of the Junos Space JA1500 Appliance The Junos Space JA1500 appliance front panel, rear panel, and LEDs are described in the sections that follow. JA1500 Appliance Front Panel Figure 2 on page 5 shows the front panel of the JA1500 appliance. -
Page 23: Mounting Brackets
The JA1500 appliance includes three hard disk drives in RAID 5 array. The serial attached SCSI (SAS), hot-swappable drives are externally accessible in field-replaceable trays, providing component high availablilty. If one drive fails, the system recovers by Copyright © 2010, Juniper Networks, Inc. -
Page 24: Ports
Junos Space JA1500 Appliance Installation Guide hot-swapping the failed drive, which is automatically rebuilt. A fourth, empty hard disk tray is available for a spare disk. The disks are labeled from left to right Disk 0 , Disk 1, Disk . -
Page 25: Ja1500 Rear Panel
The power supply includes an AC receptacle for a power cord. The JA1500 appliance is upgradable to a redundant hot-swappable dual power supply. The power supplies are numbered from bottom to top: PSU1, PSU2 Copyright © 2010, Juniper Networks, Inc. -
Page 26: Understanding How Nodes Are Connected In A Fabric
Related Topics Junos Space JA1500 Appliance Overview on page 3 Understanding How Nodes Are Connected in a Fabric Each Junos Space appliance (physical or virtual) that you install and configure is represented as a single node in the fabric. -
Page 27: Ntp Time Source For Each Ja1500 Appliance
A Junos Space fabric comprises one or more IP-connected nodes. A node is a logical object that represents a single Junos Space JA1500 appliance or Junos Space virtual appliance, its operating system, and the Junos Space software that runs on the operating system. -
Page 28: Single Node Functionality
Junos Space JA1500 Appliance Installation Guide Figure 5: Administrator Connects to a Single Virtual IP Address to Manage Fabric Nodes Single Node Functionality When the fabric comprises a single appliance, all devices in the managed network connect to the appliance. When you install and configure the first appliance, Junos Space automatically creates a fabric with one node. -
Page 29: Figure 6: Functions Enabled On Fabric Containing One Node
The load balancer and application logic node functions provide scalability and high availability. Copyright © 2010, Juniper Networks, Inc. -
Page 30: Figure 7: Functions Enabled On Fabric Containing Two Nodes
Junos Space JA1500 Appliance Installation Guide The database node function on the second node provides high availability only. Figure 7 on page 12 shows the functions enabled on a fabric comprising two nodes. Figure 7: Functions Enabled on Fabric Containing Two Nodes... -
Page 31: Node Function Availability
(the appliance physically crashes or stops sending heartbeats), the node functioning as the standby server takes over all resources that were managed by the node functioning as the active server. Related Topics Adding a Fabric Node Viewing Nodes in the Fabric Copyright © 2010, Juniper Networks, Inc. - Page 32 Junos Space JA1500 Appliance Installation Guide Copyright © 2010, Juniper Networks, Inc.
-
Page 33: Planning
PART 2 Planning Planning for the Junos Space JA1500 Appliance on page 17 Copyright © 2010, Juniper Networks, Inc. - Page 34 Junos Space JA1500 Appliance Installation Guide Copyright © 2010, Juniper Networks, Inc.
-
Page 35: Planning For The Junos Space Ja1500 Appliance
Power Requirements for a Junos Space JA1500 Appliance on page 19 Rack Requirements and Specifications for a Junos Space JA1500 Appliance The Junos Space JA1500 appliance has a 2U rack-mountable chassis. It ships with 2-post and 4-post mounting hardware. The appliance can be installed in many types of racks, including four-post (telco) racks and open-frame racks. -
Page 36: Environmental Requirements For The Junos Space Ja1500 Appliance
The spacing of rails and adjacent racks must also allow for the clearances around the appliance and rack. Related Topics Environmental Requirements for the Junos Space JA1500 Appliance on page 18 Power Requirements for a Junos Space JA1500 Appliance on page 19 Environmental Requirements for the Junos Space JA1500 Appliance The appliance must be installed in a rack or cabinet housed in a dry, clean, well-ventilated, and temperature-controlled environment. -
Page 37: Power Requirements For A Junos Space Ja1500 Appliance
General Safety Guidelines and Warnings for the Junos Space JA1500 Appliance on page 23 Rack Requirements and Specifications for a Junos Space JA1500 Appliance on page 17 Power Requirements for a Junos Space JA1500 Appliance on page 19 Power Requirements for a Junos Space JA1500 Appliance A JA1500 appliance can be powered by an AC electrical supply. - Page 38 Junos Space JA1500 Appliance Installation Guide Copyright © 2010, Juniper Networks, Inc.
-
Page 39: Safety
PART 3 Safety Safety and Compliance for the Junos Space JA1500 Appliance on page 23 Copyright © 2010, Juniper Networks, Inc. - Page 40 Junos Space JA1500 Appliance Installation Guide Copyright © 2010, Juniper Networks, Inc.
-
Page 41: Safety And Compliance For The Junos Space Ja1500 Appliance
General Safety Guidelines and Warnings for the Junos Space JA1500 Appliance on page 23 Fire Safety Requirements for the Junos Space JA1500 Appliance on page 24 General Safety Guidelines and Warnings for the Junos Space JA1500 Appliance The following guidelines help ensure your safety and protect the appliance from damage. -
Page 42: Fire Safety Requirements For The Junos Space Ja1500 Appliance
Related Topics Fire Safety Requirements for the Junos Space JA1500 Appliance on page 24 Environmental Requirements for the Junos Space JA1500 Appliance on page 18 Fire Safety Requirements for the Junos Space JA1500 Appliance In the event of a fire emergency involving switches and other network equipment, the safety of people is the primary concern. - Page 43 NOTE: To keep warranties effective, do not use a dry chemical fire extinguisher to control a fire at or near a Juniper Networks appliance. If a dry chemical fire extinguisher is used, the unit is no longer eligible for coverage under a service agreement.
- Page 44 Junos Space JA1500 Appliance Installation Guide Copyright © 2010, Juniper Networks, Inc.
- Page 45 PART 4 Installation Installing the Junos Space JA1500 Appliance on page 29 Copyright © 2010, Juniper Networks, Inc.
- Page 46 Junos Space JA1500 Appliance Installation Guide Copyright © 2010, Juniper Networks, Inc.
-
Page 47: Installing The Junos Space Ja1500 Appliance
Booting and Configuring the Junos Space JA1500 Appliance on page 33 Unpacking the Junos Space JA1500 Appliance The Junos Space JA1500 appliance is shipped in a cardboard shipping container and is secured with foam packing material. The container also includes an accessory box. The... -
Page 48: Attaching Mounting Brackets To A Junos Space Ja1500 Appliance
Related Topics Attaching Mounting Brackets to a Junos Space JA1500 Appliance on page 30 Installing the Junos Space JA1500 Appliance in a Rack and Connecting the Cables on page 31 Connecting a Console to a Junos Space JA1500 Appliance on page 32... -
Page 49: Cables
Related Topics Unpacking the Junos Space JA1500 Appliance on page 29 Installing the Junos Space JA1500 Appliance in a Rack and Connecting the Cables on page 31 Installing the Junos Space JA1500 Appliance in a Rack and Connecting the Cables Before installing the physical appliance in a rack: Unpack the appliance, as described in “Unpacking the Junos Space JA1500 Appliance”... -
Page 50: Connecting A Console To A Junos Space Ja1500 Appliance
Related Topics Connecting a Console to a Junos Space JA1500 Appliance on page 32 Attaching Mounting Brackets to a Junos Space JA1500 Appliance on page 30 Connecting a Console to a Junos Space JA1500 Appliance on page 32... -
Page 51: Booting And Configuring The Junos Space Ja1500 Appliance
Upgrading the Junos Space Software on page 50 Booting and Configuring the Junos Space JA1500 Appliance Follow these steps to start up the Junos Space JA1500 Appliance and install the Junos Space application and operating system. The JA1500 Appliance must be installed in a rack, turned on, and connected to a console terminal running an emulation utility such as HyperTerminal. - Page 52 Junos Space JA1500 Appliance Installation Guide Copyright © 2010, Juniper Networks, Inc.
-
Page 53: Configuration
PART 5 Configuration Configuring the Junos Space JA1500 Appliance on page 37 Copyright © 2010, Juniper Networks, Inc. - Page 54 Junos Space JA1500 Appliance Installation Guide Copyright © 2010, Juniper Networks, Inc.
-
Page 55: Configuring The Junos Space Ja1500 Appliance
Configuring the Junos Space JA1500 Appliance Configuring Basic Settings for a Junos Space JA1500 Appliance on page 37 Understanding How Junos Space Uses Ethernet Interfaces eth0 and eth3 on page 40 Changing Network and System Settings for a Junos Space Appliance on page 41... - Page 56 Junos Space JA1500 Appliance Installation Guide If the appliance will be not be added to an existing node cluster or is the first node in the cluster: Enter n when prompted “Will this Junos Space system be added to an existing cluster?”...
-
Page 57: Configuring The Junos Space Ja1500 Appliance
Configuring the Junos Space JA1500 Appliance logd is already stopped heartbeat is stopped. No process Starting High-Availability services: 2009/11/04_11:34:50 INFO: Resource is stopped [ OK ] Done! Adding password for user maintenance httpd is stopped Starting httpd: httpd: Could not reliably determine the server's fully qualified domain name, using 10.155.65.191 for ServerName... -
Page 58: Understanding How Junos Space Uses Ethernet Interfaces Eth0 And Eth3
Junos Space JA1500 Appliance Installation Guide 4> Change Time Options 5> Retrieve Logs 6> Security 7> (Debug) run shell Q> Quit R> Redraw menu Choice [1-7,QR]: Type Q to quit. The configuration of the JA1500 Appliance is now complete. NOTE: To log in to the Junos Space user interface from a Web browser, See the Junos Space Network Application User Guide. -
Page 59: Changing Network And System Settings For A Junos Space Appliance
Configuring the Junos Space JA1500 Appliance Related Topics Configuring Basic Settings for a Junos Space JA1500 Appliance on page 37 Changing Network and System Settings for a Junos Space Appliance on page 41 Changing Network and System Settings for a Junos Space Appliance You can change some of the basic settings that you configured when you first installed and set up your Junos Space appliance. -
Page 60: Setting Routing Option
Junos Space JA1500 Appliance Installation Guide Your password is updated and the setup program returns you to the main menu. Setting Routing Option The Set Routing option changes only the default gateway. You can not add a new static route using Set Routing. When you have only a management ETH0 interface configured, the Set Routing option allows you to change the default gateway for the Management interface. -
Page 61: Retrieving Logs
Configuring the Junos Space JA1500 Appliance NOTE: When an NTP server is enabled on the first node in the cluster, all other nodes are synchronized with the NTP server time. However to ensure time synchronization across all nodes in a fabric in the event of failover, all nodes in a fabric should be configured using the same NTP server. -
Page 62: Configuring Security
Junos Space JA1500 Appliance Installation Guide Configuring Security The Security CLI menu command allows you to enable and disable the firewall and SSH connection to an appliance. Enabling or disabling the firewall and SSH take place immediately. You can enable the firewall to examine all traffic routed between the network and the appliance to prevent intrusion. -
Page 63: Running The Shell
From the Junos Space Appliance Settings menu, enter 7 and follow the prompts. Related Topics Configuring Basic Settings for a Junos Space JA1500 Appliance on page 37 Changing Network and System Settings for a Junos Space Appliance on page 41... - Page 64 Junos Space JA1500 Appliance Installation Guide The Add Fabric Node screen is displayed. In the Name field, enter a name for the node. In the IP address field, enter the IP address of the Junos Space appliance or virtual appliance.
-
Page 65: Upgrading
PART 6 Upgrading Upgrading the Junos Space JA1500 Appliance Software on page 49 Copyright © 2010, Juniper Networks, Inc. - Page 66 Junos Space JA1500 Appliance Installation Guide Copyright © 2010, Juniper Networks, Inc.
-
Page 67: Upgrading The Junos Space Ja1500 Appliance Software
Upgrading the Network Application Platform on page 53 Junos Space Software Upgrade Overview To upgrade Junos Space software for Juniper Networks physical and virtual appliances, you upload the Junos Space image file to your existing fabric and perform the software upgrade from the Junos Space user interface. -
Page 68: Upgrading The Junos Space Software
Upgrading the Junos Space Software Junos Space administrator can upgrade software for the JA1500 Junos Space appliance by downloading the Junos Space Upgrade image file from the Juniper Networks software download site onto the local client file system. Once downloaded, upload the Junos Space software to Junos Space using Platform >... -
Page 69: Before You Begin
Campus Builder applications are disabled. You must upgrade these applications to release 1.4 (see the Junos Space Network Platform User Guide. To add or upgrade software: Download the latest Junos Space software file from the Juniper Networks software download Web site to the local appliance. See http://www.juniper.net/support/products/space/#sw In the current version of the Junos Space software, navigate to Platform >... - Page 70 Junos Space JA1500 Appliance Installation Guide Use the Browse button to navigate to the latest Junos Software release file. Click Upload to upload the software image. Wait until the software uploading is complete. Select Platform > Administration > Manage Software.
-
Page 71: Upgrading Junos Space Release 1.3 To Release 1.4
Upgrading the Junos Space JA1500 Appliance Software Upgrading Junos Space Release 1.3 to Release 1.4 The Platform provides the running environment for all Junos Space applications, so upgrading it causes operation interruption. NOTE: When upgrading Junos Space from release 1.3 to release 1.4, the Network Application Platform and Service Now application are upgraded only. - Page 72 NOTE: Juniper Networks recommends that you clear the Web browser cache before logging in to the upgraded software. NOTE: Juniper recommends that you perform a functional audit on all deployed services after upgrading. You can now log in to begin using the upgraded Junos Space software.
-
Page 73: Part 7 Troubleshooting
PART 7 Troubleshooting Troubleshooting the Junos Space JA1500 Appliance Hardware on page 57 Copyright © 2010, Juniper Networks, Inc. - Page 74 Junos Space JA1500 Appliance Installation Guide Copyright © 2010, Juniper Networks, Inc.
-
Page 75: Troubleshooting The Junos Space Ja1500 Appliance Hardware
CHAPTER 7 Troubleshooting the Junos Space JA1500 Appliance Hardware Removing and Installing a Hard Disk on page 57 Removing and Installing a Fan on page 59 Removing and Installing a Power Supply on page 60 Removing and Installing a Hard Disk Problem The JA1500 appliance ships with three hard disk drives in RAID 5 array. -
Page 76: Figure 11: Ja1500 Appliance Hard Disk Removal
Junos Space JA1500 Appliance Installation Guide To remove a failed hard disk and install a new one: Place an antistatic bag on a flat surface. Attach the electrostatic discharge (ESD) grounding strap to your bare wrist, and connect the strap to the ESD point on the JA1500 appliance Loosen the hard disk captive screws. -
Page 77: Removing And Installing A Fan
Troubleshooting the Junos Space JA1500 Appliance Hardware Removing and Installing a Fan Problem The JA1500 appliance ships with two field-replaceable fans that are hot-removable and hot-insertable. You can remove and replace a fan without powering off the appliance or disrupting functions. -
Page 78: Removing And Installing A Power Supply
Junos Space JA1500 Appliance Installation Guide Figure 14: JA1500 Appliance Fan Removal Pull the fan out of the chassis. Place the fan in the antistatic bag or on the antistatic mat placed on a flat, stable surface. Remove the new fan from the antistatic bag. -
Page 79: Figure 16: Ja1500 Appliance Front Panel Status Leds
Troubleshooting the Junos Space JA1500 Appliance Hardware circuits fails. If a power supply fails, you can remove it while the other functioning power supply carries the full power load. When a power supply fails, the red Failure status LED lights on the front panel of the JA1500 appliance. -
Page 80: Figure 18: Ja1500 Appliance Power Supply Installation
Junos Space JA1500 Appliance Installation Guide Grasp the power supply handle and pull firmly to slide it halfway out of the appliance. Place one hand under the power supply to support it and slide it completely out of the appliance. -
Page 81: Part 8 Index
PART 8 Index Index on page 65 Copyright © 2010, Juniper Networks, Inc. - Page 82 Junos Space JA1500 Appliance Installation Guide Copyright © 2010, Juniper Networks, Inc.
-
Page 83: Index
Junos Space software power...................19 base application............50 hot-pluggable applications........50 network application platform, upgrading.....53 safety guidelines and warnings upgrade highlights............50 general................23 upgrade scenarios............50 support, technical See technical support upgrading................50 upgrading , before you begin........51 technical support contacting JTAC..............xvi Copyright © 2010, Juniper Networks, Inc. - Page 84 Junos Space JA1500 Appliance Installation Guide troubleshooting fan failure................59 hard dis,k failure..............57 power supply failure.............60 upgrading Junos Space Platform........53 warnings general................23 Copyright © 2010, Juniper Networks, Inc.